@Autowired注解的实现原理
@Autowired注解可以被标注在构造函数、属性、setter方法或配置方法上,用于实现依赖自动注入。
这里对@Autowired注解底层进行源码分析
参考:https://blog.csdn.net/One_L_Star/article/details/114829247
@Autowired注解的作用是由AutowiredAnnotationBeanPostProcessor实现的,查看该类的源码会发现它实现了MergedBeanDefinitionPostProcessor接口,进而实现了接口中的postProcessMergedBeanDefinition方法,@Autowired注解正是通过这个方法实现注入类型的预解析,将需要依赖注入的属性信息封装到InjectionMetadata类中,InjectionMetadata类中包含了哪些需要注入的元素及元素要注入到哪个目标类中,在Spring容器启动的过程中初始化单例bean的时候通过populateBean方法实现对属性的注入。
public class AutowiredAnnotationBeanPostProcessor extends InstantiationAwareBeanPostProcessorAdapter implements MergedBeanDefinitionPostProcessor, PriorityOrdered, BeanFactoryAware {

public void postProcessMergedBeanDefinition(RootBeanDefinition beanDefinition, Class<?> beanType, String beanName) {
    if (beanType != null) {
        InjectionMetadata metadata = this.findAutowiringMetadata(beanName, beanType, (PropertyValues)null);
        metadata.checkConfigMembers(beanDefinition);
    }
}

public class InjectionMetadata {
	private static final Log logger = LogFactory.getLog(InjectionMetadata.class);
	private final Class<?> targetClass;
	private final Collection<InjectedElement> injectedElements;
	private volatile Set<InjectedElement> checkedElements;
Spring对autowire注解的实现逻辑位于类:AutowiredAnnotationBeanPostProcessor#postProcessProperties之中,——>findAutowiringMetadata——>buildAutowiringMetadata,核心代码就在buildAutowiringMetadata方法里面
private InjectionMetadata buildAutowiringMetadata(Class<?> clazz) {
    if (!AnnotationUtils.isCandidateClass(clazz, this.autowiredAnnotationTypes)) {
        return InjectionMetadata.EMPTY;
    } else {
        List<InjectedElement> elements = new ArrayList();
        // 需要处理的目标类
        Class targetClass = clazz;

        do {
            List<InjectedElement> currElements = new ArrayList();
            // 通过反射获取该类所有的字段,并遍历每一个字段,并通过方法findAutowiredAnnotation遍历每一个字段的所用注解,并如果用autowired修饰了,则返回auotowired相关属性
            ReflectionUtils.doWithLocalFields(targetClass, (field) -> {
                MergedAnnotation<?> ann = this.findAutowiredAnnotation(field);
                if (ann != null) {
                    // 校验autowired注解是否用在了static方法上
                    if (Modifier.isStatic(field.getModifiers())) {
                        if (this.logger.isInfoEnabled()) {
                            this.logger.info("Autowired annotation is not supported on static fields: " + field);
                        }

                        return;
                    }

                    // 判断是否指定了required
                    boolean required = this.determineRequiredStatus(ann);
                    currElements.add(new AutowiredAnnotationBeanPostProcessor.AutowiredFieldElement(field, required));
                }

            });
            // 和上面一样的逻辑,但是是通过反射处理类的method
            ReflectionUtils.doWithLocalMethods(targetClass, (method) -> {
                Method bridgedMethod = BridgeMethodResolver.findBridgedMethod(method);
                if (BridgeMethodResolver.isVisibilityBridgeMethodPair(method, bridgedMethod)) {
                    MergedAnnotation<?> ann = this.findAutowiredAnnotation(bridgedMethod);
                    if (ann != null && method.equals(ClassUtils.getMostSpecificMethod(method, clazz))) {
                        if (Modifier.isStatic(method.getModifiers())) {
                            if (this.logger.isInfoEnabled()) {
                                this.logger.info("Autowired annotation is not supported on static methods: " + method);
                            }

                            return;
                        }

                        if (method.getParameterCount() == 0 && this.logger.isInfoEnabled()) {
                            this.logger.info("Autowired annotation should only be used on methods with parameters: " + method);
                        }

                        boolean required = this.determineRequiredStatus(ann);
                        PropertyDescriptor pd = BeanUtils.findPropertyForMethod(bridgedMethod, clazz);
                        currElements.add(new AutowiredAnnotationBeanPostProcessor.AutowiredMethodElement(method, required, pd));
                    }

                }
            });
            // 用@Autowired修饰的注解可能不止一个,因此都加在currElements这个容器里面,一起处理
            elements.addAll(0, currElements);
            targetClass = targetClass.getSuperclass();
        } while(targetClass != null && targetClass != Object.class);

        return InjectionMetadata.forElements(elements, clazz);
    }
}
- 获取需要处理的目标类
- 通过doWithLocalFields方法传入目标类参数,通过反射获取该类所有的字段,并遍历每一个字段,并通过方法findAutowiredAnnotation遍历每一个字段的所用注解,并如果用autowired修饰了,则返回auotowired相关属性
- 判断autowired注解是否用在了static方法上
- 如有多个@Autowired修饰的注解,都加在currElements这个容器里面,一起处理
最后返回包含所有带有autowire注解修饰的一个InjectionMetadata集合,如下
- targetClass:要处理的目标类
- elements:上述方法获取到的所以elements集合
public InjectionMetadata(Class<?> targetClass, Collection<InjectionMetadata.InjectedElement> elements) {
    this.targetClass = targetClass;
    this.injectedElements = elements;
}
有了目标类,与所有需要注入的元素集合之后,我们就可以实现autowired的依赖注入逻辑了,实现的方法如下:
public PropertyValues postProcessPropertyValues(PropertyValues pvs, PropertyDescriptor[] pds, Object bean, String beanName) {
    if (!this.validatedBeanNames.contains(beanName)) {
        if (!this.shouldSkip(this.beanFactory, beanName)) {
            List<String> invalidProperties = new ArrayList();
            PropertyDescriptor[] var6 = pds;
            int var7 = pds.length;

            for(int var8 = 0; var8 < var7; ++var8) {
                PropertyDescriptor pd = var6[var8];
                if (this.isRequiredProperty(pd) && !pvs.contains(pd.getName())) {
                    invalidProperties.add(pd.getName());
                }
            }

            if (!invalidProperties.isEmpty()) {
                throw new BeanInitializationException(this.buildExceptionMessage(invalidProperties, beanName));
            }
        }

        this.validatedBeanNames.add(beanName);
    }

    return pvs;
}
调用InjectionMetadata中定义的inject方法:
public void inject(Object target, @Nullable String beanName, @Nullable PropertyValues pvs) throws Throwable {
    Collection<InjectionMetadata.InjectedElement> checkedElements = this.checkedElements;
    Collection<InjectionMetadata.InjectedElement> elementsToIterate = checkedElements != null ? checkedElements : this.injectedElements;
    if (!((Collection)elementsToIterate).isEmpty()) {
        Iterator var6 = ((Collection)elementsToIterate).iterator();

        while(var6.hasNext()) {
            InjectionMetadata.InjectedElement element = (InjectionMetadata.InjectedElement)var6.next();
            element.inject(target, beanName, pvs);
        }
    }
}
进行遍历,然后调用inject方法,inject方法其实现逻辑如下:
protected void inject(Object target, @Nullable String requestingBeanName, @Nullable PropertyValues pvs) throws Throwable {
    if (this.isField) {
        Field field = (Field)this.member;
        // 暴力破解的方法,通过反射技术对对象进行实例化和赋值
        ReflectionUtils.makeAccessible(field);
        field.set(target, this.getResourceToInject(target, requestingBeanName));
    } else {
        if (this.checkPropertySkipping(pvs)) {
            return;
        }

        try {
            Method method = (Method)this.member;
            ReflectionUtils.makeAccessible(method);
            // 注入的bean的名字,这个方法的功能就是根据这个bean的名字去拿到它
            method.invoke(target, this.getResourceToInject(target, requestingBeanName));
        } catch (InvocationTargetException var5) {
            throw var5.getTargetException();
        }
    }
}
- 使用了反射技术,分成字段和方法去处理的。
- makeAccessible这样的可以称之为暴力破解的方法,通过反射技术对对象进行实例化和赋值
- getResourceToInject方法的参数就是要注入的bean的名字,这个方法的功能就是根据这个bean的名字去拿到它
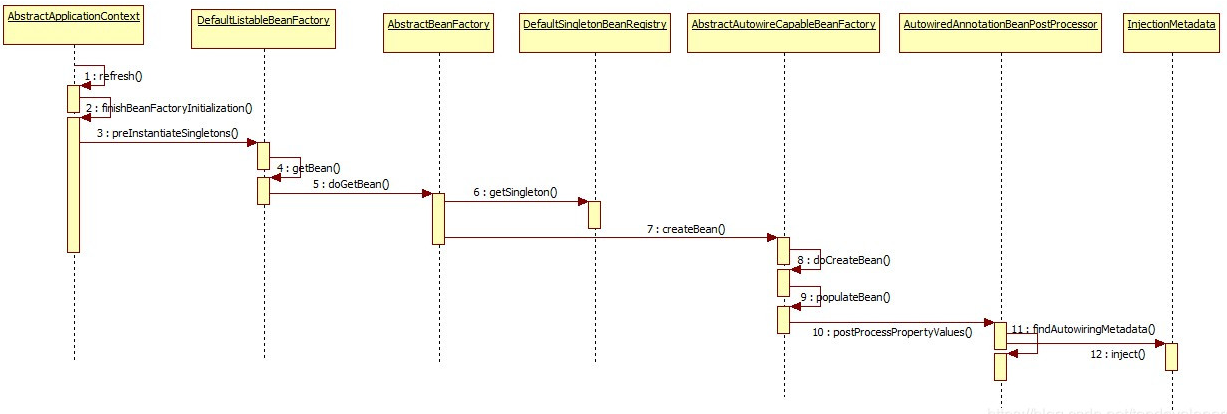
@AutoWired自动注入过程图: