Harbor私有仓库
Harbor私有仓库
文章目录
- Harbor私有仓库
- Harbor简介:
- Harbor 提供了以下主要功能和特性:
- 优缺点:
- 环境说明:
- 部署harbor
- 1.永久关闭防火墙和seliux,配置阿里云源,添加映射关系
- 2.安装docker,开启docker服务并添加加速器
- 3.进入Docker Compose官网查看安装部署流程
- 4.进入harbor官网,拉取harbor二进制包
- 5.复制出一份harbor.yml文件,编辑/usr/local/harbor/下的harbor.yml文件
- 6.执行install.sh文件
- 7.将harbor设置为开机自启
- 8.登录到docker的私有镜像仓库(harbor)
- 9.拉取一个官方镜像,将官方镜像名称更改后上传到我们的私有仓库
- 10.测试,以拉取的镜像制作一个容器
Harbor简介:
无论是使用Docker-distribution去自建仓库,还是通过官方镜像跑容器的方式去自建仓库,通过前面的演示我们可以发现其是非常的简陋的,还不如直接使用官方的Docker Hub去管理镜像来得方便,至少官方的Docker Hub能够通过web界面来管理镜像,还能在web界面执行搜索,还能基于Dockerfile利用Webhooks和Automated Builds实现自动构建镜像的功能,用户不需要在本地执行docker build,而是把所有build上下文的文件作为一个仓库推送到github上,让Docker Hub可以从github上去pull这些文件来完成自动构建。
但无论官方的Docker Hub有多强大,它毕竟是在国外,所以速度是最大的瓶颈,我们很多时候是不可能去考虑使用官方的仓库的,但是上面说的两种自建仓库方式又十分简陋,不便管理,所以后来就出现了一个被 CNCF 组织青睐的项目,其名为Harbor。
Harbor 提供了以下主要功能和特性:
- 容器镜像存储:Harbor 允许用户存储 Docker 镜像,使其能够轻松地管理和分享容器镜像。
- 访问控制:Harbor 支持灵活的访问控制策略,可以定义用户和团队对镜像的访问权限,包括读取和写入权限。这有助于维护镜像的安全性和隐私性。
- 复制和同步:Harbor 支持镜像的复制和同步功能,允许用户将镜像从一个 Harbor 实例复制到另一个,以便在多个地理位置或环境之间共享。
- 漏洞扫描:Harbor 集成了漏洞扫描工具,可以检查镜像中的漏洞,并提供关于安全问题的报告,有助于确保容器镜像的安全性。
- 存储策略:用户可以配置存储策略,包括镜像的保留策略和自动清理机制,以控制存储资源的使用。
- 多租户支持:Harbor 支持多租户架构,允许不同团队或项目在同一个 Harbor 实例上创建和管理他们自己的私有镜像仓库。
- 活动审计:Harbor 记录了所有对镜像仓库的操作,以提供审计功能,帮助跟踪谁在何时访问和修改了镜像。
- LDAP/AD集成:Harbor 支持与LDAP和Active Directory集成,方便组织内部管理用户和团队的访问权限。
优缺点:
优点:
- 安全性:Harbor 提供强大的访问控制和漏洞扫描功能,有助于确保镜像的安全性。
- 隐私:组织可以轻松创建和管理私有仓库,控制其镜像的访问权限,确保敏感数据不会泄露。
- 灵活性:Harbor 可以在多云环境或本地部署,适用于各种部署场景。
- 多租户:支持多租户,使不同项目或团队能够在同一实例上管理他们自己的仓库。
- 容器镜像管理:提供了丰富的容器镜像管理功能,包括复制、同步、存储策略等。
缺点:
- 维护成本:部署和维护 Harbor 需要一定的工作量和资源,尤其是在大规模使用时。
- 学习曲线:对于新用户来说,配置和管理 Harbor 可能需要一些学习和时间。
- 性能:在处理大量镜像时,性能可能成为一个问题,需要适当的硬件和调优。
环境说明:
| 主机名称 | IP地址 | 所需服务 | 充当角色 |
|---|---|---|---|
| harbor.com | 192.168.195.135 | docker,harbor(需先安装docker) | 私有镜像仓库 |
| docker | 192.168.195.136 | docker | 客户机 |
部署harbor
[Docker Compose官方文档]
Harbor官方文档
1.永久关闭防火墙和seliux,配置阿里云源,添加映射关系
在所有主机上操作
//此处用harbor.com主机上演示
[root@harbor ~]# systemctl disable --now firewalld.service
Removed /etc/systemd/system/multi-user.target.wants/firewalld.service.
Removed /etc/systemd/system/dbus-org.fedoraproject.FirewallD1.service.
[root@harbor ~]# vim /etc/selinux/config
[root@harbor ~]# grep '^SELINUX=' /etc/selinux/config
SELINUX=disabled
[root@harbor ~]# reboot  //重启后重新连接[root@harbor ~]# rm -rf /etc/yum.repos.d/*
[root@harbor ~]# curl -o /etc/yum.repos.d/CentOS-Base.repo https://mirrors.aliyun.com/repo/Centos-vault-8.5.2111.repo% Total    % Received % Xferd  Average Speed   Time    Time     Time  CurrentDload  Upload   Total   Spent    Left  Speed
100  2495  100  2495    0     0   2720      0 --:--:-- --:--:-- --:--:--  2717
[root@harbor ~]# yum clean all
Updating Subscription Management repositories.
Unable to read consumer identity
This system is not registered to Red Hat Subscription Management. You can use subscription-manager to register.
12 files removed
[root@harbor ~]# yum makecache
Updating Subscription Management repositories.
Unable to read consumer identity
This system is not registered to Red Hat Subscription Management. You can use subscription-manager to register.
CentOS-8.5.2111 - Base - mirrors.aliyun.com                                           3.0 MB/s | 4.6 MB     00:01
CentOS-8.5.2111 - Extras - mirrors.aliyun.com                                          33 kB/s |  10 kB     00:00
CentOS-8.5.2111 - AppStream - mirrors.aliyun.com                                      2.2 MB/s | 8.4 MB     00:03
Metadata cache created.
[root@harbor ~]# vim /etc/hosts
[root@harbor ~]# cat /etc/hosts
127.0.0.1   localhost localhost.localdomain localhost4 localhost4.localdomain4
::1         localhost localhost.localdomain localhost6 localhost6.localdomain6192.168.195.135 harbor.com
192.168.195.136 docker
2.安装docker,开启docker服务并添加加速器
在所有主机上操作
//此处在harbor.com主机上演示
[root@harbor ~]# dnf config-manager --add-repo=https://download.docker.com/linux/centos/docker-ce.repo
[root@harbor ~]# dnf repolist -v    //查看是否启用
[root@harbor ~]# dnf list docker-ce --showduplicates | sort -r    //查看可安装版本
[root@harbor ~]# yum -y install docker-ce-24.0.6-1.el8 --allowerasing //安装所需版本
[root@harbor ~]# systemctl enable --now docker.service    //启动docker服务
Created symlink /etc/systemd/system/multi-user.target.wants/docker.service → /usr/lib/systemd/system/docker.service.
[root@harbor ~]#
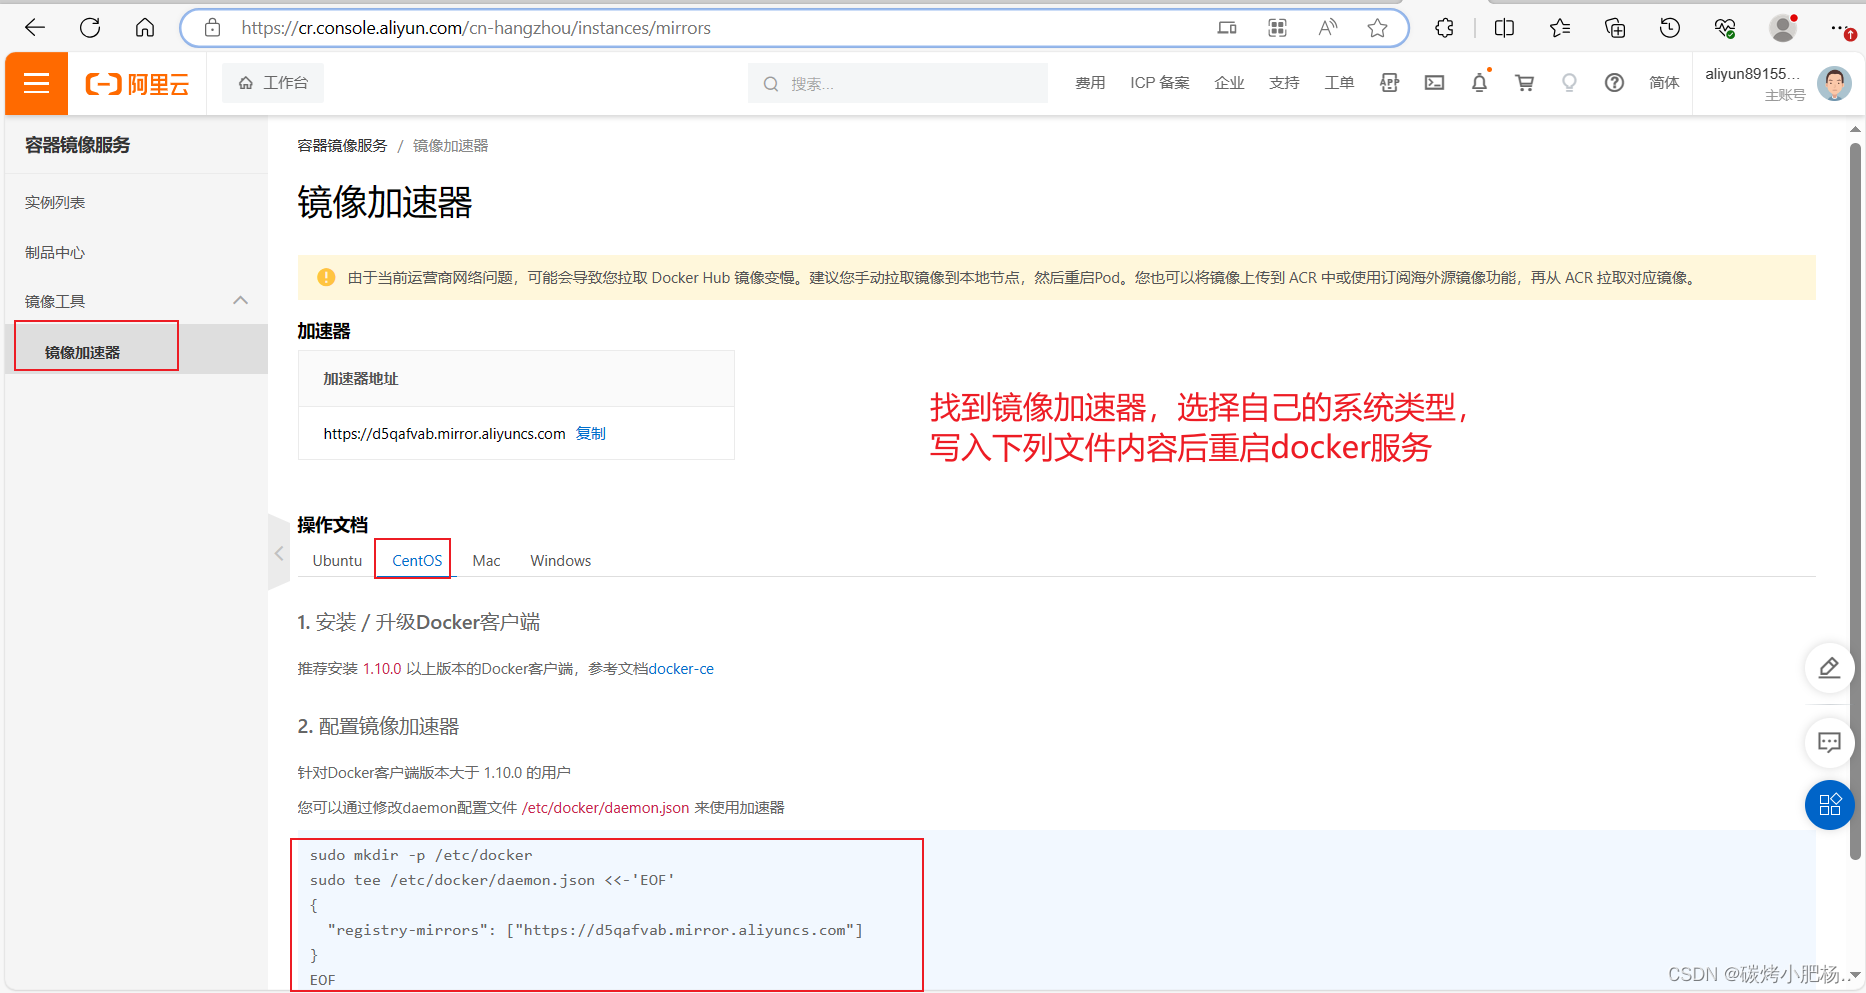
添加加速器
阿里云登录页 (aliyun.com)
在所有主机上操作
//此处在harbor.com主机上演示
[root@harbor ~]# vim /etc/docker/daemon.json
[root@harbor ~]# cat /etc/docker/daemon.json
{"dns": ["114.114.114.114"],"registry-mirrors": ["https://d5qafvab.mirror.aliyuncs.com"]
}
[root@harbor ~]# systemctl restart docker.service  //重启docker服务生效
[root@harbor ~]# docker info . . .Registry Mirrors:https://d5qafvab.mirror.aliyuncs.com/      //出现这串信息则表示添加加速器成功Live Restore Enabled: false[root@harbor ~]#
3.进入Docker Compose官网查看安装部署流程
[Docker Compose官方文档]
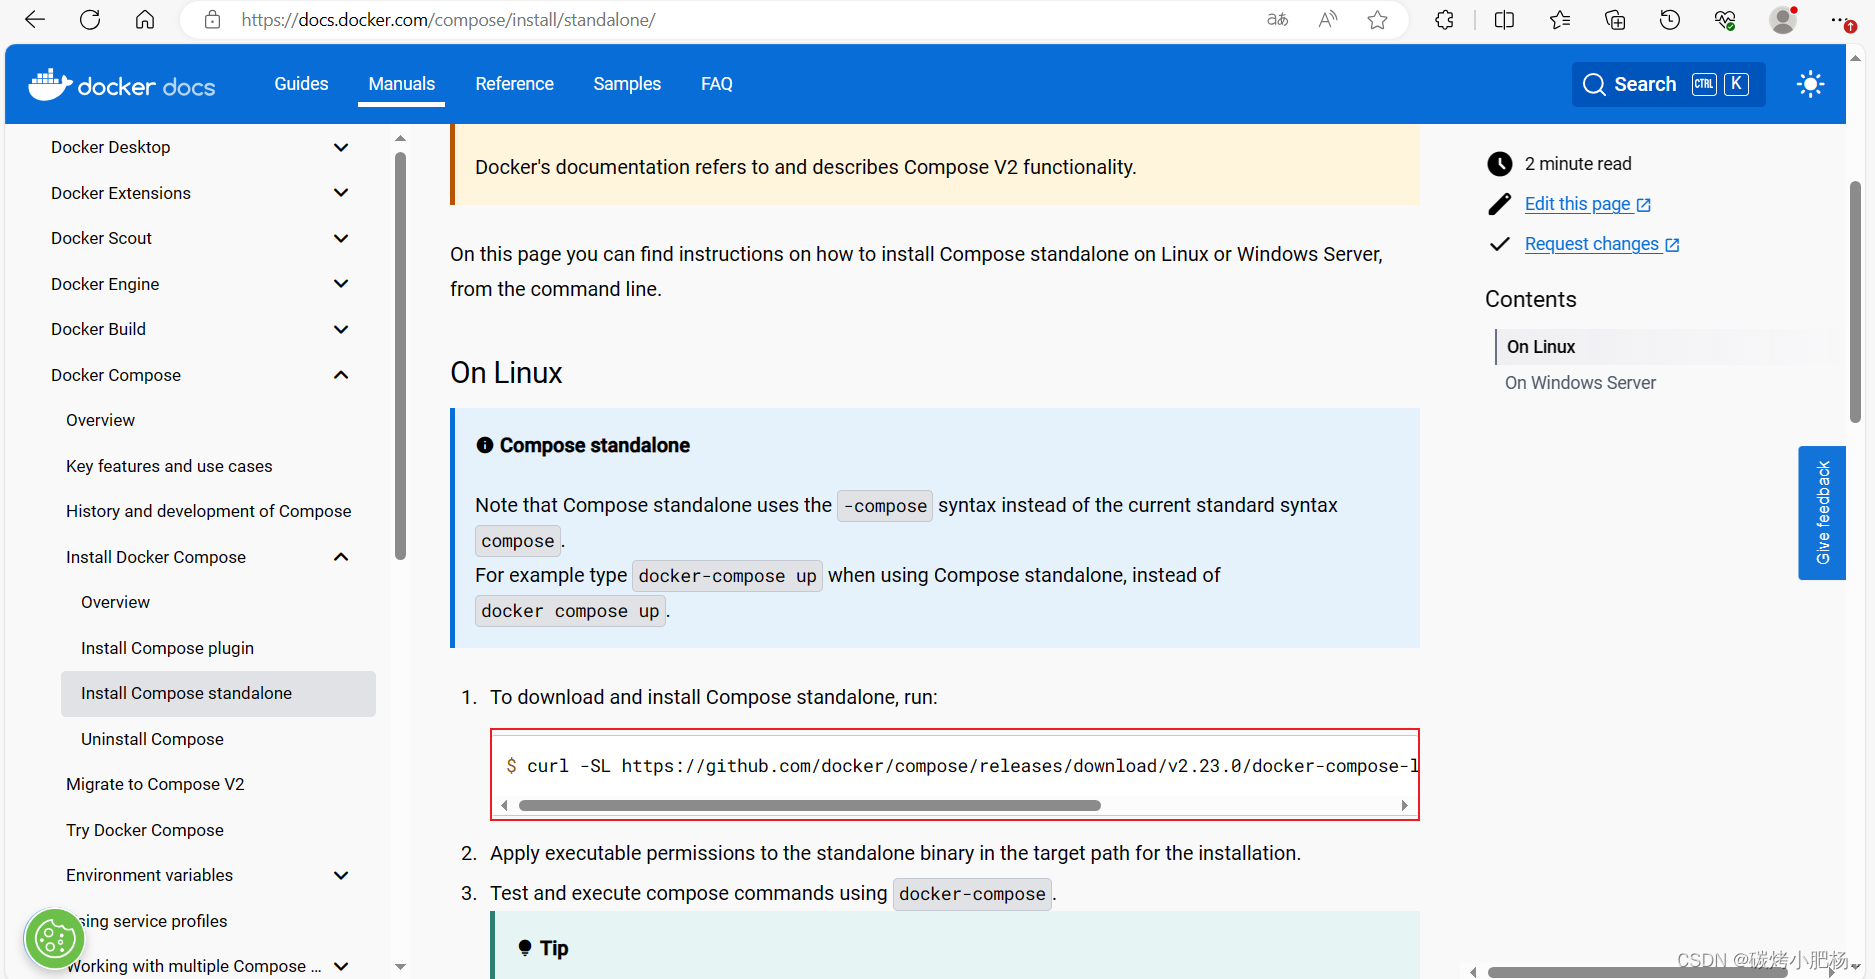
[root@harbor ~]# curl -SL https://github.com/docker/compose/releases/download/v2.23.0/docker-compose-linux-x86_64 -o /usr/local/bin/docker-compose% Total    % Received % Xferd  Average Speed   Time    Time     Time  CurrentDload  Upload   Total   Spent    Left  Speed0     0    0     0    0     0      0      0 --:--:--  0:00:16 --:--:--     0
curl: (52) Empty reply from server
[root@harbor ~]# chmod +x /usr/local/bin/docker-compose   //添加执行权限
[root@harbor ~]# ln -s /usr/local/bin/docker-compose /usr/bin/docker-compose //将其链接到/usr/bin/下面
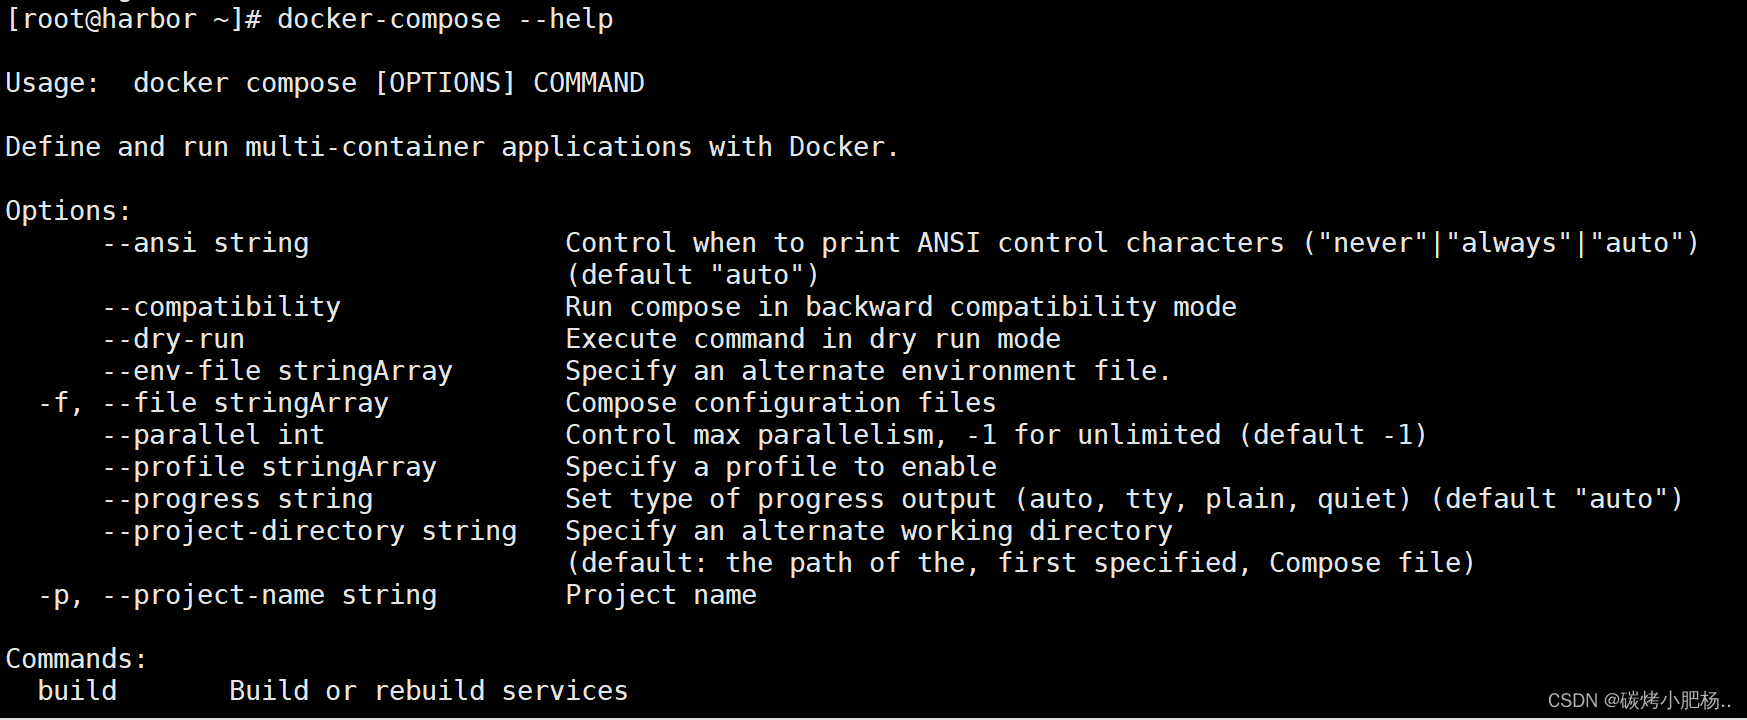
能够使用docker-compose --help则表示成功
4.进入harbor官网,拉取harbor二进制包
[Harbor官方文档](Releases · goharbor/harbor (github.com))

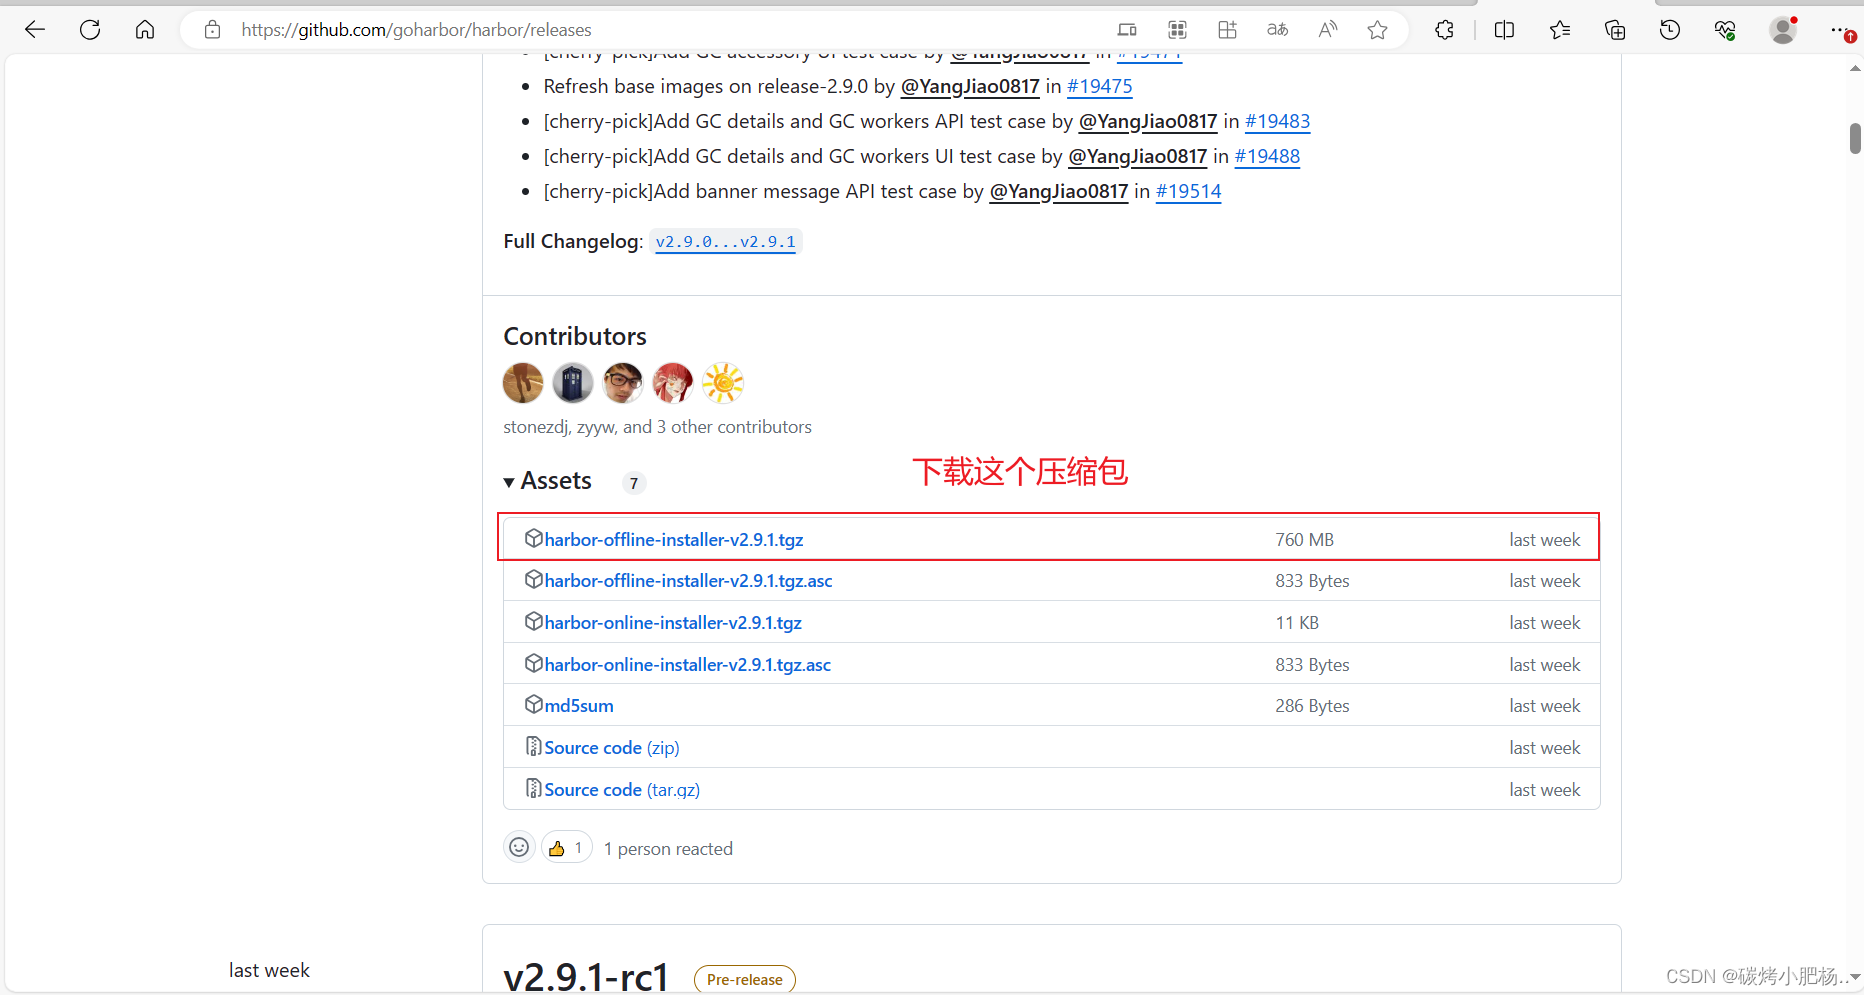
*下载完成后,将该压缩包传到harbor.com主机中
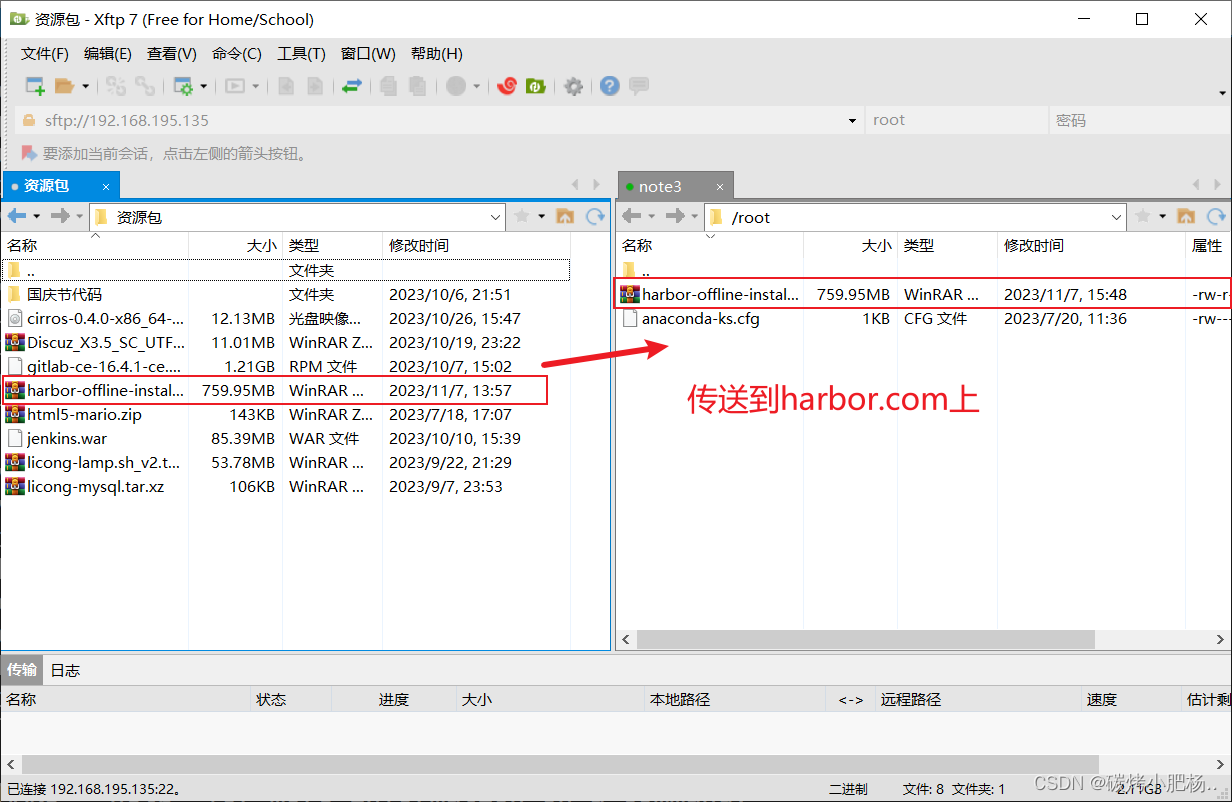
[root@harbor ~]# ls
anaconda-ks.cfg  harbor-offline-installer-v2.9.1.tgz//解压压缩包
[root@harbor harbor]# tar xf harbor.v2.9.1.tar.gz -C /usr/local/
5.复制出一份harbor.yml文件,编辑/usr/local/harbor/下的harbor.yml文件
//修改文件中的hostname,并注释掉有关https的信息
[root@harbor local]# ls
bin  etc  games  harbor  include  lib  lib64  libexec  sbin  share  src
[root@harbor local]# cd harbor/ && ls
common     docker-compose.yml    install.sh  prepare    common.sh  harbor.v2.9.1.tar.gz  harbor.yml.tmpl  LICENSE
[root@harbor harbor]# cp harbor.yml.tmpl harbor.yml
[root@harbor local]# cd harbor/ && ls
common     docker-compose.yml    harbor.yml       install.sh  prepare
common.sh  harbor.v2.9.1.tar.gz  harbor.yml.tmpl  LICENSE//修改如下配置
[root@harbor harbor]# vim harbor.yml
[root@harbor harbor]# grep '^hostname' harbor.yml
hostname: harbor.com    //改为自己的主机名
[root@harbor harbor]# grep -A6 '^# https related config' harbor.yml
# https related config      //注释掉https的信息
#https:# https port for harbor, default is 443#port: 443# The path of cert and key files for nginx#certificate: /your/certificate/path#private_key: /your/private/key/path
[root@harbor harbor]# grep -A1 '# The default data volume' harbor.yml
# The default data volume
data_volume: /data     //此处可以修改存放位置,尽量选择空间较大的位置
[root@harbor harbor]# grep -A1 '# insecure The flag to skip verifying registry certificate' harbor.yml# insecure The flag to skip verifying registry certificateinsecure: true    //跳过验证证书
6.执行install.sh文件
[root@harbor harbor]# ./install.sh [Step 0]: checking if docker is installed ...Note: docker version: 24.0.7[Step 1]: checking docker-compose is installed ...Note: Docker Compose version v2.21.0[Step 2]: loading Harbor images ...
Loaded image: goharbor/harbor-jobservice:v2.9.1
Loaded image: goharbor/harbor-registryctl:v2.9.1
Loaded image: goharbor/harbor-core:v2.9.1
Loaded image: goharbor/harbor-log:v2.9.1
Loaded image: goharbor/harbor-db:v2.9.1
Loaded image: goharbor/harbor-exporter:v2.9.1
Loaded image: goharbor/redis-photon:v2.9.1
Loaded image: goharbor/nginx-photon:v2.9.1
Loaded image: goharbor/registry-photon:v2.9.1
Loaded image: goharbor/trivy-adapter-photon:v2.9.1
Loaded image: goharbor/prepare:v2.9.1
Loaded image: goharbor/harbor-portal:v2.9.1[Step 3]: preparing environment ...[Step 4]: preparing harbor configs ...
prepare base dir is set to /usr/local/harbor
WARNING:root:WARNING: HTTP protocol is insecure. Harbor will deprecate http protocol in the future. Please make sure to upgrade to https
Clearing the configuration file: /config/portal/nginx.conf
Clearing the configuration file: /config/log/logrotate.conf
Clearing the configuration file: /config/log/rsyslog_docker.conf
Clearing the configuration file: /config/nginx/nginx.conf
Clearing the configuration file: /config/core/env
Clearing the configuration file: /config/core/app.conf
Clearing the configuration file: /config/registry/passwd
Clearing the configuration file: /config/registry/config.yml
Clearing the configuration file: /config/registry/root.crt
Clearing the configuration file: /config/registryctl/env
Clearing the configuration file: /config/registryctl/config.yml
Clearing the configuration file: /config/db/env
Clearing the configuration file: /config/jobservice/env
Clearing the configuration file: /config/jobservice/config.yml
Generated configuration file: /config/portal/nginx.conf
Generated configuration file: /config/log/logrotate.conf
Generated configuration file: /config/log/rsyslog_docker.conf
Generated configuration file: /config/nginx/nginx.conf
Generated configuration file: /config/core/env
Generated configuration file: /config/core/app.conf
Generated configuration file: /config/registry/config.yml
Generated configuration file: /config/registryctl/env
Generated configuration file: /config/registryctl/config.yml
Generated configuration file: /config/db/env
Generated configuration file: /config/jobservice/env
Generated configuration file: /config/jobservice/config.yml
loaded secret from file: /data/secret/keys/secretkey
Generated configuration file: /compose_location/docker-compose.yml
Clean up the input dirNote: stopping existing Harbor instance ...
[+] Running 10/10✔ Container harbor-jobservice  Removed                                                                          0.3s ✔ Container nginx              Removed                                                                          0.3s ✔ Container registryctl        Removed                                                                          0.3s ✔ Container harbor-portal      Removed                                                                          0.2s ✔ Container harbor-core        Removed                                                                          0.2s ✔ Container redis              Removed                                                                          0.2s ✔ Container harbor-db          Removed                                                                          0.2s ✔ Container registry           Removed                                                                          0.2s ✔ Container harbor-log         Removed                                                                         10.1s ✔ Network harbor_harbor        Removed                                                                          0.1s [Step 5]: starting Harbor ...
[+] Running 10/10✔ Network harbor_harbor        Created                                                                          0.1s ✔ Container harbor-log         Started                                                                          0.0s ✔ Container harbor-portal      Started                                                                          0.0s ✔ Container harbor-db          Started                                                                          0.0s ✔ Container redis              Started                                                                          0.0s ✔ Container registryctl        Started                                                                          0.0s ✔ Container registry           Started                                                                          0.0s ✔ Container harbor-core        Started                                                                          0.0s ✔ Container nginx              Started                                                                          0.0s ✔ Container harbor-jobservice  Started                                                                          0.0s
✔ ----Harbor has been installed and started successfully.----
[root@harbor harbor]#//查看启动的容器
[root@harbor harbor]# docker ps
CONTAINER ID   IMAGE                                COMMAND                  CREATED         STATUS                   PORTS                                   NAMES
350ca8862054   goharbor/harbor-jobservice:v2.9.1    "/harbor/entrypoint.…"   5 minutes ago   Up 5 minutes (healthy)                                           harbor-jobservice
b72bc2f82a68   goharbor/nginx-photon:v2.9.1         "nginx -g 'daemon of…"   5 minutes ago   Up 5 minutes (healthy)   0.0.0.0:80->8080/tcp, :::80->8080/tcp   nginx
44f7ef47465b   goharbor/harbor-core:v2.9.1          "/harbor/entrypoint.…"   5 minutes ago   Up 5 minutes (healthy)                                           harbor-core
1b21077159ba   goharbor/harbor-portal:v2.9.1        "nginx -g 'daemon of…"   5 minutes ago   Up 5 minutes (healthy)                                           harbor-portal
e806f3263cd6   goharbor/registry-photon:v2.9.1      "/home/harbor/entryp…"   5 minutes ago   Up 5 minutes (healthy)                                           registry
e88001619f8b   goharbor/harbor-db:v2.9.1            "/docker-entrypoint.…"   5 minutes ago   Up 5 minutes (healthy)                                           harbor-db
3b0dc2c89b77   goharbor/harbor-registryctl:v2.9.1   "/home/harbor/start.…"   5 minutes ago   Up 5 minutes (healthy)                                           registryctl
dd19f6c1fbfa   goharbor/redis-photon:v2.9.1         "redis-server /etc/r…"   5 minutes ago   Up 5 minutes (healthy)                                           redis
e6ebc7e08482   goharbor/harbor-log:v2.9.1           "/bin/sh -c /usr/loc…"   5 minutes ago   Up 5 minutes (healthy)   127.0.0.1:1514->10514/tcp               harbor-log//镜像存放位置,镜像都存放在我们指定的/data目录下面
[root@harbor harbor]# ls /data
ca_download  database  job_logs  redis  registry  secret
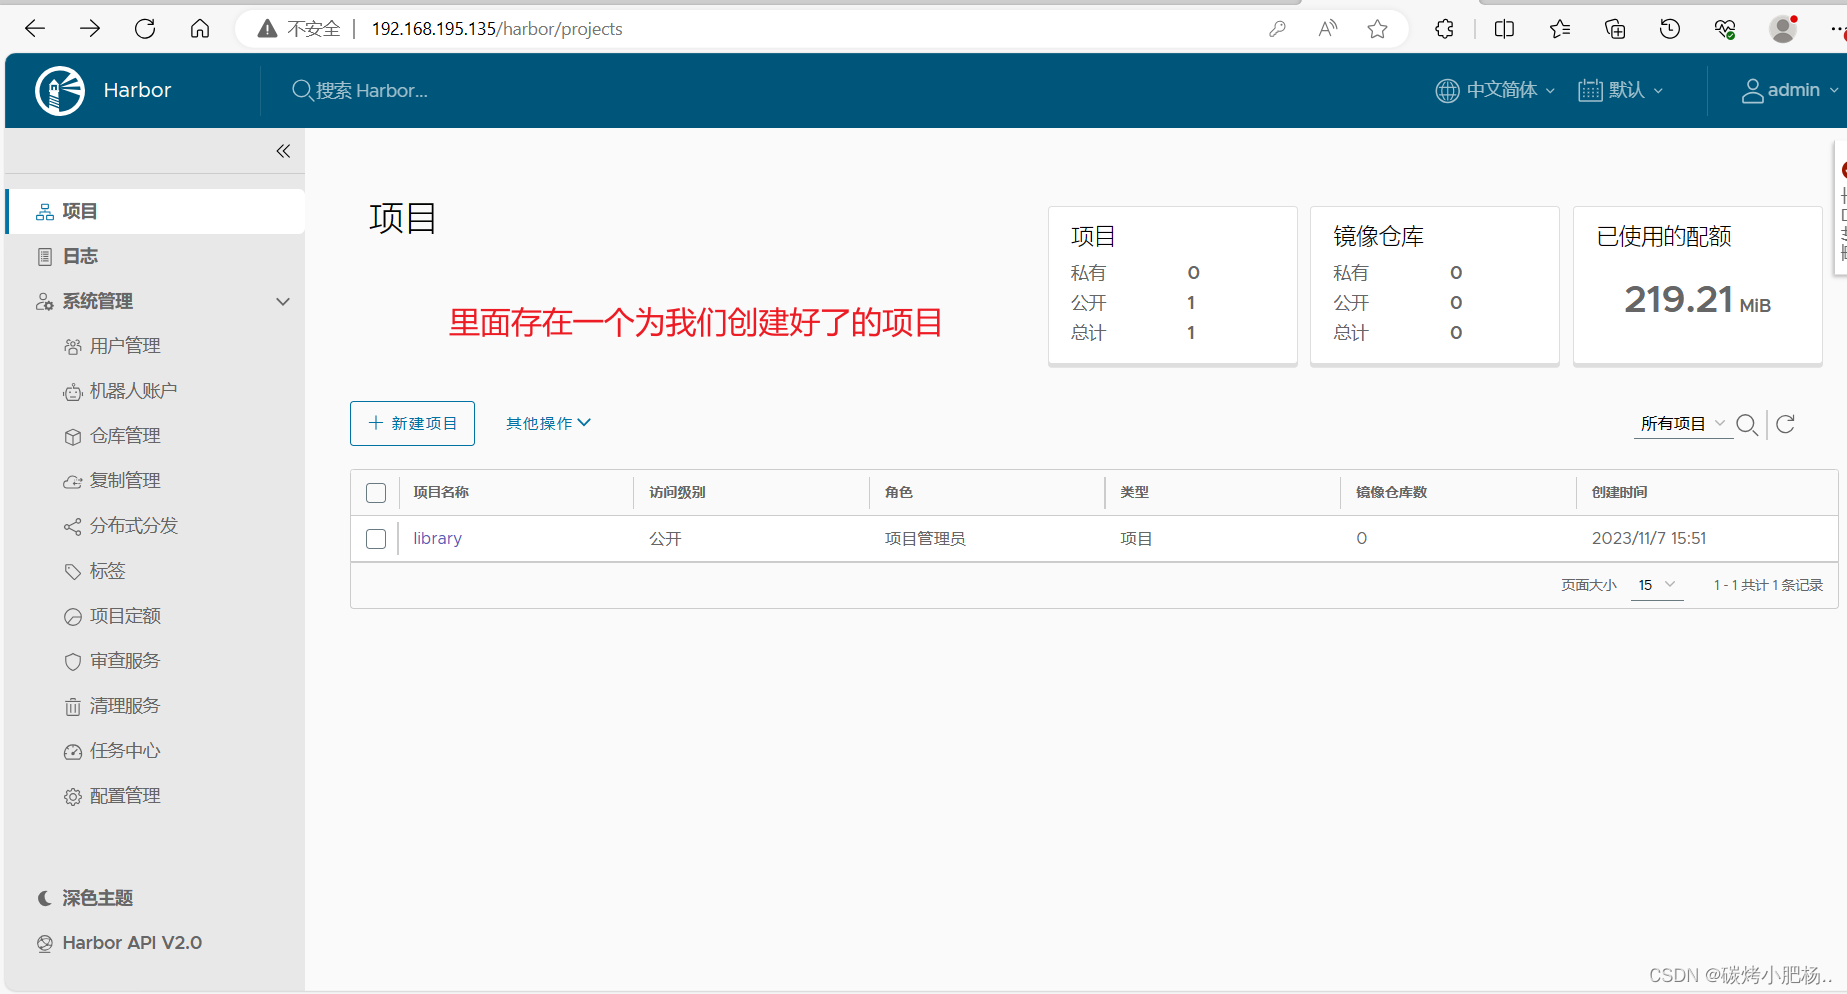
通过IP访问harbor的web界面

使用Harbor的注意事项:
- 在客户端上传镜像时一定要记得执行docker login进行用户认证,否则无法直接push
- 在客户端使用的时候如果不是用的https则必须要在客户端的/etc/docker/daemon.json配置文件中配置insecure-registries参数
- 数据存放路径应在配置文件中配置到一个容量比较充足的共享存储中
- Harbor是使用docker-compose命令来管理的,如果需要停止Harbor也应用docker-compose stop来停止,其他参数请–help
7.将harbor设置为开机自启
//由于想要关闭或开启harbor需要进入到有docker-compose.yml文件的目录下执行,所以我们将该命令放到虚拟机启动最后执行的一个文件中去,也就是/etc/rc.local文件中[root@harbor harbor]# vim /etc/rc.local
[root@harbor harbor]# head -5 /etc/rc.local
#!/bin/bash
cd /usr/local/harbor/ && docker-compose start
# THIS FILE IS ADDED FOR COMPATIBILITY PURPOSES
#
# It is highly advisable to create own systemd services or udev rules
[root@harbor harbor]# ll /etc/rc.local
lrwxrwxrwx. 1 root root 13 Mar 24  2020 /etc/rc.local -> rc.d/rc.local
[root@harbor harbor]# chmod +x /etc/rc.d/rc.local
[root@harbor harbor]# ll /etc/rc.d/rc.local
-rwxr-xr-x. 1 root root 520 Nov  7 22:29 /etc/rc.d/rc.local//将cd /usr/local/harbor/ && docker-compose start写入到这个文件中后,他就会在开启这个虚拟机的时候执行进入/usr/local/harbor/目录中执行开启harbor的命令
8.登录到docker的私有镜像仓库(harbor)
//在登录我们的harbor私有仓库时,需在/etc/docker/daemon.json文件中添加harbor仓库的信息,指定我们设置的harbor.com这个主机名
[root@docker local]# vim /etc/docker/daemon.json
[root@docker local]# cat /etc/docker/daemon.json
{"dns": ["114.114.114.114"],"insecure-registries": ["harbor.com"],   //添加此行 "registry-mirrors": ["https://d5qafvab.mirror.aliyuncs.com"]
}
[root@docker local]# systemctl restart docker.service    //重启生效[root@docker ~]# docker login harbor.com   //登录到私有镜像仓库
Username: admin
Password:                    //此处密文密码为Harbor.com
Authenticating with existing credentials...
WARNING! Your password will be stored unencrypted in /root/.docker/config.json.
Configure a credential helper to remove this warning. See
https://docs.docker.com/engine/reference/commandline/login/#credentials-storeLogin Succeeded   //登录成功
[root@docker ~]#
9.拉取一个官方镜像,将官方镜像名称更改后上传到我们的私有仓库
[root@docker ~]# docker pull nginx
Using default tag: latest
latest: Pulling from library/nginx
a2abf6c4d29d: Pull complete
a9edb18cadd1: Pull complete
589b7251471a: Pull complete
186b1aaa4aa6: Pull complete
b4df32aa5a72: Pull complete
a0bcbecc962e: Pull complete
Digest: sha256:0d17b565c37bcbd895e9d92315a05c1c3c9a29f762b011a10c54a66cd53c9b31
Status: Downloaded newer image for nginx:latest
docker.io/library/nginx:latest
[root@docker ~]# docker images
REPOSITORY TAG IMAGE ID CREATED SIZE
nginx latest 605c77e624dd 22 months ago 141MB
[root@docker ~]# docker tag nginx:latest harbor.com/library/nginx:v0.1 //更改名称
[root@docker ~]# docker images
REPOSITORY TAG IMAGE ID CREATED SIZE
nginx latest 605c77e624dd 22 months ago 141MB
harbor.com/library/nginx v0.1 605c77e624dd 22 months ago 141MB
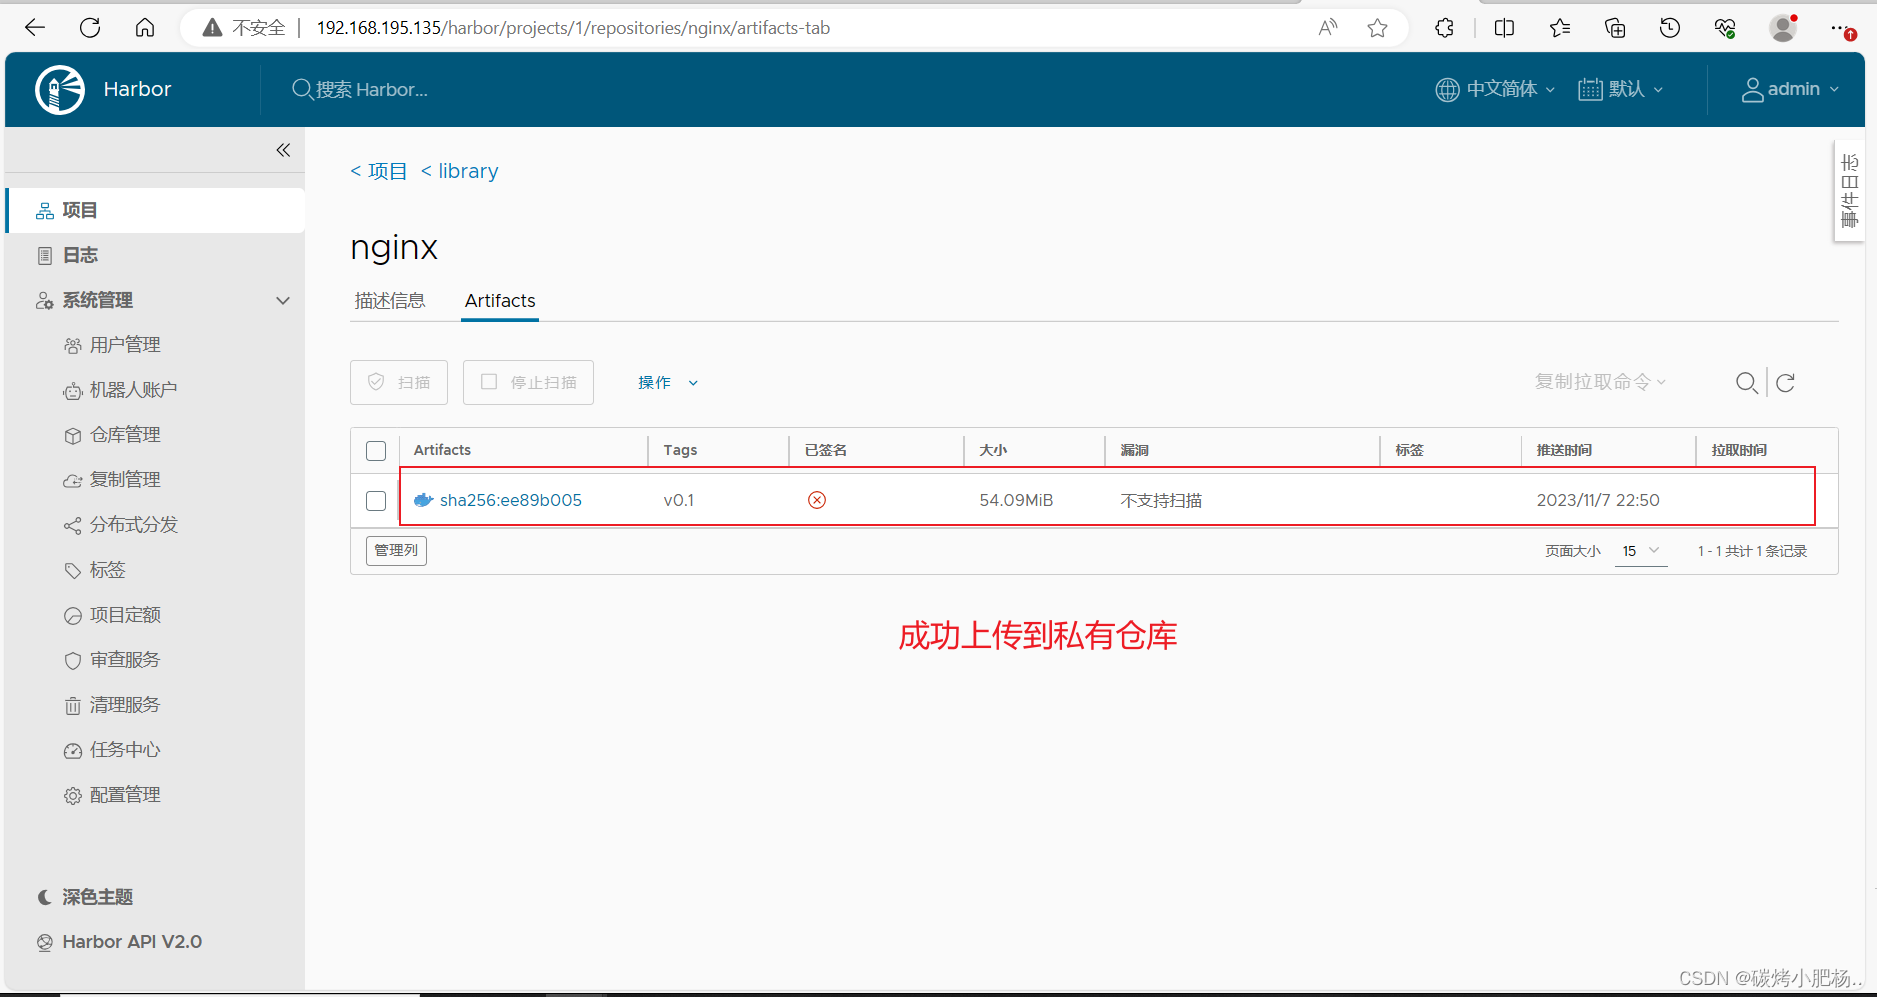
[root@docker ~]# docker push harbor.com/library/nginx:v0.1 //上传到私有仓库
The push refers to repository [harbor.com/library/nginx]
d874fd2bc83b: Pushed
32ce5f6a5106: Pushed
f1db227348d0: Pushed
b8d6e692a25e: Pushed
e379e8aedd4d: Pushed
2edcec3590a4: Pushed
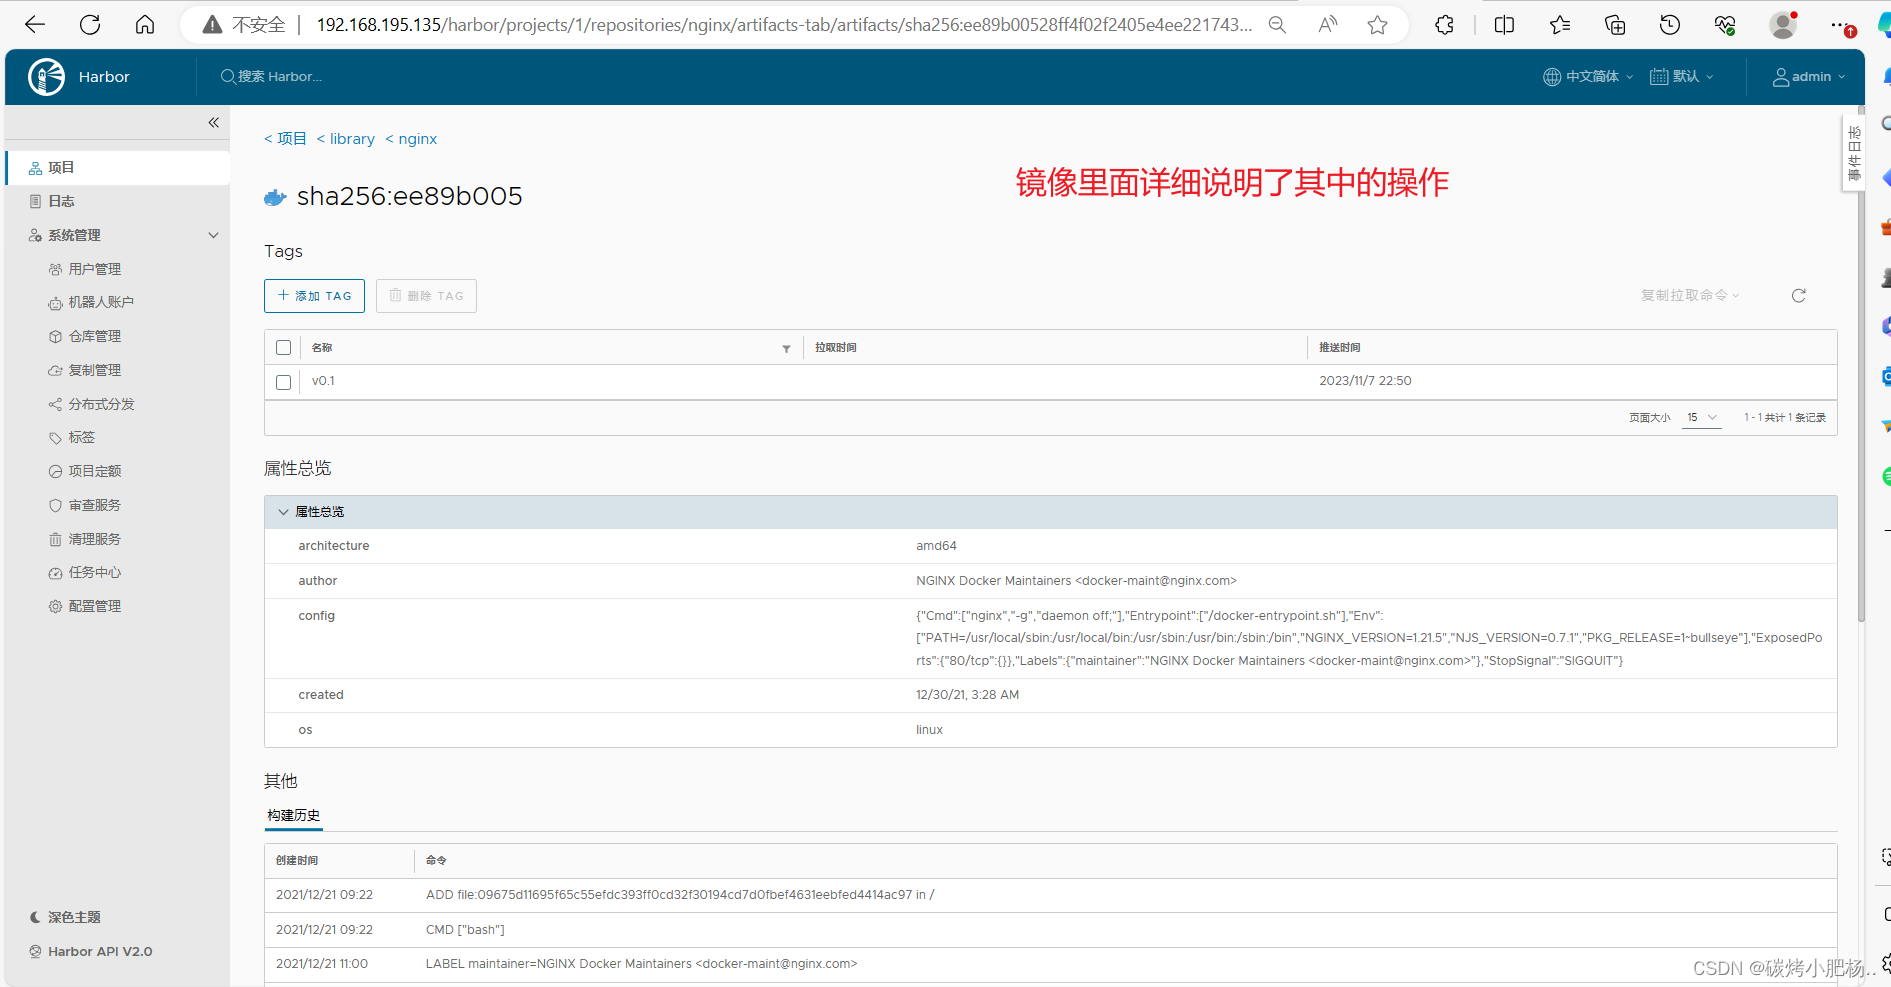
v0.1: digest: sha256:ee89b00528ff4f02f2405e4ee221743ebc3f8e8dd0bfd5c4c20a2fa2aaa7ede3 size: 1570
[root@docker ~]#
进入私有仓库查看
删除现存镜像,尝试从私有仓库拉取镜像
[root@docker ~]# docker rmi -f $(docker images -q)
Untagged: nginx:latest
Untagged: nginx@sha256:0d17b565c37bcbd895e9d92315a05c1c3c9a29f762b011a10c54a66cd53c9b31
Untagged: harbor.com/library/nginx:v0.1
Untagged: harbor.com/library/nginx@sha256:ee89b00528ff4f02f2405e4ee221743ebc3f8e8dd0bfd5c4c20a2fa2aaa7ede3
Deleted: sha256:605c77e624ddb75e6110f997c58876baa13f8754486b461117934b24a9dc3a85
Deleted: sha256:b625d8e29573fa369e799ca7c5df8b7a902126d2b7cbeb390af59e4b9e1210c5
Deleted: sha256:7850d382fb05e393e211067c5ca0aada2111fcbe550a90fed04d1c634bd31a14
Deleted: sha256:02b80ac2055edd757a996c3d554e6a8906fd3521e14d1227440afd5163a5f1c4
Deleted: sha256:b92aa5824592ecb46e6d169f8e694a99150ccef01a2aabea7b9c02356cdabe7c
Deleted: sha256:780238f18c540007376dd5e904f583896a69fe620876cabc06977a3af4ba4fb5
Deleted: sha256:2edcec3590a4ec7f40cf0743c15d78fb39d8326bc029073b41ef9727da6c851f
[root@docker ~]# docker images
REPOSITORY   TAG       IMAGE ID   CREATED   SIZE
[root@docker ~]# docker images
REPOSITORY   TAG       IMAGE ID   CREATED   SIZE
[root@docker ~]# docker pull harbor.com/library/nginx:v0.1
v0.1: Pulling from library/nginx
a2abf6c4d29d: Pull complete
a9edb18cadd1: Pull complete
589b7251471a: Pull complete
186b1aaa4aa6: Pull complete
b4df32aa5a72: Pull complete
a0bcbecc962e: Pull complete
Digest: sha256:ee89b00528ff4f02f2405e4ee221743ebc3f8e8dd0bfd5c4c20a2fa2aaa7ede3
Status: Downloaded newer image for harbor.com/library/nginx:v0.1
harbor.com/library/nginx:v0.1//由于是以图文的方式展示,无法凸显出从私有仓库拉取镜像的效率,但正常情况下从私有仓库拉取镜像比从官方拉取镜像速度快
10.测试,以拉取的镜像制作一个容器
[root@docker ~]# docker run -d -p 80:80 harbor.com/library/nginx:v0.1
ac1593a13a916fe20acf57a14bb5cb67b998d449e5d6b080a98c6dd29099f735
[root@docker ~]# docker ps
CONTAINER ID   IMAGE                           COMMAND                  CREATED         STATUS         PORTS                               NAMES
ac1593a13a91   harbor.com/library/nginx:v0.1   "/docker-entrypoint.…"   2 minutes ago   Up 2 minutes   0.0.0.0:80->80/tcp, :::80->80/tcp   awesome_ellis
在浏览器中通过80端口进行访问
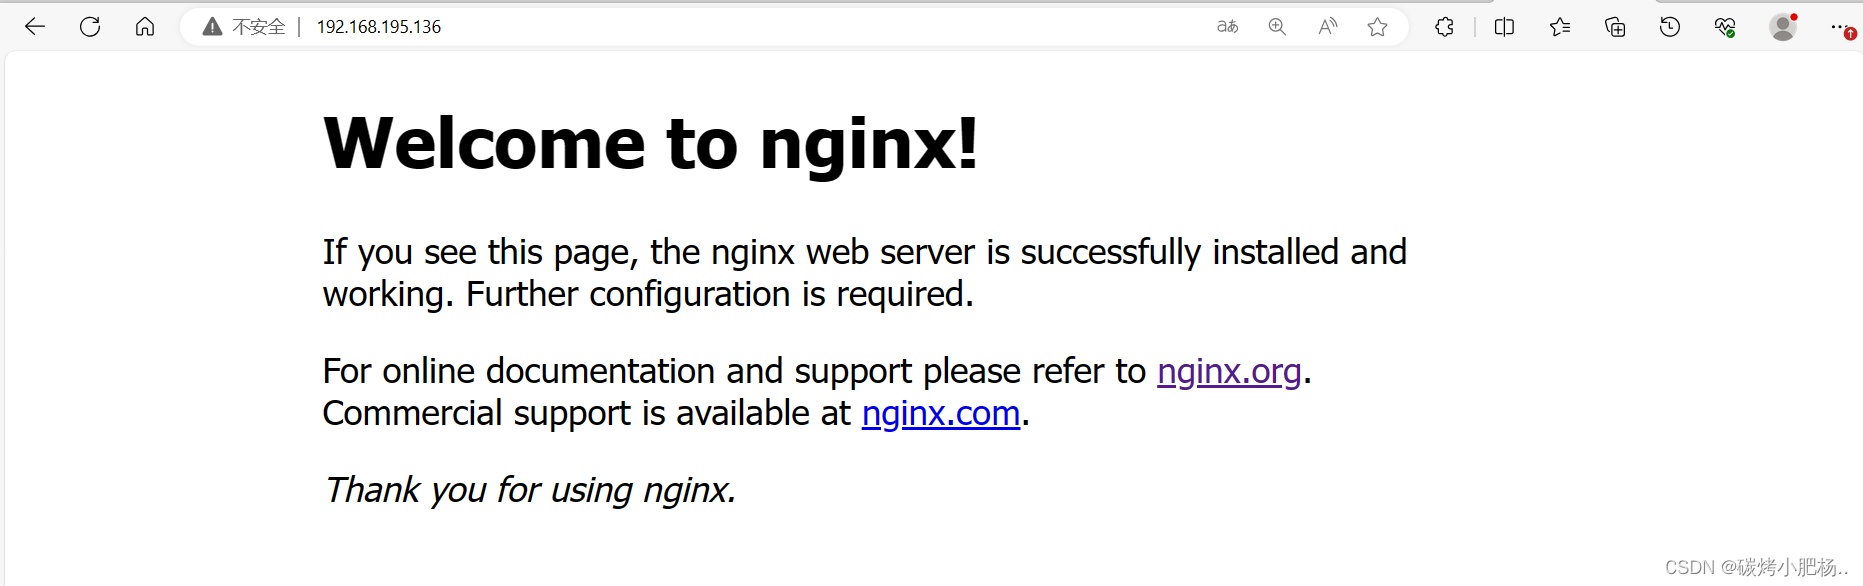
访问成功
总的来说,Harbor 私有仓库是一个功能丰富、安全可靠的容器镜像管理工具,适用于组织和开发团队,特别是那些需要严格控制镜像访问权限和确保安全性的情况。然而,它需要考虑到部署和维护成本,以及对性能的关注。