Day16:HTTP协议、Spring MVC、Thymeleaf模版引擎、Spring处理浏览器请求实例(传入和传出)、MyBatis
HTTP
- HyperText Transfer Protocol:超文本传输协议
- 规定了浏览器和服务器之间如何通信,以及通信时的数据格式。

- 为什么有这么多?浏览器先收到html,再根据html内容接受图片、css、js等文件。
Spring MVC
- 三层架构:表现层、业务层、数据访问层
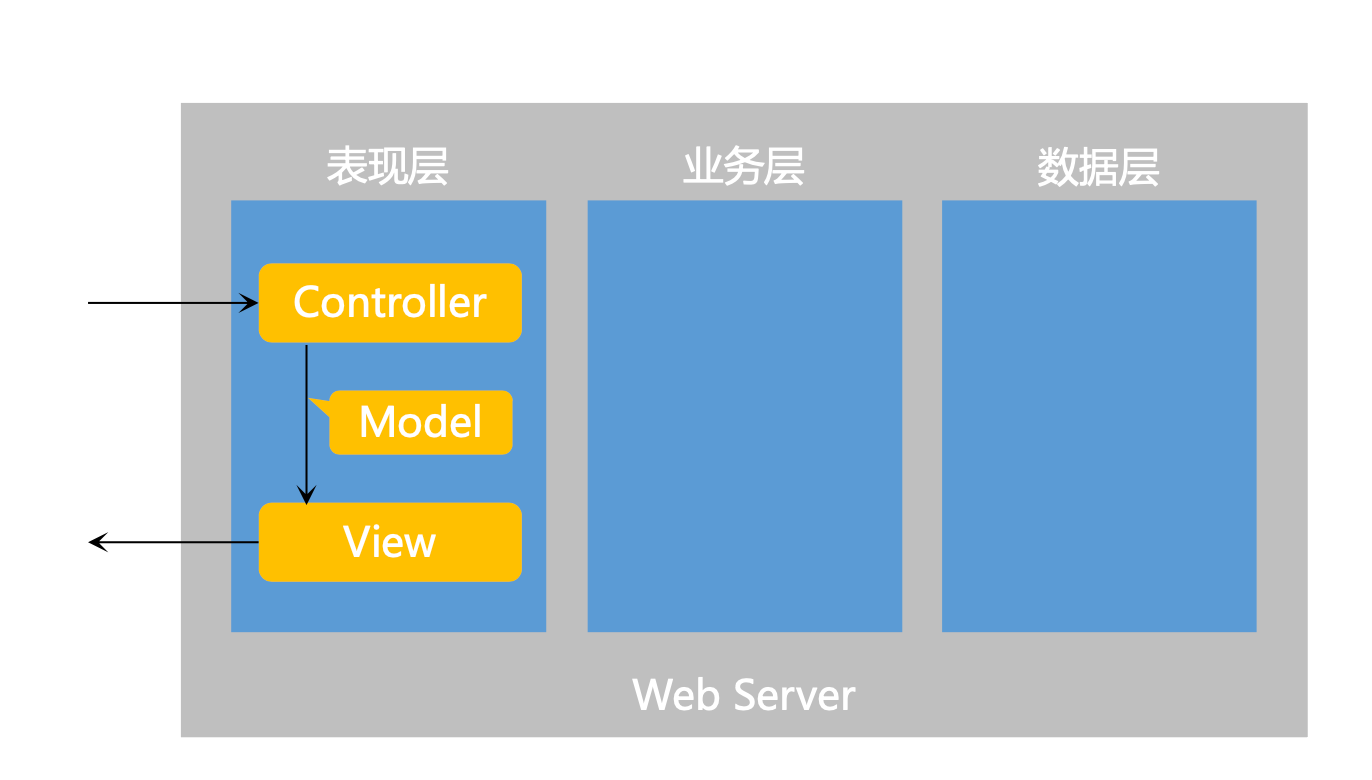
- MVC设计模式:M:model(模型,用来封装数据), V:view(视图,用来渲染展现), C:controller(控制,用于控制行为)
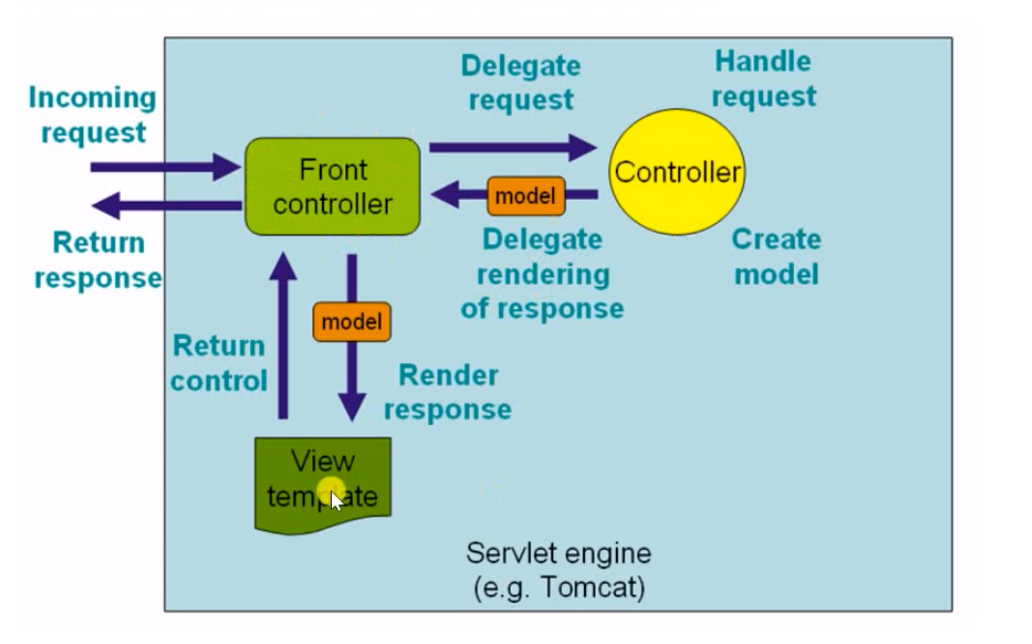
- 核心组件:前端控制器:
DispatcherServlet
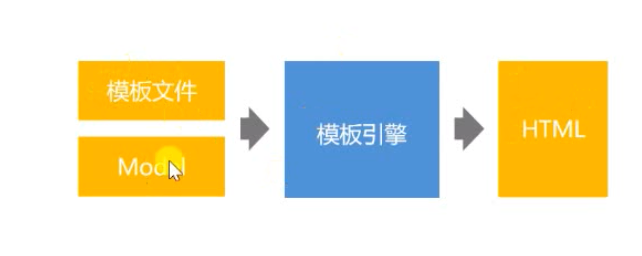
Thymeleaf模版引擎
- 模版引擎的作用:生成动态的html
- Thymeleaf:模版引擎的一种,倡导自然模板,即以HTML文件为模板。
- 原理:
Spring处理浏览器请求实例(繁琐方式)
- 开发时在application.properties将Thymeleaf的缓存关闭(不然界面刷新慢,上线要打开):
server.port=8888
server.servlet.context-path=/communityspring.thymeleaf.cache=false
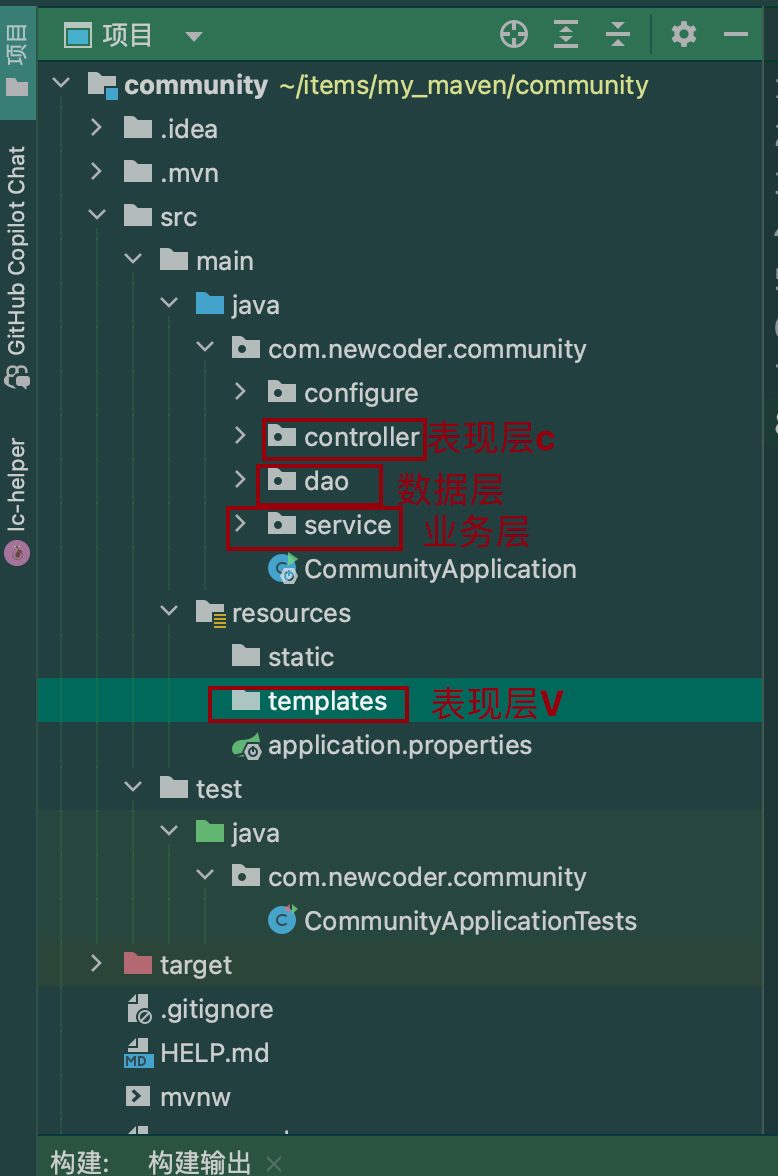
- 明确三个层(表现层、业务层、数据层)和表现层M和V和C的代码之后会写在哪里。
- Model:spring自带 。
- 在controller->alphaController类中添加http方法,包含一些常见的获取请求/设置响应的方法:
@RequestMapping("/http")public void http(HttpServletRequest request, HttpServletResponse response) throws Exception {System.out.println(request.getMethod());//获取请求方式System.out.println(request.getServletPath());//获取请求路径Enumeration<String> enumeration = request.getHeaderNames();while(enumeration.hasMoreElements()){String name = enumeration.nextElement();String value = request.getHeader(name);System.out.println(name + ':' + value);}System.out.println(request.getParameter("code"));//response给浏览器返回响应数据response.setContentType("text/html; charset=utf-8");PrintWriter writer = response.getWriter();writer.write("<h1>gmz</h1>");writer.close();}
- @RequestMapping(“/http”):映射路径到localhost:8080/community中
- HttpServletRequest request请求对象,HttpServletResponse response响应对象;
- Enumeration enumeration = request.getHeaderNames();获取header名字,是一个迭代器,用Enumeration接;
- request.getHeader(name);获取特定名字的header的值。
- response.setContentType(“text/html; charset=utf-8”);设置响应类型是html,字符集是utf-8
- PrintWriter writer = response.getWriter();用PrintWriter写。
运行结果:
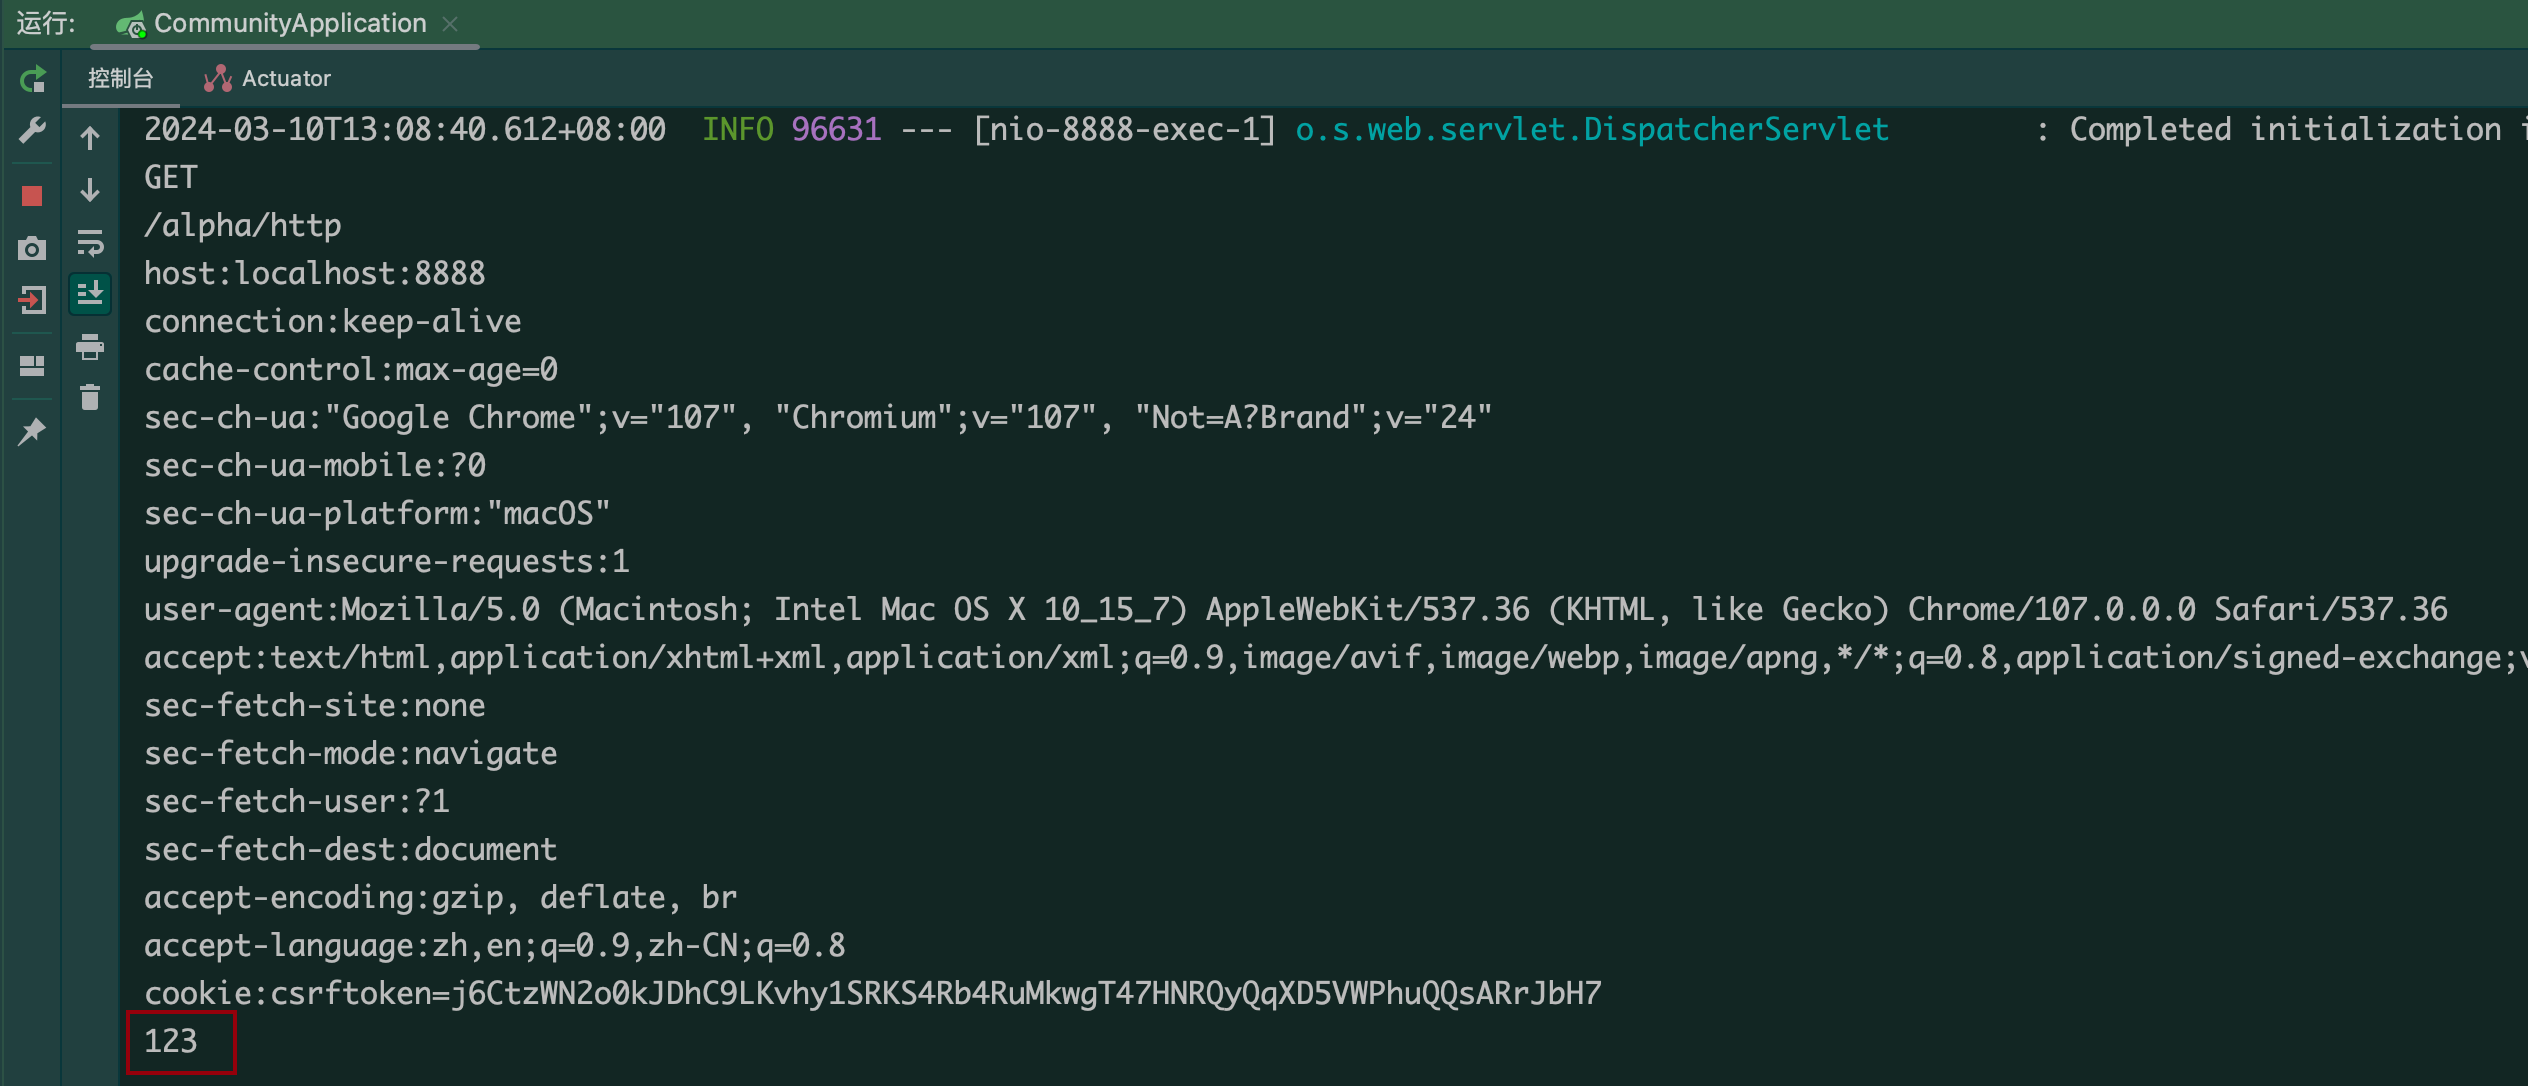
(这里把code传进来了,通过http://localhost:8888/community/alpha/http?code=123的?)
Spring处理浏览器请求实例(简便方式)
通过?获取参数值:(GET)
//GET//查询所有的学生:路径/students?current=1&limit=20@RequestMapping(path = "/students", method = RequestMethod.GET)@ResponseBodypublic String getStudents(@RequestParam(name = "current", required = false, defaultValue = "1") int current,@RequestParam(name = "limit", required = false, defaultValue = "10") int limit) {System.out.println(current);System.out.println(limit);return "some students";}
- @RequestMapping(path = “/students”, method = RequestMethod.GET)拓展了注解,说明路径是/students,且请求方式是GET
- @RequestParam(name = “current”, required = false, defaultValue = “1”)这是一个注解, 表明通过current识别对应参数,不是必须要通过?传过来的参数,默认值是1
通过/路径获取参数值:(GET)
@RequestMapping(path = "student/{id}", method = RequestMethod.GET)@ResponseBodypublic String getStudent(@PathVariable(name = "id") int id) {System.out.println(id);return "A student";}
- @PathVariable(name = “id”) int id注解表示把/{id}中的内容赋值给id变量。
通过绑定参数名获取参数:(POST)
- 为什么用POST?
- GET传参用明文,不安全;
- GET传的数据有限(URL长度有限)
- 编写示例html:(static/html/student.html
<!DOCTYPE html>
<html lang="en">
<head><meta charset="UTF-8"><title>增加学生</title>
</head>
<body><form method="post" action="/community/alpha/student"><label>姓名:</label><input type="text" id="name" name="name"><br><label>年龄:</label><input type="text" id="age" name="age"><br><input type = "submit" value = "提交"></form></body>
</html>
- 在controller中:
@RequestMapping(path = "/student", method = RequestMethod.POST)@ResponseBodypublic String saveStudent(String name, int age){System.out.println(name);System.out.println(age);return "success";}
- @RequestMapping(path = “/student”, method = RequestMethod.POST)设置请求类型为POST。
- POST获取参数很简单,之间表明参数名和html中设置的表单的参数名一样即可。
在HTML表单中,所有的输入都是作为字符串处理的。当你在表单中输入年龄并提交时,这个年龄值会作为字符串发送到服务器。在你的Spring Boot应用中,Spring MVC会尝试将这个字符串转换为你在处理方法中指定的类型,也就是int。 在你的例子中,public String saveStudent(String name, int age),Spring MVC会尝试将age参数从字符串转换为int。如果转换成功,那么这个方法就可以正常工作。如果转换失败(例如,如果用户输入的不是一个数字),那么Spring MVC会抛出一个类型转换异常。 这就是为什么你可以在HTML表单中将年龄设置为文本输入,然后在服务器端将其处理为int的原因。Spring MVC在背后处理了类型转换。
向浏览器响应数据(HTML):GET
之前都适用 @ResponseBody + return str的形式返回简单的字符串,现在考虑返回完成的html。
- 构建要返回的教师变量(参数):
//响应HTML@RequestMapping(path = "/teacher", method = RequestMethod.GET)public ModelAndView getTeacher(){ModelAndView modelAndView = new ModelAndView();modelAndView.addObject("name", "张三");modelAndView.addObject("age", "30");modelAndView.setViewName("demo/view");//实际是view.htmlreturn modelAndView;
- ModelAndView:要返回的数据封装出的对象;
- modelAndView.addObject(name,value):添加对象对;
- modelAndView.setViewName(“demo/view”):把封装了数据的model封装到对应的动态template的路径去。这里的view其实省略了.html。
- 在templates中编写网页html:
<!DOCTYPE html>
<html lang="en", xmlns:th="http://www.thymeleaf.org">
<!--当前网页是一个模版-->
<head><meta charset="UTF-8"><title>Teacher</title>
</head>
<body>
<p th:text="${name}"></p>
<p th:text="${age}"></p></body>
</html>
- 假如xmlns:th="http://www.thymeleaf.org"说明是一个thymeleaf的模版。
向浏览器响应数据(HTML)简便:GET
@RequestMapping(path = "/school", method = RequestMethod.GET)public String getSchool(Model model){model.addAttribute("name", "北京大学");model.addAttribute("age", "100");return "/demo/view";}
- 更加简单,这里传入一个Model参数,是dispatcherServlet管理的,我们只需要把model中的信息填进去。
- return的字符串是路径
向浏览器响应json数据(异步请求):
- 异步请求:比如注册时填入用户名并移动鼠标时就会判断用户名是否符合要求(查数据库),但页面没有刷新 。
- 需要转换:Java对象 -> JSON字符串 -> JS对象
//Json数据(异步请求)
//需要转换:Java对象 -> JSON字符串 -> JS对象
@RequestMapping(path = "/emp", method = RequestMethod.GET)
@ResponseBody//加上这个注解,返回的数据不会被解析为html,而是直接返回为json
public Map<String, Object> getEmp(){Map<String, Object> emp = new HashMap<>();emp.put("name", "张三");emp.put("age", 23);emp.put("salary", 8000.00);return emp;
}

返回多个json:
@RequestMapping(path = "/emps", method = RequestMethod.GET)@ResponseBody//加上这个注解,返回的数据不会被解析为html,而是直接返回为jsonpublic List<Map<String, Object>> getEmps(){List<Map<String, Object>> list = new ArrayList<>();Map<String, Object> emp = new HashMap<>();emp.put("name", "张三");emp.put("age", 23);emp.put("salary", 8000.00);list.add(emp);Map<String, Object> emp2 = new HashMap<>();emp2.put("name", "李四");emp2.put("age", 24);emp2.put("salary", 9000.00);list.add(emp2);return list;}

MySQL
安装MySQL server
brew install mysql
- 启动服务:
brew services start mysql
- 客户端连接本地:
mysql -u root -p
- 修改密码:
ALTER USER 'root'@'localhost' IDENTIFIED BY '新密码';
FLUSH PRIVILEGES;
- 导入相关的sql建表语句:
source /Users/iris/Desktop/community-init-sql-1.5/init_schema.sql;
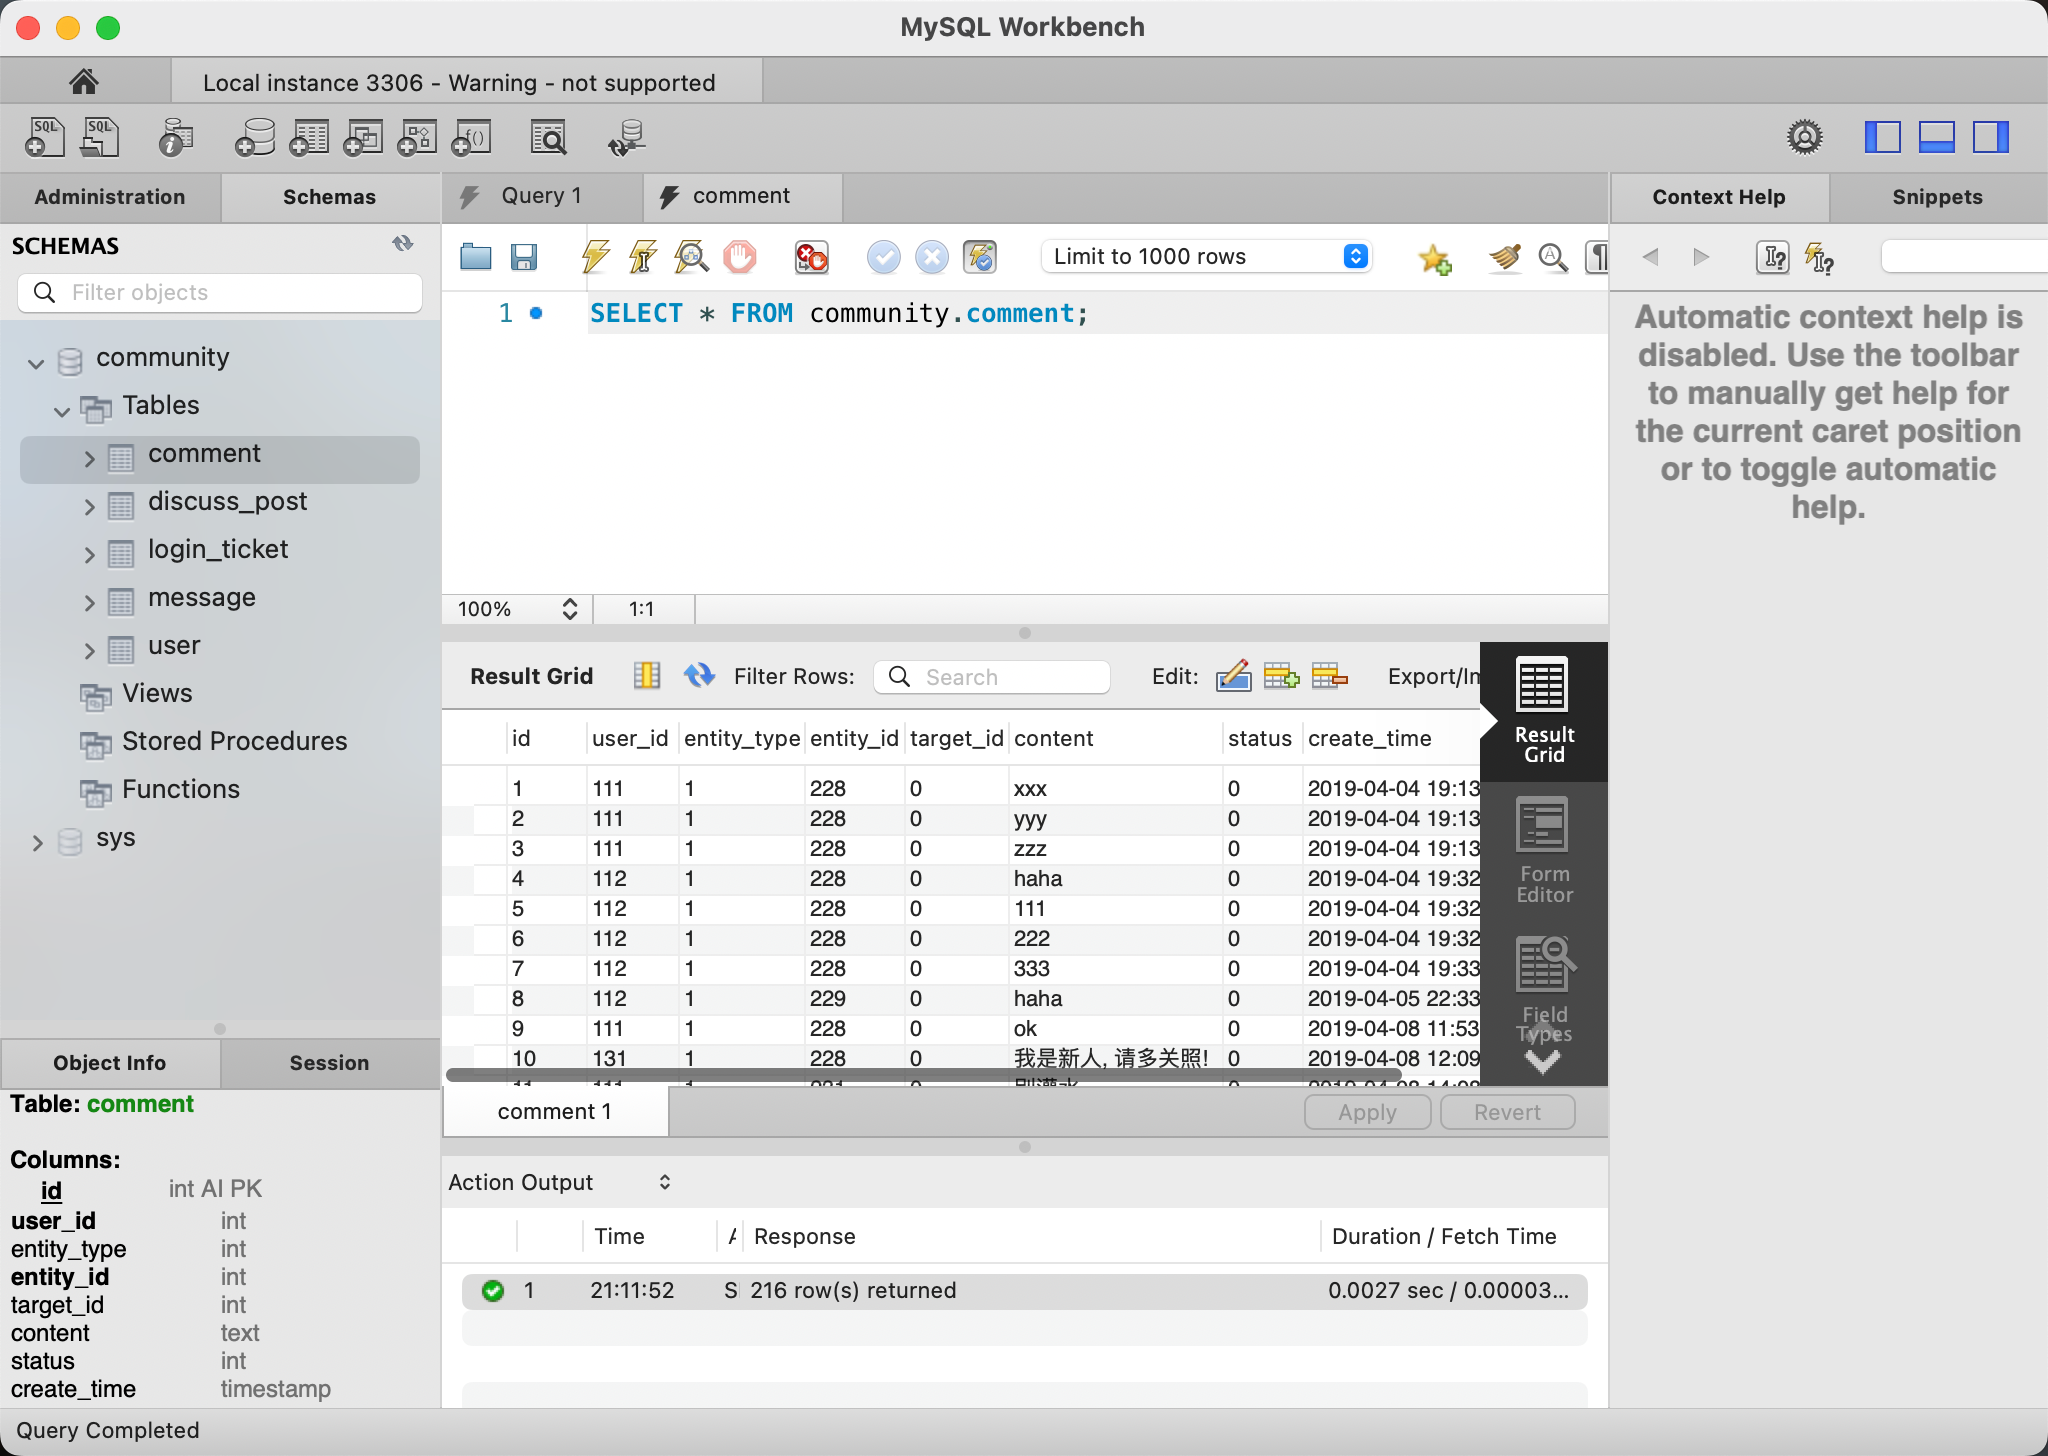
安装MySQL WorkBench客户端
- 之前的命令行不好看,搞个可视化的。
- 安装地址:https://dev.mysql.com/downloads/file/?id=525970
- 界面张这个样子:
MyBatis
- 核心组件
- SqlSessionFactory:用于创建SqlSession的工厂类。(Spring自动)
- SqlSession:MyBatis的核心组件,用于向数据库执行SQL。(Spring自动)
- 主配置文件:XML配置文件,可以对MyBatis的底层行为做出详细的配置。(Spring自动)
- Mapper接口:就是DAO接口,在MyBatis中习惯性的称之为Mapper。
- Mapper映射器:用于编写SQL,并将SQL和实体类映射的组件,采用XML、注解均可实现。
示例:使用MyBatis对user表进行CRUD(增删改查)操作
- 导入MySQL(Maven)
<!-- https://mvnrepository.com/artifact/com.mysql/mysql-connector-j -->
<dependency><groupId>com.mysql</groupId><artifactId>mysql-connector-j</artifactId><version>8.2.0</version>
</dependency>- 导入MyBatis
<!-- https://mvnrepository.com/artifact/org.mybatis.spring.boot/mybatis-spring-boot-starter --><dependency><groupId>org.mybatis.spring.boot</groupId><artifactId>mybatis-spring-boot-starter</artifactId><version>3.0.3</version></dependency>
- 在application.properties中配置mysql:
# DataSourceProperties
spring.datasource.driver-class-name=com.mysql.cj.jdbc.Driver
spring.datasource.url=jdbc:mysql://localhost:3306/community?characterEncoding=utf-8&useSSL=false&serverTimezone=Hongkong
spring.datasource.username=root
spring.datasource.password=lihonghe
spring.datasource.type=com.zaxxer.hikari.HikariDataSource
spring.datasource.hikari.maximum-pool-size=15
spring.datasource.hikari.minimum-idle=5
spring.datasource.hikari.idle-timeout=30000//超时多久才关空闲
- 在application.properties中配置mybatis:
# MybatisProperties
mybatis.mapper-locations=classpath:mapper/*.xml
mybatis.type-aliases-package=com.nowcoder.community.entity
mybatis.configuration.useGeneratedKeys=true//自动生成主键
mybatis.configuration.mapUnderscoreToCamelCase=true//不区分下划线和驼峰,互相匹配
- 创建User的实体类:entity.User:
public class User {private int id;private String username;private String password;private String salt;private String email;private int type;private int status;private String activationCode;private String headerUrl;private java.util.Date createTime;public int getId() {return id;}public void setId(int id) {this.id = id;}public String getUsername() {return username;}public void setUsername(String username) {this.username = username;}public String getPassword() {return password;}public void setPassword(String password) {this.password = password;}public String getSalt() {return salt;}public void setSalt(String salt) {this.salt = salt;}public String getEmail() {return email;}public void setEmail(String email) {this.email = email;}public int getType() {return type;}public void setType(int type) {this.type = type;}public int getStatus() {return status;}public void setStatus(int status) {this.status = status;}public String getActivationCode() {return activationCode;}
- 根据sql表中的属性一一对应;
- 添加getter和setter
- 重写to_string()方法方便打印;
- 创建UserMapper接口:dao.UserMapper
@Mapper
public interface UserMapper {User selectById(int id);User selectByName(String username);User selectByEmail(String email);int insertUser(User user);int updateStatus(int id, int status);int updateHeader(int id, String headerUrl);int updatePassword(int id, String password);}-
只要接口,Mapper会自动生成SQL语句的实现类;
-
使用Mapper注解表明这是一个与Mapper相关的Bean;
- 创建user-mapper.xml的配置文件:resources/mapper/user-mapper.xml
<?xml version="1.0" encoding="UTF-8" ?>
<!DOCTYPE mapperPUBLIC "-//mybatis.org//DTD Mapper 3.0//EN""http://mybatis.org/dtd/mybatis-3-mapper.dtd">
<mapper namespace="com.newcoder.community.dao.UserMapper"><sql id="insertFields">username, password, salt, email, type, status, activation_code, header_url, create_time</sql><sql id="selectFields">id, username, password, salt, email, type, status, activation_code, header_url, create_time</sql><select id="selectById" resultType="User">select<include refid="selectFields"></include>from userwhere id = #{id}</select><select id="selectByName" resultType="User">select<include refid="selectFields"></include>from userwhere username = #{username}</select><select id="selectByEmail" resultType="User">select<include refid="selectFields"></include>from userwhere email = #{email}</select><insert id="insertUser" parameterType="User" keyProperty="id">insert into user (<include refid="insertFields"></include>)values(#{username}, #{password}, #{salt}, #{email}, #{type}, #{status}, #{activationCode}, #{headerUrl},#{createTime})</insert><update id="updateStatus">update userset status = #{status}where id = #{id}</update><update id="updateHeader">update userset header_url = #{headerUrl}where id = #{id}</update><update id="updatePassword">update userset password = #{password}where id = #{id}</update></mapper>
-
namespace注明是为哪个Mapper Bean服务的(全名)
-
各种各样的标签表明增删查改方法;
-
resultType:返回的类型——实体类User;
-
parameterType:传入的参数类型——实体类User
-
keyProperty:主键
-
#{username}:User中要用的值的占位值
-
可以使用标签服用一些字段,使用插入。
- 编写测试类和测试函数:
@RunWith(SpringRunner.class)
@SpringBootTest
@ContextConfiguration(classes = CommunityApplication.class)
public class MapperTests {@Autowiredprivate UserMapper userMapper;@Testpublic void testSelectUser() {User user = userMapper.selectById(101);System.out.println(user);user = userMapper.selectByName("liubei");System.out.println(user);user = userMapper.selectByEmail("nowcoder101@sina.com");System.out.println(user);}@Testpublic void testInsertUser() {User user = new User();user.setUsername("test");user.setPassword("lala");user.setSalt("abc");user.setEmail("adsd@mail.ustc.edu.cn");user.setHeaderUrl("http://www.nowcoder.com/101.png");user.setCreateTime(new java.util.Date());int rows = userMapper.insertUser(user);System.out.println(rows);System.out.println(user.getId());}@Testpublic void testUpdateUser() {int rows = userMapper.updateStatus(150, 1);System.out.println(rows);rows = userMapper.updateHeader(150, "http://www.nowcoder.com/102.png");System.out.println(rows);rows = userMapper.updatePassword(150, "hello");System.out.println(rows);}
}- @Autowired:依赖注入;
- Test: Junit的注解;
- 调试方便,把日志级别定义为DEBUG:applications.properties
# logger
logging.level.com.newcoder.community=debug