【调试笔记-20240525-Windows-配置 QEMU/x86_64 运行 OpenWrt-23.05 发行版并搭建 WordPress 博客网站】
调试笔记-系列文章目录
调试笔记-20240525-Windows-配置 QEMU/x86_64 运行 OpenWrt-23.05 发行版并搭建 WordPress 博客网站
文章目录
- 调试笔记-系列文章目录
- 调试笔记-20240525-Windows-配置 QEMU/x86_64 运行 OpenWrt-23.05 发行版并搭建 WordPress 博客网站
- 前言
- 一、调试环境
- 操作系统:Windows 10 专业版
- 调试环境
- 调试目标
- 二、调试步骤
- 开启 Windows 虚拟化功能 WHPX
- 配置上网功能
- 网络拓扑结构
- 配置 OpenWrt 远程连接
- 配置 LuCI 管理界面
- 安装 nginx Web 服务器
- 安装 PHP8 FPM 服务
- 安装 MariaDB/MySQL 数据库服务
- 安装 WordPress 博客 CMS
- 三、应用场景
- 个人博客站点
- 四、参考资料
- 总结
前言
本文记录在 Windows 环境下使用 QEMU 运行 OpenWrt-23.05 发行版本的方法。
实验使用的电脑如下:
CPU:
Intel Core i5 8265U
操作系统:
Microsoft Windows 10 Professional (x64), Version 22H2, Build 19045.4412
一、调试环境
操作系统:Windows 10 专业版
操作系统详细信息如下:
Microsoft Windows 10 Professional (x64), Version 22H2, Build 19045.4412
调试环境
- Windows 系统已安装 QEMU 并成功运行 OpenWrt 发行版
参考【安装笔记-20240520-Windows-在 QEMU 中尝试运行 OpenWRT】
调试目标
在 Windows/QEMU 中运行 OpenWrt-23.05 发行版本。
说明:按照【调试笔记-20240521-Linux-编译 QEMU/x86_64 可运行的 OpenWrt 固件】编译好 OpenWrt 固件后,我们尝试配置好 QEMU ,使其完整运行 OpenWrt 各项功能,包括:
1、能上网
2、可以访问 OpenWrt 配置界面
3、开启对外的 Web 服务功能
4、提供个人博客功能
5、更多……
二、调试步骤
开启 Windows 虚拟化功能 WHPX
- 在 “启用或关闭 Windows 功能” 中勾选 “Windows 虚拟机监控程序平台"

配置上网功能
网络拓扑结构
- OpenWrt eth0: LAN
- OpenWrt 主机配置为客户设备模式,挂在 QEMU 的 SLIRP 网络中
- OpenWrt 主机 LAN 网卡开启 DHCP-client 模式,自动获取 IP 地址
- QEMU 网络设备的设置中增加 Windows 主机端口转发,将 Windows 主机的 50022 端口转发到 QEMU 访客系统(即 OpenWrt 主机)的 22 端口,从而实现从 Windows 主机通过 SSH 连接访问 OpenWrt 主机系统的功能

接下来我们一步一步实现前述功能需求。
配置 OpenWrt 远程连接
1、设置 QEMU 启动选项,输入以下命令:
..\qemu\8.2.0\qemu-system-x86_64.exe -L "D:\qkd-app\vmos\data" -cpu "Penryn,vendor=GenuineIntel,+ssse3,+sse4.2" -M "q35,accel=whpx,kernel-irqchip=off" -m 4G -bios "data\ovmf.fd" -netdev "user,id=hn0,hostfwd=tcp::50022-:22" -device "e1000,netdev=hn0,id=nic1" -debugcon "file:debug.log" -global "isa-debugcon.iobase=0x402" -hda openwrt-23.05.3-x86-64-generic-ext4-combined-efi.img
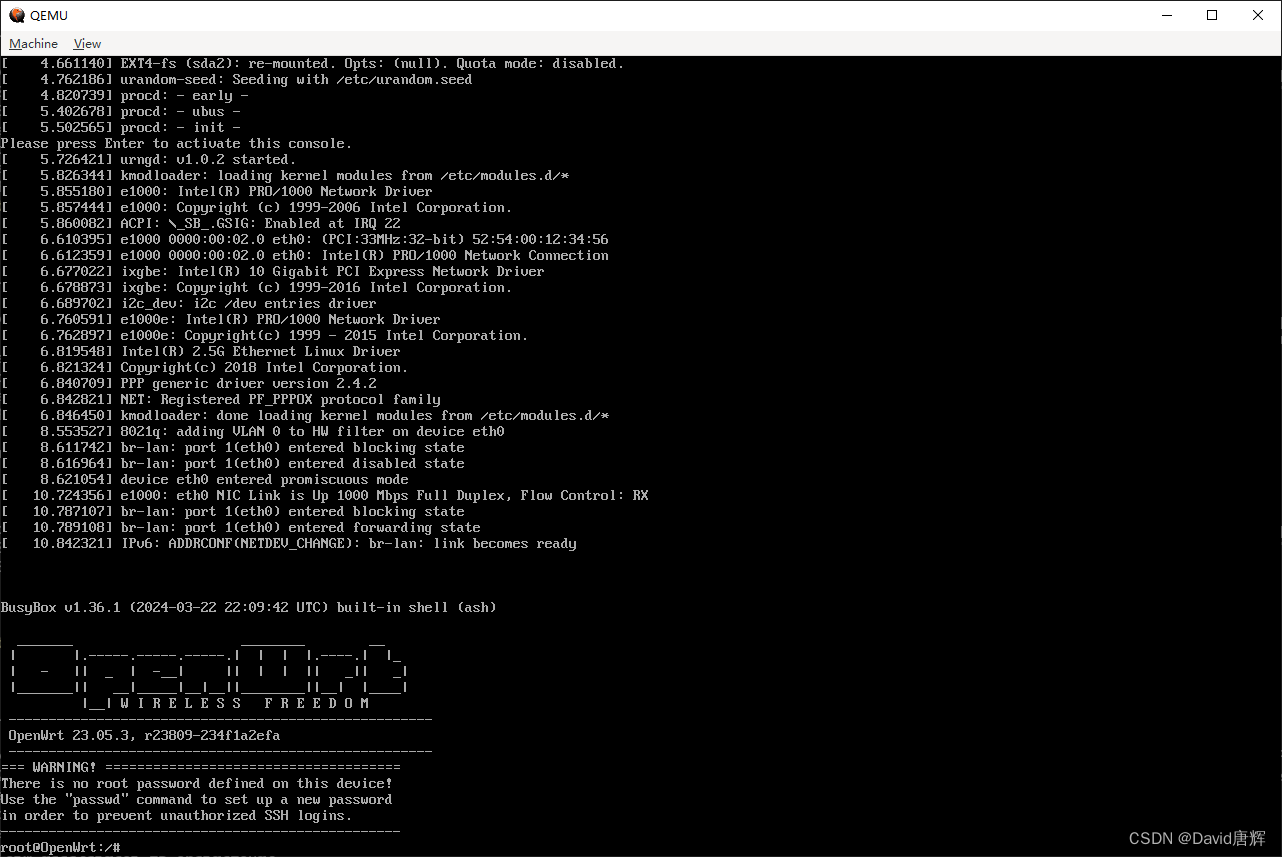
2、配置 OpenWrt 主机为客户设备模式,并开启 DHCP-client 功能
在 OpenWrt 主机终端输入以下命令:
uci set network.lan.proto="dhcp"
uci commit network
service network restart
然后,输入以下命令检查 OpenWrt 主机是否正确获取到 QEMU SiLRP 网络 DHCP 服务器分配的 IP 地址
ip addr
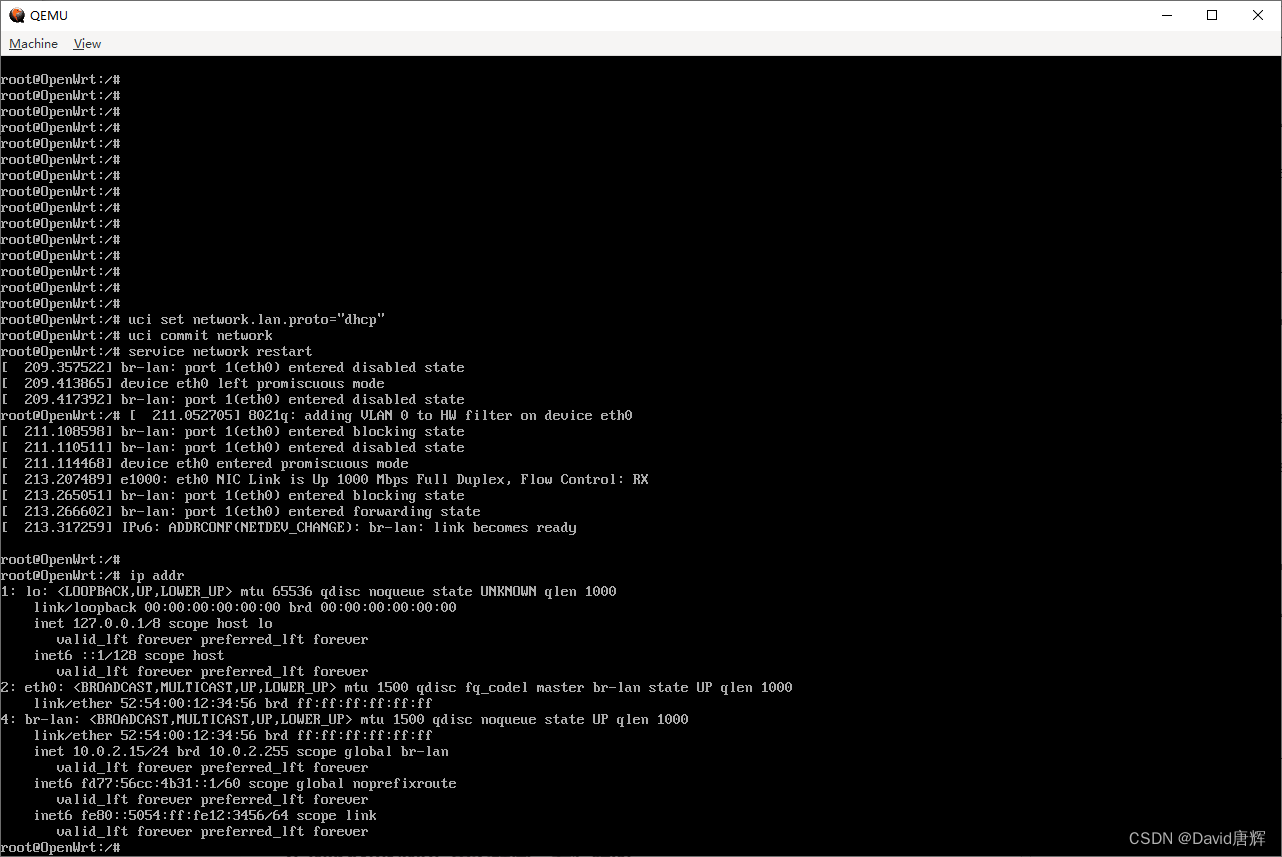
从上图可见,OpenWrt 主机已经成功获得 10.0.2.15 的 IP 地址
3、从 Windows 主机通过 SSH 连接 OpenWrt 访客主机
主机:localhost
端口:50022

成功登录 OpenWrt 主机后,界面如下:

4、测试网络联通性
在 PuTTY 窗口输入以下命令:
ping www.baidu.com
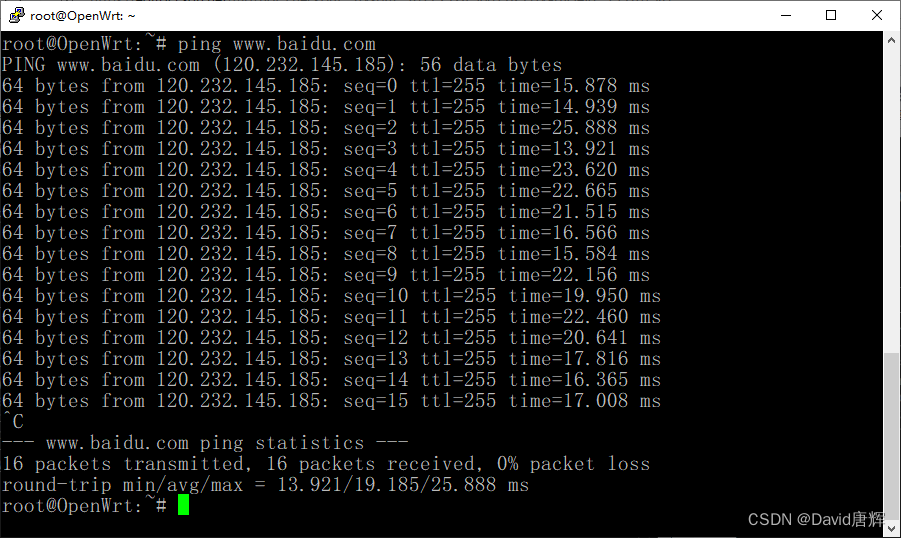
上图可见,OpenWrt 访客主机能访问到 www.baidu.com ,网络通畅。
配置 LuCI 管理界面
5、修改管理页面 uhttpd 服务器的监听端口,输入以下命令:
uci set uhttpd.main.listen_http='0.0.0.0:50080'
uci add_list uhttpd.main.listen_http='[::]:50080'
uci set uhttpd.main.listen_https='0.0.0.0:50443'
uci add_list uhttpd.main.listen_https='[::]:50443'
uci commit uhttpd
/etc/init.d/uhttpd restart
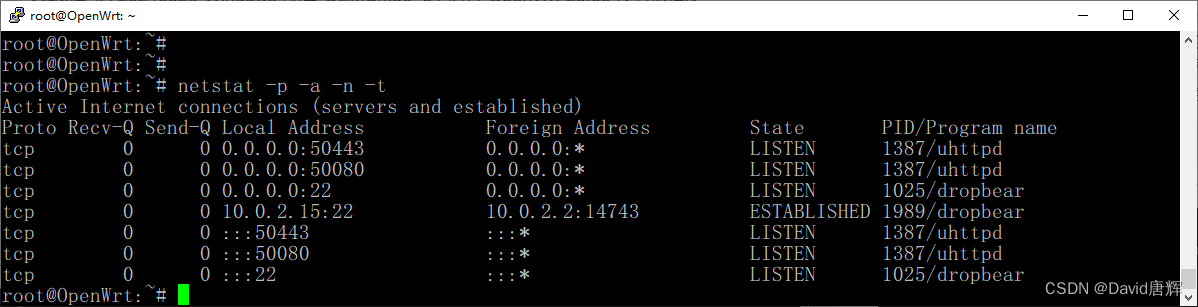
完成后,使用 netstat 命令确认是否修改成功
netstat -a -n -t
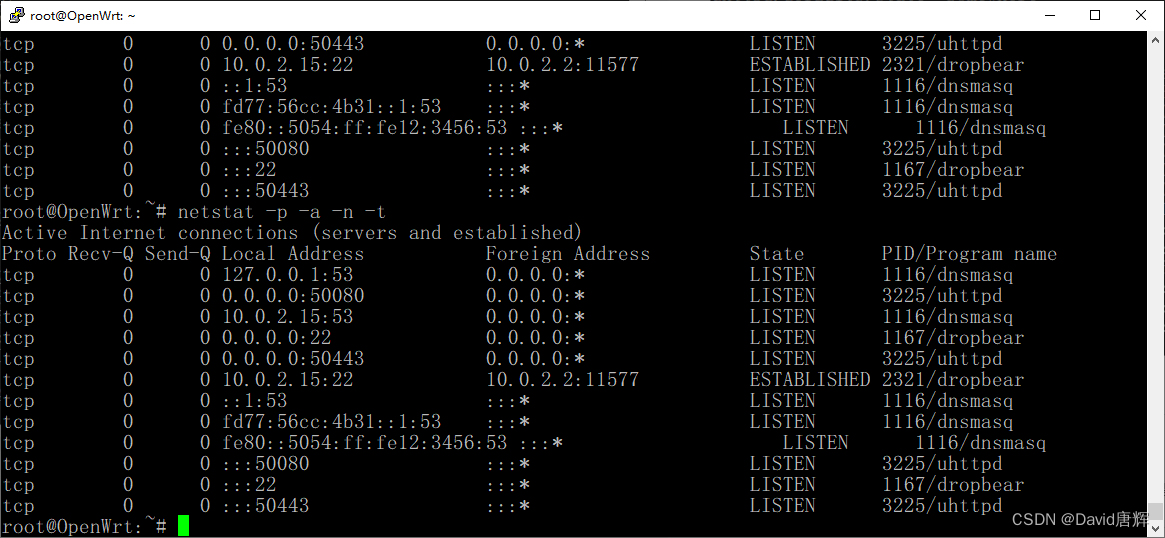
上图可见,已经将 uhttpd 的监听端口修改到 50080 和 50443 了。
6、删除 dnsmasq 包
观察到 OpenWrt 主机的 53 端口有 dnsmasq 进程在监听,此进程提供 DHCP 和 DNS 服务,本例中我们不需要提供这两项服务,执行以下命令删除 dnsmasq 包:
opkg remove dnsmasq
重启 OpenWrt 主机后,输入以下命令确认是否删除并停止了 DHCP 和 DNS 服务:
netstat -p -a -n -t
安装 nginx Web 服务器
7、安装 nginx HTTP 服务器,执行以下命令:
opkg update
opkg install nginx-full
默认 nginx 配置给 OpenWrt 的 LuCI 使用。
因此,我们需要关闭此设置,并设置新的站点,执行以下命令:
uci set nginx.global.uci_enable=false
uci commit
接下来我们为 nginx 创建一个 example.com 的网站,执行以下命令:
uci add nginx server
uci rename nginx.@server[-1]=example_com
uci add_list nginx.example_com.listen='80'
uci add_list nginx.example_com.listen='[::]:80'
uci set nginx.example_com.server_name='example.com'
uci set nginx.example_com.client_header_timeout='10s'
uci add_list nginx.example_com.include='conf.d/example.com.locations'
先设置此站点不可用,执行以下命令:
uci set nginx.example_com=disable
uci commit nginx
创建站点配置文件 /etc/nginx/conf.d/example.com.locations ,内容如下:
location /srv/www {access_log off; # default: not logging accesses.# access_log /proc/self/fd/1 openwrt; # use logd (init forwards stdout).# error_log stderr; # default: logging to logd (init forwards stderr).error_log /dev/null; # disable error logging after config file is read.# (state path of a file for access_log/error_log to the file instead.)index index.html;
}
将配置给 LuCI 的站点设置为不可用,执行以下命令:
uci set nginx._lan=disable
uci set nginx._redirect2ssl=disable
uci commit nginx
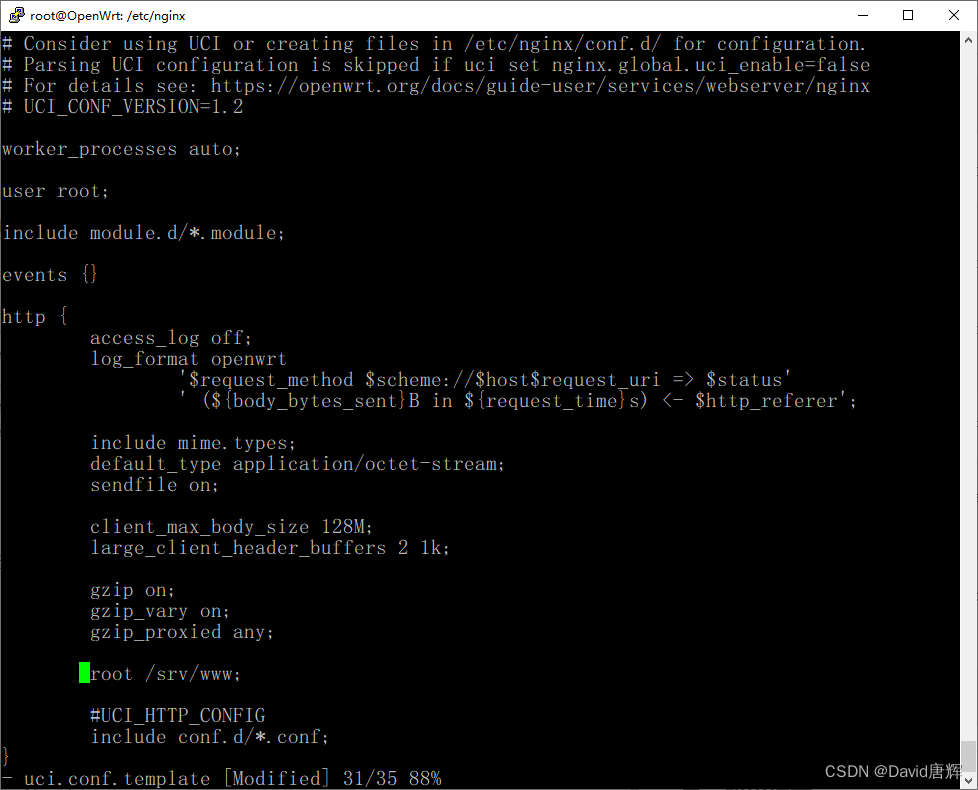
修改 nginx 的 uci 模板文件 /etc/nginx/uci.conf.template ,将 root 设置为 /srv/www ,文件内容如下:
# Consider using UCI or creating files in /etc/nginx/conf.d/ for configuration.
# Parsing UCI configuration is skipped if uci set nginx.global.uci_enable=false
# For details see: https://openwrt.org/docs/guide-user/services/webserver/nginx
# UCI_CONF_VERSION=1.2worker_processes auto;user root;include module.d/*.module;events {}http {access_log off;log_format openwrt'$request_method $scheme://$host$request_uri => $status'' (${body_bytes_sent}B in ${request_time}s) <- $http_referer';include mime.types;default_type application/octet-stream;sendfile on;client_max_body_size 128M;large_client_header_buffers 2 1k;gzip on;gzip_vary on;gzip_proxied any;root /srv/www;#UCI_HTTP_CONFIGinclude conf.d/*.conf;
}
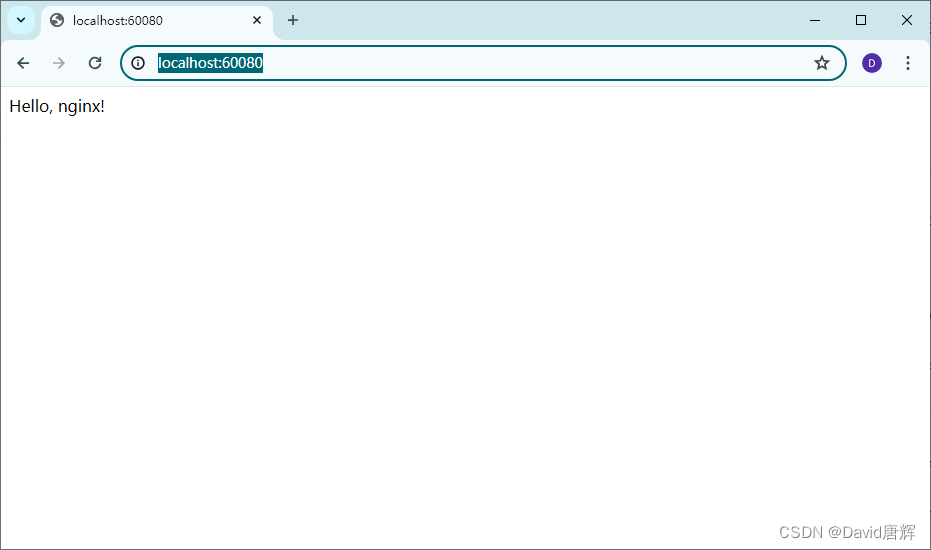
创建 HTTP 服务器测试文件,输入以下命令:
mkdir -p /srv/www
echo "<html><head><title>test</title></head><body>Hello, nginx!</body></html>" | tee /srv/www/index.html
设置 example.com 站点为可用,执行以下命令:
uci set nginx.example_com=server
uci commit nginx
重启 nginx 服务,执行以下命令:
service nginx restart
通过 Windows 主机的浏览器访问目标地址 localhost:60080 ,此处需注意,在 QEMU 启动参数中需要添加端口转发设置,将 Windows 主机的 60080 端口转发到 OpenWrt 访客机器的 80 端口,设置如下:
-netdev "user,id=hn0,hostfwd=tcp::50022-:22,hostfwd=tcp::50080-:50080,hostfwd=tcp::50443-:50443,hostfwd=tcp::60080-:80,hostfwd=tcp::60443-:443"
为 example.com 站点配置 SSL,执行以下命令:
uci del_list nginx.example_com.listen='80'
uci del_list nginx.example_com.listen='[::]:80'
uci add_list nginx.example_com.listen='443 ssl'
uci add_list nginx.example_com.listen='[::]:443 ssl'
uci set nginx.example_com.ssl_certificate='/etc/nginx/conf.d/example.com.crt'
uci set nginx.example_com.ssl_certificate_key='/etc/nginx/conf.d/example.com.key'
uci set nginx.example_com.ssl_session_cache='shared:SSL:32k'
uci set nginx.example_com.ssl_session_timeout='64m'
uci commit nginx
添加自签名证书,执行以下命令:
nginx-util add_ssl example.com
重启 nginx 服务,执行以下命令:
service nginx restart
通过 Windows 主机的浏览器访问目标地址 localhost:60443 ,此处需注意,在 QEMU 启动参数中需要添加端口转发设置,将 Windows 主机的 60443 端口转发到 OpenWrt 访客机器的 443 端口,设置如下:
-netdev "user,id=hn0,hostfwd=tcp::50022-:22,hostfwd=tcp::50080-:50080,hostfwd=tcp::50443-:50443,hostfwd=tcp::60080-:80,hostfwd=tcp::60443-:443"
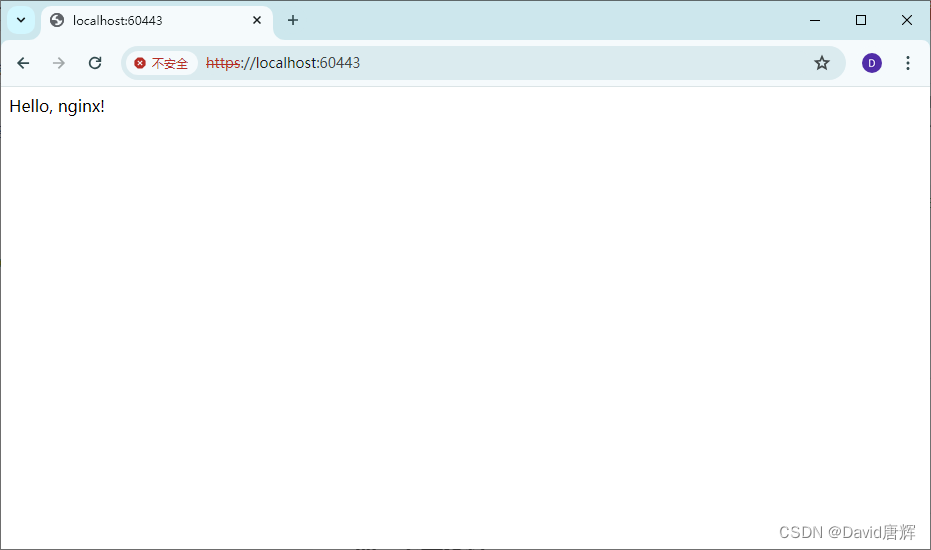
至此,nginx HTTP 服务器配置完成。
安装 PHP8 FPM 服务
8、安装 PHP8 FPM,执行以下命令:
opkg update
opkg install php8-fpm
在 nginx 配置目录中添加配置文件 /etc/nginx/conf.d/php8.locations ,内容如下:
location ~ [^/]\.php(/|$) {fastcgi_split_path_info ^(.+?\.php)(/.*)$;if (!-f $document_root$fastcgi_script_name) {return 404;}# Mitigate https://httpoxy.org/ vulnerabilitiesfastcgi_param HTTP_PROXY "";#error_log /dev/null;fastcgi_connect_timeout 300s;fastcgi_read_timeout 300s;fastcgi_send_timeout 300s;fastcgi_buffer_size 32k;fastcgi_buffers 4 32k;fastcgi_busy_buffers_size 32k;fastcgi_temp_file_write_size 32k;client_body_timeout 10s;send_timeout 60s; # default, increase if experiencing a lot of timeouts.output_buffers 1 32k;fastcgi_index index.php;fastcgi_pass unix:/var/run/php8-fpm.sock;# include the fastcgi_param settinginclude fastcgi_params;# SCRIPT_FILENAME parameter is used for PHP FPM determining#  the script name. If it is not set in fastcgi_params file,# i.e. /etc/nginx/fastcgi_params or in the parent contexts,# please comment off following line:fastcgi_param  SCRIPT_FILENAME    $document_root$fastcgi_script_name;fastcgi_param  PATH_INFO          $fastcgi_path_info;fastcgi_param  PATH_TRANSLATED    $document_root$fastcgi_path_info;
}
同步修改 /etc/php.ini 文件中的以下配置项:
doc_root = "/srv/www"
cgi.force_redirect = 1
cgi.redirect_status_env = "yes"
创建 PHP 测试文件,输入以下命令:
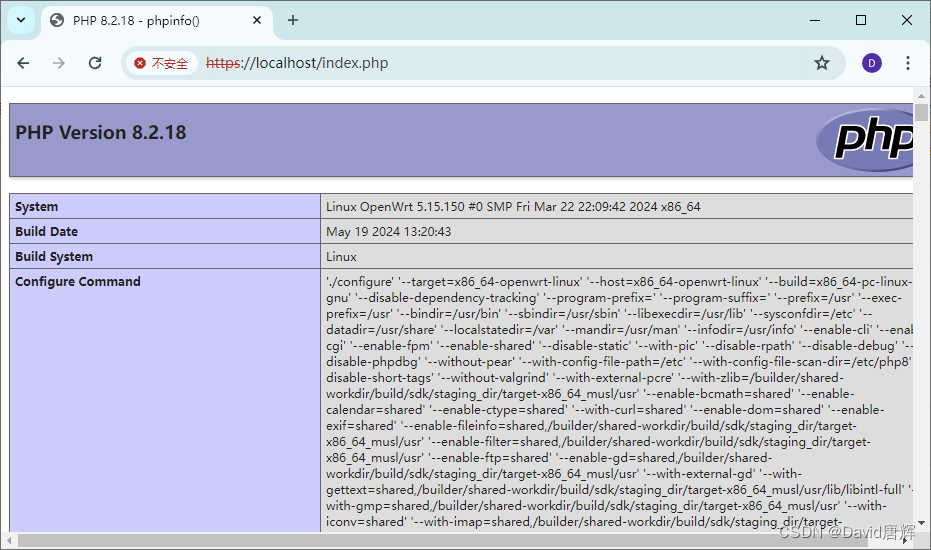
echo "<?php phpinfo(); ?>" | tee /srv/www/index.php
配置成功,显示如下界面:
安装 MariaDB/MySQL 数据库服务
9、安装 MariaDB/MySQL 服务器
opkg install mariadb-server mariadb-server-extra mariadb-client
opkg install coreutils-stty
修改配置文件 /etc/mysql/conf.d/50-server.conf ,确认以下设置:
datadir         = /srv/mysql
tmpdir          = /tmp
创建数据目录,执行以下命令:
mkdir -p /srv/mysql
mysql_install_db --force
chown mariadb.mariadb -R /srv/mysql/
启动 MariaDB,执行以下命令:
uci set mysqld.general.enabled='1'
uci commitservice mysqld restart
检查 MariaDB 的运行状态,执行以下命令:
/etc/init.d/mysqld status
创建 MariaDB 数据库,执行以下命令,并按要求回答:
/usr/bin/mysql_secure_installation -u root
测试数据库连接,执行一下命令:
mysql -u root
在 mysql 客户端输入:
SHOW DATABASES;

支持 MariaDB 数据库服务器安装配置好了。
安装 WordPress 博客 CMS
10、安装 WordPress 博客 CMS,当前版本为 6.5.3
下载最新版本 WordPress,下载地址:
https://cn.wordpress.org/latest-zh_CN.zip
在 OpenWrt 的控制台执行以下命令:
wget https://cn.wordpress.org/latest-zh_CN.zip
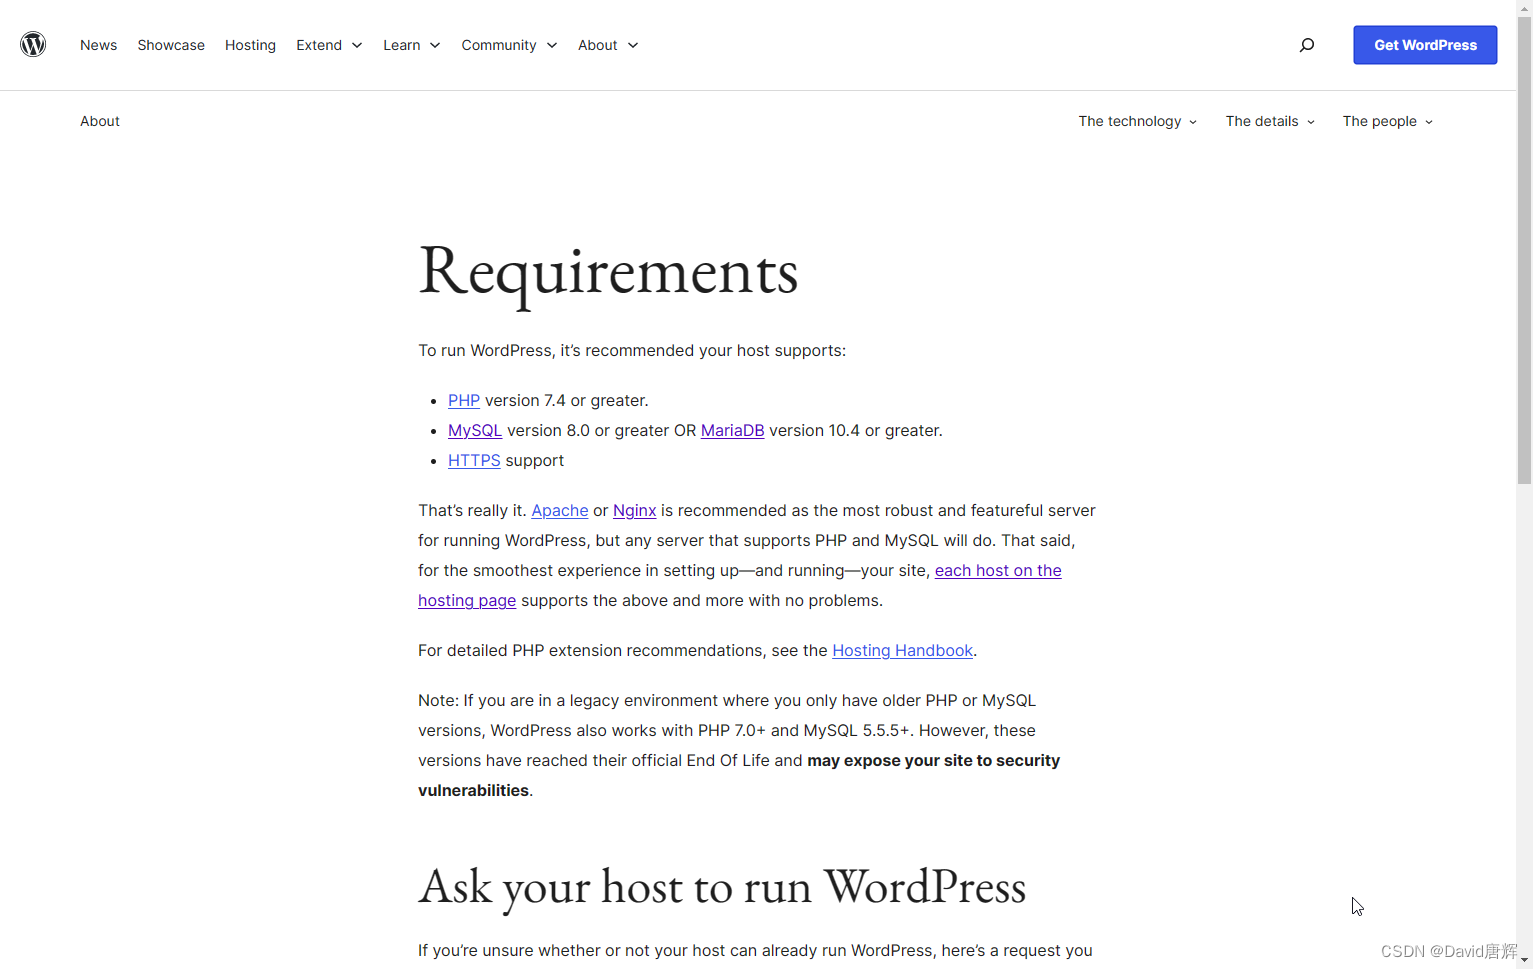
WP 6.5.3 的安装要求如下:
解压安装文件,并放到 Web 服务器工作目录中,执行以下命令:
unzip latest-zh_CN.zip
mv wordpress /srv/www/blog
安装 PHP MySQL Improved Extension 模块
opkg update
opkg install php8-mod-mysqli
创建 WP 需要的数据库
mysql -u root
创建 WP 专用数据库,在 MariaDB 的客户终端输入以下命令:
create database wordpress;
创建 WP 专用数据库用户,在 MariaDB 的客户终端输入以下命令:
create user wordpress;
给 WP 数据库用户的赋予该数据库的所有权限,在 MariaDB 的客户终端输入以下命令:
grant all privileges on wordpress.* to 'wordpress' identified by 'wordpress123';
配置好后,在 Windows 主机浏览器中输入网址:
https://localhost/blog/index.php
出现 WP 的安装页面,根据前边的数据库配置填入相应信息:
数据库:wordpress
用户:wordpress
密码:wordpress123
主机:127.0.0.1
需要注意,主机用 “127.0.0.1” 而不是 “localhost”,因为默认 MariaDB 监听端口在 “127.0.0.1:3306”,由于 OpenWrt 主机配置了 IPv4 和 IPv6 地址,当解析 localhost 时,首先解析到 ::1 的 IPv6 地址,这样导致如果主机输入 localhost ,WordPress 首先到 “::1” 的 IPv6 地址端口 “3306” 访问。
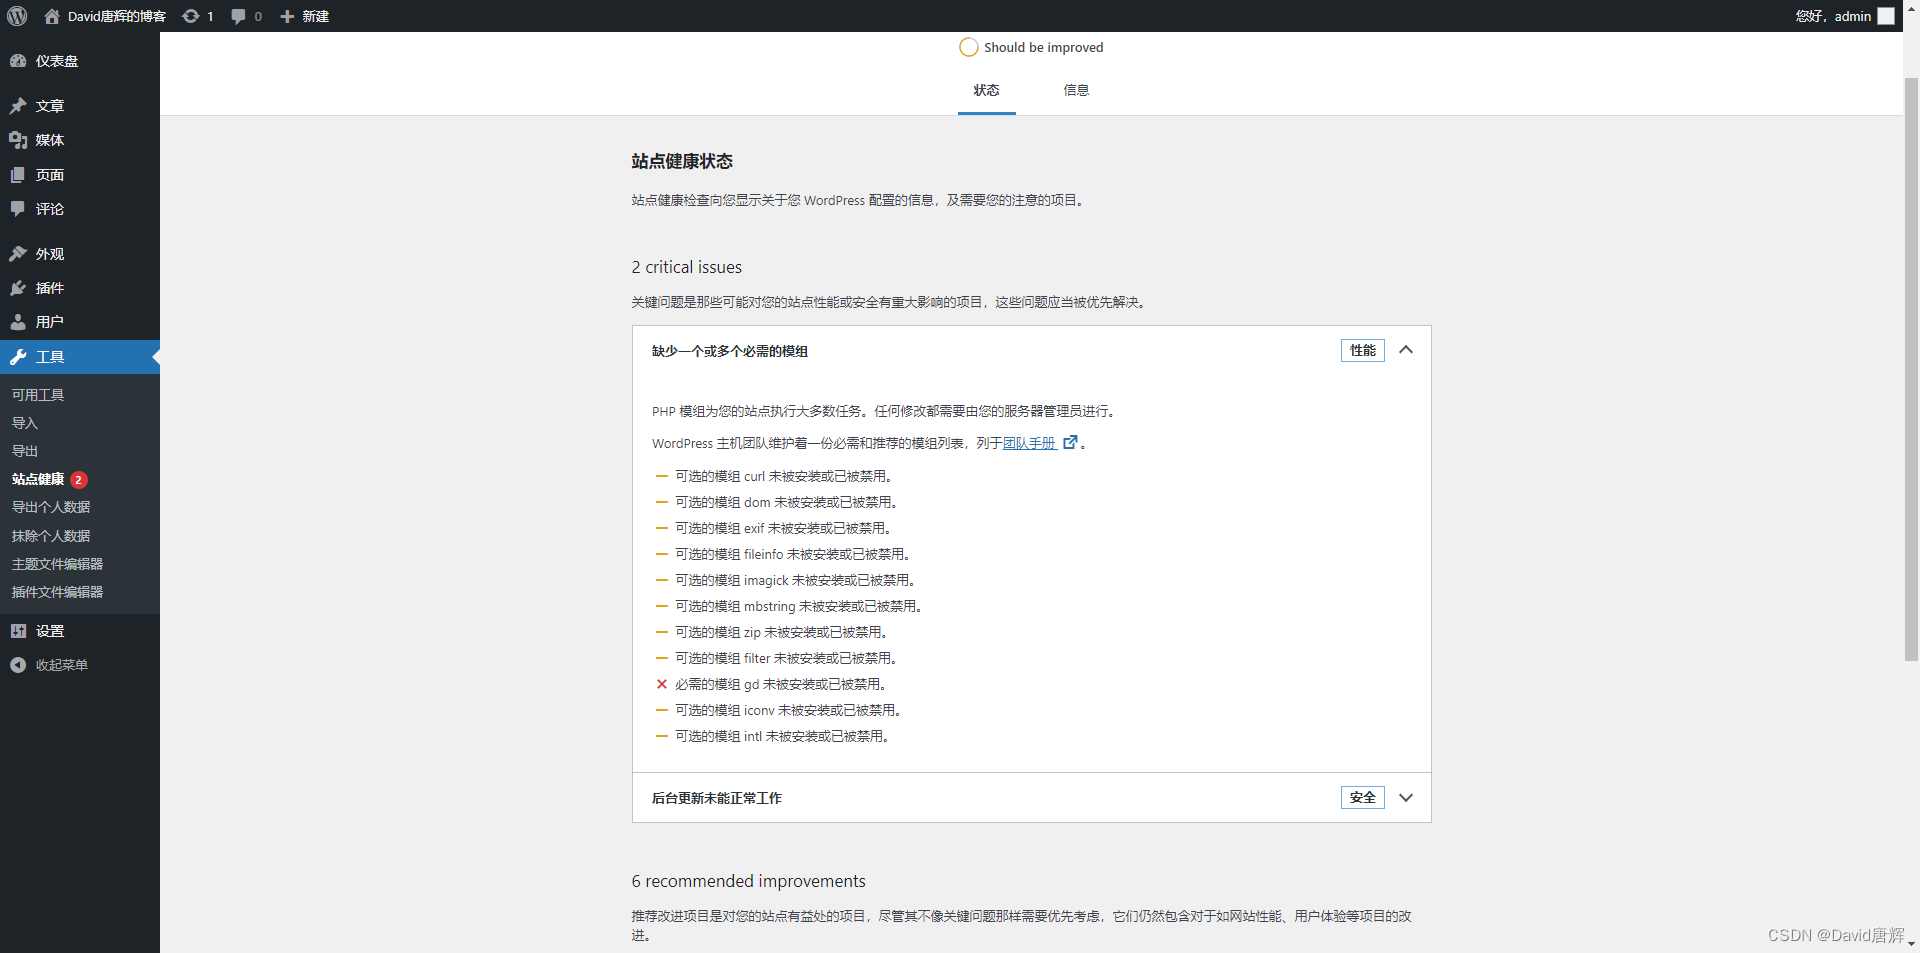
站点健康检查,如下图:
安装需要的模块,执行以下命令:
opkg update
opkg install php8-mod-gd
opkg install php8-mod-curl
opkg install php8-mod-exif
opkg install php8-mod-fileinfo
opkg install php8-mod-mbstring
opkg install php8-mod-zip
opkg install php8-mod-filter
opkg install php8-mod-iconv
opkg install php8-mod-intl
opkg install php8-pecl-imagick
service php8-fpm restart
解决读写权限问题,执行以下命令:
chown nobody.nogroup /srv/www/blog/ -R
解决 “XML or PCRE extensions not loaded!” 的问题,执行以下命令:
opkg update
opkg install php8-mod-xml
opkg install php8-mod-xmlreader
opkg install php8-mod-xmlwriter
修改 example.com.locations , 解决 REST API 和 伪静态页面问题
location / {access_log off; # default: not logging accesses.# access_log /var/run/nginx_access_log;# access_log /proc/self/fd/1 openwrt; # use logd (init forwards stdout).# error_log stderr; # default: logging to logd (init forwards stderr).error_log /dev/null; # disable error logging after config file is read.# error_log /var/run/nginx_error_log;# (state path of a file for access_log/error_log to the file instead.)index index.html index.htm index.php;try_files $uri $uri/ /index.php$is_args$args;location /blog/ {try_files $uri $uri/ /blog/index.php?$args;rewrite /wp-admin$ $scheme://$host$uri/ permanent;}
}
安装 WP Fastest Cache 插件,解决没有缓存问题。
检查站点健康状态:
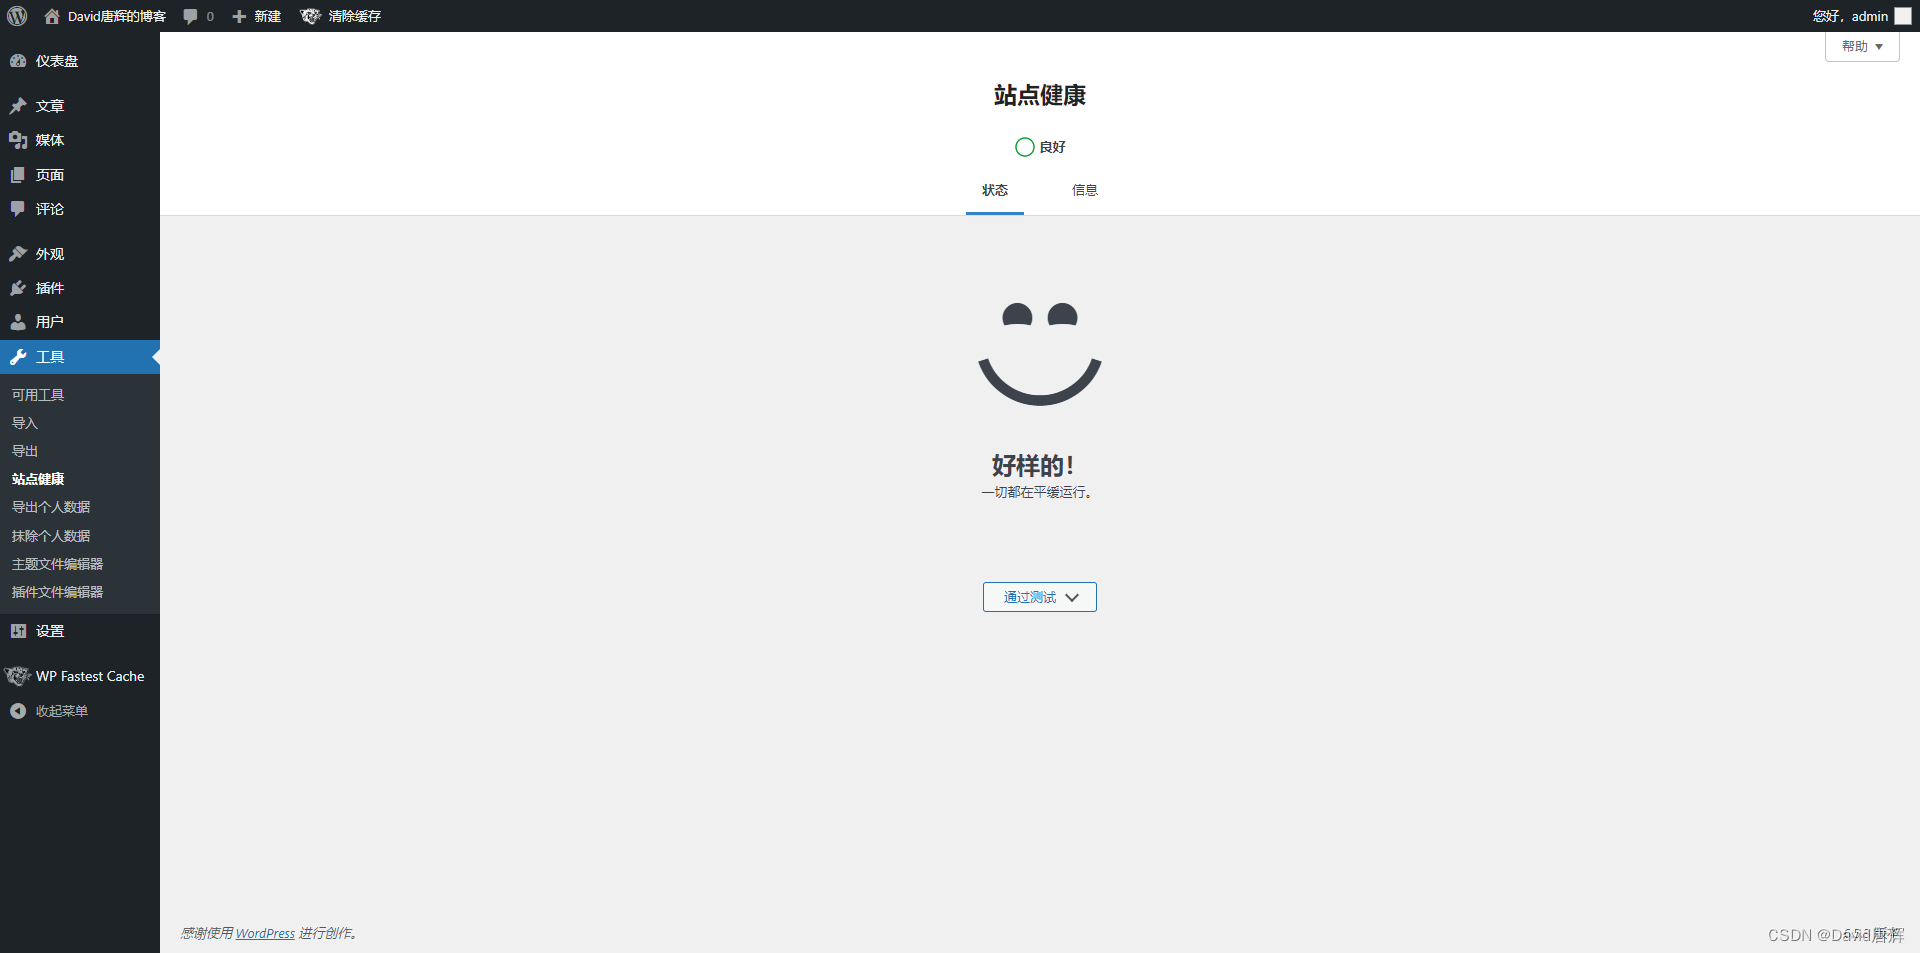
至此,用 WordPress 搭建的个人博客网站已经准备就绪。
三、应用场景
个人博客站点

四、参考资料
1、WSL 的基本命令
2、旧版 WSL 的手动安装步骤
3、Windows 虚拟机监控程序平台
4、Windows Hypervisor Platform API Definitions
5、Windows Hypervisor Platform Instruction Emulator API Definitions and Support DLLs
6、QEMU Documentation/Networking
7、OpenWrt on x86 hardware (PC / VM / server)
8、The UCI system
9、Set up a LAMP webserver stack
10、ownCloud or NextCloud
总结
本文记录在 Windows 环境下用 QEMU 运行 OpenWrt 并安装配置 LNMP 服务器和 WordPress 博客 CMS 的方法,并指出过程中遇到的问题及解决方法。