bind编译安装及压力测试
编译安装
1、环境准备
# yum groupinstall "Development Tools"
2、下载及解压
# wget -q ftp://172.16.0.1/pub/Sources/sources/bind/bind-9.9.5.tar.gz
# tar -xf bind-9.9.5.tar.gz
3、检查并准备编译环境
# cd bind-9.9.5
# ./configure --prefix=/usr/local/bind9 --sysconfdir=/etc/named/ --enable-threads --enable-epoll --disable-chroot
#             程序安装路径                  配置文件路径             开启多线程          多路复用IO      不使用chroot
checking for OpenSSL library... configure: error: OpenSSL was not found in any of /usr /usr/local /usr/local/ssl /usr/pkg /usr/sfw; use --with-openssl=/path
If you don't want OpenSSL, use --without-openssl
# 缺少openssl 库,一般来讲编译环境缺少的都会是开发包,安装openssl开发包
# yum -y install openssl-devel
...
Complete! # openssl-devel安装完成
# 重新检查编译环境
# ./configure --prefix=/usr/local/bind9 --sysconfdir=/etc/named/ --enable-threads --enable-epoll --disable-chroot
4、编译
# make
5、安装
# make install
6、编辑配置文件
# vim /etc/named/named.con
# 写入下面的内容
options {
        directory "/var/named";
        pid-file "/usr/local/bind9/var/run/named.pid";
};
zone "." IN {
        type hint;
        file "named.ca";
};
zone "localhost" IN {
        type master;
        file "named.localhost";
        allow-transfer { none; };
};
zone "0.0.127.in-addr.arpa" IN {
        type master;
        file "named.loopback";
        allow-transfer { none; };
};
7、编辑数据文件
# mkdir /var/named
# dig -t NS . @172.16.0.1 > /var/named/named.ca
# vim /var/named/named.localhost
# 写入下面内容
$TTL 86400
@ IN SOA localhost. admin.localhost. (
                20140317
                2H
                10M
                7D
                1D
                )
       IN   NS  localhost.
localhost. IN A 127.0.0.1

# vim /var/named/named.loopback
# 写入下面的内容
$TTL 86400
@ IN SOA localhost. admin.localhost. (
                20140317
                2H
                10M
                7D
                1D
                )
        IN   NS    localhost.
1       IN   PTR   localhost.
8、设置运行环境
# groupadd -g 53 -r named
# useradd -g named -r named
# chown root:named /etc/named/named.conf  /var/named/*
# chmod 640 /etc/named/named.conf /var/named/*
9、导出环境变量
# PATH环境变量
# echo 'export PATH=/usr/local/bind9/bin:/usr/local/bind9/sbin:$PATH' > /etc/profile.d/named.sh
# source /etc/profile.d/named.sh
# 头文件
# ln -sv /usr/local/bind9/include  /usr/include/named
# 库文件
# vim /etc/ld.so.d/named.conf
    /usr/local/bind9/lib64
# man文档
# man -M /usr/local/bind9/share/man named
# 或者
# vim /etc/man.config
    MANPATH /usr/local/bind9/share/man
10、试启动
# named -u named
# 以named用户运行程序
# 查看监听端口
# ss -tnul
# 查看日志
# tail /var/log/messages
11、配置rndc(远程管理工具,很显然需要密钥)。
# 生成密钥
# rndc-confgen -r /dev/urandom > /etc/named/rndc.conf
# 改变密钥文件属性
# chown root:named /etc/named/rndc.conf
# chmod 640 /etc/named/rndc.conf # 其他用户没有任何权限
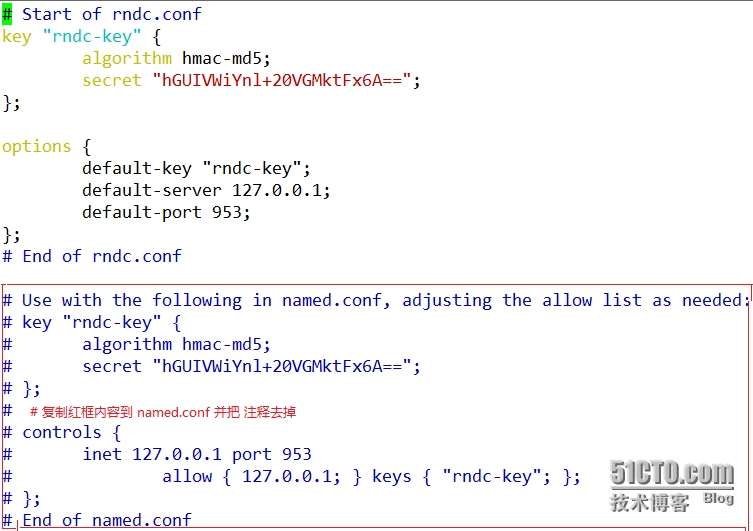
12、打开rndc.conf按要求操作。
# vim /etc/named/rndc.conf

# vim /etc/named.conf
13、重启服务,并测试rndc(本地测试)
# killall named
# named -u named
# rndc status
version: 9.9.5 <id:f9b8a50e>
CPUs found: 2
worker threads: 2
UDP listeners per interface: 2
number of zones: 100
debug level: 0
xfers running: 0
xfers deferred: 0
soa queries in progress: 0
query logging is OFF
recursive clients: 0/0/1000
tcp clients: 0/100
server is up and running
14、编辑服务配置脚本。
# vim /etc/init.d/named
# 写入脚本
#!/bin/bash
# description: daemon named
# chkconfig: 345 20 50
#
pidFile=/usr/local/bind9/var/run/named.pid
lockFile=/var/lock/subsys/named
confFile=/etc/named/named.conf
[ -r /etc/rc.d/init.d/functions ] && . /etc/rc.d/init.d/functions
start() {
        if [ -e $lockFile ]; then
                echo "named is already running..."
        else
                echo -n "Starting named:"
                daemon --pidfile "$pidFile" /usr/local/bind9/sbin/named -u named -c "$confFile"
                RETVAL=$?
                if [ $RETVAL -eq 0 ]; then
                        touch $lockFile
                        success
                else
                        rm -f $lockFile $pidFile
                        failure
                fi
                echo
        fi
}
stop() {
        if [ ! -e $lockFile ]; then
                echo "named is stopped."
        else
                echo -n "Stopping named:"
                killproc named
                RETVAL=$?
                if [ $RETVAL -eq 0 ];then
                        rm -f $lockFile $pidFile
                        success
                else
                        echo "Cannot stop named."
                        failure
                fi
                echo
        fi
}
restart() {
        stop
        sleep 2
        start
}
reload() {
        echo -n "Reloading named: "
        killproc named -HUP
        echo
}
status() {
        if pidof named &> /dev/null; then
                echo -n "named is running..."
        else
                echo -n "named is stopped..."
        fi
        echo
}
usage() {
        echo "Usage: named {start|stop|restart|status|reload}"
}
case $1 in
start)
        start ;;
stop)
        stop ;;
restart)
        restart ;;
status)
        status ;;
reload)
        reload ;;
*)
        usage
            ;;
esac
15、将脚本添加到服务中去并启动。
# chmod +x /etc/init.d/named # 给脚本增加执行权限
# chkconfig --add /etc/init.d/named
# chkconfig --list named
named           0:off   1:off   2:off   3:on    4:on    5:on    6:off
# service named start
Starting named:                                            [  OK  ]
# ss -tnul | grep ":53"
压力测试
转载于:https://blog.51cto.com/suninger/1379407

