Spring基础
1 Spring
1.1 spring优点
- spring是一个开源的免费框架
- spring是一个轻量级、非入侵式的框架
- 控制反转(IOC),面向切面
- 支持事务的处理,对框架整合的支持!
总结一句话:Spring是一个轻量级的控制反转(IOC)和面向切面变成(AOP)的框架!!
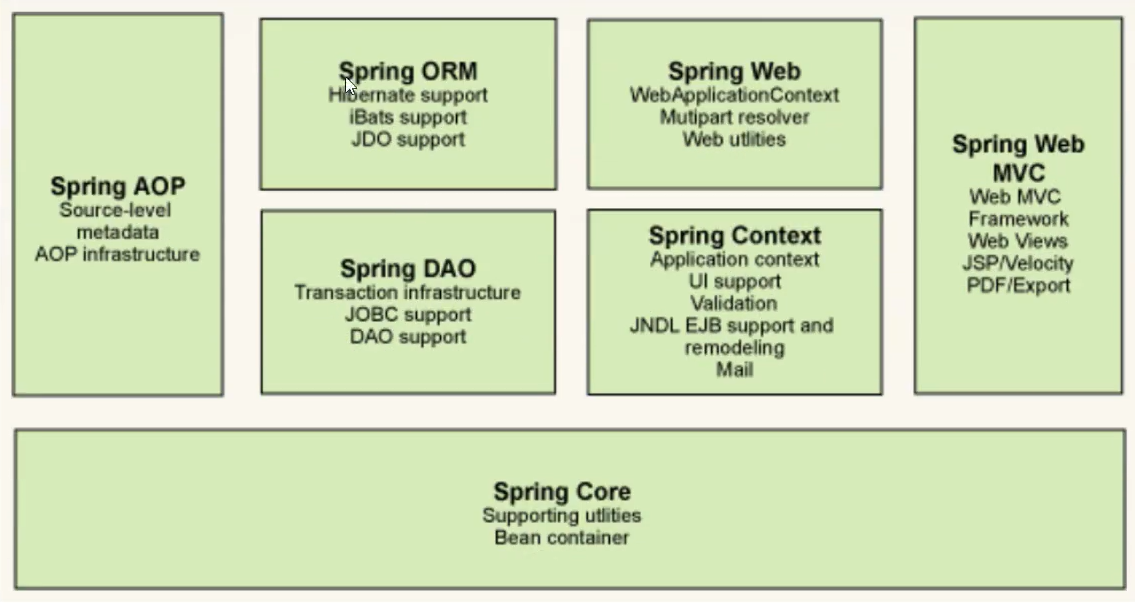
1.2 spring组成
1.3 拓展
在spring的官网有这个介绍,现代化java开发,说白了就是基于spring开发

springboot
- 是一个快速开发的脚手架,
- 基于springboot可以快速开发单个微服务
- 约定大于配置
springcloud
- 基于springboot实现
现在大多数公司都在使用springboot进行快速开发使用,学习springboot的前提是完全掌握spring和springmvc!
spring起到承上启下的作用!!
弊端:spring发展太久之后违背了原来的理念,配置十分繁琐,人称"配置地狱"!!!!
2 IOC理论推导
使用spring之前
-
userDao接口
package com.wshy.Dao; /** * @author wshy * @data 2021/7/31 **/ public interface UserDao { void getUser(); } -
userDaoImpl实现类
package com.wshy.Dao; /** * * @title: UserDaoImpl * @Author: wshy */ public class UserDaoImpl implements UserDao { @Override public void getUser () { System.out.println ("默认获取用户的数据"); } } -
userService业务接口
package com.wshy.Service; /** * @author wshy * @data 2021/7/31 **/ public interface UserService { void getUser(); } -
userServiceImpl业务实现类
package com.wshy.Service;
import com.wshy.Dao.UserDao;
import com.wshy.Dao.UserDaoImpl;

/**
 *
 * @title: UserServiceImpl
 * @Author: wshy
 */
public class UserServiceImpl implements UserService{

    private UserDao userDao = new UserDaoImpl ();

    @Override
    public void getUser () {
        userDao.getUser ();
    }
}
5.测试类
import com.wshy.Service.UserService;
import com.wshy.Service.UserServiceImpl;

/**
 *
 * @title: MyTest
 * @Author: wshy
 */
public class MyTest {
    public static void main (String[] args) {

        // 用户实际调用的是业务层,Dao层并不接触
        UserService userService = new UserServiceImpl ();
        userService.getUser ();
    }
}
6.结果打印

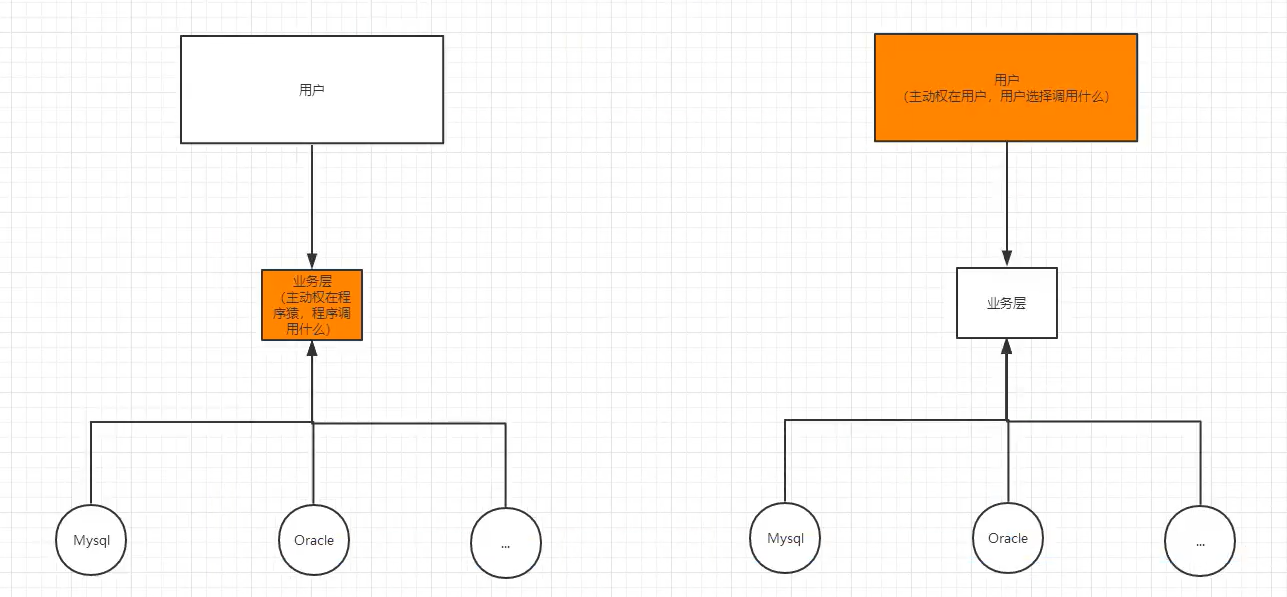
此时,如果业务需求增加,需要增加一个mysql实现类,需要增加UserDaoMySqlImpl、UserServiceImpl
着重看UserServiceImpl业务层实现类的new对象的操作,修改为private UserServiceMySqlImpl userDao = new UserServiceMySqlImpl ();package com.wshy.Dao; import com.wshy.Service.UserService; /** * @title: UserServiceMySqlImpl * @Author: wshy */ public class UserServiceMySqlImpl implements UserService { @Override public void getUser () { System.out.println ("Mysql实现类"); } }package com.wshy.Service; import com.wshy.Dao.UserDao; import com.wshy.Dao.UserDaoImpl; import com.wshy.Dao.UserServiceMySqlImpl; /** * * @title: UserServiceImpl * @Author: wshy */ public class UserServiceImpl implements UserService{ //private UserDao userDao = new UserDaoImpl (); private UserServiceMySqlImpl userDao = new UserServiceMySqlImpl (); @Override public void getUser () { userDao.getUser (); } }返回结果:

接着如果再增加一个Oracle实现类,需要重复以上操作,需要增加UserDaoOracleImpl实现类、并修改UserServiceImpl对Dao层实现类对象创建
将UserServiceImpl业务层实现类的new对象的操作,修改为private UserServiceOracleImpl userDao = new UserServiceOracleImpl ();
package com.wshy.Service;
import com.wshy.Dao.UserDao;
import com.wshy.Dao.UserDaoImpl;
import com.wshy.Dao.UserServiceMySqlImpl;
import com.wshy.Dao.UserServiceOracleImpl;

/**
 *
 * @title: UserServiceImpl
 * @Author: wshy
 */
public class UserServiceImpl implements UserService{

    //private UserDao userDao = new UserDaoImpl ();
    //private UserServiceMySqlImpl userDao = new UserServiceMySqlImpl ();
    private UserServiceOracleImpl userDao = new UserServiceOracleImpl ();

    @Override
    public void getUser () {
        userDao.getUser ();
    }
}
返回结果:

那么问题来了,如果业务需要实现的类越来越多,那么每次都要手工去修改业务层UserService中对Dao层UserDaoXXXService实现类对象的创建
这样的操作,每当有请求修改,都要去修改代码,这种设计是不合理的!!!!
可以在业务层UserServiceImpl中对象的创建使用set注入,然后在测试类中,传入需要注入的对象即可,这样就不需要每次都去修改业务层的代码,不用在业务层每次都去new一个Dao层对象。
如下是对UserServiceImpl、MyTest中的修改及结果
package com.wshy.Service;
import com.wshy.Dao.UserDao;
import com.wshy.Dao.UserDaoImpl;
import com.wshy.Dao.UserServiceMySqlImpl;
import com.wshy.Dao.UserServiceOracleImpl;

import java.util.Set;

/**
 *
 * @title: UserServiceImpl
 * @Author: wshy
 */
public class UserServiceImpl implements UserService{

    //private UserDao userDao = new UserDaoImpl ();
    //private UserServiceMySqlImpl userDao = new UserServiceMySqlImpl ();
    //private UserServiceOracleImpl userDao = new UserServiceOracleImpl ();

    private UserDao userDao;

    // 利用set进行动态实现值得注入
    public void setUserDao (UserDao userDao) {
        this.userDao = userDao;
    }

    @Override
    public void getUser () {
        userDao.getUser ();
    }
}
import com.wshy.Dao.UserDaoImpl;
import com.wshy.Dao.UserServiceMySqlImpl;
import com.wshy.Service.UserService;
import com.wshy.Service.UserServiceImpl;

/**
 *
 * @title: MyTest
 * @Author: wshy
 */
public class MyTest {
    public static void main (String[] args) {

        // 用户实际调用的是业务层,Dao层并不接触
        UserServiceImpl userService = new UserServiceImpl ();
        userService.setUserDao(new UserServiceMySqlImpl ());

        userService.getUser ();
    }
}

以上程序发生了本质的变化
- 之前,程序是主动创建对象,控制权在程序员手中
- 现在,使用set注入后,程序不再具有主动性,而是变成了被动的接收对象
这种思想,本质上解决了问题,我们程序员不用再去管理对象的创建了,系统耦合性大大降低!!!可以更加专注的在业务实现上,这是IOC的原型!
3.IOC本质
控制反转(IOC),是一种设计思想,DI(依赖注入)是实现IOC的一种方法
在没有IOC的程序中,我们使用面向对象编程,对象的创建于对象之间的依赖关系完成硬编码的方式在程序中体现,对象的创建有程序自己控制,控制反转后将对象的创建转移到第三方,其本质就是**获得依赖对象的方式反转了**
从下面的图可以帮助理解
- 图一,各个对象之间是强耦合的,程序决定依赖关系
- 图二,各个对象中间加了一个中间容器,IOC容器,负责将各个对象之间关系进行解耦
- 图三,各个对象之间的调用,没有任何耦合性
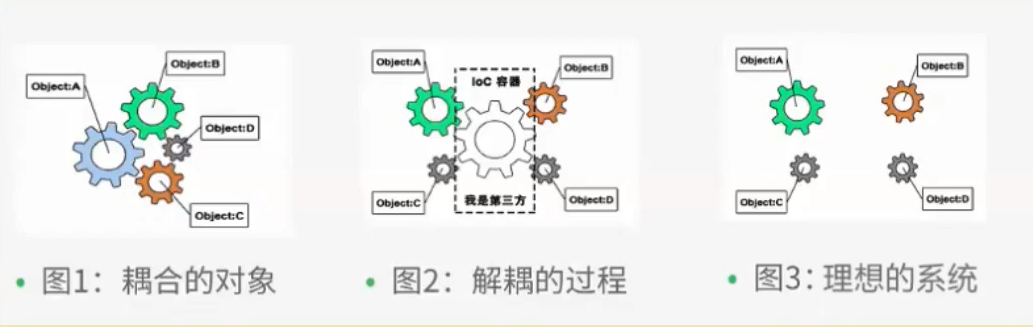
IOC是Spring框架的核心内容,使用多种方式完美的实现了IOC,可以使用IOC的方式,可以使用注解的方式,也可以使用Spring新特性中的零配置(自动注入)实现IOC
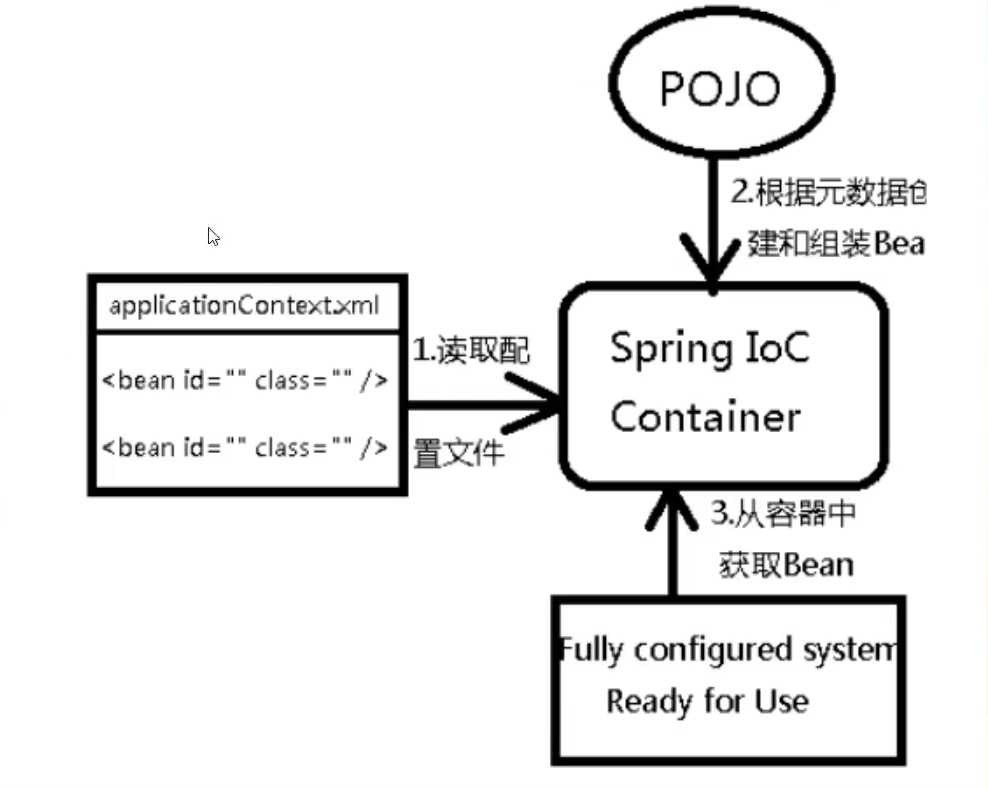
spring在初始化时,先读取配置文件,根据配置文件信息或元数据创建组织对象存入容器中,程序使用时,再从IOC容器中获取所需对象。
4.HelloSpring
4.1 hello.java
package com.wshy.pojo;

/**
 * @title: Hello
 * @Author: wshy
 */
public class Hello {
    private String str;

    public String getStr () {
        return str;
    }

    public void setStr (String str) {
        this.str = str;
    }

    @Override
    public String toString () {
        return "Hello{" +
                "str='" + str + '\'' +
                '}';
    }
}
4.2 beans.xml
<?xml version="1.0" encoding="UTF-8"?>
<beans xmlns="http://www.springframework.org/schema/beans"
       xmlns:xsi="http://www.w3.org/2001/XMLSchema-instance"
       xsi:schemaLocation="http://www.springframework.org/schema/beans http://www.springframework.org/schema/beans/spring-beans.xsd">

<!--使用spring创建对象,在spring中这些都被成为Bean-->
    <bean id="hello" class="com.wshy.pojo.Hello">
        <property name="str" value="Spring"/>
    </bean>

</beans>
4.3 MyTest
import com.wshy.pojo.Hello;
import javafx.application.Application;
import org.springframework.context.ApplicationContext;
import org.springframework.context.support.ClassPathXmlApplicationContext;

/**
 * @title: MyTest
 * @Author: wshy
 */
public class MyTest {
    public static void main (String[] args) {
        // 获取spring的上下文对象
        ApplicationContext context = new ClassPathXmlApplicationContext ("beans.xml");

        //我们的对象都在spring中管理了,我们要使用,直接去里面取就好了,取id为hello的Bean
        Hello hello = (Hello) context.getBean ("hello");
        System.out.println (hello.toString ());

    }
}
4.4 结果

4.5 解析说明
beans.xml解析
<?xml version="1.0" encoding="UTF-8"?>
<beans xmlns="http://www.springframework.org/schema/beans"
       xmlns:xsi="http://www.w3.org/2001/XMLSchema-instance"
       xsi:schemaLocation="http://www.springframework.org/schema/beans http://www.springframework.org/schema/beans/spring-beans.xsd">
    <!--使用spring创建对象,在spring中这些都被成为Bean-->
    <!--
    以前创建对象
    类型   变量名  =  new 类型();
    Hello hello = new Hello();

    使用Beans.xml配置文件后
    id = 变量名
    class = new 对象
    property 相当于给对象中的属性设置一个值

    -->
    <bean id="hello" class="com.wshy.pojo.Hello">
        <property name="str" value="Spring"/>
    </bean>
</beans>
4.6 以spring的方式修改以前创建对象的方式
添加beans.xml
<?xml version="1.0" encoding="UTF-8"?>
<beans xmlns="http://www.springframework.org/schema/beans"
       xmlns:xsi="http://www.w3.org/2001/XMLSchema-instance"
       xsi:schemaLocation="http://www.springframework.org/schema/beans http://www.springframework.org/schema/beans/spring-beans.xsd">

    <bean id="mysqlImpl" class="com.wshy.Dao.UserServiceMySqlImpl" />
    <bean id="oracleImpl" class="com.wshy.Dao.UserServiceOracleImpl" />

    <!--
		ref:引用spring容器中创建好的对象
		value:具体的值,基本数据类型
	-->
    <bean id="userServiceImpl" class="com.wshy.Service.UserServiceImpl">
        <property name="userDao" ref="mysqlImpl"/>
    </bean>

</beans>
修改MyTest.java
/**
 * @author wshy
 * @data 2021/7/31
 **/

import com.wshy.Dao.UserDaoImpl;
import com.wshy.Dao.UserServiceMySqlImpl;
import com.wshy.Service.UserService;
import com.wshy.Service.UserServiceImpl;
import org.springframework.context.ApplicationContext;
import org.springframework.context.support.ClassPathXmlApplicationContext;

/**
 *
 * @title: MyTest
 * @Author: wshy
 */
public class MyTest {
    public static void main (String[] args) {

        // 用户实际调用的是业务层,Dao层并不接触
        //UserServiceImpl userService = new UserServiceImpl ();
        //userService.setUserDao(new UserServiceMySqlImpl ());
        //
        //userService.getUser ();

        ApplicationContext context = new ClassPathXmlApplicationContext ("beans.xml");
        UserServiceImpl userServiceImpl = (UserServiceImpl) context.getBean ("userServiceImpl");
        userServiceImpl.getUser ();
    }
}
运行结果

此时,如果想要修改业务,只需要修改配置文件中的ref引用为oracleImpl,接口打印出**Oracle实现类
总结
- hello对象是由spring创建的
- hello对象的属性是在spring配置文件中设置的
这个过程就是控制反转:
- 控制:谁来控制对象的创建,传统应用程序的对象是由程序本身创建的,使用spring后,对象由spring来创建
- 反转:程序本身不创建对象,而变成被动的接收对象
- 依赖注入:就是利用set方法来实现注入的
IOC是一种编程思想,由主动创建对象 ,变为被动接收
我们可以彻底不用修改代码,而去实现不同的操作,只需要在xml配置文件中红进行修改,所谓的IOC,就是由spring来创建、管理、装配对象!