Harfbuzz是一个OpenType 的shaping engine (http://www.freedesktop.org/wiki/Software/HarfBuzz)。目前Harfbuzz有两个Code trees,早期的那个code tree称之为Harfbuzz,或者old harfbuzz。而目前还处于比较活跃的开发状态的这个code tree,在整个代码的结构上面,与前面的那一版,有着非常大的区别,为了能够区分这两者,新的这个称之为harfbuzz-ng。前面Behdad Esfahbod所发的那个Title为Harfbuzz API 设计(Harfbuzz API design)的mail,所描述的是Harfbuzz-ng API的设计。
下面这段code来源于harfbuzz-0.9.10代码库(harfbuzz-0.9.10/src/test.cc):
#ifdef HAVE_CONFIG_H
#include "config.h"
#endif

#include "hb.h"

#ifdef HAVE_GLIB
#include <glib.h>
#endif
#include <stdlib.h>
#include <stdio.h>

#ifdef HAVE_FREETYPE
#include "hb-ft.h"
#endif

static inline float HBFixedToFloat(int v) {
    // Harfbuzz uses 26.6 fixed point values for pixel offsets
    return v * (1.0f / 2048);
}

int main(int argc, char **argv) {
    hb_blob_t *blob = NULL;

    if (argc != 2) {
        fprintf(stderr, "usage: %s font-file.ttf\n", argv[0]);
        exit(1);
    }

    /* Create the blob */
    {
        const char *font_data;
        unsigned int len;
        hb_destroy_func_t destroy;
        void *user_data;
        hb_memory_mode_t mm;

#ifdef HAVE_GLIB
        GMappedFile *mf = g_mapped_file_new (argv[1], false, NULL);
        font_data = g_mapped_file_get_contents (mf);
        len = g_mapped_file_get_length (mf);
        destroy = (hb_destroy_func_t) g_mapped_file_unref;
        user_data = (void *) mf;
        mm = HB_MEMORY_MODE_READONLY_MAY_MAKE_WRITABLE;
#else
        FILE *f = fopen(argv[1], "rb");
        fseek(f, 0, SEEK_END);
        len = ftell(f);
        fseek(f, 0, SEEK_SET);
        font_data = (const char *) malloc(len);
        if (!font_data)
            len = 0;
        len = fread((char *) font_data, 1, len, f);
        destroy = free;
        user_data = (void *) font_data;
        fclose(f);
        mm = HB_MEMORY_MODE_WRITABLE;
#endif

        blob = hb_blob_create(font_data, len, mm, user_data, destroy);
    }

    printf("Opened font file %s: %u bytes long\n", argv[1],
            hb_blob_get_length(blob));

    /* Create the face */
    hb_face_t *face = hb_face_create(blob, 0 /* first face */);
    hb_blob_destroy(blob);
    blob = NULL;
    unsigned int upem = hb_face_get_upem(face);

    int textSize = 36;
    uint16_t x_ppem, y_ppem;
    int x_scale, y_scale;

    x_ppem = y_ppem = textSize;
    const int kDevicePixelFraction = 64;
    const int kMultiplyFor16Dot16 = 1 << 16;
    float emScale = kDevicePixelFraction * kMultiplyFor16Dot16 / (float)upem;
    x_scale = emScale * textSize;
    y_scale = emScale * textSize;

    hb_font_t *font = hb_font_create(face);
    hb_font_set_scale(font, x_scale, y_scale);
    hb_font_set_ppem(font, x_ppem, y_ppem);
    printf("x_scale = %d, y_scale = %d, x_ppem = %d, y_ppem = %d\n", x_scale, y_scale, x_ppem, y_ppem);


#ifdef HAVE_FREETYPE
    hb_ft_font_set_funcs (font);
#endif

    hb_buffer_t *buffer = hb_buffer_create();

    uint16_t myanmarChars[] = {0x1005, 0x102C, 0x1001, 0x102B,
            0x101E, 0x102D, 0x1000, 0x1039, 0x1001, 0x102C,
            0x101E, 0x1012, 0x1039, 0x1013, 0x102B,
            0x100A, 0x102D, 0x102F, 0x1011, 0x102F, 0x1036, 0x1038
    };

    uint16_t thaiChars[] = {
            0xE01, 0xE49, 0xE33, 0xE20, 0xE21, 0xE22, 0xE2B, 0xE2C, 0xE2E

    };

    uint16_t *chars = thaiChars;

//    hb_buffer_add_utf8(buffer,
//            "\xe0\xa4\x95\xe0\xa5\x8d\xe0\xa4\xb0\xe0\xa5\x8d\xe0\xa4\x95", -1,
//            0, -1);
    hb_buffer_add_utf16(buffer, chars, -1, 0, -1);

    hb_shape(font, buffer, NULL, 0);

    unsigned int count = hb_buffer_get_length(buffer);
    hb_glyph_info_t *infos = hb_buffer_get_glyph_infos(buffer, NULL);
    hb_glyph_position_t *positions = hb_buffer_get_glyph_positions(buffer,
            NULL);

    for (unsigned int i = 0; i < count; i++) {
        hb_glyph_info_t *info = &infos[i];
        hb_glyph_position_t *pos = &positions[i];

        printf("cluster %d    glyph 0x%x at    offset(%f,%f)+position(%f,%f)\n",
                info->cluster,
                info->codepoint,
                HBFixedToFloat(pos->x_offset),
                HBFixedToFloat(pos->x_offset),
                HBFixedToFloat(pos->x_advance),
                HBFixedToFloat(pos->y_advance));
    }

    hb_buffer_destroy(buffer);
    hb_font_destroy(font);
    hb_face_destroy(face);

    return 0;
}
Harfbuzz-ng的编译,与网络上那些基于源码发布的项目的编译相比,也没有什么特别的地方,也都是configure->make这种。编译Harfbuzz-ng时,这个test app会一并被编译。可以像下面这样来执行这个test app:
./test ~/Data/font_language/font_files/android_4.2_fonts/DroidSansThai.ttf这个地方的这个字库文件取自于android 4.2的codebase。android 4.2 codebase的下载可以参考Google官网上的说明。下面是执行的输出:
Opened font file ~/Data/font_language/font_files/android_4.2_fonts/DroidSansThai.ttf: 35584 bytes long
x_scale = 73728, y_scale = 73728, x_ppem = 36, y_ppem = 36
cluster 0    glyph 0x4 at    offset(0.000000,0.000000)+position(22.218750,0.000000)
cluster 0    glyph 0x4e at    offset(0.123047,0.123047)+position(0.000000,0.000000)
cluster 0    glyph 0x5e at    offset(2.232422,2.232422)+position(0.000000,0.000000)
cluster 0    glyph 0x37 at    offset(0.000000,0.000000)+position(17.472656,0.000000)
cluster 3    glyph 0x25 at    offset(0.000000,0.000000)+position(23.115234,0.000000)
cluster 4    glyph 0x26 at    offset(0.000000,0.000000)+position(21.533203,0.000000)
cluster 5    glyph 0x27 at    offset(0.000000,0.000000)+position(22.869141,0.000000)
cluster 6    glyph 0x30 at    offset(0.000000,0.000000)+position(23.203125,0.000000)
cluster 7    glyph 0x31 at    offset(0.000000,0.000000)+position(24.240234,0.000000)
cluster 8    glyph 0x33 at    offset(0.000000,0.000000)+position(21.005859,0.000000)
接着再来看前面那段code的结构。
- 从line 30 ~ line 61这31行,可以看到所做的事情就是读取字库文件中的数据,然后创建一个hb_blot_t。
- 从line 66 ~ line 70这几行,可以看到所做的事情是,利用前面创建的那个含有字库文件数据的blob,创建一个face。
- 从line 72 ~ line 86这几行,可以看到所做的事情主要是,利用前面创建的face,创建一个font。然后把字体大小的信息(ppem)及字体设计空间向用户空间转换的系数(scale)设置给font。计算ppem及scale 的那段code是借用了android 4.2 TextLayoutCache.cpp的一些code。
- 从line 93 ~ line 111这几行,所做的事情是,创建一个buffer,然后把text添加进去。这个地方用UTF-16编码,是因为就手动编码Unicode而言,对于许多复杂语系的Unicode范围,UTF-16比UTF-8要方便的多,因而也使得我们可以更为方便的来修改这个test。
- line 113是调用Harfbuzz-ng 的主shape接口来做shape动作。
- line 115 ~ line 131则是从shape之后的buffer中,取出glyph 和position的相关信息。
通常情况下对于Harfbuzz-ng API 的使用,大体上也会如上面的几个步骤。用一张图来说命上面的那个过程:
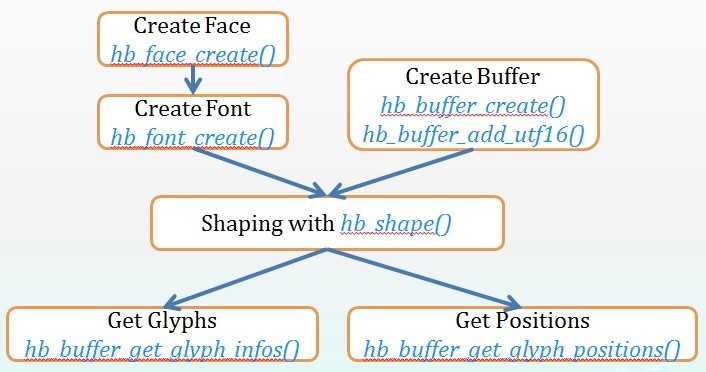
这样的用法,之所以称为basic usage,最起码有如下的这样一些原因:
- 前面的第2、3步,在创建face和font时,是直接通过字库文件。通常情况每个系统中都会有自己的字库文件管理系统和Glyph管理系统,这种做法就完全没有考虑与现有系统的这些模块衔接的问题。在实际系统中,着两个object应该要通过相应有callback参数的那些接口来创建。
- 在Harfbuzz API Design中,我们看到有提到Unicode callback及Script、Language和Direction这些text 属性等,这些都是需要正确的设置给buffer的,因而前面第4步所对应的这个test app的做法,所创建的buffer是不足够完整的。
- 在print position信息时,我们看到有通过HBFixedToFloat() 这个函数来对harfbuzz-ng 输出的position信息做一个转换,转换为float格式的像素个数值。可以看到这个地方是除了一个2048。这个系数在这个test app里面用的是一个猜想的值。字体大小为36,所以猜想返回的advance值应该要处于这一数量级。所以取用了2048这个系数。