hyperLedger fabric 从0到1 + End2EndIT源码解析
背景:本文主要是从0开始在阿里云ECS/mac上搭建fabric网络,然后在本地的MAC电脑intellij下载fabric-sdk-java,使用End2EndIT单元测试ECS/mac 部署的区块链;最后再完整实现一个业务CASE进行实战讲解;(鉴于本文过长,章节7单独开一个文章)
- fabric环境依赖安装
- fabric安装
- fabric官方例子
- fabric-sdk-java获取
- mac环境+End2EndIT快速上手
- fabric-sdk-java工程
- 工程目录详解
- End2EndIT代码详解
- 业务真实CASE完整开发过程
- 业务讲解
- 基于业务的网络拓扑设计
- 链码(智能合约)编写/UnitTest
- 阿里云ECS部署定制的网络拓扑
- 客户端代码编写
- 测试
- 数据流转变化
一、fabric环境依赖安装
fabric依赖cURL(linux/mac机器默认都有)、docker容器、GO语言
1.1)ECS安装社区CE版本docker,参考:阿里云ECS安装docker
yum install epel-release –y
yum clean all
yum list
yum install docker-io –y
systemctl start docker
docker info
安装docker-compose
sudo curl -L https://github.com/docker/compose/releases/download/1.21.2/docker-compose-$(uname -s)-$(uname -m) -o /usr/local/bin/docker-compose
sudo chmod +x /usr/local/bin/docker-compose
docker-compose --version
1.1) mac 安装docker:homebrew命令安装docker(包含了docker-compose)或者直接下载安装
brew install dockermac 安装完docker后,可以看到mac右上角出现了?图标
1.2) ECS安装go
yum install go -y配置go环境变量
export GOPATH=/usr/local/go
export PATH=$PATH:$GOPATH/bin
1.2) mac 安装go
brew install go配置go环境变量
vi /etc/profile
source /etc/profile

写入profile的内容:
export GOROOT=/usr/local/Cellar/go/1.10
export GOPATH=/Users/你的用户名/go  #go命令默认下载的所有外部库/代码都会存储在这个目录
export GOBIN=$GOPATH/bin
export PATH=$PATH:$GOBIN
二、fabric安装
ECS /mac 都可以调用脚本,脚本包含fabric binary、官方例子、fabric所有类型docker镜像
curl -sSL https://goo.gl/6wtTN5 | bash -s 1.1.0注意点1:
因为ECS或者mac容易被墙(有钱的可以装个shadowsocks),上面命令一直卡着执行不了,终止上面的命令,直接打开:https://goo.gl/6wtTN5 然后粘贴里面的内容到一个本地一个xxx.sh文件
touch fabric_download.sh
vi fabric_download.sh  #把内容帖进去
chmod +x fabric_download.sh
./fabric_download.sh
如果是ECS机器,默认没有git,需要先安装git,不然checkout不了fabric-samples
yum install git如果中间出现意外,需要选择安装,可以修改脚本的这几行,自主选择安装docker镜像、样例、库
DOCKER=true
SAMPLES=true
BINARIES=true
注意点2:
1)因为fabric 依赖的docker有10G以上,耐心等待......,如果下载过慢,可以考虑阿里云docker加速器或者DaoCloud
2)mac配置加速:右上角?-》Preference-》Daemon-》Registry mirrors-》添加阿里云 or DaoCloud的个人加速地址
命令执行完成后,可以查看 /usr/local/bin 下面生成了fabric后续要用到的工具
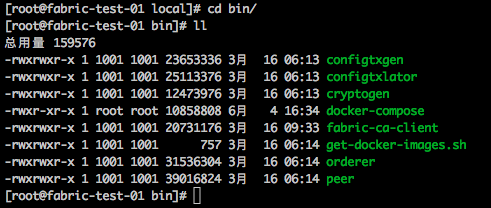
查看下载的docker 镜像
docker image ls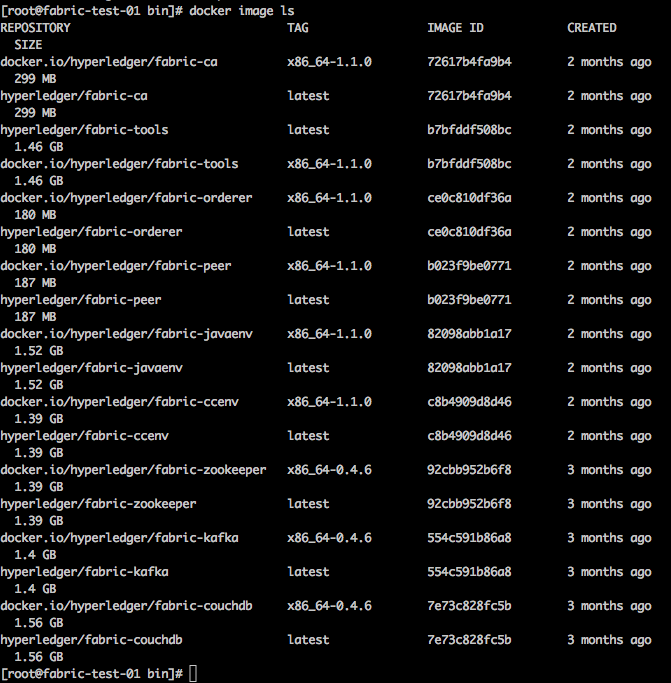
三、fabric官方例子
1)官方例子byfn (build your first network)
[root@fabric-test-01 first-network]# cd /usr/local/fabric-samples/first-network
[root@fabric-test-01 first-network]# ./byfn.sh up
云ECS环境直接使用./byfn.sh up 会挂掉,fabric官方issue,原因分析
官方建议增加- GODEBUG=netdns=go,测试后发现还是不好使,还是会出现peer 加入通道异常,尝试延长时间方式依旧不能解决
[root@fabric-test-01 first-network]# ./byfn down
[root@fabric-test-01 first-network]# vi docker-compose-cli.yaml
[root@fabric-test-01 first-network]# ./byfn up -t 10000 #设置超时为10s
增加- GODEBUG=netdns=go 
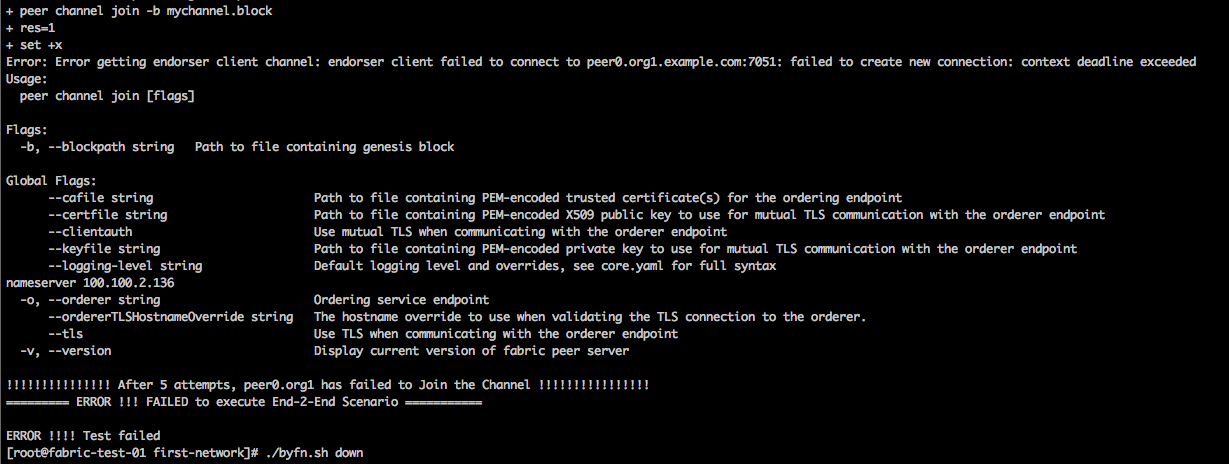
最终解决方式:根据原因分析,修改 /etc/resolv.conf 配置,将 options timeout:2 attempts:3 rotate single-request-reopen 这一行内容注释掉
[root@fabric-test-01 first-network]# ./byfn.sh down
[root@fabric-test-01 first-network]# vi /etc/resolv.conf
[root@fabric-test-01 first-network]# ./byfn.sh up -t 10000
2)byfn 启动过程详解
-
第一步
先调用byfn.sh脚本先调用networkUp方法:
1、进行版本校验
2、cryptogen生成公私钥和证书、
3、configtxgen生成创世区块、channel配置区块、两个组织锚点,
4、最后会调用scripts/script.sh执行后续操作-
cryptogen
CA证书扫盲
TLS原理
Fabric中有两种类型的公私钥和证书,一种是给节点之前通讯安全而准备的TLS证书,另一种是用户登录和权限控制的用户证书。这些证书本来应该是由CA来颁发,但是我们这里是测试环境,并没有启用CA节点,所以Fabric帮我们提供了一个工具:cryptogen
[root@fabric-test-01 first-network]# cryptogen generate --config=./crypto-config.yaml
org1.example.com
org2.example.com
当前cryptogen命令根据crypto-config.yaml 在当前目录下生成了crypto-config文件夹,文件夹结构如下
[root@fabric-test-01 first-network]# yum install tree
[root@fabric-test-01 first-network]# tree -L 4 crypto-config
crypto-config
├── ordererOrganizations
│   └── example.com
│       ├── ca
│       │   ├── 16cdf940fba55b97f3cdf71eb44ed39bc08ff7149757ac34d7596707c97b18b8_sk
│       │   └── ca.example.com-cert.pem
│       ├── msp
│       │   ├── admincerts
│       │   ├── cacerts
│       │   └── tlscacerts
│       ├── orderers
│       │   └── orderer.example.com
│       ├── tlsca
│       │   ├── b38e560de1aa8138923ad0d2797b8b8f16ed082b8a14381190a0dea1829e749a_sk
│       │   └── tlsca.example.com-cert.pem
│       └── users
│           └── Admin@example.com
└── peerOrganizations
    ├── org1.example.com
    │   ├── ca
    │   │   ├── 0f7e3c534db8811228222fc7b16d2105e59b1002981745ca75d9c16a64e32287_sk
    │   │   └── ca.org1.example.com-cert.pem
    │   ├── msp
    │   │   ├── admincerts
    │   │   ├── cacerts
    │   │   ├── config.yaml
    │   │   └── tlscacerts
    │   ├── peers
    │   │   ├── peer0.org1.example.com
    │   │   └── peer1.org1.example.com
    │   ├── tlsca
    │   │   ├── 4d4a78f0c71d4a1247867f7d9e389cde56869dec283eb2555fd0825441fba0c3_sk
    │   │   └── tlsca.org1.example.com-cert.pem
    │   └── users
    │       ├── Admin@org1.example.com
    │       └── User1@org1.example.com
    └── org2.example.com
        ├── ca
        │   ├── 83b3d4ce5fb3877c76817da2a50329ddb4f4c4bc9f5cdbc9b7cf0fa44aa6fa17_sk
        │   └── ca.org2.example.com-cert.pem
        ├── msp
        │   ├── admincerts
        │   ├── cacerts
        │   ├── config.yaml
        │   └── tlscacerts
        ├── peers
        │   ├── peer0.org2.example.com
        │   └── peer1.org2.example.com
        ├── tlsca
        │   ├── 12e7338b1321c4660fbebf42dac0adc38ec6fd6e1b972bd6c13b27f5798cf95f_sk
        │   └── tlsca.org2.example.com-cert.pem
        └── users
            ├── Admin@org2.example.com
            └── User1@org2.example.com

39 directories, 14 files
crypto-config.yaml 文件解析如下
# Copyright IBM Corp. All Rights Reserved.
#
# SPDX-License-Identifier: Apache-2.0
#

# ---------------------------------------------------------------------------
# "OrdererOrgs" - Definition of organizations managing orderer nodes
# ---------------------------------------------------------------------------
OrdererOrgs:  #排序组织
  # ---------------------------------------------------------------------------
  # Orderer
  # ---------------------------------------------------------------------------
  - Name: Orderer  #组织名称
    Domain: example.com #组织的域名
    # ---------------------------------------------------------------------------
    # "Specs" - See PeerOrgs below for complete description
    # ---------------------------------------------------------------------------
    Specs:
      - Hostname: orderer #额外生成一个orderer.example.com
                          #“Spec”的作用是不受下面的Template模板生成规则影响,个性化指定一个域名
# ---------------------------------------------------------------------------
# "PeerOrgs" - Definition of organizations managing peer nodes
# ---------------------------------------------------------------------------
PeerOrgs:#网络节点组织
  # ---------------------------------------------------------------------------
  # Org1
  # ---------------------------------------------------------------------------
  - Name: Org1 #组织Org1名称
    Domain: org1.example.com #组织Org1的域名
    EnableNodeOUs: true #Node.js支持,java的sdk里面默认是注释掉的
    # ---------------------------------------------------------------------------
    # "Specs"
    # ---------------------------------------------------------------------------
    # Uncomment this section to enable the explicit definition of hosts in your
    # configuration.  Most users will want to use Template, below
    #
    # Specs is an array of Spec entries.  Each Spec entry consists of two fields:
    #   - Hostname:   (Required) The desired hostname, sans the domain.
    #   - CommonName: (Optional) Specifies the template or explicit override for
    #                 the CN.  By default, this is the template:
    #
    #                              "{{.Hostname}}.{{.Domain}}"
    #
    #                 which obtains its values from the Spec.Hostname and
    #                 Org.Domain, respectively.
    # ---------------------------------------------------------------------------
    # Specs:
    #   - Hostname: foo # implicitly "foo.org1.example.com"
    #     CommonName: foo27.org5.example.com # overrides Hostname-based FQDN set above
    #   - Hostname: bar
    #   - Hostname: baz
    # ---------------------------------------------------------------------------
    # "Template"
    # ---------------------------------------------------------------------------
    # Allows for the definition of 1 or more hosts that are created sequentially
    # from a template. By default, this looks like "peer%d" from 0 to Count-1.
    # You may override the number of nodes (Count), the starting index (Start)
    # or the template used to construct the name (Hostname).
    #
    # Note: Template and Specs are not mutually exclusive.  You may define both
    # sections and the aggregate nodes will be created for you.  Take care with
    # name collisions
    # ---------------------------------------------------------------------------
    Template:#根据上面注释的模板生成2套公私钥+证书,默认生成规则是peer0-9.组织的域名
      Count: 2 #即生成peer0.org1.example.com、peer1.org1.example.com 两个节点的公私钥和证书
      # Start: 5
      # Hostname: {{.Prefix}}{{.Index}} # default
    # ---------------------------------------------------------------------------
    # "Users"
    # ---------------------------------------------------------------------------
    # Count: The number of user accounts _in addition_ to Admin
    # ---------------------------------------------------------------------------
    Users:#除了admin用户,额外生成一个User1
      Count: 1
  # ---------------------------------------------------------------------------
  # Org2: See "Org1" for full specification
  # ---------------------------------------------------------------------------
  - Name: Org2
    Domain: org2.example.com
    EnableNodeOUs: true
    Template:
      Count: 2
    Users:
Count: 1-
configtxgen
Configtxgen 使用configtx.yaml生成4个组件,在此之前需要为configtxgen工具指定configtx.yaml文件的路径,我们需要设置一个环境变量为当前目录,生成的文件在当前目录的channel-artifacts下
①生成排序节点的创世区块genesis.block
②生成"通道的配置"交易:channel.tx
③生成channel的组织1锚点peer
④生成channel的组织2锚点peer
锚点peer:在一个channel上可以被所有其他peer发现的peer,channel上的每个成员都有一个anchor Peer(或多个anchor peer 来防止单点故障),允许属于不同成员的peer发现chnnel上的所有现有peer
[root@fabric-test-01 first-network]# export FABRIC_CFG_PATH=$PWD
[root@fabric-test-01 first-network]# configtxgen -profile TwoOrgsOrdererGenesis -outputBlock ./channel-artifacts/genesis.block
[root@fabric-test-01 first-network]# configtxgen -profile TwoOrgsChannel -outputCreateChannelTx ./channel-artifacts/channel.tx -channelID mychannel
[root@fabric-test-01 first-network]# configtxgen -profile TwoOrgsChannel -outputAnchorPeersUpdate ./channel-artifacts/Org1MSPanchors.tx -channelID mychannel -asOrg Org1MSP
[root@fabric-test-01 first-network]# configtxgen -profile TwoOrgsChannel -outputAnchorPeersUpdate ./channel-artifacts/Org2MSPanchors.tx -channelID mychannel -asOrg Org2MSP
configtx.yaml这个文件里面配置了由2个Org参与的Orderer共识配置TwoOrgsOrdererGenesis,以及由2个Org参与的Channel配置:TwoOrgsChannel。Orderer可以设置共识的算法是Solo还是Kafka,以及共识时区块大小,超时时间等,我们使用默认值即可,不用更改。而Peer节点的配置包含了MSP的配置,锚节点的配置。如果我们有更多的Org,或者有更多的Channel,那么就可以根据模板进行对应的修改
-
第二步
启动fabric的各个container容器,docker-compose使用当前目录的docker-compose-cli.yaml执行初始化,生成了4个fabric-peer交易节点容器、1个fabric-order排序节点容器,1个fabric-tools的cli容器,cli作用是替代sdk客户端,因为我们并没有启动java sdk,所以需要创建一个客户端工具连接fabric网络进行测试
[root@fabric-test-01 first-network]# docker-compose -f docker-compose-cli.yaml up -d
Creating network "net_byfn" with the default driver
Creating volume "net_orderer.example.com" with default driver
Creating volume "net_peer0.org1.example.com" with default driver
Creating volume "net_peer1.org1.example.com" with default driver
Creating volume "net_peer0.org2.example.com" with default driver
Creating volume "net_peer1.org2.example.com" with default driver
Creating orderer.example.com    ... done
Creating peer1.org1.example.com ... done
Creating peer0.org2.example.com ... done
Creating peer1.org2.example.com ... done
Creating peer0.org1.example.com ... done
Creating cli                    ... done
[root@fabric-test-01 first-network]# docker ps -a
CONTAINER ID        IMAGE                               COMMAND             CREATED             STATUS              PORTS                                              NAMES
2f3af7e64868        hyperledger/fabric-tools:latest     "/bin/bash"         18 seconds ago      Up 17 seconds                                                          cli
dfea53b15138        hyperledger/fabric-peer:latest      "peer node start"   19 seconds ago      Up 17 seconds       0.0.0.0:7051->7051/tcp, 0.0.0.0:7053->7053/tcp     peer0.org1.example.com
3eac41603863        hyperledger/fabric-peer:latest      "peer node start"   19 seconds ago      Up 17 seconds       0.0.0.0:10051->7051/tcp, 0.0.0.0:10053->7053/tcp   peer1.org2.example.com
ea1ef950b845        hyperledger/fabric-peer:latest      "peer node start"   19 seconds ago      Up 17 seconds       0.0.0.0:9051->7051/tcp, 0.0.0.0:9053->7053/tcp     peer0.org2.example.com
ec49121fbdd5        hyperledger/fabric-peer:latest      "peer node start"   19 seconds ago      Up 17 seconds       0.0.0.0:8051->7051/tcp, 0.0.0.0:8053->7053/tcp     peer1.org1.example.com
11ecb9d115f2        hyperledger/fabric-orderer:latest   "orderer"           19 seconds ago      Up 17 seconds       0.0.0.0:7050->7050/tcp                             orderer.example.com
docker-compose-cli.yaml文件基本上是完全继承了docker-compose-base.yaml,docker-compose-base.yaml文件解析:
# Copyright IBM Corp. All Rights Reserved.
#
# SPDX-License-Identifier: Apache-2.0
#

version: '2'

services: #提供的排序、交易节点

  orderer.example.com: #排序服务
    container_name: orderer.example.com #容器名称
    image: hyperledger/fabric-orderer:$IMAGE_TAG #使用的fabric docker镜像生成容器
    environment: #环境变量配置
      - ORDERER_GENERAL_LOGLEVEL=INFO #日志等级
      - ORDERER_GENERAL_LISTENADDRESS=0.0.0.0 #监听地址段,0.0.0.0代表接受网络所有机器需求
      - ORDERER_GENERAL_GENESISMETHOD=file #生成文件区块
      - ORDERER_GENERAL_GENESISFILE=/var/hyperledger/orderer/orderer.genesis.block
      - ORDERER_GENERAL_LOCALMSPID=OrdererMSP #成员管理id
      - ORDERER_GENERAL_LOCALMSPDIR=/var/hyperledger/orderer/msp #docker 容器内成员管理的目录
      # enabled TLS
      - ORDERER_GENERAL_TLS_ENABLED=true #是否在网络层启动tls,下面是docker容器的文件路径
      - ORDERER_GENERAL_TLS_PRIVATEKEY=/var/hyperledger/orderer/tls/server.key
      - ORDERER_GENERAL_TLS_CERTIFICATE=/var/hyperledger/orderer/tls/server.crt
      - ORDERER_GENERAL_TLS_ROOTCAS=[/var/hyperledger/orderer/tls/ca.crt]
    working_dir: /opt/gopath/src/github.com/hyperledger/fabric
    command: orderer
    volumes: #映射本地linux机器生成的目录到docker容器内的目录
    - ../channel-artifacts/genesis.block:/var/hyperledger/orderer/orderer.genesis.block
    - ../crypto-config/ordererOrganizations/example.com/orderers/orderer.example.com/msp:/var/hyperledger/orderer/msp
    - ../crypto-config/ordererOrganizations/example.com/orderers/orderer.example.com/tls/:/var/hyperledger/orderer/tls
    - orderer.example.com:/var/hyperledger/production/orderer
    ports: #映射本地linux机器的端口到docker容器的端口
      - 7050:7050

  peer0.org1.example.com: #交易节点peer0.org1,下面的peer1.org1都是基本相同的配置
    container_name: peer0.org1.example.com #容器名称
    extends:#继承peer-base的配置
      file: peer-base.yaml
      service: peer-base
    environment:#环境变量
      - CORE_PEER_ID=peer0.org1.example.com #节点网络地址、监听端口
      - CORE_PEER_ADDRESS=peer0.org1.example.com:7051
      - CORE_PEER_GOSSIP_BOOTSTRAP=peer1.org1.example.com:7051 #gossip协议配置
      - CORE_PEER_GOSSIP_EXTERNALENDPOINT=peer0.org1.example.com:7051
      - CORE_PEER_LOCALMSPID=Org1MSP #配置的成员管理名称
    volumes:
        - /var/run/:/host/var/run/
        - ../crypto-config/peerOrganizations/org1.example.com/peers/peer0.org1.example.com/msp:/etc/hyperledger/fabric/msp
        - ../crypto-config/peerOrganizations/org1.example.com/peers/peer0.org1.example.com/tls:/etc/hyperledger/fabric/tls
        - peer0.org1.example.com:/var/hyperledger/production
    ports:
      - 7051:7051
      - 7053:7053
peer-base.yaml文件解析:
# Copyright IBM Corp. All Rights Reserved.
#
# SPDX-License-Identifier: Apache-2.0
#

version: '2'

services:
  peer-base:
    image: hyperledger/fabric-peer:$IMAGE_TAG #使用fabric-peer镜像生成容器
    environment: #环境变量
      - CORE_VM_ENDPOINT=unix:///host/var/run/docker.sock
      # the following setting starts chaincode containers on the same
      # bridge network as the peers
      # https://docs.docker.com/compose/networking/
      - CORE_VM_DOCKER_HOSTCONFIG_NETWORKMODE=${COMPOSE_PROJECT_NAME}_byfn
      - CORE_LOGGING_LEVEL=INFO #日志等级
      #- CORE_LOGGING_LEVEL=DEBUG
      - CORE_PEER_TLS_ENABLED=true #是否使用tls
      - CORE_PEER_GOSSIP_USELEADERELECTION=true #使用主节点选举方式
      - CORE_PEER_GOSSIP_ORGLEADER=false
      - CORE_PEER_PROFILE_ENABLED=true
      - CORE_PEER_TLS_CERT_FILE=/etc/hyperledger/fabric/tls/server.crt #tls节点证书
      - CORE_PEER_TLS_KEY_FILE=/etc/hyperledger/fabric/tls/server.key #tls公钥
      - CORE_PEER_TLS_ROOTCERT_FILE=/etc/hyperledger/fabric/tls/ca.crt #tls根证书
    working_dir: /opt/gopath/src/github.com/hyperledger/fabric/peer
    command: peer node start
-
第三步
容器创建完成后,接着创建通道channel,然后peer节点需要加入到channel中,并设置每一个组织的锚点;channel有点类似netty里面channel的概念;channel可以隔离交易;
我们要进入模拟的客户端cli容器内部,在里面创建Channel。先用以下命令进入CLI内部Bash,再执行命令
[root@fabric-test-01 first-network]# docker exec -it cli bash
root@2f3af7e64868:/opt/gopath/src/github.com/hyperledger/fabric/peer#
root@2f3af7e64868:/opt/gopath/src/github.com/hyperledger/fabric/peer# peer channel create -o orderer.example.com:7050 -c mychannel -f ./channel-artifacts/channel.tx --tls true --cafile /opt/gopath/src/github.com/hyperledger/fabric/peer/crypto/ordererOrganizations/example.com/orderers/orderer.example.com/msp/tlscacerts/tlsca.example.com-cert.pem参数解析:-o 参数指定了排序节点,orderer.example.com:7050,docker-compose-base里面我们指定了排序节点为7050端口;
-c mychannel -f ./channel-artifacts/channel.tx 指定了channel的名称,使用刚才生成的channel.tx配置文件初始化channel;
--tls true 网络使用tls协议加密传输
--cafile 指定CA证书路径
接着设置环境变量+peer 加入到 channel里面
注意:peer0.org1是cli默认链接的,也就是peer0.Org1是可以直接使用命令peer channel join -b mychannel.block 的其他的节点都需要修改环境变量才能成功
root@2f3af7e64868:/opt/gopath/src/github.com/hyperledger/fabric/peer# peer channel join -b mychannel.block
root@2f3af7e64868:/opt/gopath/src/github.com/hyperledger/fabric/peer# CORE_PEER_MSPCONFIGPATH=/opt/gopath/src/github.com/hyperledger/fabric/peer/crypto/peerOrganizations/org1.example.com/users/Admin@org1.example.com/msp CORE_PEER_ADDRESS=peer1.org1.example.com:7051 CORE_PEER_LOCALMSPID="Org1MSP" CORE_PEER_TLS_ROOTCERT_FILE=/opt/gopath/src/github.com/hyperledger/fabric/peer/crypto/peerOrganizations/org1.example.com/peers/peer0.org1.example.com/tls/ca.crt peer channel join -b mychannel.block
root@2f3af7e64868:/opt/gopath/src/github.com/hyperledger/fabric/peer# CORE_PEER_MSPCONFIGPATH=/opt/gopath/src/github.com/hyperledger/fabric/peer/crypto/peerOrganizations/org2.example.com/users/Admin@org2.example.com/msp CORE_PEER_ADDRESS=peer0.org2.example.com:7051 CORE_PEER_LOCALMSPID="Org2MSP" CORE_PEER_TLS_ROOTCERT_FILE=/opt/gopath/src/github.com/hyperledger/fabric/peer/crypto/peerOrganizations/org2.example.com/peers/peer0.org2.example.com/tls/ca.crt peer channel join -b mychannel.block
root@2f3af7e64868:/opt/gopath/src/github.com/hyperledger/fabric/peer# CORE_PEER_MSPCONFIGPATH=/opt/gopath/src/github.com/hyperledger/fabric/peer/crypto/peerOrganizations/org2.example.com/users/Admin@org2.example.com/msp CORE_PEER_ADDRESS=peer1.org2.example.com:7051 CORE_PEER_LOCALMSPID="Org2MSP" CORE_PEER_TLS_ROOTCERT_FILE=/opt/gopath/src/github.com/hyperledger/fabric/peer/crypto/peerOrganizations/org2.example.com/peers/peer0.org2.example.com/tls/ca.crt peer channel join -b mychannel.block
最后设置两个组织每一个自己的锚点:peer0.org1.example.com:7051,peer0.org2.example.com:7051
root@2f3af7e64868:/opt/gopath/src/github.com/hyperledger/fabric/peer# CORE_PEER_MSPCONFIGPATH=/opt/gopath/src/github.com/hyperledger/fabric/peer/crypto/peerOrganizations/org1.example.com/users/Admin@org1.example.com/msp CORE_PEER_ADDRESS=peer0.org1.example.com:7051 CORE_PEER_LOCALMSPID="Org1MSP" CORE_PEER_TLS_ROOTCERT_FILE=/opt/gopath/src/github.com/hyperledger/fabric/peer/crypto/peerOrganizations/org1.example.com/peers/peer0.org1.example.com/tls/ca.crt peer channel update -o orderer.example.com:7050 -c mychannel -f ./channel-artifacts/Org1MSPanchors.tx --tls true --cafile /opt/gopath/src/github.com/hyperledger/fabric/peer/crypto/ordererOrganizations/example.com/orderers/orderer.example.com/msp/tlscacerts/tlsca.example.com-cert.pem
root@2f3af7e64868:/opt/gopath/src/github.com/hyperledger/fabric/peer# CORE_PEER_MSPCONFIGPATH=/opt/gopath/src/github.com/hyperledger/fabric/peer/crypto/peerOrganizations/org2.example.com/users/Admin@org2.example.com/msp CORE_PEER_ADDRESS=peer0.org2.example.com:7051 CORE_PEER_LOCALMSPID="Org2MSP" CORE_PEER_TLS_ROOTCERT_FILE=/opt/gopath/src/github.com/hyperledger/fabric/peer/crypto/peerOrganizations/org2.example.com/peers/peer0.org2.example.com/tls/ca.crt peer channel update -o orderer.example.com:7050 -c mychannel -f ./channel-artifacts/Org2MSPanchors.tx --tls true --cafile /opt/gopath/src/github.com/hyperledger/fabric/peer/crypto/ordererOrganizations/example.com/orderers/orderer.example.com/msp/tlscacerts/tlsca.example.com-cert.pem
-
第四步
安装链码chaincode,并且new一个实例出来,chaincode是需要安装到每一个peer节点上面的,cli默认链接的peer0.org1同上不需要设置环境变量
安装链码:
root@2f3af7e64868:/opt/gopath/src/github.com/hyperledger/fabric/peer# peer chaincode install -n mycc -v 1.0 -p github.com/chaincode/chaincode_example02/go/
root@2f3af7e64868:/opt/gopath/src/github.com/hyperledger/fabric/peer# CORE_PEER_MSPCONFIGPATH=/opt/gopath/src/github.com/hyperledger/fabric/peer/crypto/peerOrganizations/org1.example.com/users/Admin@org1.example.com/msp CORE_PEER_ADDRESS=peer1.org1.example.com:7051 CORE_PEER_LOCALMSPID="Org1MSP" CORE_PEER_TLS_ROOTCERT_FILE=/opt/gopath/src/github.com/hyperledger/fabric/peer/crypto/peerOrganizations/org1.example.com/peers/peer0.org1.example.com/tls/ca.crt peer chaincode install -n mycc -v 1.0 -p github.com/chaincode/chaincode_example02/go/
root@2f3af7e64868:/opt/gopath/src/github.com/hyperledger/fabric/peer# CORE_PEER_MSPCONFIGPATH=/opt/gopath/src/github.com/hyperledger/fabric/peer/crypto/peerOrganizations/org2.example.com/users/Admin@org2.example.com/msp CORE_PEER_ADDRESS=peer0.org2.example.com:7051 CORE_PEER_LOCALMSPID="Org2MSP" CORE_PEER_TLS_ROOTCERT_FILE=/opt/gopath/src/github.com/hyperledger/fabric/peer/crypto/peerOrganizations/org2.example.com/peers/peer0.org2.example.com/tls/ca.crt peer chaincode install -n mycc -v 1.0 -p github.com/chaincode/chaincode_example02/go/
root@2f3af7e64868:/opt/gopath/src/github.com/hyperledger/fabric/peer# CORE_PEER_MSPCONFIGPATH=/opt/gopath/src/github.com/hyperledger/fabric/peer/crypto/peerOrganizations/org2.example.com/users/Admin@org2.example.com/msp CORE_PEER_ADDRESS=peer1.org2.example.com:7051 CORE_PEER_LOCALMSPID="Org2MSP" CORE_PEER_TLS_ROOTCERT_FILE=/opt/gopath/src/github.com/hyperledger/fabric/peer/crypto/peerOrganizations/org2.example.com/peers/peer0.org2.example.com/tls/ca.crt peer chaincode install -n mycc -v 1.0 -p github.com/chaincode/chaincode_example02/go/
实例化链码:
实例化链上代码主要是在Peer所在的机器上对前面安装好的链上代码进行包装,生成对应Channel的Docker镜像和Docker容器。并且在实例化时我们可以指定背书策略;
实例化1次就ok了
root@2f3af7e64868:/opt/gopath/src/github.com/hyperledger/fabric/peer# peer chaincode instantiate -o orderer.example.com:7050 --tls true --cafile /opt/gopath/src/github.com/hyperledger/fabric/peer/crypto/ordererOrganizations/example.com/orderers/orderer.example.com/msp/tlscacerts/tlsca.example.com-cert.pem -C mychannel -n mycc -l golang -v 1.0 -c '{"Args":["init","a","100","b","200"]}' -P 'OR ('\''Org1MSP.peer'\'','\''Org2MSP.peer'\'')'可以新开一个terminal查看对应的日志、启动的docker 容器
[root@fabric-test-01 ~]# docker logs -f peer0.org1.example.com[root@fabric-test-01 ~]# docker ps -a-
第五步
查询验证数据
root@2f3af7e64868:/opt/gopath/src/github.com/hyperledger/fabric/peer# peer chaincode query -C mychannel -n mycc -c '{"Args":["query","a"]}'
2018-06-07 09:15:04.862 UTC [chaincodeCmd] checkChaincodeCmdParams -> INFO 001 Using default escc
2018-06-07 09:15:04.862 UTC [chaincodeCmd] checkChaincodeCmdParams -> INFO 002 Using default vscc
Query Result: 100
2018-06-07 09:15:04.866 UTC [main] main -> INFO 003 Exiting.....
尝试a向b转10块钱:
root@2f3af7e64868:/opt/gopath/src/github.com/hyperledger/fabric/peer# peer chaincode invoke -o orderer.example.com:7050  --tls true --cafile /opt/gopath/src/github.com/hyperledger/fabric/peer/crypto/ordererOrganizations/example.com/orderers/orderer.example.com/msp/tlscacerts/tlsca.example.com-cert.pem -C mychannel -n mycc -c '{"Args":["invoke","a","b","10"]}'
2018-06-07 09:18:33.697 UTC [chaincodeCmd] checkChaincodeCmdParams -> INFO 001 Using default escc
2018-06-07 09:18:33.697 UTC [chaincodeCmd] checkChaincodeCmdParams -> INFO 002 Using default vscc
2018-06-07 09:18:33.704 UTC [chaincodeCmd] chaincodeInvokeOrQuery -> INFO 003 Chaincode invoke successful. result: status:200
2018-06-07 09:18:33.704 UTC [main] main -> INFO 004 Exiting.....
root@2f3af7e64868:/opt/gopath/src/github.com/hyperledger/fabric/peer# peer chaincode query -C mychannel -n mycc -c '{"Args":["query","a"]}'
2018-06-07 09:18:47.068 UTC [chaincodeCmd] checkChaincodeCmdParams -> INFO 001 Using default escc
2018-06-07 09:18:47.068 UTC [chaincodeCmd] checkChaincodeCmdParams -> INFO 002 Using default vscc
Query Result: 90
2018-06-07 09:18:47.073 UTC [main] main -> INFO 003 Exiting.....
[root@fabric-test-01 ~]# docker logs --tail 200 dev-peer0.org1.example.com-mycc-1.0
ex02 Init
Aval = 100, Bval = 200
ex02 Invoke
Query Response:{"Name":"a","Amount":"100"}
ex02 Invoke
Aval = 90, Bval = 210
ex02 Invoke
Query Response:{"Name":"a","Amount":"90"}
ex02 Invoke
Query Response:{"Name":"a","Amount":"90"}四、fabric-sdk-java获取
intellij 环境 + jdk1.8(该工程只能用1.8+)
准备工作:
1)因为fabric 使用google的protobuf 作为序列化工具,json暂未支持,intellij 需要先安装protobuf插件
intellij-》Preferences -》Plugins-》Browse repositories-》搜索安装Protobuf Support2)mac用homebrew安装依赖的libtool,否则启动单测会报错"ltdl.h: no such file or directory"
brew install libtool3) 拉取分支并切换到1.1版本,因为最新版本是1.2,但是1.2是没有发布起不来
git clone https://github.com/hyperledger/fabric-sdk-java.git
git checkout --track remotes/origin/release-1.1
maven install
五、mac环境+End2EndIT快速上手
mac本机同时作为服务器端+客户端,前提是已经在mac按照上文一、二完成了mac 的fabric安装
1)服务器端:执行下面两个命令后,启动fabric区块链网络;
2)客户端:End2endIT.java-》Run -》Run 即运行简单的区块链转账交易;
cd src/test/fixture/sdkintegration
./fabric.sh up
fabric.sh脚本详解:
1)脚本命令包含了:./fabric.sh up 强制重新创建网络(默认会启动)、./fabric.sh start启动、
./fabric.sh stop停止、./fabric.sh clean清理生成的docker容器;
实际上fabric.sh只是对docker-compose命令的简单封装,一般用docker-compose也就好了
2)每次使用后,如果重新跑需要执行clean命令清除掉生成的docker容器和其他临时文件;
查看日志命令:
docker ps -a
docker logs --tail 200 "容器CONTAINER ID/名称"
六、fabric-sdk-java工程
-
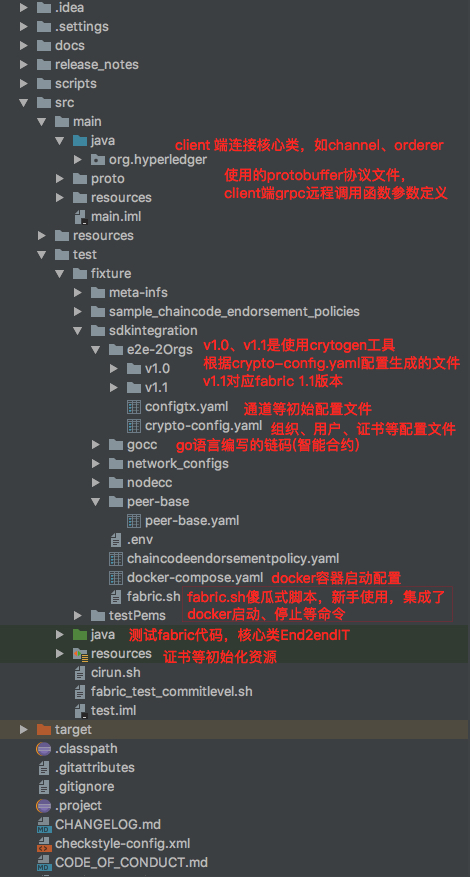
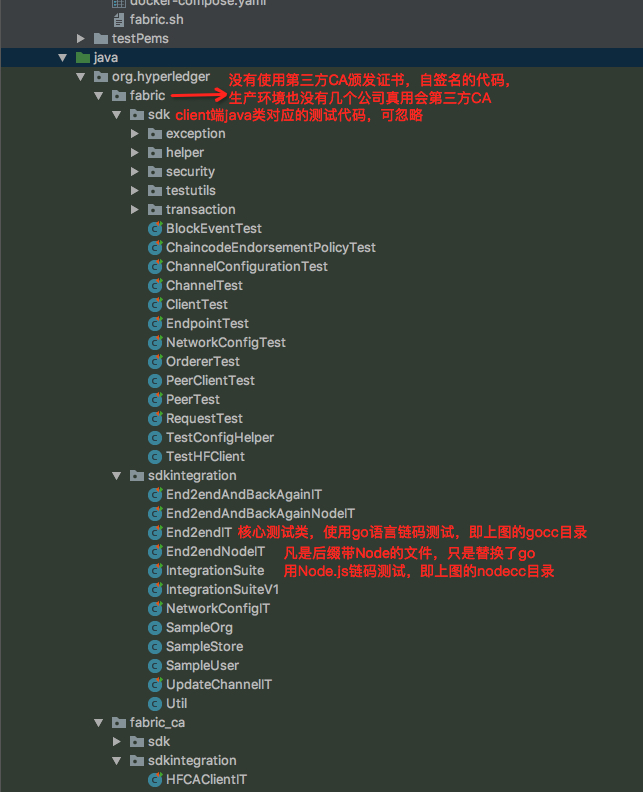
工程目录详解
-
End2EndIT代码详解
因为sdk包里面使用了protobuf作为传输协议,然后使用grpc和服务器端进行通信、配置文件使用yaml,没有了解的可以先入门;
建议大家先走一次上面的fabric官方例子,sdk的流程无非就是把刚才的cli模拟客户端的命令行变成了java的代码而已;
先执行checkConfig()方法检查配置项
    @Before
    public void checkConfig() throws NoSuchFieldException, SecurityException, IllegalArgumentException, IllegalAccessException, MalformedURLException, org.hyperledger.fabric_ca.sdk.exception.InvalidArgumentException {
        out("\n\n\nRUNNING: %s.\n", testName);
        resetConfig();//先重置配置文件org.hyperledger.fabric.sdk.helper.Config,config主要是的fabric需要的配置项
        configHelper.customizeConfig();//调用命令行输入的指定变量,覆盖掉上面的Config配置

        testSampleOrgs = testConfig.getIntegrationTestsSampleOrgs();//获取testConfig配置的组织,TestConfig在End2endIT已经被new出来,里面也有大量的测试配置项
        for (SampleOrg sampleOrg : testSampleOrgs) {//设置颁发证书的CA证书机构
            String caName = sampleOrg.getCAName();
            if (caName != null && !caName.isEmpty()) {
                sampleOrg.setCAClient(HFCAClient.createNewInstance(caName, sampleOrg.getCALocation(), sampleOrg.getCAProperties()));
            } else {
                sampleOrg.setCAClient(HFCAClient.createNewInstance(sampleOrg.getCALocation(), sampleOrg.getCAProperties()));
            }
        }
    }
    @Test
    public void setup() throws Exception {
        if (sampleStoreFile.exists()) {
            sampleStoreFile.delete();//模拟数据库存储使用了HFCSampletest.properties
        }
        sampleStore = new SampleStore(sampleStoreFile);//初始化存储
        enrollUsersSetup(sampleStore);// 利用ca做初始化
        runFabricTest(sampleStore);//核心方法

    }
    public void runFabricTest(final SampleStore sampleStore) throws Exception {

        // Setup client

        //Create instance of client.
        HFClient client = HFClient.createNewInstance();//初始化一个链接客户端,类似cli

        client.setCryptoSuite(CryptoSuite.Factory.getCryptoSuite());//设置加密算法


        //Construct and run the channels
        // 获取peerOrg1组织1
        SampleOrg sampleOrg = testConfig.getIntegrationTestsSampleOrg("peerOrg1");
        // 构建一个channel通道,Org1加入到该通道中
        Channel fooChannel = constructChannel(FOO_CHANNEL_NAME, client, sampleOrg);
        // 保存通道名称到数据库中(这里是存储到上面方法文件)
        sampleStore.saveChannel(fooChannel);
        // 安装链码、实例化链码、执行一个查询测试
        runChannel(client, fooChannel, true, sampleOrg, 0);

        assertFalse(fooChannel.isShutdown());
        fooChannel.shutdown(true); // Force foo channel to shutdown clean up resources.
        assertTrue(fooChannel.isShutdown());

        assertNull(client.getChannel(FOO_CHANNEL_NAME));
        out("\n");
        // 下面是组织2的过程,跟组织1是类似的
        sampleOrg = testConfig.getIntegrationTestsSampleOrg("peerOrg2");
        Channel barChannel = constructChannel(BAR_CHANNEL_NAME, client, sampleOrg);
        assertTrue(barChannel.isInitialized());
        /**
         * sampleStore.saveChannel uses {@link Channel#serializeChannel()}
         */
        sampleStore.saveChannel(barChannel);
        assertFalse(barChannel.isShutdown());
        runChannel(client, barChannel, true, sampleOrg, 100); //run a newly constructed bar channel with different b value!
        //let bar channel just shutdown so we have both scenarios.

        out("\nTraverse the blocks for chain %s ", barChannel.getName());
        // 对区块进行各种查询,包括区块读写集、区块数量高度等
        blockWalker(client, barChannel);

        assertFalse(barChannel.isShutdown());
        assertTrue(barChannel.isInitialized());
        out("That's all folks!");

    }
// 构建一个channel通道,Org1加入到该通道中
Channel fooChannel = constructChannel(FOO_CHANNEL_NAME, client, sampleOrg);
// 安装链码、实例化链码、执行一个查询测试
runChannel(client, fooChannel, true, sampleOrg, 0);
这两个方法是最为核心两个方法,下面进行详细讲解
- constructChannel
a.先设置操作的用户上下文
client.setUserContext(sampleOrg.getPeerAdmin());
获取peer的admin用户,End2endIT.enrollUsersSetup 设置了该字段如下代码所示,该字段实际上是crytogen根据crypto-config.yaml配置的默认admin账户,读取的是crytogen生成的V1.1目录的文件 src/test/fixture/sdkintegration/e2e-2Orgs/V1.1/crypto-config/peerOrganizations/org1.example.com/users/Admin@org1.example.com/msp/keystore/
SampleUser peerOrgAdmin = sampleStore.getMember(sampleOrgName + "Admin", sampleOrgName, sampleOrg.getMSPID(),
        Util.findFileSk(Paths.get(testConfig.getTestChannelPath(), "crypto-config/peerOrganizations/",
                sampleOrgDomainName, format("/users/Admin@%s/msp/keystore", sampleOrgDomainName)).toFile()),
        Paths.get(testConfig.getTestChannelPath(), "crypto-config/peerOrganizations/", sampleOrgDomainName,
                format("/users/Admin@%s/msp/signcerts/Admin@%s-cert.pem", sampleOrgDomainName, sampleOrgDomainName)).toFile());

sampleOrg.setPeerAdmin(peerOrgAdmin); //A special user that can create channels, join peers and install chaincode
b.接着是初始化orderer排序节点对象
        Collection<Orderer> orderers = new LinkedList<>();

        for (String orderName : sampleOrg.getOrdererNames()) {

            Properties ordererProperties = testConfig.getOrdererProperties(orderName);

            //example of setting keepAlive to avoid timeouts on inactive http2 connections.
            // Under 5 minutes would require changes to server side to accept faster ping rates.
            ordererProperties.put("grpc.NettyChannelBuilderOption.keepAliveTime", new Object[] {5L, TimeUnit.MINUTES});
            ordererProperties.put("grpc.NettyChannelBuilderOption.keepAliveTimeout", new Object[] {8L, TimeUnit.SECONDS});
            ordererProperties.put("grpc.NettyChannelBuilderOption.keepAliveWithoutCalls", new Object[] {true});


            orderers.add(client.newOrderer(orderName, sampleOrg.getOrdererLocation(orderName),
                    ordererProperties));
        }
sampleOrg.getOrdererLocation 获取的是TestConfig配置的orderer grpc的url,下面是默认值
defaultProperty(INTEGRATIONTESTS_ORG + "peerOrg1.orderer_locations", "orderer.example.com@grpc://" + LOCALHOST + ":7050");
c.接着创建一个channel
跟上面fabric官方的例子过程类似,这里使用的是Configtxgen 生成的“通道配置”文件(上文说过Configtxgen生成了4种文件,这里用到了):src/test/fixture/sdkintegration/e2e-2Orgs/V1.1/foo.tx
        //Just pick the first orderer in the list to create the channel.

        Orderer anOrderer = orderers.iterator().next();
        orderers.remove(anOrderer);

        ChannelConfiguration channelConfiguration = new ChannelConfiguration(new File(TEST_FIXTURES_PATH + "/sdkintegration/e2e-2Orgs/" + TestConfig.FAB_CONFIG_GEN_VERS + "/" + name + ".tx"));

        //Create channel that has only one signer that is this orgs peer admin. If channel creation policy needed more signature they would need to be added too.
        Channel newChannel = client.newChannel(name, anOrderer, channelConfiguration, client.getChannelConfigurationSignature(channelConfiguration, sampleOrg.getPeerAdmin()));

        out("Created channel %s", name);
d.接着client.newPeer创建peer节点,然后joinPeer加入通道channel中
joinPeer逻辑较为复杂,主要过程是先签名,再把加入通道的提案Proposal发送给所有的peers节点,这里先不展开
       boolean everyother = true; //test with both cases when doing peer eventing.
        for (String peerName : sampleOrg.getPeerNames()) {
            String peerLocation = sampleOrg.getPeerLocation(peerName);

            Properties peerProperties = testConfig.getPeerProperties(peerName); //test properties for peer.. if any.
            if (peerProperties == null) {
                peerProperties = new Properties();
            }


            //Example of setting specific options on grpc's NettyChannelBuilder
            peerProperties.put("grpc.NettyChannelBuilderOption.maxInboundMessageSize", 9000000);

            Peer peer = client.newPeer(peerName, peerLocation, peerProperties);
            if (doPeerEventing && everyother) {
                newChannel.joinPeer(peer, createPeerOptions()); //Default is all roles.
            } else {
                // Set peer to not be all roles but eventing.
                newChannel.joinPeer(peer, createPeerOptions().setPeerRoles(PeerRole.NO_EVENT_SOURCE));
            }
            out("Peer %s joined channel %s", peerName, name);
            everyother = !everyother;
        }
peerLocation获取的是TestConfig配置的peer 的grpc的url,下面是默认值
defaultProperty(INTEGRATIONTESTS_ORG + "peerOrg1.peer_locations", "peer0.org1.example.com@grpc://" + LOCALHOST + ":7051, peer1.org1.example.com@grpc://" + LOCALHOST + ":7056");
e.接着是给channel设置监听事件的grpc接口,最后进行初始化
        for (String eventHubName : sampleOrg.getEventHubNames()) {

            final Properties eventHubProperties = testConfig.getEventHubProperties(eventHubName);

            eventHubProperties.put("grpc.NettyChannelBuilderOption.keepAliveTime", new Object[] {5L, TimeUnit.MINUTES});
            eventHubProperties.put("grpc.NettyChannelBuilderOption.keepAliveTimeout", new Object[] {8L, TimeUnit.SECONDS});


            EventHub eventHub = client.newEventHub(eventHubName, sampleOrg.getEventHubLocation(eventHubName),
                    eventHubProperties);
            newChannel.addEventHub(eventHub);
        }

        newChannel.initialize();
- runChannel
a.安装链码,安装的链码文件是java里面的example_cc.go这个用go语言编写的链码文件
            if (installChaincode) {
                // 一大段代码设置安装的链码信息
                // 发送安装链码的交易提案
                responses = client.sendInstallProposal(installProposalRequest, peers);
            }
b.初始化链码实例,设置背书策略
            ///
             Instantiate chaincode.
            InstantiateProposalRequest instantiateProposalRequest = client.newInstantiationProposalRequest();
            instantiateProposalRequest.setProposalWaitTime(testConfig.getProposalWaitTime());
            instantiateProposalRequest.setChaincodeID(chaincodeID);
            instantiateProposalRequest.setChaincodeLanguage(CHAIN_CODE_LANG);
            instantiateProposalRequest.setFcn("init");
            instantiateProposalRequest.setArgs(new String[] {"a", "500", "b", "" + (200 + delta)});
            Map<String, byte[]> tm = new HashMap<>();
            tm.put("HyperLedgerFabric", "InstantiateProposalRequest:JavaSDK".getBytes(UTF_8));
            tm.put("method", "InstantiateProposalRequest".getBytes(UTF_8));
            instantiateProposalRequest.setTransientMap(tm);

            /*
              policy OR(Org1MSP.member, Org2MSP.member) meaning 1 signature from someone in either Org1 or Org2
              See README.md Chaincode endorsement policies section for more details.
            */
            ChaincodeEndorsementPolicy chaincodeEndorsementPolicy = new ChaincodeEndorsementPolicy();
            chaincodeEndorsementPolicy.fromYamlFile(new File(TEST_FIXTURES_PATH + "/sdkintegration/chaincodeendorsementpolicy.yaml"));
            instantiateProposalRequest.setChaincodeEndorsementPolicy(chaincodeEndorsementPolicy);

            out("Sending instantiateProposalRequest to all peers with arguments: a and b set to 100 and %s respectively", "" + (200 + delta));
            successful.clear();
            failed.clear();

            if (isFooChain) {  //Send responses both ways with specifying peers and by using those on the channel.
                responses = channel.sendInstantiationProposal(instantiateProposalRequest, channel.getPeers());
            } else {
                responses = channel.sendInstantiationProposal(instantiateProposalRequest);
            }
c.最后是一段超长的垃圾代码,只是为了测试是否ok,为啥不写单测,好恶心...
channel.sendTransaction(successful, createTransactionOptions()
                    .userContext(client.getUserContext())
                    .shuffleOrders(false)
                    .orderers(channel.getOrderers())
                    .nOfEvents(nOfEvents)
            ).thenApply(transactionEvent -> {
// 调用example_cc.go里面的move方法,a给b转账
}.thenApply(transactionEvent -> {
// query查询b的余额
                try {
}).exceptionally(e -> {
// 异常处理
}
d.最后是一些查询区块高度、信息之类
精彩业务case从0->1开发未完待续....