TensorFlow模型保存和加载方法
模型保存
import tensorflow as tf

w1 = tf.Variable(tf.constant(2.0, shape=[1]), name="w1-name") w2 = tf.Variable(tf.constant(3.0, shape=[1]), name="w2-name") a = tf.placeholder(dtype=tf.float32, name="a-name") b = tf.placeholder(dtype=tf.float32, name="b-name") y = a * w1 + b * w2 init = tf.global_variables_initializer() saver = tf.train.Saver() with tf.Session() as sess: sess.run(init) print(a) # Tensor("a-name:0", dtype=float32) print(b) # Tensor("b-name:0", dtype=float32) print(y) # Tensor("add:0", dtype=float32) print(sess.run(y, feed_dict={a: 10, b: 10})) saver.save(sess, "./model/model.ckpt")- 1
- 2
- 3
- 4
- 5
- 6
- 7
- 8
- 9
- 10
- 11
- 12
- 13
- 14
- 15
- 16
- 17
- 18
- 19
- 20
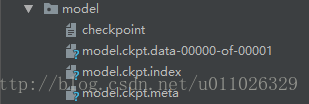
这段代码中,通过saver.save函数将TensorFlow模型保存到了model/model.ckpt文件中,这里代码中指定路径为"model/model.ckpt",也就是保存到了当前程序所在文件夹里面的model文件夹中。
TensorFlow模型会保存在后缀为.ckpt的文件中。保存后在save这个文件夹中实际会出现3个文件,因为TensorFlow会将计算图的结构和图上参数取值分开保存。
model.ckpt.meta文件保存了TensorFlow计算图的结构,可以理解为神经网络的网络结构model.ckpt文件保存了TensorFlow程序中每一个变量的取值checkpoint文件保存了一个目录下所有的模型文件列表
模型加载:只加载变量,但是还是需要重新定义图结构
import tensorflow as tf

# 使用和保存模型代码中一样的方式来声明变量
# 变量rw1, rw2 不需要进行初始化
rw1 = tf.Variable(tf.constant(2.0, shape=[1]), name="w1-name") rw2 = tf.Variable(tf.constant(3.0, shape=[1]), name="w2-name") # 重新定义图结构 result = 10 * rw1 + 10 * rw2 saver = tf.train.Saver() with tf.Session() as sess: saver.restore(sess, "./model/model.ckpt") print(sess.run(result))- 1
- 2
- 3
- 4
- 5
- 6
- 7
- 8
- 9
- 10
- 11
- 12
- 13
- 14
- 15
tf.train.Saver类也支持在保存和加载时给变量重命名
import tensorflow as tf

# 声明的变量名称name与已保存的模型中的变量名称name不一致
rw1 = tf.Variable(tf.constant(2.0, shape=[1]), name="rw1-name") rw2 = tf.Variable(tf.constant(3.0, shape=[1]), name="rw2-name") # 重新定义图结构 result = 10 * rw1 + 10 * rw2 # 若直接生命Saver类对象,会报错变量找不到 # 使用一个字典dict重命名变量即可,{"已保存的变量的名称name": 重命名变量名} # 原来名称name为 w1-name 的变量现在加载到变量 rw1(名称name为 rw1-name)中 saver = tf.train.Saver({"w1-name": rw1, "w2-name": rw2}) with tf.Session() as sess: saver.restore(sess, "./model/model.ckpt") print(sess.run(result))- 1
- 2
- 3
- 4
- 5
- 6
- 7
- 8
- 9
- 10
- 11
- 12
- 13
- 14
- 15
- 16
- 17
模型加载: 不需要重新定义图结构
import tensorflow as tf

saver = tf.train.import_meta_graph("./model/model.ckpt.meta")
graph = tf.get_default_graph()

# 通过 Tensor 名获取变量
a = graph.get_tensor_by_name("a-name:0") b = graph.get_tensor_by_name("b-name:0") y = graph.get_tensor_by_name("add:0") with tf.Session() as sess: saver.restore(sess, "./model/model.ckpt") print(sess.run(y, feed_dict={a: 10, b: 10}))- 1
- 2
- 3
- 4
- 5
- 6
- 7
- 8
- 9
- 10
- 11
- 12
- 13
convert_variables_to_constants
# 通过convert_variables_to_constants函数将计算图中的变量及其取值通过常量的方式保存于一个文件中

import tensorflow as tf
from tensorflow.python.framework import graph_util v1 = tf.Variable(tf.constant(1.0, shape=[1]), name="v1") v2 = tf.Variable(tf.constant(2.0, shape=[1]), name="v2") result = v1 + v2 with tf.Session() as sess: sess.run(tf.global_variables_initializer()) # 导出当前计算图的GraphDef部分,即从输入层到输出层的计算过程部分 graph_def = tf.get_default_graph().as_graph_def() output_graph_def = graph_util.convert_variables_to_constants(sess, graph_def, ['add']) with tf.gfile.GFile("Model/combined_model.pb", 'wb') as f: f.write(output_graph_def.SerializeToString()) # 载入包含变量及其取值的模型 import tensorflow as tf from tensorflow.python.platform import gfile with tf.Session() as sess: model_filename = "Model/combined_model.pb" with gfile.FastGFile(model_filename, 'rb') as f: graph_def = tf.GraphDef() graph_def.ParseFromString(f.read()) result = tf.import_graph_def(graph_def, return_elements=["add:0"]) print(sess.run(result)) # [array([ 3.], dtype=float32)]- 1
- 2
- 3
- 4
- 5
- 6
- 7
- 8
- 9
- 10
- 11
- 12
- 13
- 14
- 15
- 16
- 17
- 18
- 19
- 20
- 21
- 22
- 23
- 24
- 25
- 26
- 27
- 28
- 29
- 30
- 31
- 32
TensorFlow 模型保存/载入的两种方法
我们在上线使用一个算法模型的时候,首先必须将已经训练好的模型保存下来。tensorflow保存模型的方式与sklearn不太一样,sklearn很直接,一个sklearn.externals.joblib的dump与load方法就可以保存与载入使用。而tensorflow由于有graph,operation 这些概念,保存与载入模型稍显麻烦。
一、基本方法
网上搜索tensorflow模型保存,搜到的大多是基本的方法。即
保存
- 定义变量
- 使用saver.save()方法保存
载入
- 定义变量
- 使用saver.restore()方法载入
如 保存 代码如下
import tensorflow as tf
import numpy as np

W = tf.Variable([[1,1,1],[2,2,2]],dtype = tf.float32,name='w') b = tf.Variable([[0,1,2]],dtype = tf.float32,name='b') init = tf.initialize_all_variables() saver = tf.train.Saver() with tf.Session() as sess: sess.run(init) save_path = saver.save(sess,"save/model.ckpt") - 1
- 2
- 3
- 4
- 5
- 6
- 7
- 8
- 9
- 10
- 11
载入代码如下:
import tensorflow as tf
import numpy as np

W = tf.Variable(tf.truncated_normal(shape=(2,3)),dtype = tf.float32,name='w') b = tf.Variable(tf.truncated_normal(shape=(1,3)),dtype = tf.float32,name='b') saver = tf.train.Saver() with tf.Session() as sess: saver.restore(sess,"save/model.ckpt") - 1
- 2
- 3
- 4
- 5
- 6
- 7
- 8
- 9
这种方法不方便的在于,在使用模型的时候,必须把模型的结构重新定义一遍,然后载入对应名字的变量的值。但是很多时候我们都更希望能够读取一个文件然后就直接使用模型,而不是还要把模型重新定义一遍。所以就需要使用另一种方法。
二、不需重新定义网络结构的方法
tf.train.import_meta_graph
import_meta_graph(
    meta_graph_or_file,
    clear_devices=False,
    import_scope=None,
    **kwargs
)- 1
- 2
- 3
- 4
- 5
- 6
这个方法可以从文件中将保存的graph的所有节点加载到当前的default graph中,并返回一个saver。也就是说,我们在保存的时候,除了将变量的值保存下来,其实还有将对应graph中的各种节点保存下来,所以模型的结构也同样被保存下来了。
比如我们想要保存计算最后预测结果的y,则应该在训练阶段将它添加到collection中。具体代码如下 :
保存
### 定义模型
input_x = tf.placeholder(tf.float32, shape=(None, in_dim), name='input_x')
input_y = tf.placeholder(tf.float32, shape=(None, out_dim), name='input_y') w1 = tf.Variable(tf.truncated_normal([in_dim, h1_dim], stddev=0.1), name='w1') b1 = tf.Variable(tf.zeros([h1_dim]), name='b1') w2 = tf.Variable(tf.zeros([h1_dim, out_dim]), name='w2') b2 = tf.Variable(tf.zeros([out_dim]), name='b2') keep_prob = tf.placeholder(tf.float32, name='keep_prob') hidden1 = tf.nn.relu(tf.matmul(self.input_x, w1) + b1) hidden1_drop = tf.nn.dropout(hidden1, self.keep_prob) ### 定义预测目标 y = tf.nn.softmax(tf.matmul(hidden1_drop, w2) + b2) # 创建saver saver = tf.train.Saver(...variables...) # 假如需要保存y,以便在预测时使用 tf.add_to_collection('pred_network', y) sess = tf.Session() for step in xrange(1000000): sess.run(train_op) if step % 1000 == 0: # 保存checkpoint, 同时也默认导出一个meta_graph # graph名为'my-model-{global_step}.meta'. saver.save(sess, 'my-model', global_step=step)- 1
- 2
- 3
- 4
- 5
- 6
- 7
- 8
- 9
- 10
- 11
- 12
- 13
- 14
- 15
- 16
- 17
- 18
- 19
- 20
- 21
- 22
- 23
- 24
载入
with tf.Session() as sess:
  new_saver = tf.train.import_meta_graph('my-save-dir/my-model-10000.meta')
  new_saver.restore(sess, 'my-save-dir/my-model-10000')
# tf.get_collection() 返回一个list. 但是这里只要第一个参数即可 y = tf.get_collection('pred_network')[0] graph = tf.get_default_graph() # 因为y中有placeholder,所以sess.run(y)的时候还需要用实际待预测的样本以及相应的参数来填充这些placeholder,而这些需要通过graph的get_operation_by_name方法来获取。 input_x = graph.get_operation_by_name('input_x').outputs[0] keep_prob = graph.get_operation_by_name('keep_prob').outputs[0] # 使用y进行预测 sess.run(y, feed_dict={input_x:...., keep_prob:1.0})- 1
- 2
- 3
- 4
- 5
- 6
- 7
- 8
- 9
- 10
- 11
- 12
- 13
- 14
具体示例
save.py
import tensorflow as tf
from tensorflow.examples.tutorials.mnist import input_data

# 加载数据集 mnist = input_data.read_data_sets("data", one_hot=True) # Parameters learning_rate = 0.001 batch_size = 100 display_step = 10 model_path = "save/model.ckpt" # Network Parameters n_hidden_1 = 256 # 1st layer number of features n_hidden_2 = 256 # 2st layer number of features n_input = 784 # MNIST data input (img shape: 28*28) n_classes = 10 # MNIST total classes (0-9 digits) # tf Graph input x = tf.placeholder(tf.float32, [None, n_input], name="input_x") y = tf.placeholder(tf.float32, [None, n_classes], name="input_y") # Store layers weight & bias weights = { 'h1': tf.Variable(tf.random_normal([n_input, n_hidden_1])), 'h2': tf.Variable(tf.random_normal([n_hidden_1, n_hidden_2])), 'out': tf.Variable(tf.random_normal([n_hidden_2, n_classes])) } biases = { 'b1': tf.Variable(tf.random_normal([n_hidden_1])), 'b2': tf.Variable(tf.random_normal([n_hidden_2])), 'out': tf.Variable(tf.random_normal([n_classes])) } # Create model def multilayer_perceptron(x, weights, biases): # layer1 h1 = tf.add(tf.matmul(x, weights['h1']), biases['b1']) h1 = tf.nn.relu(h1) # layer2 h2 = tf.add(tf.matmul(h1, weights['h2']), biases['b2']) h2 = tf.nn.relu(h2) # out out = tf.add(tf.matmul(h2, weights['out']), biases['out']) return out # Construct model logits = multilayer_perceptron(x, weights, biases) pred = tf.nn.softmax(logits) # Define loss and optimizer cost = tf.reduce_mean(tf.nn.softmax_cross_entropy_with_logits(logits=logits, labels=y)) optimizer = tf.train.AdamOptimizer(learning_rate=learning_rate).minimize(cost) corrcet_pred = tf.equal(tf.argmax(pred, 1), tf.argmax(y, 1)) accuracy = tf.reduce_mean(tf.cast(corrcet_pred, tf.float32)) # Initializing the variables init = tf.global_variables_initializer() # 保存模型 saver = tf.train.Saver() tf.add_to_collection("pred", pred) tf.add_to_collection('acc', accuracy) with tf.Session() as sess: sess.run(init) step = 0 while step * batch_size < 180000: batch_xs, batch_ys = mnist.train.next_batch(batch_size) loss, _, acc = sess.run([cost, optimizer, accuracy], feed_dict={x: batch_xs, y: batch_ys}) if step % display_step == 0: # step: 1790 loss: 16.9724 acc: 0.95 print("step: ", step, "loss: ", loss, "acc: ", acc) saver.save(sess, save_path=model_path, global_step=step) step += 1 print("Train Finish!")- 1
- 2
- 3
- 4
- 5
- 6
- 7
- 8
- 9
- 10
- 11
- 12
- 13
- 14
- 15
- 16
- 17
- 18
- 19
- 20
- 21
- 22
- 23
- 24
- 25
- 26
- 27
- 28
- 29
- 30
- 31
- 32
- 33
- 34
- 35
- 36
- 37
- 38
- 39
- 40
- 41
- 42
- 43
- 44
- 45
- 46
- 47
- 48
- 49
- 50
- 51
- 52
- 53
- 54
- 55
- 56
- 57
- 58
- 59
- 60
- 61
- 62
- 63
- 64
- 65
- 66
- 67
- 68
- 69
- 70
- 71
- 72
- 73
- 74
- 75
- 76
- 77
- 78
- 79
- 80
- 81
- 82
- 83
checkpoint:
model_checkpoint_path: "model.ckpt-1790"
all_model_checkpoint_paths: "model.ckpt-1750"
all_model_checkpoint_paths: "model.ckpt-1760" all_model_checkpoint_paths: "model.ckpt-1770" all_model_checkpoint_paths: "model.ckpt-1780" all_model_checkpoint_paths: "model.ckpt-1790"- 1
- 2
- 3
- 4
- 5
- 6
restore.py
import tensorflow as tf
from tensorflow.examples.tutorials.mnist import input_data

# load mnist data mnist = input_data.read_data_sets("data", one_hot=True) with tf.Session() as sess: new_saver = tf.train.import_meta_graph("save/model.ckpt-1790.meta") new_saver.restore(sess, "save/model.ckpt-1790") # tf.get_collection() 返回一个list. 但是这里只要第一个参数即可 pred = tf.get_collection("pred")[0] acc = tf.get_collection("acc")[0] # 因为 pred, acc 中有 placeholder,所以 sess.run(acc)的时候还需要用实际待预测的样本以及相应的参数来填充这些placeholder, # 而这些需要通过graph的get_operation_by_name方法来获取。 graph = tf.get_default_graph() x = graph.get_operation_by_name("input_x").outputs[0] y = graph.get_operation_by_name("input_y").outputs[0] test_xs = mnist.test.images test_ys = mnist.test.labels #test set acc: [0.91820002] print("test set acc: ", sess.run([acc], feed_dict={ x: test_xs, y: test_ys }))
原文:https://blog.csdn.net/u011026329/article/details/79190347