2019独角兽企业重金招聘Python工程师标准>>> 
关于授权认证请看这篇
后台授权认证弄完了现在搞前台。 模版是用 Angular 的ngx-admin. 效果很酷炫。
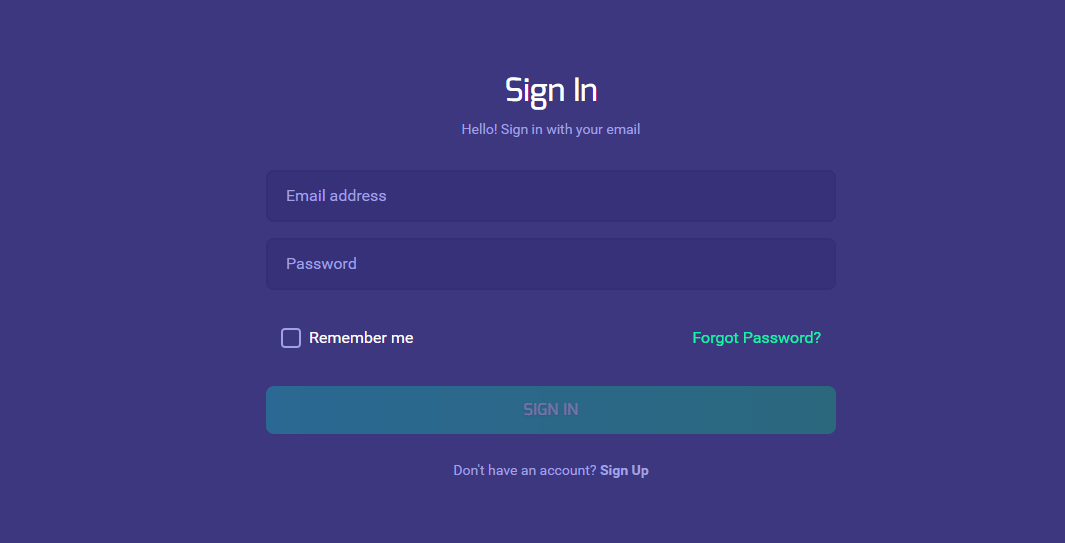
重写了login component, 将原有的那个google ,facebook 等第三方登入先移除掉。查看
修改方法也很简单,自己从新注册这个component。
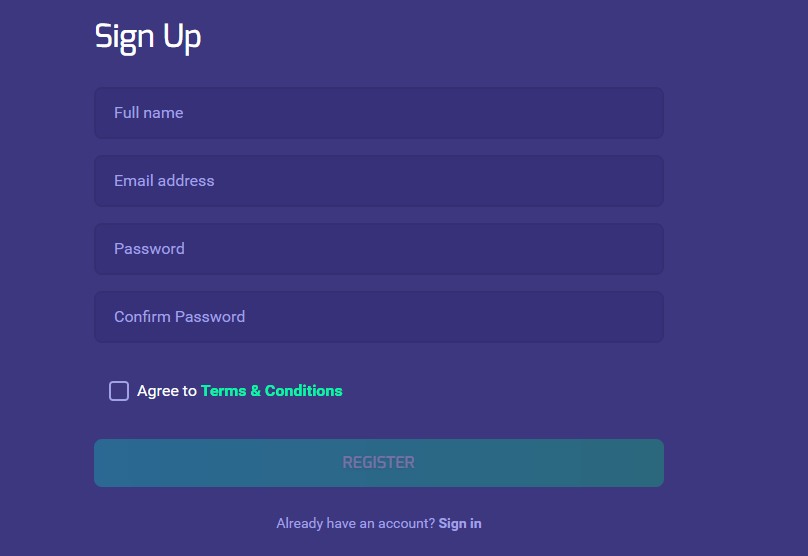
同理 注册页面也是一样的
国际化也已经添加 这里就不介绍了。
下面主要的是代码逻辑。 建议可以先看一下这个文档
const NB_CORE_PROVIDERS = [
  ...DataModule.forRoot().providers,
  ...NbAuthModule.forRoot({
    providers: {
      email: {
        service: NbEmailPassAuthProvider,
        config: {
          baseEndpoint: '/api',
          delay: 500,
          login: {
            rememberMe: true,
            endpoint: '/oauth/token',
            method: 'post',
            redirect: {
              success: '/',
              failure: null,
            },
            defaultErrors: ['auth.login.loginError'],
            defaultMessages: ['auth.login.loginSuccess'],
          },
          register: {
            endpoint: '/user/register',
            method: 'post',
            redirect: {
              success: '/',
              failure: null,
            },
            defaultErrors: 'Register error',
            defaultMessages: 'Success',
          },
          token: {
            key: 'access_token',
          },
        },
      },
    },
    forms: {
      login: {
        socialLinks: socialLinks,
      },
      register: {
        socialLinks: socialLinks,
      },
    },
  }).providers,
提供一个provider.
登入 /api/oauth/token
注册 /api/user/register
启动的时候几个配置 proxy,
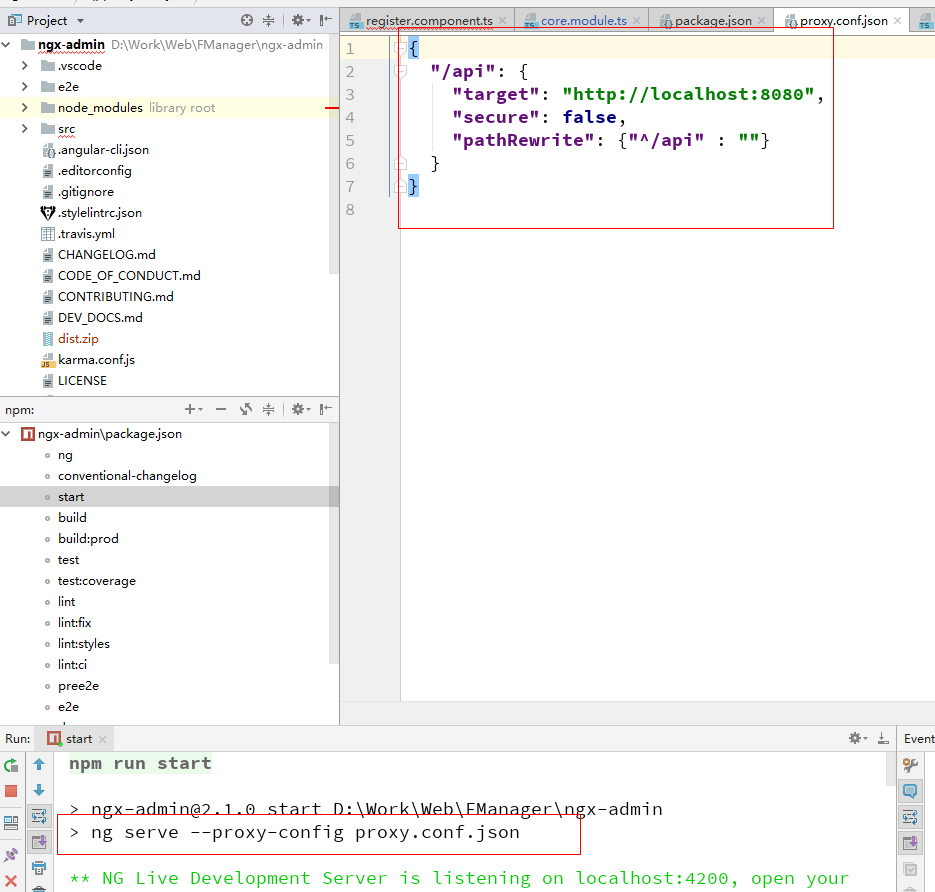
这样当你访问 /api/oauth/token 它会访问 localhost:8080/oauth/token
angular 里面提供的http 请求时候的拦截器,在登入的时候我们在拦截器里面添加head 属性
/**
 * Created by fky on 4/4/2018.
 */
import {Injectable} from '@angular/core';
import {HttpInterceptor, HttpHandler, HttpRequest, HttpEvent} from '@angular/common/http';
import {Md5} from 'ts-md5/dist/md5'
import {Observable} from 'rxjs/Observable';
import 'rxjs/add/operator/do';
import {NbTokenService} from '@nebular/auth/services/token/token.service'
import 'rxjs/add/operator/switchMap';

@Injectable()
export class RequestInterceptor implements HttpInterceptor {


  constructor(private nbTokenService: NbTokenService) {

  }


  intercept(req: HttpRequest<any>,
            next: HttpHandler): Observable<HttpEvent<any>> {

    if (req.url === '/api/oauth/token') {
      const requestCopy = req.clone({
          headers: req.headers
            .append('Content-Type', 'application/x-www-form-urlencoded;charset=utf-8') //spring auth token 验证需要这个 type
            .append('authorization', 'Basic dGVzdGp3dGNsaWVudGlkOlhZN2ttem9OemwxMDA='), // 这个是clientid 和client_secret basic
          body: 'username=' + req.body.email + '&password=' + Md5.hashStr(req.body.password) + '&grant_type=password',
        },
      );
      return next.handle(requestCopy);
    } else if (req.url === '/api/user/register') {
      const requestCopy = req.clone({
          body: {
            email: req.body.email,
            username: req.body.username,
            password: Md5.hashStr(req.body.password),
            confirmPassword: Md5.hashStr(req.body.confirmPassword),
            terms: req.body.terms,
          },
        },
      );
      return next.handle(requestCopy);
    } else {
      return this.nbTokenService.get().switchMap(tokenObj => {
        const token = tokenObj.getValue();
        const requestCopy = req.clone({
          headers: req.headers
            .append('Authorization', 'Bearer ' + token),
        });
        return next.handle(requestCopy);
      });
    }
  }
}
登入时候我把密码MD5了一下。
登入的后台验证过程都是spring完成的, 我们只是之前配置了一下。 逻辑可以看一下源码
类:org.springframework.security.oauth2.provider.endpoint.TokenEndpoint.class
@RequestMapping(value = "/oauth/token", method=RequestMethod.POST)
	public ResponseEntity<OAuth2AccessToken> postAccessToken(Principal principal, @RequestParam
	Map<String, String> parameters) throws HttpRequestMethodNotSupportedException {

		if (!(principal instanceof Authentication)) {
			throw new InsufficientAuthenticationException(
					"There is no client authentication. Try adding an appropriate authentication filter.");
		}

		String clientId = getClientId(principal);
		ClientDetails authenticatedClient = getClientDetailsService().loadClientByClientId(clientId);

		TokenRequest tokenRequest = getOAuth2RequestFactory().createTokenRequest(parameters, authenticatedClient);

		if (clientId != null && !clientId.equals("")) {
			// Only validate the client details if a client authenticated during this
			// request.
			if (!clientId.equals(tokenRequest.getClientId())) {
				// double check to make sure that the client ID in the token request is the same as that in the
				// authenticated client
				throw new InvalidClientException("Given client ID does not match authenticated client");
			}
		}
		if (authenticatedClient != null) {
			oAuth2RequestValidator.validateScope(tokenRequest, authenticatedClient);
		}
		if (!StringUtils.hasText(tokenRequest.getGrantType())) {
			throw new InvalidRequestException("Missing grant type");
		}
		if (tokenRequest.getGrantType().equals("implicit")) {
			throw new InvalidGrantException("Implicit grant type not supported from token endpoint");
		}

		if (isAuthCodeRequest(parameters)) {
			// The scope was requested or determined during the authorization step
			if (!tokenRequest.getScope().isEmpty()) {
				logger.debug("Clearing scope of incoming token request");
				tokenRequest.setScope(Collections.<String> emptySet());
			}
		}

		if (isRefreshTokenRequest(parameters)) {
			// A refresh token has its own default scopes, so we should ignore any added by the factory here.
			tokenRequest.setScope(OAuth2Utils.parseParameterList(parameters.get(OAuth2Utils.SCOPE)));
		}

		OAuth2AccessToken token = getTokenGranter().grant(tokenRequest.getGrantType(), tokenRequest);
		if (token == null) {
			throw new UnsupportedGrantTypeException("Unsupported grant type: " + tokenRequest.getGrantType());
		}

		return getResponse(token);

	}
登入成功 返回一串token 值 , 后续验证用户时候只要带这串token 就可以了。
注册 后台controller
@RestController
@RequestMapping("/user")
public class UserController {

	@Autowired
	private UserServcie userService;

	@RequestMapping(value = "/register", method = RequestMethod.POST)
	public ResponseEntity<OAuth2AccessToken> register(@RequestBody User user) throws RestException {
		OAuth2AccessToken token = userService.registerUser(user);
		HttpHeaders headers = new HttpHeaders();
		headers.set("Cache-Control", "no-store");
		headers.set("Pragma", "no-cache");
		return new ResponseEntity<OAuth2AccessToken>(token, headers, HttpStatus.OK);
	}

}
@Override
	public OAuth2AccessToken registerUser(User user) throws RestException {

		User u = userDAO.findByEmail(user.getEmail());
		if (u != null) {
			throw new RestException("User email exist");
		}

		User copy = new User();
		BeanUtils.copyProperties(user, copy);

		// 将得到的 md5 密码再加密一边存数据库
		// encode password
		BCryptPasswordEncoder encoder = new BCryptPasswordEncoder();
		copy.setPassword(encoder.encode(user.getPassword()));
		userDAO.registerUser(copy);

		return createToken(user);
	}

	private OAuth2AccessToken createToken(User user) {
		Map<String,String> param = new HashMap<>();

		param.put("username", user.getEmail());
		param.put("password", user.getPassword());
		param.put("grant_type", grantType);

		Set<String> scopes = new HashSet<>();
		scopes.add(scopeRead);
		scopes.add(scopeWrite);

		TokenRequest tokenRequest = new TokenRequest(param, clientId, scopes, grantType);
		ClientDetails authenticatedClient =  clientDetailsService.loadClientByClientId(clientId);

		//user password authentication token
		Authentication userAuth = new UsernamePasswordAuthenticationToken(user.getEmail(), user.getPassword());
		param.remove("password");
		((AbstractAuthenticationToken) userAuth).setDetails(param);

		userAuth = authenticationManager.authenticate(userAuth);
		return tokenServices.createAccessToken(new OAuth2Authentication(tokenRequest.createOAuth2Request(authenticatedClient), userAuth));
	}
写注册时候 成功的时候要返回token 给我一阵好整。 分析了login的整个流程,用新注册的账号重新模拟再登入一遍。 返回token 前台直接跳到home page.
仓库:https://gitee.com/codefans/fmanager
https://gitee.com/codefans/admin-cli
欢迎小伙伴加入一起玩耍