JS组件化验证检测
作者:Jiang, Jilin
在web开发过程中,我们时常会遇到输入检测的情况。如果只是简单的输入验证检测,例如邮箱、电话等。我们可以简单的使用if…else if…来依次判断。但是如果这些判断存在延迟检测(例如ajax验证),再使用if…else if…已经无法满足需求了。
但是好在,利用jQuery的deffer方法。通过done(func)嵌套,可以实现序列化的检测:

| $deferred.done(function() { // Condition $deferred.done(function() { // Condition $deferred.done(function() { // Condition $deferred.done(function() { // Condition $deferred.done(function() { // Condition // do something }); }); }); }); }); |
通过嵌套依次进行检测
通常而言,通过这种嵌套,可以实现大多数的检测判断。但是如果我们考虑如下的检测顺序:
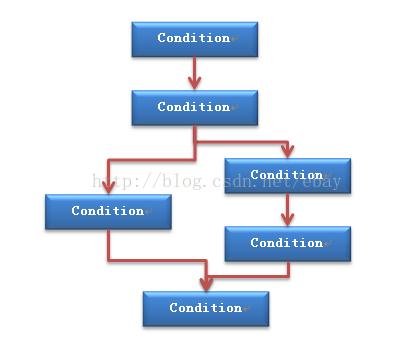
在这种多分支的情况下,使用deffer如下:
| var _once = true; function finalCheck() { if(!_once) return; _once = false;
$deferred.done(function() { // Condition // do something }); }
$deferred.done(function() { // Condition $deferred.done(function() { // Condition $deferred.done(function() { // Condition finalCheck(); }); $deferred.done(function() { // Condition $deferred.done(function() { // Condition finalCheck(); }); }); }); }); |
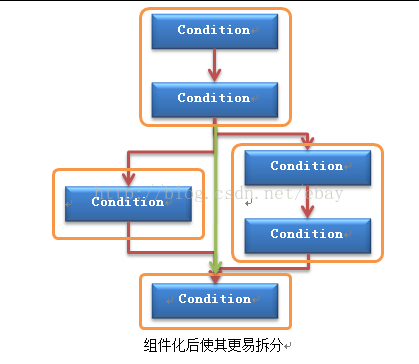
可以发现随着分支增多,代码结构会变得越来越复杂。随着时间推移,如果需求变更。需要在判断中增加、删除甚至添加一个分支的时候。你会发现,这种结构很难维护。
那么如何通过封装来将此结构保持最好的维护性呢?我们可以通过将一个个检测条件打包,变成一个个组件。通过组合组件顺序,便可组织出我们需要的检测结构。
| 第一种结构设计: new Condition(function(result) { // Condition result.success(); }).next(function(result) { // Condition result.success(); }).next(function(result) { // Condition result.success(); }).next(function(result) { // Condition result.success(); }).next(function(result) { // Condition result.success(); }). success(function() { // do something }).start(); |
| 第二种结构设计: var seq1 = new Condition(function(result) { // Condition result.success(); }).next(function(result) { // Condition result.success(); });
var seq2_1 = new Condition(function(result) { // Condition result.success(); }); var seq2_2 = new Condition(function(result) { // Condition result.success() }).next(function(result) { // Condition result.success(); });
seq1 .nextOr(seq2_1, seq2_2) .next(function(result) { // Condition result.success(); }). success(function() { // do something }).start(); |
接下来,我们开始构建我们的组件容器:
| var Condition = function(func) { this.func = func; this.root = null; this.successFunc = null; return this; }; |
其中,通过调用next方法,可以添加一个新的检测条件,并返回一个新的组件:
| Condition.prototype.next = function(func) { var _next = new Condition(func); _next.root = this.root || this; this._next = _next; return _next; }; |
添加success方法用于存储检测成功的回调函数:
| Condition.prototype.success = function(func) { this.successFunc = func; return this; }; |
接着,就是添加start事件。当其被调用时,开始整个检测序列:
| Condition.prototype._doAction = function() { var _this = this; _this.func({ success: function() { // 如果该组件有success回调,则调用 if(_this.successFunc) { _this.successFunc(); } // 如果有后续组件则继续调用 if(_this._next) { _this._next._doAction(); } } }); };
Condition.prototype.start = function() { (this.root || this)._doAction(); }; |
测试如下:
| new Condition(function(result) { console.log("Condition 1"); result.success(); }).success(function() { console.log("Success 1"); }).next(function(result) { console.log("Condition 2"); result.success(); }).success(function() { console.log("Success 2"); }).start();
// Condition 1 // Success 1 // Condition 2 // Success 2 |
有时候,我们会需要支持多个success事件,所以可以对success方法进行扩充:
| var Condition = function(func) { this.func = func; this.root = null; this.successFunc = []; return this; }; |
| Condition.prototype.success = function(func) { this.successFunc.push(func); return this; }; |
| // 如果该组件有success回调,则调用 for(var i = 0 ; i < _this.successFunc.length ; i += 1) { _this.successFunc[i](); } |
然后考虑or分支结构,我们使用一个数组保存Condition列表。当执行到包含列表的组件时,遍历执行:
| Condition.prototype.nextOr = function() { var _next = new Condition(function(result) { result.success(); }); _next.root = this.root || this; this._next = _next;
this._nextList = arguments; for(var i = 0 ; i < arguments.length ; i += 1) { arguments[i].success(function() { _next._doAction(); }); } return _next; }; |
同时,我们需要改写_doAction方法,使其支持多个Condition运行:
| Condition.prototype._doAction = function() { var _this = this; _this.func({ success: function() { // 如果该组件有success回调,则调用 if(_this.successFunc) { _this.successFunc(); } // 如果有后续组件则继续调用 if(_this._next) { if(_this._nextList) { for(var i = 0 ; i < _this._nextList.length ; i += 1) { _this._nextList[i].start (); } } else { _this._next._doAction(); } } } }); }; |
测试如下:
| var s1 = new Condition(function(result) { console.log("Condition 1.1"); result.success(); }).next(function(result) { console.log("Condition 1.2"); result.success(); });
var s2_1 = new Condition(function(result) { console.log("Condition 2-1"); result.success(); }); var s2_2 = new Condition(function(result) { console.log("Condition 2-2.1"); result.success(); }).next(function(result) { console.log("Condition 2-2.2"); result.success(); }); s1.nextOr(s2_1, s2_2).success(function() { console.log("Condition 3"); }).start();
// Condition 1.1 // Condition 1.2 // Condition 2-1 // Condition 3 // Condition 2-2.1 // Condition 2-2.2 // Condition 3 |
我们发现通过两个分支走后,都调用了Condition3,这是我们不希望看到的。我们接下去要实现组件的once:
| Condition.prototype.nextOr = function() { var _once = true; var _next = new Condition(function(result) { result.success(); }); _next.root = this.root || this; this._next = _next;
this._nextList = arguments; for(var i = 0 ; i < arguments.length ; i += 1) { arguments[i].success(function() { if(!_once) return; _once = false;
_next._doAction(); }); } return _next; }; |
测试如下:
| // Condition 1.1 // Condition 1.2 // Condition 2-1 // Condition 3 // Condition 2-2.1 // Condition 2-2.2 |
| 小贴士:在Condition中使用once和原来的结构中使用once区别是什么? 将分支管理逻辑从代码中剥离可以减少代码复杂度,从而提升代码的可读性和维护性。 |
大致功能已经完成,但是仍然不满意。因为第一个分支已经成功的情况下,第二个分支还是走了一边。在不产生效果的情况下,该分支其实可以跳过。对doAction进行扩展:
| Condition.prototype._doAction = function() { var _succeed = false; var _this = this; var i;
_this.func({ success: function() { // 如果该组件有success回调,则调用 for(i = 0 ; i < _this.successFunc.length ; i += 1) { _this.successFunc[i](); } // 如果有后续组件则继续调用 if(_this._next) { if(_this._nextList) { for(i = 0 ; i < _this._nextList.length ; i += 1) { if(_succeed) break;
_this._nextList[i].success(function() { _succeed = true; }).start(); } } else { _this._next._doAction(); } } } }); }; |
测试如下:
| // Condition 1.1 // Condition 1.2 // Condition 2-1 // Condition 3 |
还没有结束,如果分支中存在延迟操作,例如ajax请求等。仍然会走遍所有分支:
| var s1 = new Condition(function(result) { console.log("Condition 1.1"); result.success(); }).next(function(result) { console.log("Condition 1.2"); result.success(); });
var s2_1 = new Condition(function(result) { console.log("Condition 2-1"); setTimeout(function() { result.success(); }, 100); }); var s2_2 = new Condition(function(result) { console.log("Condition 2-2.1"); setTimeout(function() { result.success(); }, 100); }).next(function(result) { console.log("Condition 2-2.2"); setTimeout(function() { result.success(); }, 100); }); s1.nextOr(s2_1, s2_2).success(function() { console.log("Condition 3"); }).start();
// Condition 1.1 // Condition 1.2 // Condition 2-1 // Condition 2-2.1 // Condition 3 // Condition 2-2.2 |
给每个分支添加一个标示符,当标示符为false时,停止该分支还未运行的所有检测:
| var Condition = function(func) { this.func = func; this.root = null; this.successFunc = []; this._stop = false; return this; }; |
| Condition.prototype._doAction = function() { var _succeed = false; var _this = this; var i; if((this.root || this)._stop) return; … }; |
| Condition.prototype.start = function() { (this.root || this)._stop = false; (this.root || this)._doAction(); }; |
| Condition.prototype.nextOr = function() { var _once = true; var _this = this; var i;
var _next = new Condition(function(result) { result.success(); }); _next.root = _this.root || _this; _this._next = _next;
_this._nextList = arguments; function doSuccess() { for(i = 0 ; i < _this._nextList.length ; i += 1) { var _root = _this._nextList[i]; _root = _root.root || _root; _root._stop = true; }
if(!_once) return; _once = false;
_next._doAction(); } for(i = 0 ; i < arguments.length ; i += 1) { arguments[i].success(function() { doSuccess(); }); } return _next; }; |
测试如下:
| // Condition 1.1 // Condition 1.2 // Condition 2-1 // Condition 2-2.1 // Condition 3 |
好了,一个简易版的组件就完成了,通过这种组件化方式可以可方便的在中间插入、删除一个新的条件检测,也可以很容易创建一个分支检测。此处仅作抛砖引玉,考虑更复杂的情况,还有fail、always等事件处理。就让各位自己尝试着完成吧。
这里是github的参考代码地址:https://github.com/zombieJ/sequence(代码实现与文中略有出入)