Python装饰器通俗理解
Python装饰器简单来讲就是用于扩展函数功能的一种工具,在扩展功能方面其与类的继承有些相似,都是为了提高代码的复用性。举个例子就是把孙悟空塞入炼丹炉,然后就出来一个还是会吃桃子会耍金箍棒,但是有火眼金睛的猴哥,只是多了特效技能,这就是为什么叫做装饰器的原因。与类的继承相比,其用途有所区别,并且降低了代码的耦合性(即类与类之间乱七八糟的关系导致整个代码体系臃肿的情形)。
Python装饰器的应用场景有很多,其中一个很普遍的功能就是打印日志或者运行时间。就比如说,如果我们需要对多个函数统计运行时间,不使用装饰器的话,会是这样的,如下:
def fun_one():
    start = time()
    sleep(1)
    end = time()
    cost_time = end - start
    print(f"func one run time {cost_time}")

def fun_two():
    start = time()
    sleep(1)
    end = time()
    cost_time = end - start
    print(f"func two run time {cost_time}")

def fun_three():
    start = time()
    sleep(1)
    end = time()
    cost_time = end - start
    print(f"func three run time {cost_time}")

fun_one()
fun_two()
fun_three()
在每个函数中我们的都需要获取开始时间start、结束时间end等,然后输出打印。但是如果使用装饰器的话将会是这样的,如下:
def run_time(name='one'):
    def time_decorator(func):
        def wrapper():
            start = time()
            func()                  # 函数在这里运行
            end = time()
            cost_time = end - start
            print(f"func {name} run time {cost_time}")
        return wrapper
    return time_decorator

@run_time(name='one')
def fun_one():
    sleep(1)

@run_time(name='two')
def fun_two():
    sleep(1)

@run_time(name='three')
def fun_three():
    sleep(1)

fun_one()
fun_two()
fun_three()
我们先不必管这个装饰器是怎么写出来的,但是读者们应该可以清晰地看到通过创建一个装饰器run_time,省去了很多重复的内容。如果更多的函数需要统计运行时间,那么节省的内容将会更多。
1. 知识铺垫
回归正题,为了更好地理解装饰器,我们必须牢牢记住以下三点(装饰器可能会颠覆Python初学者的三观,所以为了不显得那么突兀,我们需要一步一步地来刷新读者的认知XD):
- Python函数也可以看做对象
- Python函数能够作为一个参数传给另外一个函数
- 能够从函数中返回另一个函数
下面开始逐一解释这三点,注意为了搞点语言艺术,笔者取了三个不太恰当的标题,还请读者不要太过当真。
1.1 一切皆可对象
前面讲到第一点,Python函数其实也可以看做对象,如下:
def shout(text):
return text.upper()
print(shout('Hello'))
# 输出:HELLO
yell = shout # 创建了一个名为yell的指针指向了shout
print(yell('Hello'))
# 输出同样为:HELLO
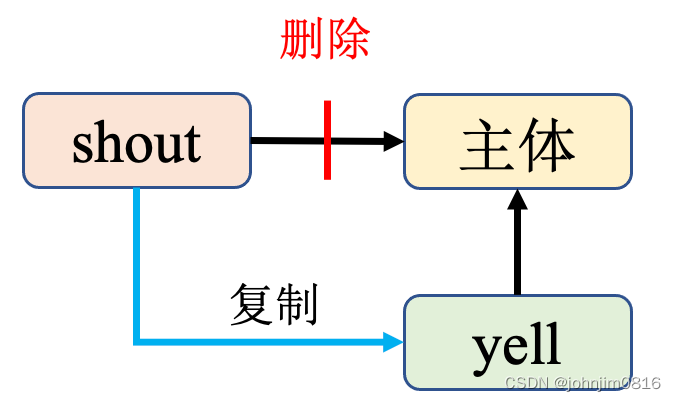
del shout # 删除shout对象,但是函数主体并没有删除
print(shout('Hello'))
# 输出:NameError: name 'shout' is not defined
print(yell('Hello'))
# 输出:HELLO
我们首先定义了一个shout函数,这个函数其实是可以作为对象的,即我们可以创建一个名为yell的指针指向这个shout。并且即使我们删除了原来的shout,yell指向的函数主体(即整个函数的内容)依然会打印相同的输出,如下图所示
1.2 神马都是参数
我要讲的第二点就是,Python函数其实是可以作为参数的,如下:
def shout(text):
    return text.upper()

def whisper(text):
    return text.lower()

def greet(func):
    greeting = func("I am created by a function passed as an argument.")
    print(greeting)

greet(shout)
# 输出:I AM CREATED BY A FUNCTION PASSED AS AN ARGUMENT.
greet(whisper)
# 输出:i am created by a function passed as an argument.
可以看到,shout和whisper函数都分别作为了greet的参数传递了进去。
1.3 从函数中来,从函数中去
第三点就是在Python中并不需要在一个函数里去执行另一个函数,我们也可以将其作为输出返回出来,如下:
def greet(name='shout'):
    def shout(text):
        return text.upper()
    def whisper(text):
        return text.lower()
    if name == "shout":
        return shout
    else:
        return whisper
a = greet(name='shout')
print(a)
# 输出:<function greet.<locals>.shout at 0x7fb1517595e0>
b = greet(name='whisper')
print(b)
# 输出:<function greet.<locals>.whisper at 0x7fb151759700>
print(a('Hello'))
# 输出:HELLO
print(b('Hello'))
# 输出:hello
首先可以看到greet返回的a和b分别指向了shout和whisper函数,再回头看看1.1所讲的,这里面的a和shout的关系其实跟1.1中的yell和shout是一样的,都是等同的对象,因此我们同样可以通过a来实现shout函数的功能,b也是同理。
2. 装饰器
铺垫了这么久,我们终于可以来讲讲装饰器的一些常见用法了,下面同样分点来讲述。
2.1 第一个装饰器
如下,我们使用@来表示装饰想要的函数,其中first_decorator是装饰器,inner是装饰函数,而func则是被装饰的函数,需要作为参数输入到装饰器中。
def first_decorator(func):
    def inner():
        print("Hello, this is before function execution")
        func()
        print("This is after function execution")
    return inner
def my_func_1():
    print("This is inside the function1 !")
my_func_1 = first_decorator(my_func_1)
my_func_1()
# 输出:Hello, this is before function execution
# This is inside the function1 !
# This is after function execution
@first_decorator
def my_func_2():
    print("This is inside the function2!")
my_func_2()
# 输出:Hello, this is before function execution
# This is inside the function1 !
# This is after function execution
print(my_func_2.__name__)
# 输出:inner
可以看到my_func_1 = first_decorator(my_func_1)这一行和@first_decorator是等价的。从print(my_func_2.__name__)这一行可以看出这里inner函数会跟装饰后的my_func_2函数是等价的,而inner里面的func是跟装饰前的my_func_2函数等价。
2.2 装饰器的输入与输出
在2.1节中,装饰器整个结构包括装饰器本身first_decorator、装饰函数inner和被装饰函数my_func_2,其中装饰器的输入就是被装饰函数的形参func,一般没有输出也就是return,而装饰函数inner和装饰形参func以及被装饰函数my_func_2的输入一般需要保持一致,但是一般被装饰函数my_func_2的输入参数不是确定的,所以装饰函数inner和装饰形参func的输入一般写成(*args, **kwargs)这样的形式,被装饰函数的输入则根据实际情况写就好,如下:
def first_decorator(func):
    def inner(*args, **kwargs):
        print("Hello, this is before function execution")
        func(*args, **kwargs)
        print(func(*args, **kwargs))
        print("This is after function execution")
        return "Outside returns"
    return inner
def my_func_1():
    print("This is inside the function1 !")

@first_decorator
def my_func_2(text):
    print("This is inside the function2!")
    text = "Inside returns"
    return text
my_func_2('text2')
print(my_func_2.__name__)
print(my_func_2('text2'))
对于输出,装饰器的输出一般就是装饰函数inner,而inner的输出即return就是装饰后my_func_2的输出,my_func_2里面的return就是装饰前的return,包含在inner函数里面来利用,上述整个代码打印的输出如下,读者们可以自行琢磨:
Hello, this is before function execution
This is inside the function2!
This is inside the function2!
Inside returns
This is after function execution
inner
Hello, this is before function execution
This is inside the function2!
This is inside the function2!
Inside returns
This is after function execution
Outside returns
2.3 嵌套装饰器
嵌套装饰器的英文是Chaining Decorators,可能笔者翻译有误,但它实际上确实很像嵌套的方式,这里读者可以结合前面讲述的,研究以下例子。我们写两个装饰器,如下:
def star(func):
    def inner(*args, **kwargs):
        print("*" * 30)
        func(*args, **kwargs)
        print("*" * 30)
    return inner
def percent(func):
    def inner(*args, **kwargs):
        print("%" * 30)
        func(*args, **kwargs)
        print("%" * 30)
    return inner
@star
@percent
def printer(msg):
    print(msg)
printer("Hello")
这样子的输出会是:
******************************
%%%%%%%%%%%%%%%%%%%%%%%%%%%%%%
Hello
%%%%%%%%%%%%%%%%%%%%%%%%%%%%%%
******************************
但是如果装饰器star和装饰器percent的顺序反过来,如下:
@percent
@star
def printer(msg):
    print(msg)
其输出会是:
%%%%%%%%%%%%%%%%%%%%%%%%%%%%%%
******************************
Hello
******************************
%%%%%%%%%%%%%%%%%%%%%%%%%%%%%%
也就是说它会首先执行被装饰函数,然后执行最靠近被装饰函数的装饰器,然后依次往上执行。但是此时代码的输出也很有趣,明明最先执行被装饰函数printer,但是打印的Hello却不是在最上面,这是因为他的输出逻辑就是嵌套的。对于第一种情况先执行percent装饰器,它首先会是如下的效果:
%%%%%%%%%%%%%%%%%%%%%%%%%%%%%%
Hello
%%%%%%%%%%%%%%%%%%%%%%%%%%%%%%
然后执行star装饰器,这时候star里面的func(*args, **kwargs)相当于装饰了percent之后的printer函数,也就是在此基础上在最外面再套一层星号,这就是装饰的精髓XD。