VueJS面试常见的300道题(英文版)
VueJS面试常见的300道题
List of 300 VueJS Interview Questions
Table of Contents
| No. | Questions |
|---|---|
| 1 | What is VueJS |
| 2 | What are the major features of VueJS |
| 3 | What are the lifecycle methods of VueJS |
| 4 | What are the conditional directives |
| 5 | What is the difference between v-show and v-if directives |
| 6 | What is the purpose of v-for directive? |
| 7 | What is vue instance? |
| 8 | How do you achieve conditional group of elements? |
| 9 | How do you reuse elements with key attribute? |
| 10 | Why should not use if and for directives together on the same element? |
| 11 | Why do you need to use key attribute on for directive? |
| 12 | What are the array detection mutation methods? |
| 13 | What are the array detection non mutation methods? |
| 14 | What are the caveats of array changes detection? |
| 15 | What are the caveats of object changes detection? |
| 16 | How do you use for directive with a range? |
| 17 | How do you use for directive on template? |
| 18 | How do you use event handlers? |
| 19 | What are the event modifiers provided by vue? |
| 20 | What are key modifiers? |
| 21 | How do you define custom key modifier aliases? |
| 22 | What are the supported System Modifier Keys? |
| 23 | What are the supported Mouse Button Modifiers? |
| 24 | How do you implement two way binding? |
| 25 | What are the supported modifiers on model? |
| 26 | What are components and give an example? |
| 27 | What are props? |
| 28 | When component needs a single root element? |
| 29 | How do you communicate from child to parent using events? |
| 30 | How do you implement model on custom input components? |
| 31 | What are slots? |
| 32 | What is global registration in components? |
| 33 | Why do you need local registration? |
| 34 | What is the difference between local and global registration in module system? |
| 35 | What are possible prop types? |
| 36 | What is the data flow followed by props? |
| 37 | What are non prop attributes? |
| 38 | Describe about validations available for props? |
| 39 | How do you customize model directive for a component? |
| 40 | What are the possible ways to provide transitions? |
| 41 | What is vue router and their features? |
| 42 | What are the steps to use vue router and give an example? |
| 43 | What is dynamic route matching? |
| 44 | How to make router param changes as reactive? |
| 45 | What is route matching priority? |
| 46 | What are nested routes? |
| 47 | What are single file components? |
| 48 | Is Single File Components violating separation of concerns? |
| 49 | What are the problems solved by Single File Components? |
| 50 | What are filters? |
| 51 | What are the different ways to create filters? |
| 52 | How do you chain filters |
| 53 | Is it possible to pass parameters for filters? |
| 54 | What are plugins and their various services? |
| 55 | How to create a plugin? |
| 56 | How to use a plugin? |
| 57 | What are mixins? |
| 58 | What are global mixins? |
| 59 | How do you use mixins in CLI? |
| 60 | What are the merging strategies in mixins? |
| 61 | What are custom options merging strategies? |
| 62 | What are custom directives? |
| 63 | How do you register directives locally? |
| 64 | What are the hook functions provided by directives? |
| 65 | What are the directive Hook Arguments? |
| 66 | How do you pass multiple values to a directive? |
| 67 | What is function shorthand in directive hooks? |
| 68 | What is the benefit of render functions over templates? |
| 69 | What is a render function? |
| 70 | Explain the structure of createElement with arguments |
| 71 | How can you write duplicate virtual nodes in a component? |
| 72 | List down the template equivalents in render functions? |
| 73 | What are functional components? |
| 74 | What are the similarities between VueJS and ReactJS? |
| 75 | What is the difference between VueJS and ReactJS? |
| 76 | What are the advantages of VueJS over ReactJS? |
| 77 | What are the advantages of ReactJS over VueJS? |
| 78 | What are the differences between VueJS and Angular? |
| 79 | What are dynamic components? |
| 80 | What is the purpose of keep alive tag? |
| 81 | What are async components? |
| 82 | What is the structure of async component factory? |
| 83 | What are inline templates? |
| 84 | What are X Templates? |
| 85 | What are recursive components? |
| 86 | How do you resolve circular dependencies between components? |
| 87 | How do you make sure vue application is CSP complaint? |
| 88 | What is the difference between full and runtime only builds? |
| 89 | List down different builds of vuejs? |
| 90 | How do you configure vuejs in webpack? |
| 91 | What is the purpose of vuejs compiler? |
| 92 | What is Dev Tools and its purpose? |
| 93 | What is the browser support of VueJS? |
| 94 | How do you use various CDNs? |
| 95 | How do you force update? |
| 96 | What is the purpose of vuejs once directive? |
| 97 | How do you access the root instance? |
| 98 | List out top 10 organizations using Vuejs? |
| 99 | What is the purpose of renderError? |
| 100 | How do you access parent instance? |
| 101 | What is vuex? |
| 102 | What are the major components of State Management Pattern? |
| 103 | How do you represent one way data flow in vuex? |
| 104 | What is a vuejs loader? |
| 105 | How do you configure vue loader in webpack? |
| 106 | What are asset url transform rules? |
| 107 | How do you work with preprocessors using vue loader? |
| 108 | What is scoped CSS? |
| 109 | Is it possible to mix both local and global styles? |
| 110 | How do you use deep selectors? |
| 111 | Is parent styles leaked into child components in scoped css? |
| 112 | How do you style dynamic generated content using scoped css? |
| 113 | Is CSS modules supported in Vuejs? |
| 114 | Can I use runtime builds for all templates? |
| 115 | How to use CSS modules in vuejs? |
| 116 | Can I use CSS modules for preprocessors? |
| 117 | Is it possible to use custom inject name for CSS modules? |
| 118 | What is hot reloading in vue loader? |
| 119 | What is the default behavior of hot reloading? |
| 120 | How do you disable hot reloading explicitly? |
| 121 | How do you use hot reloading? |
| 122 | What are state preservation rules in hot reloading? |
| 123 | How to create functional components using vue loader? |
| 124 | How do you access global properties of functional components? |
| 125 | How do you perform testing in vuejs? |
| 126 | How do you apply linting for css? |
| 127 | How do you use eslint plugin? |
| 128 | What is the purpose of eslint loader? |
| 129 | What is CSS extraction? |
| 130 | What are custom blocks? |
| 131 | What are the features of stylelint? |
| 132 | What are the principles for vuex application structure? |
| 133 | Is Vuex supports hot reloading? |
| 134 | What is the purpose of hotUpdate API of vuex store? |
| 135 | How do you test mutations? |
| 136 | How do you test your getters? |
| 137 | What is the procedure to run tests in node? |
| 138 | What is the procedure to run tests in browser? |
| 139 | What is the purpose of strict mode in vuex? |
| 140 | Can I use strict mode in production environment? |
| 141 | What is vuex plugin? |
| 142 | How do you mutate state in plugins? |
| 143 | What is vuex store? |
| 144 | What are the differences of vuex store and plain global object? |
| 145 | What is the reason not to update the state directly? |
| 146 | What is Single state tree? |
| 147 | How do you install vuex? |
| 148 | Do I need promise for vuex? |
| 149 | How do you display store state in vue components? |
| 150 | How do you inject store into child components? |
| 151 | What is mapState helper? |
| 152 | How do you combine local computed properties with mapState helper? |
| 153 | Do you need to replace entire local state with vuex? |
| 154 | What are vuex getters? |
| 155 | What is a property style access? |
| 156 | What is a method style access? |
| 157 | What is mapGetter helper? |
| 158 | What are mutations? |
| 159 | How do you commit with payload? |
| 160 | What is object style commit? |
| 161 | What are the caveats with vuex mutations? |
| 162 | Why mutations should be synchronous? |
| 163 | How do you perform mutations in components? |
| 164 | Is it mandatory to use constants for mutation types? |
| 165 | How do you perform asynchronous operations? |
| 166 | What are differences between mutations and actions? |
| 167 | Give an example usage of actions? |
| 168 | How do you dispatch actions? |
| 169 | Can you dispatch an action using payload or object? |
| 170 | Can I use styled components in vuejs? |
| 171 | How do you dispatch actions in components? |
| 172 | How do you compose actions? |
| 173 | What are modules in vuex? |
| 174 | What is module local state? |
| 175 | What is namespacing in vuex |
| 176 | What is the default namespace behavior in vuex? |
| 177 | When do you reuse modules? |
| 178 | What are the principles enforced by vuex? |
| 179 | Can I perform mutations directly in strict mode? |
| 180 | How to use model directive with two way computed property? |
| 181 | What is Vue CLI? |
| 182 | What are the features provided by Vue CLI? |
| 183 | What is instant prototyping? |
| 184 | How do you create project using Vue CLI? |
| 185 | How do you create project using GUI? |
| 186 | What are plugins in vue CLI? |
| 187 | How do you install plugins in an existing Vue CLI project? |
| 188 | How to access local plugins in a project? |
| 189 | How do you create UI plugins kind of behavior? |
| 190 | What are presets? |
| 191 | What is the versioning behavior in preset plugins? |
| 192 | How do you allow plugin prompts? |
| 193 | What are remote presets? |
| 194 | Can I use local presets? |
| 195 | What is the purpose of browserslist option? |
| 196 | How do you find VueJS version using API? |
| 197 | How do you create reactive objects |
| 198 | What is the purpose new slot directive? |
| 199 | What is the use of compile method? |
| 200 | What does nextTick do in VueJS? |
| 201 | What is async error handling? |
| 202 | What are Dynamic Directive Arguments? |
| 203 | What are the drawbacks of dynamic directive arguments? |
| 204 | What is the special handling for null values in dynamic directive arguments? |
| 205 | Can I use dynamic directive null value for slots? |
| 206 | What is Vue I18n plugin? |
| 207 | #What are the types of formatting? |
| 208 | What is custom formatting? |
| 209 | How do you handle Pluralization? |
| 210 | How to implement DateTime localization? |
| 211 | How do you implement Number localization? |
| 212 | How do you perform locale changing |
| 213 | What is Lazy loading translations? |
| 214 | What is the main difference between method and computed property? |
| 215 | What is vuetify? |
| 216 | How do you watch for nested data changes? |
| 217 | How to trigger watchers on initialization? |
| 218 | What is the purpose of comments option? |
| 219 | How to identify whether code is running on client or server? |
| 220 | How do you watch route object changes? |
| 221 | How do you sync current route in vuex store? |
| 222 | What are navigation guards in vue router? |
| 223 | Can I use computed property in another computed property? |
| 224 | How can I use imported constant in template section? |
| 225 | Is recommended to use async for computed properties? |
| 226 | What happens if you use duplicate field names? |
| 227 | Why the component data must be a function? |
| 228 | What is the reason for recommendation for multi-word component names? |
| 229 | How to use composition API in Vue2.0? |
| 230 | What is composition API? |
| 231 | What is the best way to re-render a component? |
-
What is VueJS?
Vue.js is an open-source, progressive Javascript framework for building user interfaces that aim to be incrementally adoptable. The core library of VueJS is focused on the
view layeronly, and is easy to pick up and integrate with other libraries or existing projects. -
What are the major features of VueJS?
Below are the some of major features available with VueJS
- Virtual DOM: It uses virtual DOM similar to other existing frameworks such as ReactJS, Ember etc. Virtual DOM is a light-weight in-memory tree representation of the original HTML DOM and updated without affecting the original DOM.
- Components: Used to create reusable custom elements in VueJS applications.
- Templates: VueJS provides HTML based templates that bind the DOM with the Vue instance data
- Routing: Navigation between pages is achieved through vue-router
- Light weight: VueJS is light weight library compared to other frameworks.
⬆ Back to Top
-
What are the lifecycle methods of VueJS?
Lifecycle hooks are a window into how the library you’re using works behind-the-scenes. By using these hooks, you will know when your component is created, added to the DOM, updated, or destroyed. Let’s look at lifecycle diagram before going to each lifecycle hook in detail,
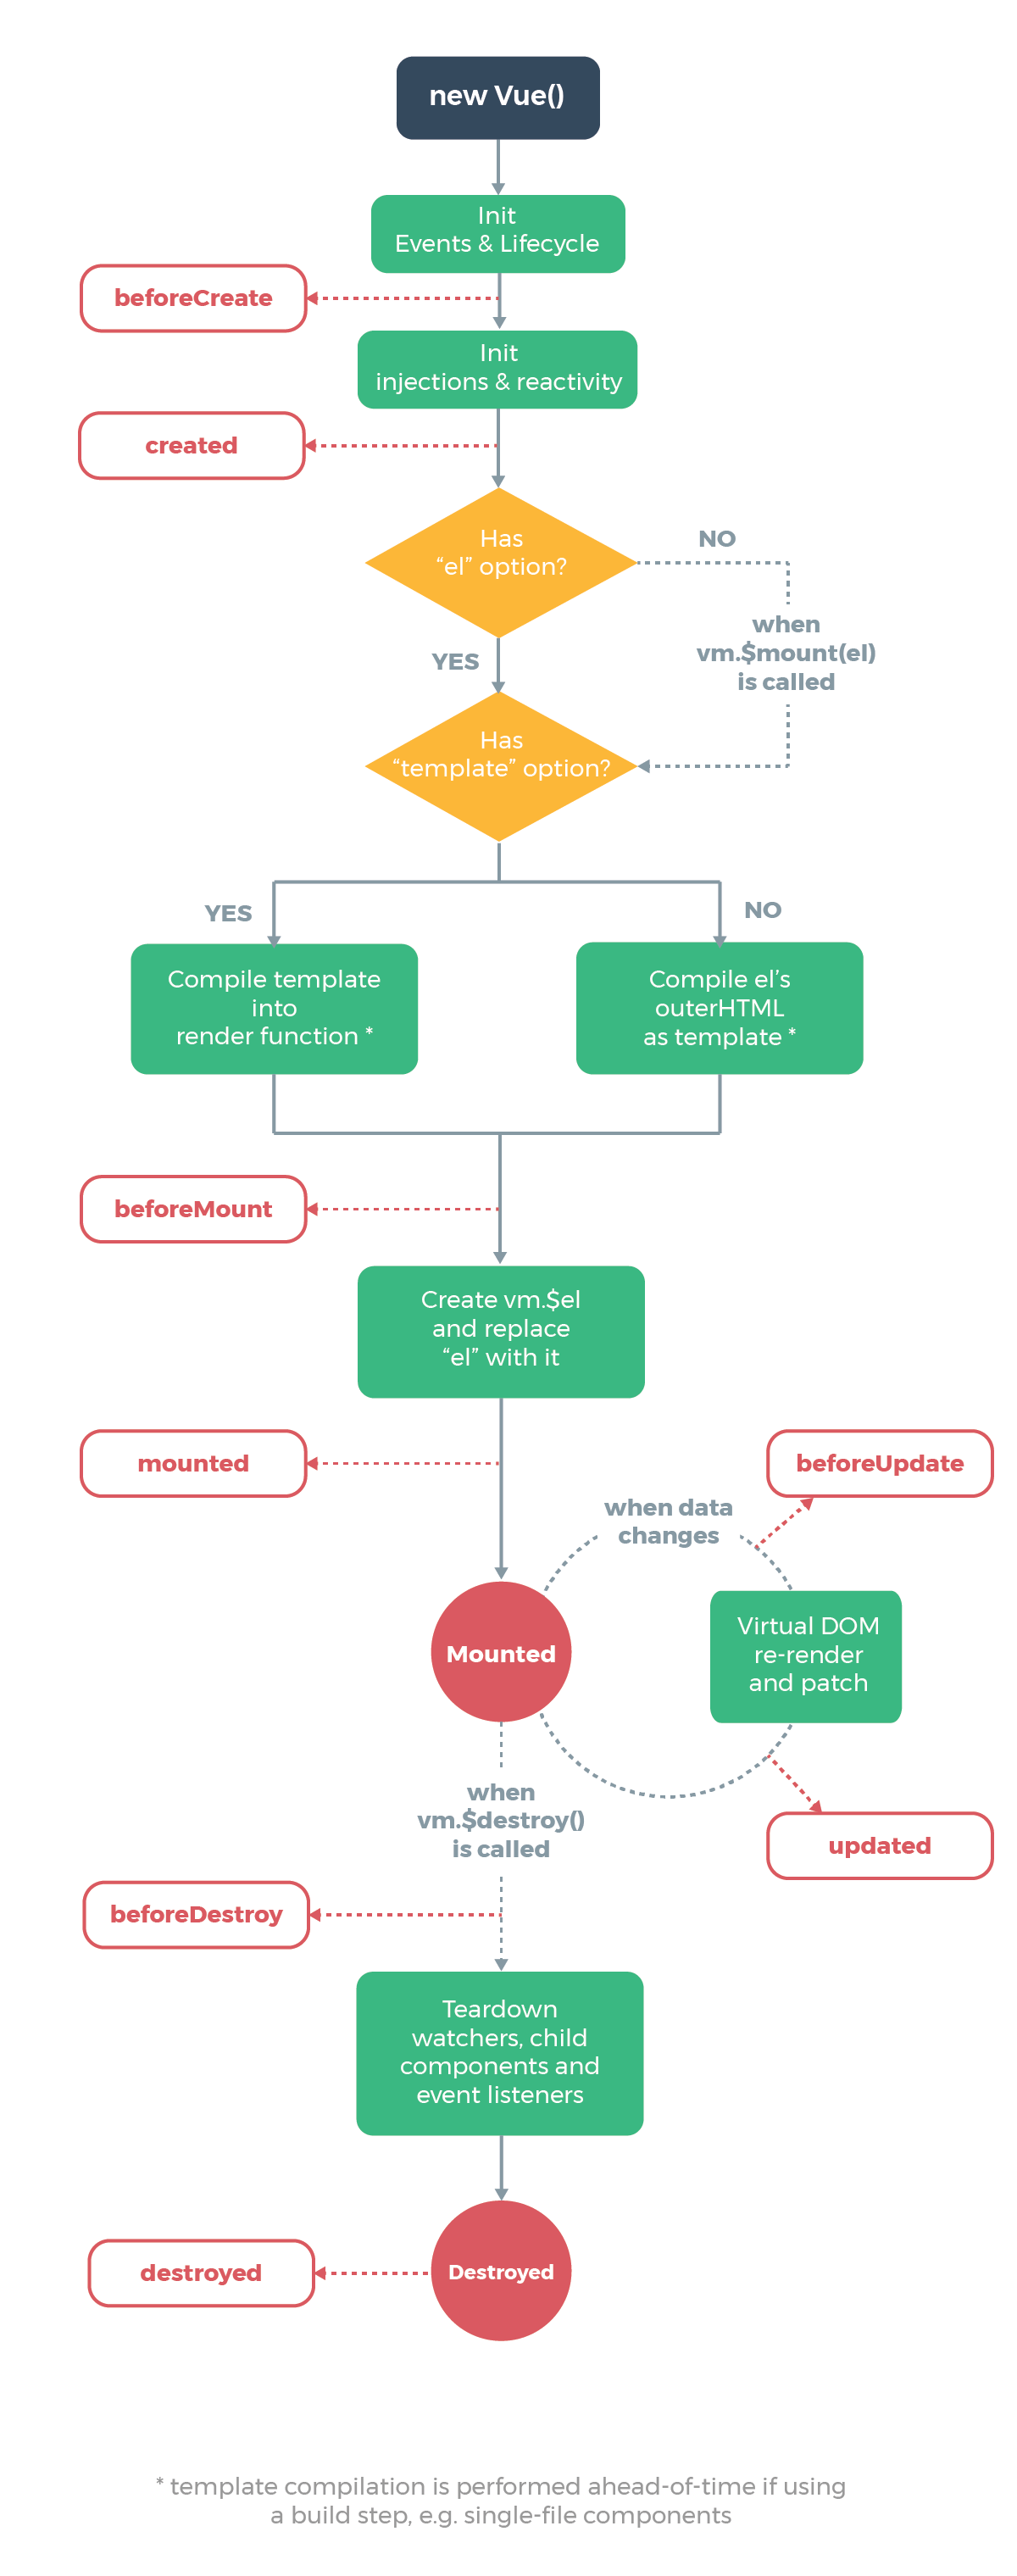
- Creation(Initialization):
Creation Hooks allow you to perform actions before your component has even been added to the DOM. You need to use these hooks if you need to set things up in your component both during client rendering and server rendering. Unlike other hooks, creation hooks are also run during server-side rendering.- beforeCreate:
This hook runs at the very initialization of your component. hook observes data and initialization events in your component. Here, data is still not reactive and events that occur during the component’s lifecycle have not been set up yet.
new Vue({ data: { count: 10 }, beforeCreate: function () { console.log('Nothing gets called at this moment') // `this` points to the view model instance console.log('count is ' + this.count); } }) // count is undefined- created:
This hook is invoked when Vue has set up events and data observation. Here, events are active and access to reactive data is enabled though templates have not yet been mounted or rendered.
Note: Remember that, You will not have access to the DOM or the target mounting element (this.$el) inside of creation hooksnew Vue({ data: { count: 10 }, created: function () { // `this` points to the view model instance console.log('count is: ' + this.count) } }) // count is: 10 - beforeCreate:
- Mounting(DOM Insertion):
Mounting hooks are often the most-used hooks and they allow you to access your component immediately before and after the first render.- beforeMount:
The beforeMount allows you to access your component immediately before and after the first render.
new Vue({ beforeMount: function () { // `this` points to the view model instance console.log(`this.$el is yet to be created`); } })- mounted:
This is a most used hook and you will have full access to the reactive component, templates, and rendered DOM (via. this.$el). The most frequently used patterns are fetching data for your component.
<div id="app"> <p>I’m text inside the component.</p> </div> new Vue({ el: ‘#app’, mounted: function() { console.log(this.$el.textContent); // I'm text inside the component. } }) - beforeMount:
- Updating (Diff & Re-render):
Updating hooks are called whenever a reactive property used by your component changes, or something else causes it to re-render- beforeUpdate:
The beforeUpdate hook runs after data changes on your component and the update cycle begins, right before the DOM is patched and re-rendered.
<div id="app"> <p>{{counter}}</p> </div> ...// rest of the code new Vue({ el: '#app', data() { return { counter: 0 } }, created: function() { setInterval(() => { this.counter++ }, 1000) }, beforeUpdate: function() { console.log(this.counter) // Logs the counter value every second, before the DOM updates. } })- updated:
This hook runs after data changes on your component and the DOM re-renders.
<div id="app"> <p ref="dom">{{counter}}</p> </div> ...// new Vue({ el: '#app', data() { return { counter: 0 } }, created: function() { setInterval(() => { this.counter++ }, 1000) }, updated: function() { console.log(+this.$refs['dom'].textContent === this.counter) // Logs true every second } }) - beforeUpdate:
- Destruction (Teardown):
Destruction hooks allow you to perform actions when your component is destroyed, such as cleanup or analytics sending.- beforeDestroy:
beforeDestroyis fired right before teardown. If you need to cleanup events or reactive subscriptions, beforeDestroy would probably be the time to do it. Your component will still be fully present and functional.
new Vue ({ data() { return { message: 'Welcome VueJS developers' } }, beforeDestroy: function() { this.message = null delete this.message } })- destroyed:
This hooks is called after your component has been destroyed, its directives have been unbound and its event listeners have been removed.
new Vue ({ destroyed: function() { console.log(this) // Nothing to show here } }) - beforeDestroy:
⬆ Back to Top
- Creation(Initialization):
-
What are the conditional directives?
VueJS provides set of directives to show or hide elements based on conditions. The available directives are: v-if, v-else, v-else-if and v-show
1. v-if: The v-if directive adds or removes DOM elements based on the given expression. For example, the below button will not show if isLoggedIn is set to false.
<button v-if="isLoggedIn">Logout</button>You can also control multiple elements with a single v-if statement by wrapping all the elements in a
<template>element with the condition. For example, you can have both label and button together conditionally applied,<template v-if="isLoggedIn"> <label> Logout </button> <button> Logout </button> </template>2. v-else: This directive is used to display content only when the expression adjacent v-if resolves to false. This is similar to else block in any programming language to display alternative content and it is preceded by v-if or v-else-if block. You don’t need to pass any value to this.
For example, v-else is used to display LogIn button if isLoggedIn is set to false(not logged in).<button v-if="isLoggedIn"> Logout </button> <button v-else> Log In </button>3. v-else-if: This directive is used when we need more than two options to be checked.
For example, we want to display some text instead of LogIn button when ifLoginDisabled property is set to true. This can be achieved through v-else statement.<button v-if="isLoggedIn"> Logout </button> <label v-else-if="isLoginDisabled"> User login disabled </label> <button v-else> Log In </button>4. v-show: This directive is similar to v-if but it renders all elements to the DOM and then uses the CSS display property to show/hide elements. This directive is recommended if the elements are switched on and off frequently.
<span v-show="user.name">Welcome user,{{user.name}}</span>⬆ Back to Top
-
What is the difference between v-show and v-if directives?
Below are some of the main differences between v-show and v-if directives,
- v-if only renders the element to the DOM if the expression passes whereas v-show renders all elements to the DOM and then uses the CSS display property to show/hide elements based on expression.
- v-if supports v-else and v-else-if directives whereas v-show doesn’t support else directives.
- v-if has higher toggle costs while v-show has higher initial render costs. i.e, v-show has a performance advantage if the elements are switched on and off frequently, while the v-if has the advantage when it comes to initial render time.
- v-if supports
<template>tab but v-show doesn’t support.
⬆ Back to Top
-
What is the purpose of v-for directive?
The built-in v-for directive allows us to loop through items in an array or object. You can iterate on each element in the array or object.
- Array usage:
<ul id="list">
  <li v-for="(item, index) in items">
    {{ index }} - {{ item.message }}
  </li>
</ul>

var vm = new Vue({
  el: '#list',
  data: {
    items: [
      { message: 'John' },
      { message: 'Locke' }
    ]
  }
})
You can also use
ofas the delimiter instead ofin, similar to javascript iterators.- Object usage:
<div id="object">
  <div v-for="(value, key, index) of user">
    {{ index }}. {{ key }}: {{ value }}
  </div>
</div>

var vm = new Vue({
  el: '#object',
  data: {
    user: {
      firstName: 'John',
      lastName: 'Locke',
      age: 30
    }
  }
})
⬆ Back to Top
-
What is vue instance?
Every Vue application works by creating a new Vue instance with the Vue function. Generally the variable vm (short for ViewModel) is used to refer Vue instance. You can create vue instance as below,
var vm = new Vue({
  // options
})
As mentioned in the above code snippets, you need to pass options object. You can find the full list of options in the API reference.
⬆ Back to Top
-
How do you achieve conditional group of elements?
You can achieve conditional group of elements(toggle multiple elements at a time) by applying v-if directive on
<template>element which works as invisible wrapper(no rendering) for group of elements.For example, you can conditionally group user details based on valid user condition.
<template v-if="condition">
  <h1>Name</h1>
  <p>Address</p>
  <p>Contact Details</p>
</template>
⬆ Back to Top
-
How do you reuse elements with key attribute?
Vue always tries to render elements as efficient as possible. So it tries to reuse the elements instead of building them from scratch. But this behavior may cause problems in few scenarios.
For example, if you try to render the same input element in both
v-ifandv-elseblocks then it holds the previous value as below,<template v-if="loginType === 'Admin'"> <label>Admin</label> <input placeholder="Enter your ID"> </template> <template v-else> <label>Guest</label> <input placeholder="Enter your name"> </template>In this case, it shouldn’t reuse. We can make both input elements as separate by applying key attribute as below,
    <template v-if="loginType === 'Admin'">
      <label>Admin</label>
      <input placeholder="Enter your ID" key="admin-id">
    </template>
    <template v-else>
      <label>Guest</label>
      <input placeholder="Enter your name" key="user-name">
    </template>
The above code make sure both inputs are independent and doesn’t impact each other.
⬆ Back to Top
-
Why should not use if and for directives together on the same element?
It is recommended not to use v-if on the same element as v-for. Because v-for directive has a higher priority than v-if.
There are two cases where developers try to use this combination,
- To filter items in a list
For example, if you try to filter the list using v-if tag,
  <ul>
    <li
      v-for="user in users"
      v-if="user.isActive"
      :key="user.id"
    >
      {{ user.name }}
    <li>
  </ul>
This can be avoided by preparing the filtered list using computed property on the initial list
computed: { activeUsers: function () { return this.users.filter(function (user) { return user.isActive }) } } ...... // ...... // <ul> <li v-for="user in activeUsers" :key="user.id"> {{ user.name }} <li> </ul>- To avoid rendering a list if it should be hidden
For example, if you try to conditionally check if the user is to be shown or hidden
  <ul>
    <li
      v-for="user in users"
      v-if="shouldShowUsers"
      :key="user.id"
    >
      {{ user.name }}
    <li>
  </ul>
This can be solved by moving the condition to a parent by avoiding this check for each user
  <ul v-if="shouldShowUsers">
    <li
      v-for="user in users"
      :key="user.id"
    >
      {{ user.name }}
    <li>
  </ul>
⬆ Back to Top
-
Why do you need to use key attribute on for directive?
In order to track each node’s identity, and thus reuse and reorder existing elements, you need to provide a unique
keyattribute for each item with inv-foriteration. An ideal value for key would be the unique id of each item.Let us take an example usage,
<div v-for="item in items" :key="item.id">
  {{item.name}}
</div>
Hence, It is always recommended to provide a key with v-for whenever possible, unless the iterated DOM content is simple.
Note: You shouldn’t use non-primitive values like objects and arrays as v-for keys. Use string or numeric values instead.
⬆ Back to Top
-
What are the array detection mutation methods?
As the name suggests, mutation methods modifies the original array.
Below are the list of array mutation methods which trigger view updates.
- push()
- pop()
- shift()
- unshift()
- splice()
- sort()
- reverse()
If you perform any of the above mutation method on the list then it triggers view update. For example, push method on array named ‘items’ trigger a view update,
vm.todos.push({ message: 'Baz' })⬆ Back to Top
-
What are the array detection non-mutation methods?
The methods which do not mutate the original array but always return a new array are called non-mutation methods.
Below are the list of non-mutation methods,
- filter()
- concat()
- slice()
For example, lets take a todo list where it replaces the old array with new one based on status filter,
vm.todos = vm.todos.filter(function (todo) {
  return todo.status.match(/Completed/)
})
This approach won’t re-render the entire list due to VueJS implementation.
⬆ Back to Top
-
What are the caveats of array changes detection?
Vue cannot detect changes for the array in the below two cases,
- When you directly set an item with the index,For example,
vm.todos[indexOfTodo] = newTodo - When you modify the length of the array, For example,
vm.todos.length = todosLength
You can overcome both the caveats using
setandsplicemethods, Let’s see the solutions with an examples,First use case solution
// Vue.set
Vue.set(vm.todos, indexOfTodo, newTodoValue)
(or)
// Array.prototype.splice
vm.todos.splice(indexOfTodo, 1, newTodoValue)
Second use case solution
vm.todos.splice(todosLength)⬆ Back to Top
- When you directly set an item with the index,For example,
-
What are the caveats of object changes detection?
Vue cannot detect changes for the object in property addition or deletion.
Lets take an example of user data changes,
var vm = new Vue({
  data: {
    user: {
      name: 'John'
    }
  }
})

// `vm.name` is now reactive

vm.user.email = john@email.com // `vm.user.email` is NOT reactive
You can overcome this scenario using the Vue.set(object, key, value) method or Object.assign(),
Vue.set(vm.user, 'email', 'john@email.com');
// (or)
vm.user = Object.assign({}, vm.user, {
  email: john@email.com
})
⬆ Back to Top
-
How do you use v-for directive with a range?
You can also use integer type(say ‘n’) for
v-fordirective which repeats the element many times.<div> <span v-for="n in 20">{{ n }} </span> </div>It displays the number 1 to 20.
⬆ Back to Top
-
How do you use v-for directive on template?
Just similar to v-if directive on template, you can also use a
<template>tag with v-for directive to render a block of multiple elements.Let’s take a todo example,
<ul>
  <template v-for="todo in todos">
    <li>{{ todo.title }}</li>
    <li class="divider"></li>
  </template>
</ul>
⬆ Back to Top
-
How do you use event handlers?
You can use event handlers in vue similar to plain javascript. The method calls also support the special $event variable.
<button v-on:click="show('Welcome to VueJS world', $event)">
  Submit
</button>

methods: {
  show: function (message, event) {
    // now we have access to the native event
    if (event) event.preventDefault()
    console.log(message);
  }
}
⬆ Back to Top
-
What are the event modifiers provided by vue?
Normally, javascript provides
event.preventDefault() or event.stopPropagation()inside event handlers. You can use methods provided by vue, but these methods are meant for data logic instead of dealing with DOM events. Vue provides below event modifiers for v-on and these modifiers are directive postfixes denoted by a dot.- .stop
- .prevent
- .capture
- .self
- .once
- .passive
Let’s take an example of stop modifier,
<!-- the click event's propagation will be stopped -->
<a v-on:click.stop="methodCall"></a>
You can also chain modifiers as below,
<!-- modifiers can be chained -->
<a v-on:click.stop.prevent="doThat"></a>
⬆ Back to Top
-
What are key modifiers?
Vue supports key modifiers on
v-onfor handling keyboard events. Let’s take an example of keyup event with enter keycode.<!-- only call `vm.show()` when the `keyCode` is 13 --> <input v-on:keyup.13="show">Remembering all the key codes is really difficult. It supports the full list of key codes aliases
- .enter
- .tab
- .delete (captures both “Delete” and “Backspace” keys)
- .esc
- .space
- .up
- .down
- .left
- .right
Now the above keyup code snippet can be written with aliases as follows,
<input v-on:keyup.enter="submit" />
<!-- OR with shorthand notation -->
<input @keyup.enter="submit" />
Note: The use of keyCode events is deprecated and may not be supported in new browsers.
⬆ Back to Top
-
How do you define custom key modifier aliases?
You can define custom key modifier aliases via the global
config.keyCodes. There are few guidelines for the properties- You can’t use camelCase. Instead you can use kebab-case with double quotation marks
- You can define multiple values in an array format
Vue.config.keyCodes = {
  f1: 112,
  "media-play-pause": 179,
  down: [40, 87]
}
⬆ Back to Top
-
What are the supported System Modifier Keys?
Vue supports below modifiers to trigger mouse or keyboard event listeners when the corresponding key is pressed,
- .ctrl
- .alt
- .shift
- .meta
Lets take an example of control modifier with click event,
<!-- Ctrl + Click -->
<div @click.ctrl="doSomething">Do something</div>
⬆ Back to Top
-
What are the supported Mouse Button Modifiers?
Vue supports below mouse button modifiers
- .left
- .right
- .middle
For example, the usage of
.rightmodifier as below<button v-if="button === 'right'" v-on:mousedown.right="increment" v-on:mousedown.left="decrement" />⬆ Back to Top
-
How do you implement two-way binding?
You can use the
v-modeldirective to create two-way data bindings on form input, textarea, and select elements.Lets take an example of it using input component,
<input v-model="message" placeholder="Enter input here">
<p>The message is: {{ message }}</p>
Remember, v-model will ignore the initial
value,checkedorselectedattributes found on any form elements. So it always use the Vue instance data as the source of truth.⬆ Back to Top
-
What are the supported modifiers on model?
There are three modifiers supported for v-model directive.
1. lazy: By default, v-model syncs the input with the data after each input event. You can add the lazy modifier to instead sync after change events.
<!-- synced after "change" instead of "input" -->
<input v-model.lazy="msg" >
2. number: If you want user input to be automatically typecast as a number, you can add the number modifier to your v-model. Even with type=“number”, the value of HTML input elements always returns a string. So, this typecast modifier is required.
<input v-model.number="age" type="number">3. trim: If you want whitespace from user input to be trimmed automatically, you can add the trim modifier to your v-model.
<input v-model.trim="msg">⬆ Back to Top
-
What are components and give an example?
Components are reusable Vue instances with a name. They accept the same options as new Vue, such as data, computed, watch, methods, and lifecycle hooks(except few root-specific options like el).
Lets take an example of counter component,
// Define a new component called button-counter
Vue.component('button-counter', {
  template: '<button v-on:click="count++">You clicked me {{ count }} times.</button>'
  data: function () {
    return {
      count: 0
    }
  },
})
Let’s use this component inside a root Vue instance created with new Vue
<div id="app">
  <button-counter></button-counter>
</div>

var vm = new Vue({ el: '#app' });
⬆ Back to Top
-
What are props?
Props are custom attributes you can register on a component. When a value is passed to a prop attribute, it becomes a property on that component instance. You can pass those list of values as props option and use them as similar to data variables in template.
Vue.component('todo-item', {
  props: ['title'],
  template: '<h2>{{ title }}</h2>'
})
Once the props are registered, you can pass them as custom attributes.
<todo-item title="Learn Vue conceptsnfirst"></todo-item>⬆ Back to Top
-
When component needs a single root element?
In VueJS 2.x, every component must have a single root element when template has more than one element. In this case, you need to wrap the elements with a parent element.
<template>
   <div class="todo-item">
       <h2>{{ title }}</h2>
       <div v-html="content"></div>
   </div>
</template>
Otherwise there will an error throwing, saying that “Component template should contain exactly one root element…”.
Whereas in 3.x, components now can have multiple root nodes. This way of adding multiple root nodes is called as fragments.
<template>
     <h2>{{ title }}</h2>
     <div v-html="content"></div>
</template>
⬆ Back to Top
-
How do you communicate from child to parent using events?
If you want child wants to communicate back up to the parent, then emit an event from child using
$emitobject to parent,Vue.component('todo-item', { props: ['todo'], template: ` <div class="todo-item"> <h3>{{ todo.title }}</h3> <button v-on:click="$emit('increment-count', 1)"> Add </button> <div v-html="todo.description"></div> </div> ` })Now you can use this todo-item in parent component to access the count value.
<ul v-for="todo in todos">
  <li>
    <todo-item
      v-bind:key="todo.id"
      v-bind:todo="todo"
      v-on:increment-count="total += 1"
    /></todo-item>
  </li>
</ul>
<span> Total todos count is {{total}}</span>
⬆ Back to Top
-
How do you implement model on custom input components?
The custom events can also be used to create custom inputs that work with v-model. The
<input>inside the component must follow below rules,- Bind the value attribute to a value prop
- On input, emit its own custom input event with the new value.
Let’s take a custom-input component as an example,
Vue.component('custom-input', {
  props: ['value'],
  template: `
    <input
      v-bind:value="value"
      v-on:input="$emit('input', $event.target.value)"
    />
  `
})
Now you can use
v-modelwith this component,<custom-input v-model="searchInput"></custom-input>⬆ Back to Top
-
What are slots?
Vue implements a content distribution API using the element to serve as distribution outlets for content created after the current Web Components spec draft.
Let’s create an alert component with slots for content insertion,
Vue.component('alert', {
  template: `
    <div class="alert-box">
      <strong>Error!</strong>
      <slot></slot>
    </div>
  `
})
Now you can insert dynamic content as below,
<alert>
  There is an issue with in application.
</alert>
⬆ Back to Top
-
What is global registration in components?
The components which are globally registered can be used in the template of any root Vue instance (new Vue) created after registration.
In the global registration, the components created using Vue.component as below,
Vue.component('my-component-name', {
  // ... options ...
})
Let’s take multiple components which are globally registered in the vue instance,
Vue.component('component-a', { /* ... */ })
Vue.component('component-b', { /* ... */ })
Vue.component('component-c', { /* ... */ })

new Vue({ el: '#app' })
The above components can be used in the vue instance,
<div id="app">
  <component-a></component-a>
  <component-b></component-b>
  <component-c></component-c>
</div>
Remember that the components can be used in subcomponents as well.
⬆ Back to Top
-
Why do you need local registration?
Due to global registration, even if you don’t use the component it could still be included in your final build. So it will create unnecessary javascript in the application. This can be avoided using local registration with the below steps,
- First you need to define your components as plain JavaScript objects
Locally registered components will not be available in sub components. In this case, you need to add them in components sectionvar ComponentA = { /* ... */ } var ComponentB = { /* ... */ } var ComponentC = { /* ... */ }var ComponentA = { /* ... */ } var ComponentB = { components: { 'component-a': ComponentA }, // ... } - You can use the components in the components section of the vue instance,
new Vue({
  el: '#app',
  components: {
    'component-a': ComponentA,
    'component-b': ComponentB
  }
})
⬆ Back to Top
- First you need to define your components as plain JavaScript objects
-
What is the difference between local and global registration in module system?
In local registration, you need to create each component in components folder(optional but it is recommended) and import them in another component file components section.
Let’s say you want to register component A and B in component C, the configuration seems as below,
import ComponentA from './ComponentA'
import ComponentB from './ComponentB'

export default {
  components: {
    ComponentA,
    ComponentB
  },
  // ...
}
Now both ComponentA and ComponentB can be used inside ComponentC‘s template.
In global registration, you need to export all common or base components in a separate file. But some of the popular bundlers like
webpackmake this process simpler by usingrequire.contextto globally register base components in the below entry file(one-time).import Vue from 'vue' import upperFirst from 'lodash/upperFirst' import camelCase from 'lodash/camelCase' const requireComponent = require.context( // The relative path of the components folder './components', // Whether or not to look in subfolders false, // The regular expression used to match base component filenames /Base[A-Z]\w+\.(vue|js)$/ ) requireComponent.keys().forEach(fileName => { // Get component config const componentConfig = requireComponent(fileName) // Get PascalCase name of component const componentName = upperFirst( camelCase( // Strip the leading `./` and extension from the filename fileName.replace(/^\.\/(.*)\.\w+$/, '$1') ) ) // Register component globally Vue.component( componentName, // Look for the component options on `.default`, which will // exist if the component was exported with `export default`, // otherwise fall back to module's root. componentConfig.default || componentConfig ) })⬆ Back to Top
-
What are possible prop types?
You can declare props with type or without type. But it is recommended to have prop types because it provides the documentation for the component and warns the developer for any incorrect data type being assigned.
props: {
  name: String,
  age: Number,
  isAuthenticated: Boolean,
  phoneNumbers: Array,
  address: Object
}
As mentioned in the above code snippet, you can list props as an object, where the properties’ names and values contain the prop names and types, respectively.
⬆ Back to Top
-
What is the data flow followed by props?
All props follows a one-way-down binding between the child property and the parent one. i.e, When the parent property is updated then that latest prop value will be passed down to the child, but not the otherway(child to parent) around. The child component should not mutate the prop otherwise it throws a warning in the console.
The possible mutation cases can be solved as below,-
When you try to use parent prop as initial value for child property:
In this case you can define a local property in child component and assign parent value as initial value
props: ['defaultUser'], data: function () { return { username: this.defaultUser } } -
When you try to transform the parent prop:
You can define a computed property using the prop’s value,
props: ['environment'],
computed: {
  localEnvironment: function () {
    return this.environment.trim().toUpperCase()
  }
}
⬆ Back to Top
-
-
What are non prop attributes?
A non-prop attribute is an attribute that is passed to a component, but does not have a corresponding prop defined.
For example, If you are using a 3rd-party custom-input component that requires a
data-tooltipattribute on the input then you can add this attribute to component instance,<custom-input data-tooltip="Enter your input" />If you try to pass the props from parent component the child props with the same names will be overridden. But props like
classandstyleare exception to this, these values will be merged in the child component.<!-- Child component --> <input type="date" class="date-control"> <!-- Parent component --> <custom-input class="custom-class" />⬆ Back to Top
-
Describe about validations available for props?
Vue provides validations such as types, required fields, default values along with customized validations. You can provide an object with validation requirements to the value of props as below,
Let’s take an example of user profile Vue component with possible validations,
Vue.component('user-profile', {
  props: {
    // Basic type check (`null` matches any type)
    age: Number,
    // Multiple possible types
    identityNumber: [String, Number],
    // Required string
    email: {
      type: String,
      required: true
    },
    // Number with a default value
    minBalance: {
      type: Number,
      default: 10000
    },
    // Object with a default value
    message: {
      type: Object,
      // Object or array defaults must be returned from
      // a factory function
      default: function () {
        return { message: 'Welcome to Vue' }
      }
    },
    // Custom validator function
    location: {
      validator: function (value) {
        // The value must match one of these strings
        return ['India', 'Singapore', 'Australia'].indexOf(value) !== -1
      }
    }
  }
})
⬆ Back to Top
-
How do you customize model directive for a component?
The v-model directive on a component uses value as the prop and input as the event, but some input types such as
checkboxesandradio buttonsmay need to use the value attribute for a server side value. In this case, it is preferred to customize model directive.Let’s take an example of checkbox component,
Vue.component('custom-checkbox', {
  model: {
    prop: 'checked',
    event: 'change'
  },
  props: {
    checked: Boolean
  },
  template: `
    <input
      type="checkbox"
      v-bind:checked="checked"
      v-on:change="$emit('change', $event.target.checked)"
    >
  `
})
Now you can use v-model on this customized component as below,
<custom-checkbox v-model="selectFramework"></custom-checkbox>The selectFramework property will be passed to the checked prop and same property will be updated when custom checkbox component emits a change event with a new value.
⬆ Back to Top
-
What are the possible ways to provide transitions?
There are many ways Vue provides transition effects when items are inserted, updated, or removed from the DOM.
Below are the possible ways,
- Automatically apply classes for CSS transitions and animations
- Integrate 3rd-party CSS animation libraries. For example, Animate.css
- Use JavaScript to directly manipulate the DOM during transition hooks
- Integrate 3rd-party JavaScript animation libraries. For example, Velocity.js
⬆ Back to Top
-
What is vue router and their features?
Vue Router is a official routing library for single-page applications designed for use with the Vue.js framework.
Below are their features,
- Nested route/view mapping
- Modular, component-based router configuration
- Route params, query, wildcards
- View transition effects powered by Vue.js’ transition system
- Fine-grained navigation control
- Links with automatic active CSS classes
- HTML5 history mode or hash mode, with auto-fallback in IE9
- Restore scroll position when going back in history mode
⬆ Back to Top
-
What are the steps to use vue router and give an example?
It is easy to integrate vue router in the vue application.
Let us see the example with step by step instructions.
Step 1: Configure router link and router view in the template
<script src="https://unpkg.com/vue/dist/vue.js"></script>
<script src="https://unpkg.com/vue-router/dist/vue-router.js"></script>

<div id="app">
  <h1>Welcome to Vue routing app!</h1>
  <p>
    <!-- use router-link component for navigation using `to` prop. It rendered as an `<a>` tag -->
    <router-link to="/home">Home</router-link>
    <router-link to="/services">Services</router-link>
  </p>
  <!-- route outlet in which component matched by the route will render here -->
  <router-view></router-view>
</div>
Step 2: Import Vue and VueRouter packages and then apply router
import Vue from 'vue';
import VueRouter from 'vue-router';

Vue.use(VueRouter)
Step 3: Define or import route components.
const Home = { template: '<div>Home</div>' }
const Services = { template: '<div>Services</div>' }
Step 4: Define your route where each one maps to a component
const routes = [
  { path: '/home', component: Home },
  { path: '/services', component: Services }
]
Step 5: Create the router instance and pass the
routesoptionconst router = new VueRouter({ routes // short for `routes: routes` })Step 6: Create and mount the root instance.
const app = new Vue({
  router
}).$mount('#app')
Now you are able to navigate different pages(Home, Services) with in Vue application.
⬆ Back to Top
-
What is dynamic route matching?
Sometimes it may be required to map routes to the same component based on a pattern.
Let’s take a user component with the mapped URLs like
/user/john/post/123and/user/jack/post/235using dynamic segments,const User = { template: '<div>User {{ $route.params.name }}, PostId: {{ route.params.postid }}</div>' } const router = new VueRouter({ routes: [ // dynamic segments start with a colon { path: '/user/:name/post/:postid', component: User } ] })⬆ Back to Top
-
How to make router param changes as reactive?
When you navigate from one URL to other(mapped with a single component) using routes with params then the same component instance will be reused. Even though it is more efficient than destroying the old instance and then creating a new one, the lifecycle hooks of the component will not be called.
This problem can be solved using either of the below approaches,
- Watch the $route object:
const User = { template: '<div>User {{ $route.params.name }} </div>', watch: { '$route' (to, from) { // react to route changes... } } } - Use beforeRouteUpdate navigation guard: This is only available since 2.2 version.
const User = {
  template: '<div>User {{ $route.params.name }} </div>',
  beforeRouteUpdate (to, from, next) {
    // react to route changes and then call next()
  }
}
Note that the beforeRouteEnter guard does NOT have access to
this. Instead you can pass a callback tonextto access the vm instance.⬆ Back to Top
- Watch the $route object:
-
What is route matching priority?
Sometimes the URL might be matched by multiple routes and the confusion of which route need to be mapped is resolved by route matching priority. The priority is based on order of routes configuration. i.e, The route which declared first has higher priority.
const router = new VueRouter({
       routes: [
         // dynamic segments start with a colon
         { path: '/user/:name', component: User } // This route gets higher priority
         { path: '/user/:name', component: Admin }
         { path: '/user/:name', component: Customer }
       ]
     })
⬆ Back to Top
-
What are nested routes?
Generally, the app is composed of nested components which are nested multiple levels deep. The segments of a URL corresponds to a certain structure of these nested components. To render components into the nested outlet, you need to use the
childrenoption inVueRouterconstructor config.Let’s take a user app composed of profile and posts nested components with respective routes. You can also define a default route configuration when there is no matching nested route.
const router = new VueRouter({
  routes: [
    { path: '/user/:id', component: User,
      children: [
        {
          // UserProfile will be rendered inside User's <router-view> when /user/:id/profile is matched
          path: 'profile',
          component: UserProfile
        },
        {
          // UserPosts will be rendered inside User's <router-view> when /user/:id/posts is matched
          path: 'posts',
          component: UserPosts
        },
          // UserHome will be rendered inside User's <router-view> when /user/:id is matched
        {  path: '',
           component: UserHome },
      ]
    }
  ]
})
⬆ Back to Top
-
What are single file components?
Single File Components are an easy concept to understand. Earlier you might heard about all three parts(HTML, JavaScript and CSS) of your application kept in different components. But Single File Components encapsulate the structure, styling and behaviour into one file. In the beginning, it seems strange to have all three parts in one file, but it actually makes a lot more sense.
Let’s take an example of Singile File Components
<template>
  <div>
    <h1>Welcome {{ name }}!</h1>
  </div>
</template>

<script>
module.exports = {
  data: function() {
    return {
      name: 'John'
    }
  }
}
</script>

<style scoped>
h1 {
  color: #34c779;
  padding: 3px;
}
</style>
⬆ Back to Top
-
Is Single File Components violating separation of concerns?
As for the latest modern UI development, separation of concerns is not equal to separation of file types. So it is preferred to divide codebase layers into loosely-coupled components and compose them instead of dividing the codebase into three huge layers that interweave with one another. This way makes Single File Components more cohesive and maintainable by combining template, logic and styles together inside a component.
You can also still maintain javascript and CSS files separately with hot-reloading and pre-compilation features.For example,
<template>
  <div>This section will be pre-compiled and hot reloaded</div>
</template>
<script src="./my-component.js"></script>
<style src="./my-component.css"></style>
⬆ Back to Top
-
What are the problems solved by Single File Components?
The Single File Components solve the common problems occurred in a javascript driven application with a .vue extension. The list of issues are,
- Global definitions force unique names for every component
- String templates lack syntax highlighting and require ugly slashes for multiline HTML
- No CSS support means that while HTML and JavaScript are modularized into components, CSS is conspicuously left out
- No build step restricts us to HTML and ES5 JavaScript, rather than preprocessors like Pug (formerly Jade) and Babel.
⬆ Back to Top
-
What are filters?
Filters can be used to apply common text formatting. These Filters should be appended to the end of the JavaScript expression, denoted by the “pipe” symbol. You can use them in two specific cases:
- mustache interpolations
- v-bind expressions
For example, Let’s define a local filter named capitalize in a component’s options
filters: {
  capitalize: function (value) {
    if (!value) return ''
    value = value.toString()
    return value.charAt(0).toUpperCase() + value.slice(1)
  }
}
Now you can use the filter in either mustache interpolation or v-bind expression,
<!-- in mustaches -->
{{ username | capitalize }}

<!-- in v-bind -->
<div v-bind:id="username | capitalize"></div>
⬆ Back to Top
-
What are the different ways to create filters?
You can define filters in two ways,
- Local filters:
You can define local filters in a component’s options. In this case, filter is applicable to that specific component.
filters: { capitalize: function (value) { if (!value) return '' value = value.toString() return value.charAt(0).toUpperCase() + value.slice(1) } }- Global filters:
You can also define a filter globally before creating the Vue instance. In this case, filter is applicable to all the components with in the vue instance,
Vue.filter('capitalize', function (value) {
  if (!value) return ''
  value = value.toString()
  return value.charAt(0).toUpperCase() + value.slice(1)
})

new Vue({
  // ...
})
⬆ Back to Top
- Local filters:
-
How do you chain filters?
You can chain filters one after the other to perform multiple manipulations on the expression. The generic structure of filter chain would be as below,
{{ message | filterA | filterB | filterB ... }}In the above chain stack, you can observe that message expression applied with three filters, each separated by a pipe(|) symbol. The first filter(filterA) takes the expression as a single argument and the result of the expression becomes an argument for second filter(filterB) and the chain continue for remaining filters.
For example, if you want to transform date expression with a full date format and uppercase then you can apply dateFormat and uppercase filters as below,
{{ birthday | dateFormat | uppercase }}⬆ Back to Top
-
Is it possible to pass parameters for filters?
Yes, you can pass arguments for a filter similar to a javascript function. The generic structure of filter parameters would be as follows,
{{ message | filterA('arg1', arg2) }}In this case, filterA takes message expression as first argument and the explicit parameters mentioned in the filter as second and third arguments.
For example, you can find the exponential strength of a particular value
{{ 2 | exponentialStrength(10) }} <!-- prints 2 power 10 = 1024 -->⬆ Back to Top
-
What are plugins and their various services?
Plugins provides global-level functionality to Vue application. The plugins provide various services,
- Add some global methods or properties. For example, vue-custom-element
- Add one or more global assets (directives, filters and transitions). For example, vue-touch
- Add some component options by global mixin. For example, vue-router
- Add some Vue instance methods by attaching them to Vue.prototype.
- A library that provides an API of its own, while at the same time injecting some combination of the above. For example, vue-router
⬆ Back to Top
-
How to create a plugin?
The Plugin is created by exposing an
installmethod which takes Vue constructor as a first argument along with options. The structure of VueJS plugin with possible functionality would be as follows,MyPlugin.install = function (Vue, options) { // 1. add global method or property Vue.myGlobalMethod = function () { // some logic ... } // 2. add a global asset Vue.directive('my-directive', { bind (el, binding, vnode, oldVnode) { // some logic ... } // ... }) // 3. inject some component options Vue.mixin({ created: function () { // some logic ... } // ... }) // 4. add an instance method Vue.prototype.$myMethod = function (methodOptions) { // some logic ... } }⬆ Back to Top
-
How to use a plugin?
You can use plugin by passing your plugin to Vue’s use global method. You need to apply this method before start your app by calling new Vue().
// calls `MyPlugin.install(Vue, { someOption: true })`
Vue.use(MyPlugin)

new Vue({
  //... options
})
⬆ Back to Top
-
What are mixins?
Mixin gives us a way to distribute reusable functionalities in Vue components. These reusable functions are merged with existing functions. A mixin object can contain any component options. Let us take an example of mixin with
createdlifecycle which can be shared across components,const myMixin = { created(){ console.log("Welcome to Mixins!") } } var app = new Vue({ el: '#root', mixins: [myMixin] })Note: Multiple mixins can be specified in the mixin array of the component.
⬆ Back to Top
-
What are global mixins?
Sometimes there is a need to extend the functionality of Vue or apply an option to all Vue components available in our application. In this case, mixins can be applied globally to affect all components in Vue. These mixins are called as global mixins.
Let’s take an example of global mixin,
Vue.mixin({
  created(){
    console.log("Write global mixins")
  }
})

new Vue({
  el: '#app'
})
In the above global mixin, the mixin options spread across all components with the console running during the instance creation. These are useful during test, and debugging or third party libraries. At the same time, You need to use these global mixins sparsely and carefully, because it affects every single Vue instance created, including third party components.
⬆ Back to Top
-
How do you use mixins in CLI?
Using Vue CLI, mixins can be specified anywhere in the project folder but preferably within
/src/mixinsfor ease of access. Once these mixins are created in a.jsfile and exposed with theexportkeyword, they can be imported in any component with theimportkeyword and their file paths. -
What are the merging strategies in mixins?
When a mixin and the component itself contain overlapping options, the options will be merged based on some strategies.
- The data objects undergo a recursive merge, with the component’s data taking priority over mixins in cases of overlapping or conflicts.
var mixin = { data: function () { return { message: 'Hello, this is a Mixin' } } } new Vue({ mixins: [mixin], data: function () { return { message: 'Hello, this is a Component' } }, created: function () { console.log(this.$data); // => { message: "Hello, this is a Component'" } } }) - The Hook functions which are overlapping merged into an array so that all of them will be called. Mixin hooks will be called before the component’s own hooks.
const myMixin = { created(){ console.log("Called from Mixin") } } new Vue({ el: '#root', mixins: [myMixin], created(){ console.log("Called from Component") } }) // Called from Mixin // Called from Component - The options that expect object values(such as methods, components and directives) will be merged into the same object. In this case, the component’s options will take priority when there are conflicting keys in these objects.
var mixin = {
  methods: {
    firstName: function () {
      console.log('John')
    },
    contact: function () {
      console.log('+65 99898987')
    }
  }
}

var vm = new Vue({
  mixins: [mixin],
  methods: {
    lastName: function () {
      console.log('Murray')
    },
    contact: function () {
      console.log('+91 893839389')
    }
  }
})

vm.firstName() // "John"
vm.lastName() // "Murray"
vm.contact() // "+91 893839389"
⬆ Back to Top
- The data objects undergo a recursive merge, with the component’s data taking priority over mixins in cases of overlapping or conflicts.
-
What are custom options merging strategies?
Vue uses the default strategy which overwrites the existing value while custom options are merged. But if you want a custom option merged using custom login then you need to attach a function to
Vue.config.optionMergeStrategiesFor the example, the structure of
myOptionscustom option would be as below,Vue.config.optionMergeStrategies.myOption = function (toVal, fromVal) { // return mergedVal }Let’s take below Vuex 1.0 merging strategy as an advanced example,
const merge = Vue.config.optionMergeStrategies.computed
Vue.config.optionMergeStrategies.vuex = function (toVal, fromVal) {
  if (!toVal) return fromVal
  if (!fromVal) return toVal
  return {
    getters: merge(toVal.getters, fromVal.getters),
    state: merge(toVal.state, fromVal.state),
    actions: merge(toVal.actions, fromVal.actions)
  }
}
⬆ Back to Top
-
What are custom directives?
Custom Directives are tiny commands that you can attach to DOM elements. They are prefixed with v- to let the library know you’re using a special bit of markup and to keep syntax consistent. They are typically useful if you need low-level access to an HTML element to control a bit of behavior.
Let’s create a custom focus directive to provide focus on specific form element during page load time,
// Register a global custom directive called `v-focus`
Vue.directive('focus', {
  // When the bound element is inserted into the DOM...
  inserted: function (el) {
    // Focus the element
    el.focus()
  }
})
Now you can use v-focus directive on any element as below,
<input v-focus>⬆ Back to Top
-
How do you register directives locally?
You can also register directives locally(apart from globally) using directives option in component as below,
directives: {
  focus: {
    // directive definition
    inserted: function (el) {
      el.focus()
    }
  }
}
Now you can use v-focus directive on any element as below,
<input v-focus>⬆ Back to Top
-
What are the hook functions provided by directives?
A directive object can provide several hook functions,
- bind: This occurs once the directive is attached to the element.
- inserted: This hook occurs once the element is inserted into the parent DOM.
- update: This hook is called when the element updates, but children haven’t been updated yet.
- componentUpdated: This hook is called once the component and the children have been updated.
- unbind: This hook is called only once when the directive is removed.
Note: There are several arguments that can be passed to the above hooks.
⬆ Back to Top
-
What are the directive Hook Arguments?
All the hooks have
el,binding, andvnodeas arguments. Along with that, update and componentUpdated hooks exposeoldVnode, to differentiate between the older value passed and the newer value. Below are the arguments passed to the hooks,el: The element the directive is bound to and it can be used to directly manipulate the DOM.binding: An object containing the following properties.name: The name of the directive, without thev-prefix.value: The value passed to the directive. For example inv-my-directive="1 + 1", the value would be 2.oldValue: The previous value, only available in update and componentUpdated. It is available whether or not the value has changed.expression: The expression of the binding as a string. For example inv-my-directive="1 + 1", the expression would be “1 + 1”.arg: The argument passed to the directive, if any. For example in v-my-directive:foo, the arg would be “foo”.modifiers: An object containing modifiers, if any. For example in v-my-directive.foo.bar, the modifiers object would be{ foo: true, bar: true }.
vnode: The virtual node produced by Vue’s compiler.oldVnode: The previous virtual node, only available in the update and componentUpdated hooks.
The arguments can be represented diagrammatically across the hooks as below,
⬆ Back to Top
-
How do you pass multiple values to a directive?
A directive can take any valid javascript expression. So if you want to pass multiple values then you can pass in a JavaScript object literal.
Let’s pass object literal to an avatar directive as below
<div v-avatar="{ width: 500, height: 400, url: 'path/logo', text: 'Iron Man' }"></div>Now let us configure avatar directive globally,
Vue.directive('avatar', function (el, binding) {
  console.log(binding.value.width) // 500
  console.log(binding.value.height)  // 400
  console.log(binding.value.url) // path/logo
  console.log(binding.value.text)  // "Iron Man"
})
⬆ Back to Top
-
What is function shorthand in directive hooks?
In few cases, you may want the same behavior on
bindandupdatehooks irrespective of other hooks. In this situation you can use function shorthand,Vue.directive('theme-switcher', function (el, binding) { el.style.backgroundColor = binding.value })⬆ Back to Top
-
What is the benefit of render functions over templates?
In VueJS, the templates are very powerful and recommended to build HTML as part of your application. However, some of the special cases like dynamic component creation based on input or slot value can be achieved through render functions. Also, these functions gives the full programmatic power of javascript eco system.
-
What is a render function?
Render function is a normal function which receives a
createElementmethod as it’s first argument used to create virtual nodes. Internally Vue.js’ templates actually compile down to render functions at build time. Hence templates are just syntactic sugar of render functions.Let’s take an example of simple Div markup and corresponding render function.
The HTML markup can be written in template tag as below,<template> <div :class="{'is-rounded': isRounded}"> <p>Welcome to Vue render functions</p> </div> </template>and the compiled down or explicit render function would appear as below,
render: function (createElement) {
  return createElement('div', {
    'class': {
      'is-rounded': this.isRounded
     }
  }, [
    createElement('p', 'Welcome to Vue render functions')
  ]);
}
Note: The react components are built with render functions in JSX.
⬆ Back to Top
-
Explain the structure of createElement with arguments?
The createElement accepts few arguments to use all the template features.
Let us see the basic structure of createElement with possible arguments,
// @returns {VNode}
createElement(
  // An HTML tag name, component options, or async function resolving to one of these.
  // Type is {String | Object | Function}
  // Required.
  'div',

  // A data object corresponding to the attributes you would use in a template.
  // Type is {Object}
  // Optional.
  {
    // Normal HTML attributes
    attrs: {
      id: 'someId'
    },
    // Component props
    props: {
      myProp: 'somePropValue'
    },
    // DOM properties
    domProps: {
      innerHTML: 'This is some text'
    },
    // Event handlers are nested under `on`
    on: {
      click: this.clickHandler
    },
    // Similar to `v-bind:style`, accepting either a string, object, or array of objects.
    style: {
      color: 'red',
      fontSize: '14px'
    },
    // Similar to `v-bind:class`, accepting either a string, object, or array of strings and objects.
    class: {
      classsName1: true,
      classsName2: false
    }
    // ....
  },

  // Children VNodes, built using `createElement()`, or using strings to get 'text VNodes'.
  // Type is {String | Array}
  // Optional.
  [
    'Learn about createElement arguments.',
    createElement('h1', 'Headline as a child virtual node'),
    createElement(MyComponent, {
      props: {
        someProp: 'This is a prop value'
      }
    })
  ]
)
See details of the date object in official doc.
⬆ Back to Top
-
How can you write duplicate virtual nodes in a component?
All virtual nodes(VNodes) in the component tree must be unique.i.e, You can’t write duplicated nodes in a straightforward way. If you want to duplicate the same element/component many times then you should use factory function.
The below render function is invalid where you are trying to duplicate h1 element 3 times,
render: function (createElement) {
  var myHeadingVNode = createElement('h1', 'This is a Virtual Node')
  return createElement('div', [
    myHeadingVNode, myHeadingVNode, myHeadingVNode
  ])
}
You can make duplicates with factory function,
render: function (createElement) {
  return createElement('div',
    Array.apply(null, { length: 3 }).map(function () {
      return createElement('h1', 'This is a Virtual Node')
    })
  )
}
⬆ Back to Top
-
List down the template equivalents in render functions?
VueJS provides proprietary alternatives and plain javascript usage for the template features.
Let’s list down them in a table for comparision,
Templates Render function Conditional and looping directives: v-if and v-for Use JavaScript’s if/else and map concepts Two-way binding: v-model Apply own JS logic with value binding and event binding Capture Event modifiers: .passive, .capture, .once and .capture.once or .once.capture &, !, ~ and ~! Event and key modifiers: .stop, .prevent, .self, keys(.enter, .13) and Modifiers Keys(.ctrl, .alt, .shift, .meta) Use javascript solutions: event.stopPropagation(), event.preventDefault(), if (event.target !== event.currentTarget) return, if (event.keyCode !== 13) return and if (!event.ctrlKey) return Slots: slot attributes Render functions provide this. s l o t s a n d t h i s . slots and this. slotsandthis.scopedSlots instance properties ⬆ Back to Top
-
What are functional components?
The functional components are just simple functions to create simple components just by passing a context. Every functional component follows two rules,
- Stateless: It doesn’t keep any state by itself
- Instanceless: It has no instance, thus no this
You need to define
functional: trueto make it functional. Let’s take an example of functional components,Vue.component('my-component', { functional: true, // Props are optional props: { // ... }, // To compensate for the lack of an instance, // we are now provided a 2nd context argument. render: function (createElement, context) { // ... } })Note: The functional components are quite popular in React community too.
⬆ Back to Top
-
What are the similarities between VueJS and ReactJS?
Even though ReactJS and VueJS are two different frameworks there are few similarities(apart from the common goal of utilized in interface design) between them.
- Both frameworks are based on the Virtual DOM model
- They provide features such Component-based structure and reactivity
- They are intended for working with the root library, while all the additional tasks are transferred to other libraries(routing, state management etc).
⬆ Back to Top
-
What is the difference between VueJS and ReactJS?
Even though VueJS and ReactJS share few common features there are many difference between them.
Let’s list down them in a table format.
Feature VueJS ReactJS Type JavaScript MVC Framework JavaScript Library Platform Primarily focused on web development Both Web and Native Learning Curve Easy to learn the framework A steep learning curve and requires deep knowledge Simplicity Vue is simpler than React React is more complex than Vue Bootstrap Application Vue-cli CRA (Create React App) ⬆ Back to Top
-
What are the advantages of VueJS over ReactJS?
Vue has the following advantages over React
- Vue is smaller and faster
- The convenient templates ease the process of developing
- It has simpler javascript syntax without learning JSX
⬆ Back to Top
-
What are the advantages of ReactJS over VueJS?
React has the following advantages over Vue
- ReactJS gives more flexibility in large apps developing
- Easy to test
- Well-suited for mobile apps creation
- The eco system is quite big and well matured.
⬆ Back to Top
-
What are the differences between VueJS and Angular?
The the syntax of Vue and Angular is common at some points because Angular is the basis for VueJS development in the beginning.
But there are many differences between VueJS and Angular as listed,
Feature VueJS Angular Complexity Easy to learn, simple API and design The framework is bit huge and need some learning curve on typescript etc Binding of Data One-way binding Two-way binding Learning Curve Easy to learn the framework A steep learning curve and requires deep knowledge Founders Created by Former Google Employee Powered by Google Initial Release February 2014 September 2016 Model Based on Virtual DOM(Document Object Model) Based on MVC(Model-View-Controller) Written in JavaScript TypeScript ⬆ Back to Top
-
What are dynamic components?
The dynamic component is used to dynamically switch beetween multiple components using element and pass data to v-bind:is attribute.
Let’s create a dynamic component to switch between different pages of a website,
new Vue({
  el: '#app',
  data: {
    currentPage: 'home'
  },
  components: {
    home: {
      template: "<p>Home</p>"
    },
    about: {
      template: "<p>About</p>"
    },
    contact: {
      template: "<p>Contact</p>"
    }
  }
})
Now you can use the dynamic component which holds the current page,
<div id="app">
   <component v-bind:is="currentPage">
       <!-- component changes when currentPage changes! -->
       <!-- output: Home -->
   </component>
</div>
⬆ Back to Top
-
What is the purpose of keep alive tag?
Keep-alive tag is an abstract component used to preserve component state or avoid re-rendering. When you wrapped tag around a dynamic component, it caches the inactive component instances without destroying them.
Let’s see the example usage of it,
<!-- Inactive components will be cached! -->
<keep-alive>
  <component v-bind:is="currentTabComponent"></component>
</keep-alive>
When there are multiple conditional children, it requires that only one child is rendered at a time.
<!-- multiple conditional children -->
<keep-alive>
  <comp-a v-if="a > 1"></comp-a>
  <comp-b v-else></comp-b>
</keep-alive>
Note: Remember that keep-alive tag doesn’t render a DOM element itself, and doesn’t show up in the component parent chain.
⬆ Back to Top
-
What are async components?
In large applications, we may need to divide the app into smaller chunks and only load a component from the server when it’s needed. To make this happen, Vue allows you to define your component as a factory function that asynchronously resolves your component definition. These components are known as async component.
Let’s see an example of async component using webpack code-splitting feature,
Vue.component('async-webpack-example', function (resolve, reject) {
  // Webpack automatically split your built code into bundles which are loaded over Ajax requests.
  require(['./my-async-component'], resolve)
})
Vue will only trigger the factory function when the component needs to be rendered and will cache the result for future re-renders.
⬆ Back to Top
-
What is the structure of async component factory?
Async component factory is useful to resolve the component asynchronously. The async component factory can return an object of the below format.
const AsyncComponent = () => ({
  // The component to load (should be a Promise)
  component: import('./MyComponent.vue'),
  // A component to use while the async component is loading
  loading: LoadingComponent,
  // A component to use if the load fails
  error: ErrorComponent,
  // Delay before showing the loading component. Default: 200ms.
  delay: 200,
  // The error component will be displayed if a timeout is
  // provided and exceeded. Default: Infinity.
  timeout: 3000
})
⬆ Back to Top
-
What are inline templates?
If you keep an
inline-templateon a child component then it will use its inner content as a template instead of treating as reusable independent content.<my-component inline-template> <div> <h1>Inline templates</h1> <p>Treated as component component owne content</p> </div> </my-component>Note: Even though this inline-templates gives more flexibility for template authoring, it is recommended to define template using template property or tag inside .vue component.
⬆ Back to Top
-
What are X Templates?
Apart from regular templates and inline templates, you can also define templates using a script element with the type
text/x-templateand then referencing the template by an id.Let’s create a x-template for simple use case as below,
<script type="text/x-template" id="script-template">
  <p>Welcome to X-Template feature</p>
</script>
Now you can define the template using reference id,
Vue.component('x-template-example', {
  template: '#script-template'
})
⬆ Back to Top
-
What are recursive components?
The Components that can recursively invoke themselves in their own template are known as recursive components.
Vue.component('recursive-component', {
  template: `<!--Invoking myself!-->
             <recursive-component></recursive-component>`
});
Recursive components are useful for displaying comments on a blog, nested menus, or basically anything where the parent and child are the same, eventhough with different content.
Note: Remember that recursive component can lead infinite loops with
max stack size exceedederror, so make sure recursive invocation is conditional(for example, v-if directive).⬆ Back to Top
-
How do you resolve circular dependencies between components?
In complex applications, vue components will actually be each other’s descendent and ancestor in the render tree.
Let’s say componentA and componentB included in their respective templates which makes circular dependency,
//ComponentA
<div>
  <component-b >
</div>
//ComponentB <div> <component-a > </div>This can be solved by either registering(or wait until) the child component in
beforeCreatehook or using webpack’s asynchronous import while registering the component,Solution1:
beforeCreate: function () {
 this.$options.components.componentB = require('./component-b.vue').default
}
Solution2:
components: {
 componentB: () => import('./component-b.vue')
}
⬆ Back to Top
-
How do you make sure vue application is CSP complaint?
Some environments(Google Chrome Apps) prohibits the usage of
new Function()for evaluating expressions and the full builds of vue applications depends on this feature to compile templates. Due to this reason, the full builds of VueJS application are not CSP complaint.In this case you can use runtime-only builds with Webpack + vue-loader or Browserify + vueify technology stack through which templates will be precompiled into render functions. This way you can make sure VueJS applications are 100% CSP complaint.
-
What is the difference between full and runtime only builds?
There are two types of builds provided by VueJS,
1. Full: These are the builds that contain both the compiler and the runtime.
2. Runtime Only: These builds doesn’t include compiler but the code is responsible for creating Vue instances, rendering and patching virtual DOM. These are about 6KB lighter min+gzip.
-
List down different builds of vuejs?
Below are the list of different builds of VueJS based on type of build,
Type UMD CommonJS ES Module (for bundlers) ES Module (for browsers) Full vue.js vue.common.js vue.esm.js vue.esm.browser.js Runtime only vue.runtime.js vue.runtime.common.js vue.runtime.esm.js NA Full (production) vue.min.js NA NA vue.esm.browser.min.js Runtime-only (production) vue.runtime.min.js NA NA NA ⬆ Back to Top
-
How do you configure vuejs in webpack?
You can configure vueJS in webpack using alias as below,
module.exports = {
  // ...
  resolve: {
    alias: {
      'vue$': 'vue/dist/vue.esm.js' // 'vue/dist/vue.common.js' for webpack 1
    }
  }
}
⬆ Back to Top
-
What is the purpose of vuejs compiler?
The compiler is is responsible for compiling template strings into JavaScript render functions.
For example, the below code snippet shows the difference of templates which need compiler and not,
// this requires the compiler
new Vue({
  template: '<div>{{ message }}</div>'
})

// this does not
new Vue({
  render (h) {
    return h('div', this.message)
  }
})
⬆ Back to Top
-
What is Dev Tools and its purpose?
DevTools is a browser extension allowing you to inspect and debug your Vue applications in a more user-friendly interface. You can find the below extensions for different browsers or environments,
- Chrome Extension
- Firefox Addon
- Standalone Electron app (works with any environment)
The DevTools plugins can be used as shown in the below snapshot,
Note:
- If the page uses a production/minified build of Vue.js, devtools inspection is disabled by default so the Vue pane won’t show up.
- To make it work for pages opened via
file://protocol, you need to check “Allow access to file URLs” for this extension in Chrome’s extension management panel.
⬆ Back to Top
-
What is the browser support of VueJS?
It supports all ECMAScript5 complaint browsers as mentioned in this url. VueJS doesn’t support IE8 browser and below, because it uses ECMAScript 5 features that are un-shimmable(require support from the underlying JS engine) in IE8.
⬆ Back to Top
-
How do you use various CDNs?
VueJS is available in jsdelivr, unpkg and cdnjs etc CDNs. Normally you can use them for prototyping or learning purposes.
For example, you can use them using jsdelivr with latest versions as below,
<script src="https://cdn.jsdelivr.net/npm/vue@2.6.7/dist/vue.js"></script>You can use it for native ES modules as below,
<script type="module">
  import Vue from 'https://cdn.jsdelivr.net/npm/vue@2.6.7/dist/vue.esm.browser.js'
</script>
Note: You can remove version number to get latest version.
⬆ Back to Top
-
How do you force update?
It is extremely rare situation of having to manually force an update despite the fact that no reactive data has changed. i.e, To force the Vue instance to re-render manually. You can do it force update using vm.$forceUpdate() API method.
Note: It does not affect all child components but only the instance itself and child components with inserted slot content.
-
What is the purpose of vuejs once directive?
If you want to render
a lot of static contentthen you need to make sure it only evaluated once and then cached thereafter. In this case, you can usev-oncedirective by wrapping at the root level.The example usage of v-once directive would be as below,
Vue.component('legal-terms', {
  template: `
    <div v-once>
      <h1>Legal Terms</h1>
      ... a lot of static content goes here...
    </div>
  `
})
Note: It is recommended not to overuse unless there is slow rendering due to lot of static content.
⬆ Back to Top
-
How do you access the root instance?
The root instance(new Vue()) can be accessed with the
$rootproperty.Let’s see the usage of root instance with an example.
First let’s create a root instance with properties and methods as below,
// The root Vue instance
new Vue({
  data: {
    age: 26
  },
  computed: {
    fullName: function () { /* ... */ }
  },
  methods: {
    interest: function () { /* ... */ }
  }
})
Now you can access root instance data and it’s methods with in subcomponents as below,
// Get root data
this.$root.age

// Set root data
this.$root.age = 29

// Access root computed properties
this.$root.fullName

// Call root methods
this.$root.interest()
It is recommend using Vuex to manage state instead of using root instance as a global store.
⬆ Back to Top
-
List out top 10 organizations using Vuejs?
Below are the top 10 organizations using VueJS for their applications or products,
- Facebook - Used on marketing side of its Newsfeed
- Netflix - Used in two internal apps for building movie streaming interfaces
- Adobe - Used for Portfolio, a custom website builder designed to help users showcase their creative work
- Xiaomi - Used for products where it sells from consumer electronics to software
- Alibaba - Provide their apps an excellent experience to its customers
- WizzAir - A budget airline WizzAir used for their customers user interface
- EuroNews
- Laracasts
- GitLab
- Laracasts
⬆ Back to Top
-
What is the purpose of renderError?
When the default render function encounters an error then you can use rennderError as an alternative render output. The error will be passed to renderError as the second argument.
The example usage of renderError is as below,
new Vue({
  render (h) {
    throw new Error('An error')
  },
  renderError (h, err) {
    return h('div', { style: { color: 'red' }}, err.stack)
  }
}).$mount('#app')
⬆ Back to Top
-
How do you access parent instance?
The p a r e n t o b j e c t r e f e r s t o t h e ∗ ∗ i m m e d i a t e o u t e r s c o p e ∗ ∗ . T h e p a r e n t w i l l b e a c c e s s i b l e a s ‘ t h i s . parent object refers to the **immediate outer scope**. The parent will be accessible as `this. parentobjectreferstothe∗∗immediateouterscope∗∗.Theparentwillbeaccessibleas‘this.parent` for the child, and the child will be pushed into the parent’s $children array. It establishes a parent-child relationship between the two instances(parent and child). You can access parent data and properties similar to $root.
⬆ Back to Top
-
What is vuex?
Vuex is a state management pattern + library (Flux-inspired Application Architecture) for Vue.js applications. It serves as a centralized store for all the components in an application, with rules ensuring that the state can only be mutated in a predictable fashion.
-
What are the major components of State Management Pattern?
The state management has state, view and actions as major components. The pattern followed by these components in a application is known as State Management Pattern. Below are the components in a detail,
- The state, which is the source of truth that drives our app
- The view, which is just a declarative mapping of the state
- The actions, which are the possible ways the state could change in reaction to user inputs from the view.
Let us take a counter example which follows state management pattern with the above 3 components,
 new Vue({
   // state
   data () {
     return {
       count: 0
     }
   },
   // view
   template: `
     <div>{{ count }}</div>
   `,
   // actions
   methods: {
     increment () {
       this.count++
     }
   }
 })
⬆ Back to Top
-
How do you represent one way data flow in vuex?
Vue.js has a one-way data flow model, through the props property. The same concept can be represented in vuex has below,
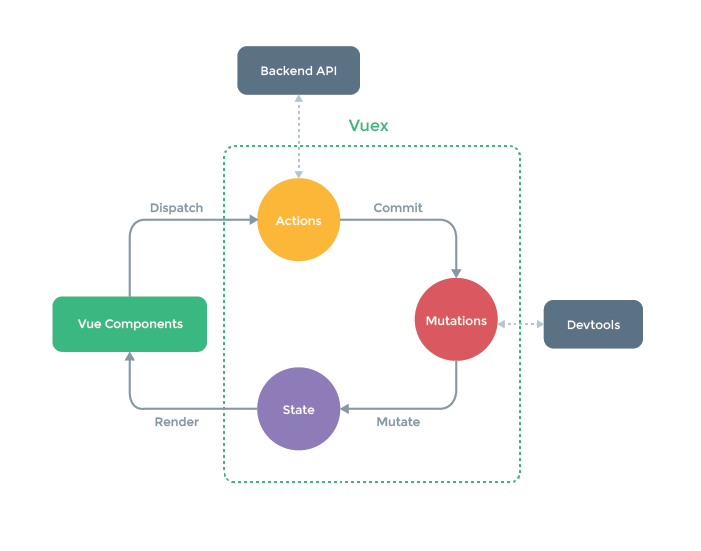
-
What is a vuejs loader?
Vue loader is a loader for webpack that allows you to author Vue components in a format called Single-File Components (SFCs).
For example, it authors HelloWorld component in a SFC,
<template>
  <div class="greeting">{{ message }}</div>
</template>

<script>
export default {
  data () {
    return {
      message: 'Hello world for vueloader!'
    }
  }
}
</script>

<style>
.greeting {
  color: blue;
}
</style>
⬆ Back to Top
-
How do you configure vue loader in webpack?
Vue Loader’s configuration is a bit different from other loaders by adding Vue Loader’s plugin to your webpack config. The vue loader plugin is required for cloning any other rules(js and css rules) defined and applying them to the corresponding language blocks(