HAproxy+Nginx7层负载均衡
一、关于4/7层负载平衡
1.1 4层负载均衡
将网络流量负载,平衡到多个服务器的最简单方法,是使用第4层(传输层)负载平衡。以这种方式进行负载均衡将根据IP范围和端口转发用户流量(即,如果请求进入http://yourdomain.com/anything,则流量将转发到处理yourdomain.com的所有请求的后端。端口80)。
工作原理
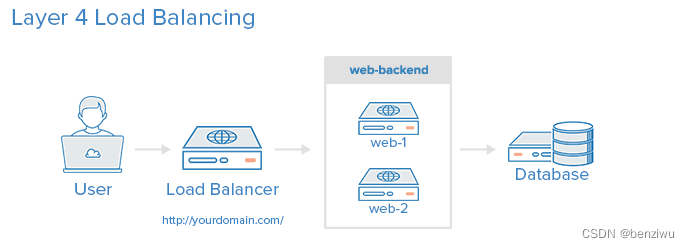
用户访问负载均衡器,负载均衡器将用户的请求转发给后端服务器的Web后端组。无论选择哪个后端服务器,都将直接响应用户的请求。通常,Web后端中的所有服务器应该提供相同的内容 - 否则用户可能会收到不一致的内容。
1.2 7层负载均衡
7层负载平衡是更复杂的负载均衡网络流量的方法是使用第7层(应用层)负载均衡。使用第7层允许负载均衡器根据用户请求的内容将请求转发到不同的后端服务器。这种负载平衡模式允许您在同一域和端口下运行多个Web应用程序服务器。
工作原理
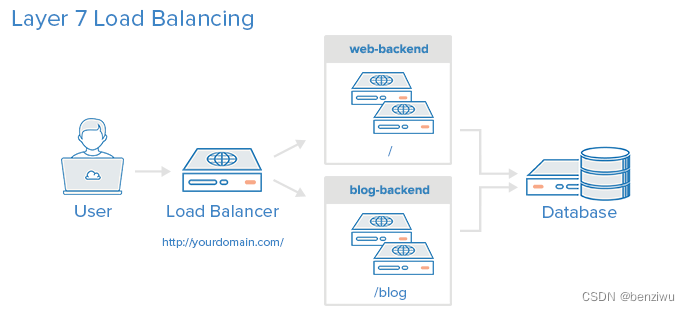
示例中,如果用户请求yourdomain.com/blog,则会将其转发到博客后端,后端是一组运行博客应用程序的服务器。其他请求被转发到web-backend,后端可能正在运行另一个应用程序。
7层负载不同叫法
7层负载均衡、应用程序负载均衡、URL负载均衡、动静分离技术
特点
- 支持tcp / http 两种协议层的负载均衡,使得其负载均衡功能非常丰富。
- 支持8种左右的负载均衡算法,尤其是在http模式时,有许多非常实在的负载均衡算法,适用各种需求。
- 性能非常优秀,基于事件驱动的链接处理模式及单进程处理模式(和Nginx类似)让其性能卓越。
处理模式
单线程处理模式:所有客户端连接全部都由同一个服务进程来处理,目标就是等待连接,来一个分配一个,主要消耗cpu。
多线程处理模式:多线程模式消耗内存,会限制并发而且多线程需要进程间通信,也会消耗相当多的cpu资源 - 拥有一个功能出色的监控页面,实时了解系统的当前状况。
- 功能强大的ACL支持,给用户极大的方便。
免费、快速并且可靠
是一款高性能的负载均衡软件。
因为其专注于负载均衡这一些事情,
因此与nginx比起来在负载均衡这件事情上做更好,更专业。
是一款高性能的负载均衡软件。
因为其专注于负载均衡这一些事情,
因此与nginx比起来在负载均衡这件事情上做更好,更专业。
用户群体
包括 GitHub、Bitbucket 、Stack Overflow 、Reddit、Tumblr、Twitter 和 Tuenti 在内的知名网站,及亚马逊网络服务系统都使用了HAProxy。
二、实战示例1
准备环境
4台LINUX,相互做好域名解析
Client:192.168.238.129
HApoxy: 192.168.238.138
WEB1:	192.168.238.140
WEB2:	192.168.238.146
再WEB1/WEB2上相同操作,修改index.html 文件,区分WEB1.WEB2
systemctl stop firewalld && setenforce 0
ntpdate IP地址		同步的主机
yum install -y httpd
echo web1 > /var/www/html/index.html
在HAproxy
HAproxy:
yum -y install epel-release
yum -y install haproxy
vim /etc/haproxy/haproxy.cfg
===========================================================================================================
[root@haproxy ~]# vim /etc/haproxy/haproxy.cfg

    #    by adding the '-r' option to the SYSLOGD_OPTIONS in
    #    /etc/sysconfig/syslog
    #
    # 2) configure local2 events to go to the /var/log/haproxy.log
    #   file. A line like the following can be added to
    #   /etc/sysconfig/syslog
    #
    #    local2.*                       /var/log/haproxy.log
    #
    log         127.0.0.1 local2

    chroot      /var/lib/haproxy
    pidfile     /var/run/haproxy.pid
    maxconn     4000
    user        haproxy
    group       haproxy
    daemon

    # turn on stats unix socket
    stats socket /var/lib/haproxy/stats

#---------------------------------------------------------------------
# common defaults that all the 'listen' and 'backend' sections will
# use if not designated in their block
#---------------------------------------------------------------------
defaults
    mode                    http
    log                     global
    option                  httplog
    option                  dontlognull
    option http-server-close
    option forwardfor       except 127.0.0.0/8
    option                  redispatch
    retries                 3
    timeout http-request    10s
    timeout queue           1m
    timeout connect         10s
    timeout client          1m
    timeout server          1m
    timeout http-keep-alive 10s
    timeout check           10s
    maxconn                 3000

#---------------------------------------------------------------------
# main frontend which proxys to the backends
#---------------------------------------------------------------------
#frontend  web *:80
#    acl url_static       path_beg       -i /static /images /javascript /stylesheets
#    acl url_static       path_end       -i .jpg .gif .png .css .js

#   use_backend static          if url_static
#    default_backend             app
==========================================================================================================
#######第一种实现方法#############
==========================================================================================================
listen app
        bind *:80
        server app1 192.168.238.140:80 check
        server app2 192.168.238.146:80 check

listen stats *:80
        mode http
#       stats uri /admin?stats
        stats uri /proxy     #  访问地址后缀
        stats auth proxy:123456
        balance roundrobin
        option httpclose
        option forwardfor
        option httpchk
        server web1 192.168.238.140:80 cookie web1 check port 80 inter 5000 fall 5
        server web2 192.168.238.146:80 cookie web2 check port 80 inter 5000 fall 5
#---------------------------------------------------------------------
# static backend for serving up images, stylesheets and such
#---------------------------------------------------------------------
                                                                           70,1-8        83%

===========================================================================================================
#####第二种方法
===========================================================================================================
vim /etc/haproxy/haproxy.cfg
修改第一种部分其他不动
stats uri /proxy
    stats realm Private lands
    stats auth proxy:123456
    stats hide-version

    frontend http-in
        bind *:80
        mode http
        log global
        option httplog
        option httpclose
     acl html url_reg  -i  \.html$
     use_backend html-server if  html
     default_backend html-server
#---------------------------------------------------------------------
# round robin balancing between the various backends
#---------------------------------------------------------------------
backend html-server
        mode http
        balance roundrobin
        option httpchk GET /index.html
        cookie SERVERID insert indirect nocache
        server html-A web1:80 weight 1 cookie 3 check inter 2000 rise 2 fall 5
        server html-B web2:80 weight 1 cookie 4 check inter 2000 rise 2 fall 5
client测试
[root@client ~]# elinks --dump http://haproxy
   web2
[root@client ~]# elinks --dump http://haproxy
   web1
[root@client ~]# elinks --dump http://haproxy
   web2
[root@client ~]# elinks --dump http://haproxy
   web2
访问HAproxy
http://192.168.238.138/proxy
账户输入上面haproxy.cfg里面的;
proxy
123456
三、Nginx
特点
功能强大,性能卓越,运行稳定
配置简单灵活
能够自动剔除工作不正常的后端服务器
上传文件使用异步模式。client---nginx---web1 web2 web3  lvs同步请求 DR client -->dr---web1
支持多种分配策略,可以分配权重,分配方式灵活。
优势
nginx复制用户请求,在后端服务器出现问题时。nginx会再复制一份请求发给另一台后端服务器。
lvs则在这种情况,只能用户重新发请求
缺点
流量会经过ngnix,nginx成为瓶颈
工作原理

3.1 7层负载示例
通过location对不同的请求进行进行负载均衡,因为通过http协议,所以称作7层
location  / {

}
location ~ \.html${
proxy_pass ...
}
location ~ \.php${
proxy_pass ...
}
location ~ \.(jpg|png|css|js)${
proxy_pass ...
}
3.2 nginx负载均衡算法
round robin(默认):	轮询方式,依次将请求分配到各个后台服务器中,默认的负载均衡方式。
	适用于后台机器性能一致的情况。
	挂掉的机器可以自动从服务列表中剔除。

weight:根据权重来分发请求到不同的机器中,指定轮询几率,weight和访问比率成正比,用于后端服务器性能不均的情况。
例如:
upstream bakend {
server 192.168.0.14 weight=10;
server 192.168.0.15 weight=10;
}

IP_hash:
根据请求者ip的hash值将请求发送到后台服务器中,可以保证来自同一ip的请求被打到固定的机器上,可以解决session问题。

例如:
upstream bakend {
ip_hash;
server 192.168.0.14:88;
server 192.168.0.15:80;
}

url_hash(第三方):
根据请求的url的hash值将请求分到不同的机器中,当后台服务器为缓存的时候效率高。
需要额外安装 nginx的upstream_hash模块
wget http://wiki.nginx.org/images/7/78/Nginx_upstream_hash-0.3.tar.gz


在upstream中加入hash语句,server语句中不能写入weight等其他的参数,hash_method是使用的hash算法
复制代码
upstream backend {
server squid1:3128;
server squid2:3128;
hash $request_uri;
hash_method crc32;
}

fair(第三方):
根据后台响应时间来分发请求,响应时间短的分发的请求多。

例如:
upstream backend {
server server1;
server server2;
fair;
}
1.down 表示单前的server暂时不参与负载
2.weight 默认为1.weight越大,负载的权重就越大
3.max_fails :允许请求失败的次数默认为1.当超过最大次数时,返回proxy_next_upstream 模块定义的错误
4.fail_timeout:max_fails次失败后,暂停的时间。
5.backup: 其它所有的非backup机器down或者忙的时候,请求backup机器。所以这台机器压力会最轻。
nginx支持同时设置多组的负载均衡,用来给不用的server来使用。
client_body_in_file_only 设置为On 可以讲client post过来的数据记录到文件中用来做debug
client_body_temp_path 设置记录文件的目录 可以设置最多3层目录
location 对URL进行匹配.可以进行重定向或者进行新的代理 负载均衡
3.3 Nginx实战
准备环境
client:192.168.238.129
nginx:nginx
apache:web1
apache:web2
Nginx Server:
yum -y install epel-release
yum -y installd nginx

vim /etc/nginx
upstream  html {
	server web1:80;
	server web2:80;
}
server {

location / {
proxy_pass   http://html;
}
}
访问nginx;能交替看到web1和web2
3.4 动静分离
   upstream html {
        server web1:80;
        server web2:80;
        }
    upstream php {
        server web3:80;
        server web4:80;
        }
server {
        location / {
         proxy_pass http://html;
        }
        location ~ \.php$ {
         proxy_pass http://php;
        }
}


测试:
elinks --dump http://nginx
elinks --dump http://nginx/index
elinks --dump http://nginx/index.php
3.5 NGINX实现7层负载均衡

一、实施过程
1. 根据站点分区进行调度
http {
    upstream news {
        server 192.168.1.11:80 weight=1 max_fails=2 fail_timeout=2;
        server 192.168.1.12:80 weight=2 max_fails=2 fail_timeout=2;
        server 192.168.1.13:80 weight=2 max_fails=2 fail_timeout=2;
       }

    upstream milis {
        server 192.168.1.21:80 weight=1 max_fails=2 fail_timeout=2;
        server 192.168.1.22:80 weight=2 max_fails=2 fail_timeout=2;
        server 192.168.1.23:80 weight=2 max_fails=2 fail_timeout=2;
       }

     upstream videos {
        server 192.168.1.31:80 weight=1 max_fails=2 fail_timeout=2;
        server 192.168.1.32:80 weight=2 max_fails=2 fail_timeout=2;
        server 192.168.1.33:80 weight=2 max_fails=2 fail_timeout=2;
       }

     upstream images {
        server 192.168.1.41:80 weight=1 max_fails=2 fail_timeout=2;
        server 192.168.1.42:80 weight=2 max_fails=2 fail_timeout=2;
        server 192.168.1.43:80 weight=2 max_fails=2 fail_timeout=2;
       }

      upstream others {
        server 192.168.1.51:80 weight=1 max_fails=2 fail_timeout=2;
        server 192.168.1.52:80 weight=2 max_fails=2 fail_timeout=2;
        server 192.168.1.53:80 weight=2 max_fails=2 fail_timeout=2;
       }

     server {
          	location / {
      		proxy_pass http://others;
      		}

      		location /news {
      		proxy_pass http://news;
      		}

      		location /mili {
      		proxy_pass http://milis;
      		}

      		location ~* \.(wmv|mp4|rmvb)$ {
      		proxy_pass http://videos;
      		}

      		location ~* \.(png|gif|jpg)$ {
      		proxy_pass http://images;
      		}
}


2. 根据动静分离进行调度
http {
     upstream htmlservers {
        server 192.168.1.3:80 weight=1 max_fails=2 fail_timeout=2;
        server 192.168.1.4:80 weight=2 max_fails=2 fail_timeout=2;
         }

	 upstream phpservers {
        server 192.168.1.3:80 weight=1 max_fails=2 fail_timeout=2;
        server 192.168.1.4:80 weight=2 max_fails=2 fail_timeout=2;
         }

      server {
      		location ~* \.html$ {
      		proxy_pass http://htmlservers;
      		}

      		location ~* \.php$ {
      		proxy_pass http://phpservers;
      		}
      }
 }


二、Keepalived实现调度器HA
注:主/备调度器均能够实现正常调度
1. 主/备调度器安装软件
[root@master ~]# yum -y install ipvsadm keepalived
[root@backup ~]# yum -y install ipvsadm keepalived

2. Keepalived
Master
# vim /etc/keepalived/keepalived.conf
! Configuration File for keepalived

global_defs {
   router_id director1			//辅助改为director2
}

vrrp_instance VI_1 {
    state BACKUP
    nopreempt
    interface eth0				//心跳接口,尽量单独连接心跳
    virtual_router_id 80		//MASTER,BACKUP一致
    priority 100					//辅助改为50
    advert_int 1
    authentication {
        auth_type PASS
        auth_pass 1111
    }
    virtual_ipaddress {
        192.168.1.80
    }
}

BACKUP


3. 启动KeepAlived(主备均启动)
# chkconfig keepalived on
# service keepalived start
# ip addr


4. 扩展对调度器Nginx健康检查(可选)
思路:
让Keepalived以一定时间间隔执行一个外部脚本,脚本的功能是当Nginx失败,则关闭本机的Keepalived
a. script
[root@master ~]# cat /etc/keepalived/check_nginx_status.sh
#!/bin/bash
/usr/bin/curl -I http://localhost &>/dev/null
if [ $? -ne 0 ];then
	/etc/init.d/keepalived stop
fi
[root@master ~]# chmod a+x /etc/keepalived/check_nginx_status.sh

b. keepalived使用script
! Configuration File for keepalived

global_defs {
   router_id director1
}

vrrp_script check_nginx {
   script "/etc/keepalived/check_nginx_status.sh"
   interval 5
}

vrrp_instance VI_1 {
    state BACKUP
    interface eth0
    nopreempt
    virtual_router_id 90
    priority 100
    advert_int 1
    authentication {
        auth_type PASS
        auth_pass tianyun
    }
    virtual_ipaddress {
        192.168.1.80
    }

    track_script {
        check_nginx
    }
}
3.6 关于php和php-fpm的一点点区别
--------------------
proxy_pass
    后端服务器用的非php独立进程
    apache+php模块
fastcgi_pass
    后端服务器用的是php-fpm
    php-fpm(fastcgi形式的php)

后端服务器部署详细过程:
安装软件:
    # yum install nginx php php-fpm -y
    # vim /etc/nginx/nginx.conf   //添加php配置
    在server里面添加如下配置:
    location ~ \.php$ {
            root           html;
            fastcgi_pass   127.0.0.1:9000;
            fastcgi_index  index.php;
            fastcgi_param SCRIPT_FILENAME $document_root$fastcgi_script_name;
            include        fastcgi_params;
        }

   修改php-fpm进程账户并开启php-fpm的进程: 端口是9000
   #vim /etc/php-fpm.d/www.conf  //修改如下参数,默认值是apache
   user = nginx
   group = nginx

   为什么设置成nginx:
       因为nginx.conf配置的账户为nginx

   # systemctl start php-fpm


前端nginx反向代理服务器:
    upstream web {
         server 10.0.0.21;
         server 10.0.0.22;
        }
    upstream phpserver {
         server 10.0.0.23;
         server 10.0.0.24;
        }       #上面的配置写到http里面server外面

    server {
        listen 80;
        server_name www.baidu.com;
        location / {                        #html的配置
        proxy_pass http://web;
        }

        location ~* \.php$ {         #php的配置
        proxy_pass http://phpserver;
        }