Spring——Spring核心基于注解方式的DI实现IoC的设计思想-搭建三层架构项目样例
说明:本篇博文介绍的是:通过使用注解的方式搭建一个基础三层架构模型。
DI和IoC概念回顾:
IoC(控制反转):全称为:Inverse of Control。从字面上理解就是控制反转了,将对在自身对象中的一个内置对象的控制反转,反转后不再由自己本身的对象进行控制这个内置对象的创建,而是由第三方系统去控制这个内置对象的创建。
DI(依赖注入):全称为Dependency Injection,意思自身对象中的内置对象是通过注入的方式进行创建。
界面层注解使用@Controller
业务逻辑层注解使用@Service
数据访问层使用注解@Repository
三层架构项目目录
- 界面层controller
- UsersController
- 数据访问层dao
- UsersMapper
- UsersMapperImpl
- 实体类pojo
- Users
- 业务逻辑层service
- 业务逻辑层实现类Impl
- UsersServiceImpl
- UsersService
- resources
- spring配置文件
- 项目核心配置文件pom.xml
- 测试类
界面层controller
UsersController
@Controller
public class UsersController {

    //注意:所有的界面层都会有业务逻辑层的对象(需要调用它的对象方法)
    //使用注解形式创建业务逻辑层对象
    @Autowired
    UsersService usersService ;//= new UsersServiceImpl();

    //界面层的功能实现:对外提供访问功能
    public int insert(Users users){
        return usersService.insert(users);
    }
}
数据访问层dao
UsersMapper
数据访问层接口
public interface UsersMapper {
    //增加用户到数据库
    int insert(Users users);
}
UsersMapperImpl
数据访问层实现类
@Repository
public class UsersMapperImpl implements UsersMapper{
    @Override
    public int insert(Users users) {
        System.out.println(users.getUserName()+"用户创建成功了");
        return 1;
    }
}
实体类pojo
Users
public class Users {

    private int userId;
    private String userName;
    private int userAge;

    public Users() {
    }

    @Override
    public String toString() {
        return "Users{" +
                "userId=" + userId +
                ", userName='" + userName + '\'' +
                ", userAge=" + userAge +
                '}';
    }

    public int getUserId() {
        return userId;
    }

    public void setUserId(int userId) {
        this.userId = userId;
    }

    public String getUserName() {
        return userName;
    }

    public void setUserName(String userName) {
        this.userName = userName;
    }

    public int getUserAge() {
        return userAge;
    }

    public void setUserAge(int userAge) {
        this.userAge = userAge;
    }

    public Users(int userId, String userName, int userAge) {
        this.userId = userId;
        this.userName = userName;
        this.userAge = userAge;
    }
}
业务逻辑层service
业务逻辑层实现类Impl
UsersServiceImpl
@Service
public class UsersServiceImpl implements UsersService {

    //注意:所有的业务逻辑层必须有数据访问层的对象
    //使用注解的方式创建引用类型的对象
    @Autowired
    private UsersMapper usersMapper ;//= new UsersMapperImpl();

    @Override
    public int insert(Users users) {

        //此处可以添加更为复杂的业务功能

        //这里直接将数据访问层的用户对象实现添加
        return usersMapper.insert(users);
    }
}
UsersService
业务逻辑层接口
public interface UsersService {

    //实现用户添加的功能
    int insert(Users users);
}
resources
spring配置文件
对于使用注解方式的DI,只需要在配置文件中指明需要扫描的包即可
<?xml version="1.0" encoding="UTF-8"?>
<beans xmlns="http://www.springframework.org/schema/beans"
       xmlns:xsi="http://www.w3.org/2001/XMLSchema-instance"
       xmlns:context="http://www.springframework.org/schema/context"
       xsi:schemaLocation="http://www.springframework.org/schema/beans http://www.springframework.org/schema/beans/spring-beans.xsd http://www.springframework.org/schema/context https://www.springframework.org/schema/context/spring-context.xsd">

    <!--指定spring扫描包-->
    <context:component-scan base-package="com.lcl"></context:component-scan>
</beans>
项目核心配置文件pom.xml
<?xml version="1.0" encoding="UTF-8"?>

<project xmlns="http://maven.apache.org/POM/4.0.0" xmlns:xsi="http://www.w3.org/2001/XMLSchema-instance"
         xsi:schemaLocation="http://maven.apache.org/POM/4.0.0 http://maven.apache.org/xsd/maven-4.0.0.xsd">
    <modelVersion>4.0.0</modelVersion>

    <groupId>com.lcl</groupId>
    <artifactId>spring_005_sanceng_annotaion</artifactId>
    <version>1.0</version>

    <name>spring_002_sanceng</name>
    <!-- FIXME change it to the project's website -->
    <url>http://www.example.com</url>

    <properties>
        <project.build.sourceEncoding>UTF-8</project.build.sourceEncoding>
        <maven.compiler.source>1.8</maven.compiler.source>
        <maven.compiler.target>1.8</maven.compiler.target>
    </properties>

    <dependencies>
        <dependency>
            <groupId>junit</groupId>
            <artifactId>junit</artifactId>
            <version>4.11</version>
            <scope>test</scope>
        </dependency>

        <!--添加spring的依赖-->
        <dependency>
            <groupId>org.springframework</groupId>
            <artifactId>spring-context</artifactId>
            <version>5.2.5.RELEASE</version>
        </dependency>
    </dependencies>

    <build>

    </build>
</project>
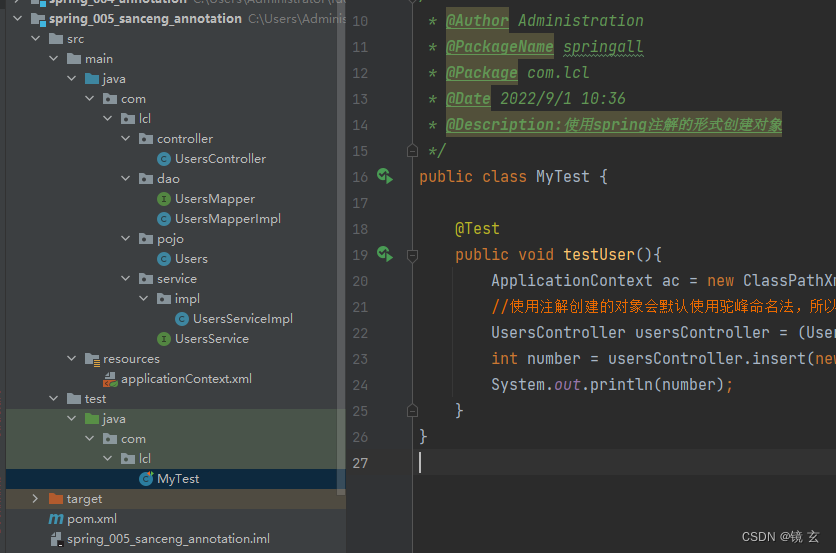
测试类
public class MyTest {

    @Test
    public void testUser(){
        ApplicationContext ac = new ClassPathXmlApplicationContext("applicationContext.xml");
        //使用注解创建的对象会默认使用驼峰命名法,所以需要注意getBean方法内填写的内容
        UsersController usersController = (UsersController) ac.getBean("usersController");
        int number = usersController.insert(new Users(100, "李华", 22));
        System.out.println(number);
    }
}
完整项目目录如下: