谷粒学苑_第五天
开始开发前端部分
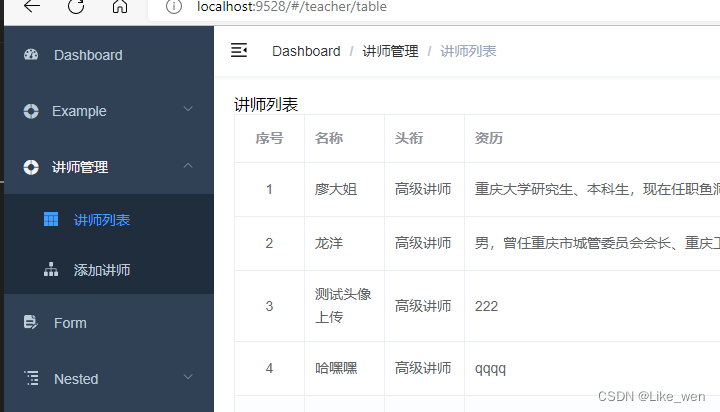
讲师列表
先登录改到本地,后期再加一个spring secutiry框架
运行:
npm run build
登录功能改造与跨域
Shift+Alt+f整理格式
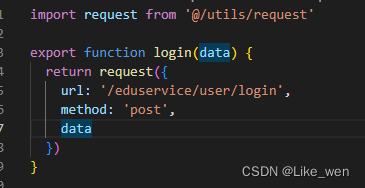
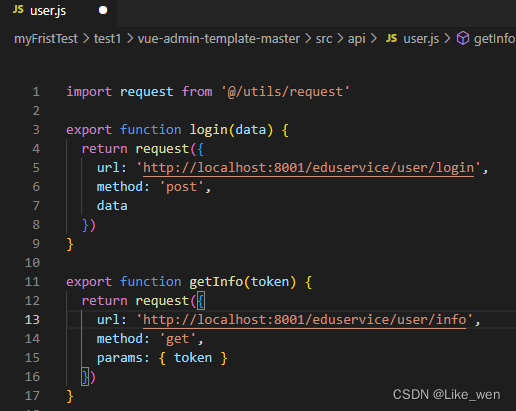
新版的登录url在这里:
src/api/user.js
用的是
http://localhost:9528/dev-api/vue-admin-template/user/login
不用修改BASE_API,因为新版本本身就是用的localhost
开发接口
创建EduLoginController
1.login
2.info
package com.lkw.eduservice.controller;

import com.lkw.commonutils.R;
import org.springframework.web.bind.annotation.GetMapping;
import org.springframework.web.bind.annotation.PostMapping;
import org.springframework.web.bind.annotation.RequestMapping;
import org.springframework.web.bind.annotation.RestController;

@RestController
@RequestMapping("/eduservice/user")
public class EduLoginController {

    //login
    @PostMapping("login")
    public R login(){
        return R.ok().data("token","admin");
    }

    //info
    @GetMapping("info")
    public R info(){
        return  R.ok().data("roles","[admin]").data("name","admin").data("avatar","https://wpimg.wallstcn.com/f778738c-e4f8-4870-b634-56703b4acafe.gif");
    }
}
在src/api/user.js修改地址:
为:/eduservice/user/login
在.env.development可以看到:
‘/dev-api’
修改为:‘’
对,就是空
然后,
在vue.config.js修改成8001
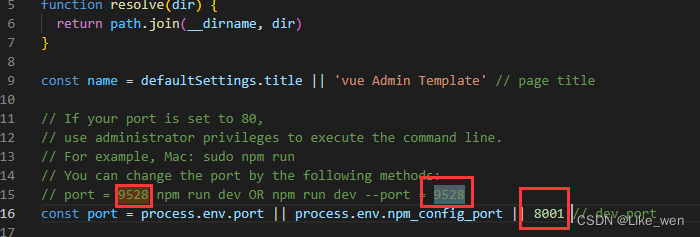
//可以先不改,后面发现改了没用
记得保存
启动idea与vscode
vscode关ctrl+c
重新启动:
npm run dev
改完之后是8002,因为8001被idea占了,到时候转到idea应该就没事
所以把这里改成全地址就能用了
http://localhost:8002/eduservice/user/login
会出现network error
需要端口号相同
跨域的解决方式
方法一:controller添加注解:
@CrossOrigin
就能够跨域访问
每个controller都要加
方法二:使用网关
前端框架
添加功能
前端的路由如何工作
寻找路由功能在前端的哪个地方
在src/router/index.js
这里会路由到views创建的vue页面
在vue页面会调用api文件夹的js文件,然后实现功能
讲师列表的前端实现
添加路由
/src/router/index
  {
    path: '/teacher',
    component: Layout,
    redirect: '/taecher/table',
    name: '讲师管理',
    meta: { title: '讲师管理', icon: 'el-icon-s-help' },
    children: [
      {
        path: 'table',
        name: '讲师列表',
        component: () => import('@/views/edu/teacher/list'),
        meta: { title: '讲师列表', icon: 'table' }
      },
      {
        path: 'tree',
        name: '添加讲师',
        component: () => import('@/views/edu/teacher/save'),
        meta: { title: '添加讲师', icon: 'tree' }
      }
    ]
  },
添加页面
创建文件:
src\views\edu\teacher\list.vue
src\views\edu\teacher\save.vue
<template>
    <div class="app-container">
        显示的信息
    </div>
</template>
创建:src\api\teacher\teacher.js
import request from '@/utils/request'


export function getTeacherListPage(current,limit,teacherQuery) {
  return request({
    //细节:url后面是`不是'
    url: ` http://localhost:8001/eduservice/teacher/pageTeacherCondition/${current}/${limit}`,
    method: 'post',
    //teacherQuery条件对象,后端使用RequestBody获取数据
    //data表示把对象转换json进行传递到接口里面
    data:teacherQuery
  })
}
在,src\views\edu\teacher\list.vue调用写好的js方法
main.vue封装好了 new Vue
主要是data,created,method
<template>
    <div class="app-container">
        讲师列表
    </div>
</template>
<script>
import teacher from '@/api/teacher/teacher'

export default{
    //核心代码位置
    // data:{
    // },
    //一般data的写法是写成函数,返回
    data(){//定义数据变量,初始值
        return{
            list:null,//查询后接口返回的集合
            page:1,//当前页
            limit:10,//每页记录数
            totoal:0,//总数
            teacherQuery:{}//条件封装对象
        }
    },


    created(){//页面渲染之前执行,一般是method的方法
    this.getList()
    },
    methods:{//具体的方法,调用teacher.js的方法实现功能
    //讲师列表方法
        getList(){
            //调用其他的方法

            teacher.getTeacherListPage(this.page,this.limit,this.teacherQuery)
            .then(response=>{//请求成功
            //返回的数据
           this.list = response.data.rows
          this.total = response.data.total
          console.log(this.list)
          console.log(this.total)

            })
            .catch(error=>{//请求失败
                console.log(error)
            })

        }

    }

}
</script>
显示数据:
使用element-ui实现
地址:https://element.eleme.cn/#/zh-CN/component/layout
两个等号判断值
三个等号判断值,也判断类型
list.vue代码:
<template>
    <div class="app-container">
        讲师列表
            <el-table
      :data="list"
      border
      fit
      highlight-current-row>

      <el-table-column
        label="序号"
        width="70"
        align="center">
        <template slot-scope="scope">
          {{ (page - 1) * limit + scope.$index + 1 }}
        </template>
      </el-table-column>

      <el-table-column prop="name" label="名称" width="80" />

      <el-table-column label="头衔" width="80">
        <template slot-scope="scope">
          {{ scope.row.level===1?'高级讲师':'首席讲师' }}
        </template>
      </el-table-column>

      <el-table-column prop="intro" label="资历" />

      <el-table-column prop="gmtCreate" label="添加时间" width="160"/>

      <el-table-column prop="sort" label="排序" width="60" />

      <el-table-column label="操作" width="200" align="center">
        <template slot-scope="scope">
          <router-link :to="'/teacher/edit/'+scope.row.id">
            <el-button type="primary" size="mini" icon="el-icon-edit">修改</el-button>
          </router-link>
          <el-button type="danger" size="mini" icon="el-icon-delete" @click="removeDataById(scope.row.id)">删除</el-button>
        </template>
      </el-table-column>
    </el-table>
    </div>
</template>
<script>
import teacher from '@/api/teacher/teacher'

export default{
    //核心代码位置
    // data:{
    // },
    //一般data的写法是写成函数,返回
    data(){//定义数据变量,初始值
        return{
            list:null,//查询后接口返回的集合
            page:1,//当前页
            limit:10,//每页记录数
            totoal:0,//总数
            teacherQuery:{}//条件封装对象
        }
    },


    created(){//页面渲染之前执行,一般是method的方法
    this.getList()
    },
    methods:{//具体的方法,调用teacher.js的方法实现功能
    //讲师列表方法
        getList(){
            //调用其他的方法

            teacher.getTeacherListPage(this.page,this.limit,this.teacherQuery)
            .then(response=>{//请求成功
            //返回的数据
           this.list = response.data.rows
          this.total = response.data.total
          console.log(this.list)
          console.log(this.total)

            })
            .catch(error=>{//请求失败
                console.log(error)
            })

        }

    }

}
</script>
分页功能
在element-ui找一个分页条
加在</div>前
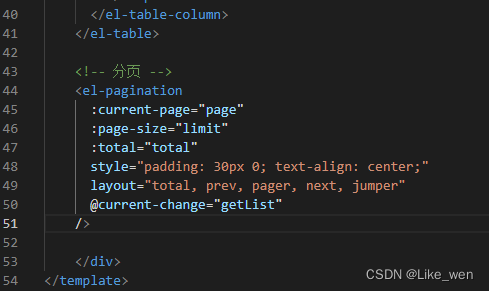
    <el-pagination
      :current-page="page"
      :page-size="limit"
      :total="total"
      style="padding: 30px 0; text-align: center;"
      layout="total, prev, pager, next, jumper"
      @current-change="getList"
    />
添加默认页码:
list.vue完整代码:
<template>
    <div class="app-container">
        讲师列表
            <el-table
      :data="list"
      border
      fit
      highlight-current-row>

      <el-table-column
        label="序号"
        width="70"
        align="center">
        <template slot-scope="scope">
          {{ (page - 1) * limit + scope.$index + 1 }}
        </template>
      </el-table-column>

      <el-table-column prop="name" label="名称" width="80" />

      <el-table-column label="头衔" width="80">
        <template slot-scope="scope">
          {{ scope.row.level===1?'高级讲师':'首席讲师' }}
        </template>
      </el-table-column>

      <el-table-column prop="intro" label="资历" />

      <el-table-column prop="gmtCreate" label="添加时间" width="160"/>

      <el-table-column prop="sort" label="排序" width="60" />

      <el-table-column label="操作" width="200" align="center">
        <template slot-scope="scope">
          <router-link :to="'/teacher/edit/'+scope.row.id">
            <el-button type="primary" size="mini" icon="el-icon-edit">修改</el-button>
          </router-link>
          <el-button type="danger" size="mini" icon="el-icon-delete" @click="removeDataById(scope.row.id)">删除</el-button>
        </template>
      </el-table-column>
    </el-table>

    <el-pagination
      :current-page="page"
      :page-size="limit"
      :total="total"
      style="padding: 30px 0; text-align: center;"
      layout="total, prev, pager, next, jumper"
      @current-change="getList"
    />

    </div>
</template>
<script>
import teacher from '@/api/teacher/teacher'

export default{
    //核心代码位置
    // data:{
    // },
    //一般data的写法是写成函数,返回
    data(){//定义数据变量,初始值
        return{
            list:null,//查询后接口返回的集合
            page:1,//当前页
            limit:10,//每页记录数
            totoal:0,//总数
            teacherQuery:{}//条件封装对象
        }
    },


    created(){//页面渲染之前执行,一般是method的方法
    this.getList()
    },
    methods:{//具体的方法,调用teacher.js的方法实现功能
    //讲师列表方法
        getList(page=1){
            //调用其他的方法
                    this.page=page
            teacher.getTeacherListPage(this.page,this.limit,this.teacherQuery)
            .then(response=>{//请求成功
            //返回的数据
           this.list = response.data.rows
          this.total = response.data.total
          console.log(this.list)
          console.log(this.total)

            })
            .catch(error=>{//请求失败
                console.log(error)
            })

        }

    }

}
</script>
条件查询
组件代码
            <!--查询表单-->
    <el-form :inline="true" class="demo-form-inline">
      <el-form-item>
        <el-input v-model="teacherQuery.name" placeholder="讲师名" />
      </el-form-item>
      <el-form-item>
        <el-select v-model="teacherQuery.level" clearable placeholder="讲师头衔">
          <el-option :value="1" label="高级讲师" />
          <el-option :value="2" label="首席讲师" />
        </el-select>
      </el-form-item>
      <el-form-item label="添加时间">
        <el-date-picker
          v-model="teacherQuery.begin"
          type="datetime"
          placeholder="选择开始时间"
          value-format="yyyy-MM-dd HH:mm:ss"
          default-time="00:00:00"
        />
      </el-form-item>
      <el-form-item>
        <el-date-picker
          v-model="teacherQuery.end"
          type="datetime"
          placeholder="选择截止时间"
          value-format="yyyy-MM-dd HH:mm:ss"
          default-time="00:00:00"
        />
      </el-form-item>
      <el-button type="primary" icon="el-icon-search" @click="getList()">查 询</el-button>
      <el-button type="default" @click="resetData()">清空</el-button>
    </el-form>
清空组件
清空按钮已存在
清空方法:
     resetData(){// 清空的方法
      //表单输入项数据清空
      this.teacherQuery = {}

      //查询所有讲师数据
      this.getList
    }
记得打逗号
讲师删除
在teacher.js补充方法:
//删除讲师
deleteTeacherId(id){
  return request({
    url: `http://localhost:8001/eduservice/teacher/${id}`,
    method: 'delete'
  })
}
在这里用的全地址,因为不写全就访问到localhost:9528了
记得打逗号
在list.vue添加方法:
 removeDataById(id) {
      this.$confirm("此操作将永久删除讲师记录, 是否继续?", "提示", {
        confirmButtonText: "确定",
        cancelButtonText: "取消",
        type: "warning",
      }).then(() => {
        // 点击确定,执行then方法
        teacher.deleteTeacherId(id)

          .then((response) => {
            //删除成功
            //提示消息
            this.$message({
              type: "success",
              message: "删除成功!",
            });
            //回到列表页面
            this.getList(this.page);
          });
      });
    },
讲师添加
teacher.js添加代码:
注意逗号
import request from '@/utils/request'


export default{

  getTeacherListPage(current,limit,teacherQuery) {
    return request({
      //细节:url后面是`不是'
      url: ` http://localhost:8001/eduservice/teacher/pageTeacherCondition/${current}/${limit}`,
      method: 'post',
      //teacherQuery条件对象,后端使用RequestBody获取数据
      //data表示把对象转换json进行传递到接口里面
      data: teacherQuery
    })
  },
   //删除讲师
   deleteTeacherId(id){
    return request({
      url: ` http://localhost:8001/eduservice/teacher/${id}`,
      method: 'delete'
    })
  },
  //添加讲师
  addTeacher(teacher){
    return request({
      url: ` http://localhost:8001/eduservice/teacher/addTeacher`,
      method: 'post',
      data: teacher
    })
  }
}
在save.vue添加代码:
<template>
  <div class="app-container">
    讲师添加
    <el-form label-width="120px">
      <el-form-item label="讲师名称">
        <el-input v-model="teacher.name" />
      </el-form-item>
      <el-form-item label="讲师排序">
        <el-input-number
          v-model="teacher.sort"
          controls-position="right"
          :min="0"
        />
      </el-form-item>
      <el-form-item label="讲师头衔">
        <el-select v-model="teacher.level" clearable placeholder="请选择">
          <!--
          数据类型一定要和取出的json中的一致,否则没法回填
          因此,这里value使用动态绑定的值,保证其数据类型是number
          -->
          <el-option :value="1" label="高级讲师" />
          <el-option :value="2" label="首席讲师" />
        </el-select>
      </el-form-item>
      <el-form-item label="讲师资历">
        <el-input v-model="teacher.career" />
      </el-form-item>
      <el-form-item label="讲师简介">
        <el-input v-model="teacher.intro" :rows="10" type="textarea" />
      </el-form-item>
      <!-- 讲师头像:TODO -->
      <el-form-item>
        <el-button
          :disabled="saveBtnDisabled"
          type="primary"
          @click="saveOrUpdate"
          >保存</el-button
        >
      </el-form-item>
    </el-form>
  </div>
</template>

<script>
import teacherApi from "@/api/teacher/teacher";

export default {
  data() {
    return {
      teacher: {
        name: '',
        sort: 0,
        level: 1,
        career: '',
        intro: '',
        avatar: '',
      },
      saveBtnDisabled: false,
    };
  },
  created() {

  },

  methods: {

    saveOrUpdate(){
      this.saveTeacher()
    },
    //添加讲师的方法
    saveTeacher() {
      teacherApi.addTeacher(this.teacher).then((response) => {
        // 添加成功
        //提示信息
        //提示消息
        this.$message({
          type: "success",
          message: "添加成功!",
        });

        //回到列表页面 路由跳转
        this.$router.push({ path: "/teacher/table" });
      });
    },
  },
};
</script>
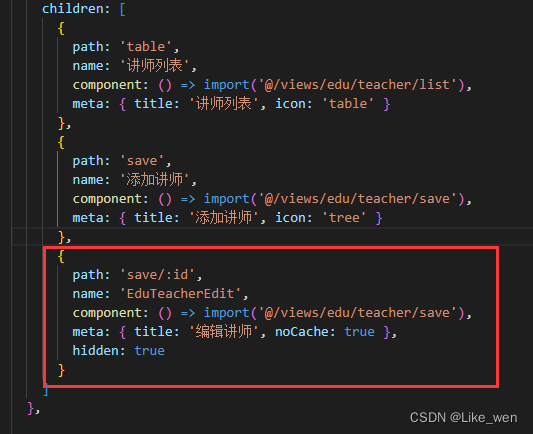
讲师编辑
在src/rou
,
      {
        path: 'save/:id',
        name: 'EduTeacherEdit',
        component: () => import('@/views/edu/teacher/save'),
        meta: { title: '编辑讲师', noCache: true },
        hidden: true
      }
save/:id的id相当于占位符
修改list.vue的修改按钮的路径
然后,点击修改就会重定向到save路径
数据回显:
定义一个接口在teacher.js
,
  getTeacherInfo(id){
    return request({
      url: `http://localhost:8001/eduservice/teacher/getTeacher/${id}`,
      method: 'get'
    })
  },
在save.vue
 //根据讲师id查询方法
    getInfo(id){
      teacherApi.getTeacherInfo(id)
      .then(response=>{
        this.teacher=response.data.teacher
      })
    },
注意逗号
调用id查询的方法,如果id为null就不调用,有id就查询回显
使用created检查参数
save.vue的created:
    if (this.$route.params && this.$route.params.id) {
      //从路径获取id值
      const id = this.$route.params.id;
      //调用根据id查询的方法
      this.getInfo(id);
    }
teacher.js里添加修改讲师方法:
  ,
      //修改讲师
  updateTeacherInfo(teacher) {
    return request({
      url: `/eduservice/teacher/updateTeacher`,
      method: 'post',
      data: teacher
    })
  }
save.vue添加修改讲师的方法
    ,
        //修改讲师的方法
    updateTeacher(){
      teacherApi.updateTeacherInfo(this.teacher)
        .then(response => {
        //提示信息
        this.$message({
          type: "success",
          message: "修改成功!",
        });
        //回到列表页面 路由跳转
        this.$router.push({ path: "/teacher/table" });
        })
    },
判断修改还是添加:
更改saveOrUpdate方法的内容:
    saveOrUpdate() {
      //判断是修改还是添加
      if (!this.teacher.id) {
        //添加
        this.saveTeacher();
      } else {
        //修改
        this.updateTeacher();
      }
    },
修bug
点了修改讲师会出现数据回显,再点添加讲师,数据不会消失,所以添加讲师的时候表单数据清空
可以用vue监听
可以监听id然后调用清空方法
//但是用的新版本的前端模板没有这个情况,该问题跳过