JAVA 抽象类和接口——万字理解
目录
一、抽象类的理解
二、接口
1、接口的特点
2、接口的使用
3、实现多接口
4、接口间的继承
5、抽象类和接口的区别
6、Object类
7、对象比较equals方法
8、hashcode方法
9、接口使用实例
1)Comparable
2)Comparator
3)实现对象冒泡排序
10、自定义对象克隆
一、抽象类的理解
理解
抽象方法:在父类不用具体实现,但在子类必须重写
abstract class Shape{
    // 抽象方法,在父类不用具体实现,在子类重写
    public abstract void draw();//有抽象方法就必须是抽象类
}
内容
抽象类的特点
- 抽象类 使用abstract修饰类
- 抽象类当中 1可以包含普通类所能包含的成员
- 抽象类和普通类不一样的是, 抽象类当中可以包含抽象方法
// 抽象类:被abstract修饰的类
public abstract class Shape {
    // 抽象方法:被abstract修饰的方法,没有方法体
    abstract public void draw();
    abstract void calcArea();
    // 抽象类也是类,也可以增加普通方法和属性
    public double getArea(){
        return area;
    }
    protected double area; // 面积
}
- 抽象方法是使用abstract修饰的。 这个方法没有具体的实现
- 不能实例化抽象类 new
Shape shape = new Shape();
// 编译出错
Error:(30, 23) java: Shape是抽象的; 无法实例化
- 抽象列存在的最大的意义 就是为了被继承。
- 继承抽象类后必须重写他的抽象方法
public abstract class Triangle extends Shape {
    private double a;
    private double b;
    private double c;
    @Override
    public void draw() {
        System.out.println("三角形:a = "+a + " b = "+b+" c = "+c);
    }
}
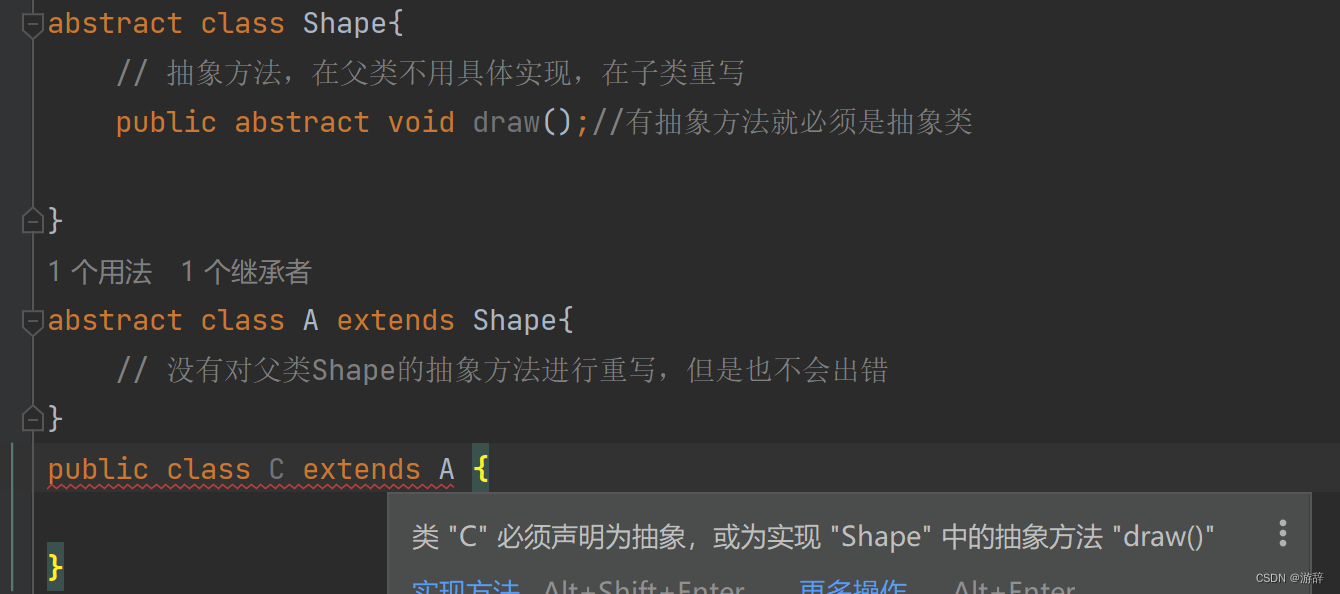
- 如果一个抽象类A继承了一个抽象类B,此时A当中不需要重写B中的抽象方法 但是如果A再被普通类继承,就需要重写。
abstract class Shape{
    // 抽象方法,在父类不用具体实现,在子类重写
    public abstract void draw();//有抽象方法就必须是抽象类

}
abstract class A extends Shape{
    // 没有对父类Shape的抽象方法进行重写,但是也不会出错
}
- 抽象方法不能是私有的 ,static也不可以,也就是要满足重写的规则
- final不可以 他和abstract是矛盾的
- 抽象类当中可以有构造方法。 为了方便子类能够调用, 来初始化抽象类当中的成员
二、接口
理解
多个类的公共规范,是一种引用数据类型
接口的定义格式与定义类的格式基本相同,将class关键字换成 interface 关键字,就定义了一个接口
public interface 接口名称{
    // 抽象方法
    public abstract void method1(); // public abstract 是固定搭配,可以不写
    public void method2();
    abstract void method3();
    void method4(); //最简洁写法
// 注意:在接口中上述写法都是抽象方法
}
1、接口的特点
内容
特点:
1.使用interface来修饰接口
2.接口当中的成员方法, 不能有具体的实现 [public]
- 抽象方法:默认是public abstract的方法,其他修饰符都会报错
public interface USB {
    // Error:(4, 18) java: 此处不允许使用修饰符private
    private void openDevice();
    void closeDevice();
}
2. JDK1.8开始 允许有可以实现的方法, 但是这个方法只能是由default修饰的。
3. 可以实现有一个静态方法
- 3.成员变量默认是public static final修饰的
public interface USB {
    double brand = 3.0; // 默认被:final public static修饰
    void openDevice();
    void closeDevice();
}
public class TestUSB {
    public static void main(String[] args) {
        System.out.println(USB.brand); // 可以直接通过接口名访问,说明是静态的
// 编译报错:Error:(12, 12) java: 无法为最终变量brand分配值
        USB.brand = 2.0; // 说明brand具有final属性
    }
}
- 4.接口不能被实例化
public class TestUSB {
    public static void main(String[] args) {
        USB usb = new USB();
    }
}
// Error:(10, 19) java: day20210915.USB是抽象的; 无法实例化
- 5.类和接口之间采用implements来实现多个接口
- 6.子类重写抽象方法, 必须加上public。
public interface USB {
    void openDevice(); // 默认是public的
    void closeDevice(); // 默认是public的
}
public class Mouse implements USB {
    @Override
    void openDevice() {
        System.out.println("打开鼠标");
    }
    // ...
}
// 编译报错,重写USB中openDevice方法时,不能使用默认修饰符
// 正在尝试分配更低的访问权限; 以前为public
- 7.接口中不能有静态代码块和构造方法
public interface USB {
    // 编译失败
    public USB(){
    }
    { } // 编译失败
    void openDevice();
    void closeDevice();
}
- 8.如果你不想实现接口的方法, 那么就把这个类定义为抽象类。 但如果这个类被其他类继承 那么必须重写
- 9.一个类 可以实现多个接口。使用implements用逗号隔开【解决了多继承的问题】
2、接口的使用
理解
接口不能直接使用,必须要有一个"实现类"来"实现"该接口,实现接口中的所有抽象方法
class 类名称 implements 接口名称 {
// ...
}
内容
**注意:子类和父类之间是extends 继承关系,类与接口之间是 implements 实现关系。 **
实现笔记本电脑使用USB鼠标、USB键盘的例子
- USB接口:包含打开设备、关闭设备功能
- 笔记本类:包含开机功能、关机功能、使用USB设备功能
- 鼠标类:实现USB接口,并具备点击功能
- 键盘类:实现USB接口,并具备输入功能
注意:
if(usb instanceof Mouse){
     Mouse mouse = (Mouse)usb;
     mouse.click();
}
需要将usb强转成Mouse类
因为click行为在Mouse类里面
代码
// USB接口
public interface USB {
    void openDevice();
    void closeDevice();
}
// 鼠标类,实现USB接口
public class Mouse implements USB {
    @Override
    public void openDevice() {
        System.out.println("打开鼠标");
    }
    @Override
    public void closeDevice() {
        System.out.println("关闭鼠标");
    }
    public void click(){
        System.out.println("鼠标点击");
    }
}
//键盘类,实现USB接口
public class KeyBoard implements USB {
    @Override
    public void openDevice() {
        System.out.println("打开键盘");
    }
    @Override
    public void closeDevice() {
        System.out.println("关闭键盘");
    }
    public void inPut(){
        System.out.println("键盘输入");
    }
}
// 笔记本类:使用USB设备
public class Computer {
    public void powerOn(){
        System.out.println("打开笔记本电脑");
    }
    public void powerOff(){
        System.out.println("关闭笔记本电脑");
    }
    public void useDevice(USB usb){
        usb.openDevice();
        if(usb instanceof Mouse){
            Mouse mouse = (Mouse)usb;
            mouse.click();
        }
        else if(usb instanceof KeyBoard){
            KeyBoard keyBoard = (KeyBoard)usb;
            keyBoard.inPut();
        }
        usb.closeDevice();
    }
}
3、实现多接口
理解
父类的继承(生物共性用继承) 重写行为(行为动作共性用接口) 目的是解决JAVA没办法实现多继承的情况
内容
在Java中,类和类之间是单继承的,一个类只能有一个父类,即Java中不支持多继承,但是一个类可以实现多个接口。下面通过类来表示一组动物 注意:一个类实现多个接口时,每个接口中的抽象方法都要实现,否则类必须设置为抽象类。
提示: IDEA 中使用 ctrl + i 快速实现接口
代码
interface IFlying{
    void flying();
}
interface ISwimming{
    void swimming();
}
interface IRunning{
    void running();
}

class Animal{
    public String name;
    public int age;
    // 构造方法
    public Animal(String name, int age) {
        this.name = name;
        this.age = age;
    }
    // 实例方法
    public void eat(){
        System.out.println("吃饭");
    }
}

class Dog extends Animal implements IRunning,ISwimming{
    // 父类的继承(生物共性用继承)
    public Dog(String name, int age) {
        super(name, age);
    }
    // 重写行为(行为动作共性用接口)
    @Override
    public void swimming() {
        System.out.println(name + "正在游泳");
    }
    @Override
    public void running() {
        System.out.println(name + "正在跑");
    }

    // 甚至可以重写父类的行为(动态绑定)
    @Override
    public void eat() {
        System.out.println(name+"正在吃狗粮");
    }
}

class Bird extends Animal implements IFlying{

    public Bird(String name, int age) {
        super(name, age);
    }
    @Override
    public void flying() {
        System.out.println(name + "正在飞!");
    }
}

class Duck extends Animal implements IFlying,ISwimming,IRunning{

    public Duck(String name, int age) {
        super(name, age);
    }

    @Override
    public void flying() {
        System.out.println(name + "正在飞!");

    }
    @Override
    public void swimming() {
        System.out.println(name + "正在游泳");
    }
    @Override
    public void running() {
        System.out.println(name + "正在跑");
    }
}
class Robot implements IRunning{
    @Override
    public void running() {
        System.out.println("机器人正在跑");
    }
}
public class Test3 {
        public static void walk(IRunning iRunning){
            iRunning.running();
        }
        // 实现多态
        public static void func(Animal animal){
            animal.eat();
        }

    public static void main(String[] args) {
        walk(new Dog("Huang",10) );
        walk(new Duck("Ming",10) );
        // 接口构造行为甚至可以————只要具备这个行为的东西就可以触发,不用继承
        walk(new Robot());
        System.out.println("======================");
        func(new Dog("Huang",10));
        func(new Duck("Ming",10));
    }
}
4、接口间的继承
理解
在Java中,类和类之间是单继承的,一个类可以实现多个接口,接口与接口之间可以多继承。即:用接口可以达到多继承的目的。
接口可以继承一个接口, 达到复用的效果. 使用 extends 关键字
内容
通过接口继承创建一个新的接口 IAmphibious 表示 "两栖的". 此时实现接口创建的 Frog 类, 就继续要实现 run 方 法, 也需要实现 swim 方法.
接口间的继承相当于把多个接口合并在一起
代码
interface IRunning {
    void run();
}
interface ISwimming {
    void swim();
}
// 两栖的动物, 既能跑, 也能游
interface IAmphibious extends IRunning, ISwimming {
}
class Frog implements IAmphibious {
...
}
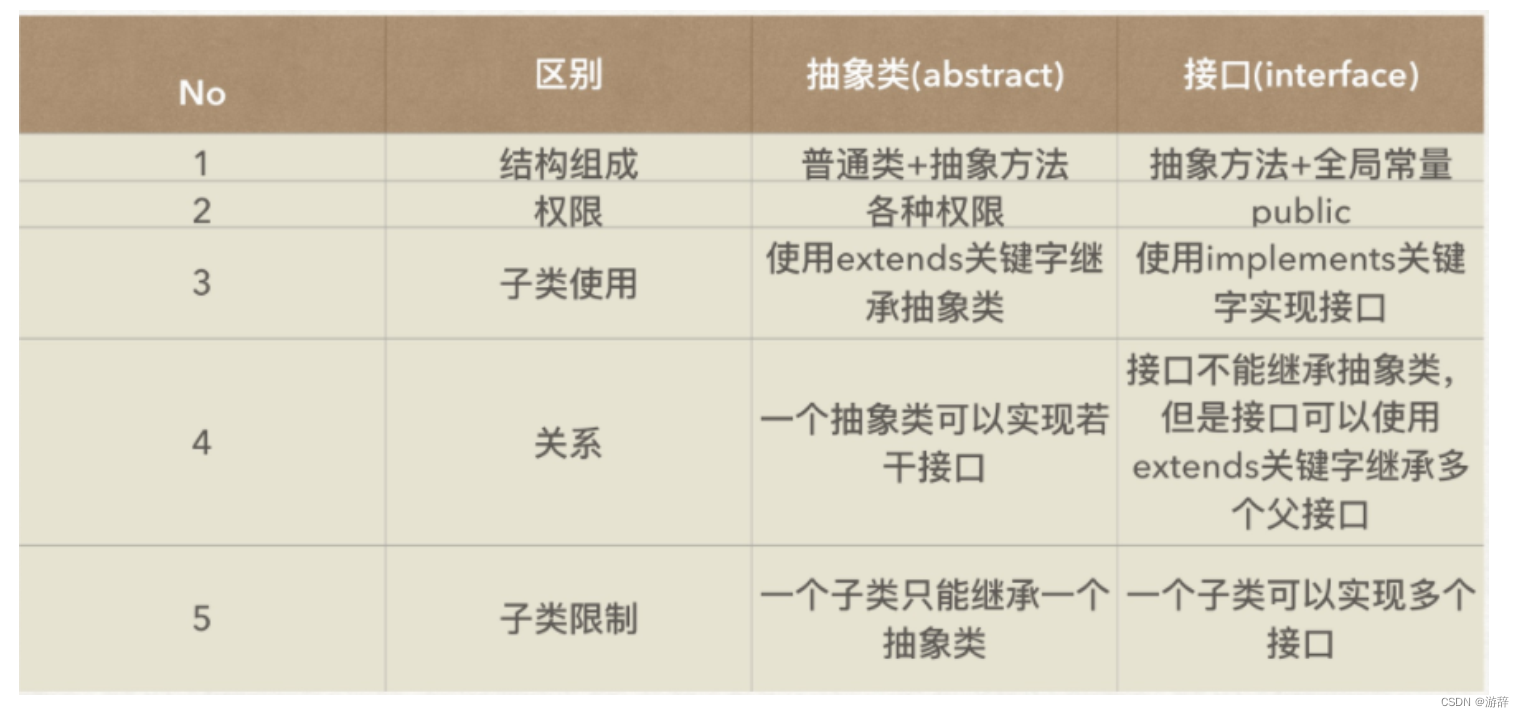
5、抽象类和接口的区别
理解
核心区别: 抽象类中可以包含普通方法和普通字段, 这样的普通方法和字段可以被子类直接使用(不必重写), 而接口中不能包含普通方法, 子类必须重写所有的抽象方法.
6、Object类
理解
Object是Java默认提供的一个类。Java里面除了Object类,所有的类都是存在继承关系的。默认会继承Object父类。即所有类的对象都可以使用Object的引用进行接收 使用Object接收所有类的对象
class Person{}
class Student{}
public class Test {
    public static void main(String[] args) {
        function(new Person());
        function(new Student());
    }
    public static void function(Object obj) {
        System.out.println(obj);
    }
}
//执行结果:
        Person@1b6d3586
        Student@4554617c
7、对象比较equals方法
理解
在Java中,==进行比较时:
a.如果==左右两侧是基本类型变量,比较的是变量中值是否相同
b.如果==左右两侧是引用类型变量,比较的是引用变量地址是否相同
c.如果要比较对象中内容,必须重写Object中的equals方法,因为equals方法默认也是按照地址比较的:
Person类重写equals方法后,然后比较:
class Person{
...
    @Override
    public boolean equals(Object obj) {
        if (obj == null) {
            return false ;
        } if(
                this == obj) {
            return true ;
        } // 不是Person类对象
        if (!(obj instanceof Person)) {
            return false ;
        }
        Person person = (Person) obj ; // 向下转型,比较属性值
        return this.name.equals(person.name) && this.age==person.age ;
    }
}
内容
比较对象中内容是否相同的时候,一定要重写equals方法
8、hashcode方法
理解
hashcode方法源码:
我们认为两个名字相同,年龄相同的对象,将存储在同一个位置,如果不重写hashcode()方法,我们可以来看示例
class Person {
    public String name;
    public int age;
    public Person(String name, int age) {
        this.name = name;
        this.age = age;
    }
}
public class TestDemo4 {
    public static void main(String[] args) {
        Person per1 = new Person("gaobo", 20) ;
        Person per2 = new Person("gaobo", 20) ;
        System.out.println(per1.hashCode());
        System.out.println(per2.hashCode());
    }
}
    //执行结果
        460141958
        1163157884
注意事项:两个对象的hash值不一样。
重写hashcode()方法再来看看
class Person {
    public String name;
    public int age;
    public Person(String name, int age) {
        this.name = name;
        this.age = age;
    }
    @Override
    public int hashCode() {
        return Objects.hash(name, age);
    }
}
public class TestDemo4 {
    public static void main(String[] args) {
        Person per1 = new Person("gaobo", 20) ;
        Person per2 = new Person("gaobo", 20) ;
        System.out.println(per1.hashCode());
        System.out.println(per2.hashCode());
    }
}
//执行结果
        460141958
        460141958
**注意事项:哈希值一样。 **
内容
**结论:
- hashcode方法用来确定对象在内存中存储的位置是否相同
- 事实上hashCode() 在散列表中才有用,在其它情况下没用。在散列表中hashCode() 的作用是获取对象的散列码,进而确定该对象在散列表中的位置。
9、接口使用实例
理解
给对象数组排序
按照我们之前的理解, 数组我们有一个现成的 sort 方法, 能否直接使用这个方法呢?
    // 原方法无法成功调用比较,会报错
    public static void main3(String[] args) {
        Student[] students = new Student[3];
        students[0] = new Student("ccc",10);
        students[1] = new Student("hello",40);
        students[2] = new Student("gbc",5);

        Arrays.sort(students);

        System.out.println(Arrays.toString(students));
    }
解决方案:
- 如果我们以后自定义的类型 一定要记住 如果比较大小那么必须要让这个类具备可以比较的功能。 此时可以选择实现接口 Comparable<...> 入侵性强
- 需要更换时:此时 需要根据姓名比较大小,就要用 比较器 Comparator<...> 入侵性比较弱
内容
1)Comparable
Student 类实现 Comparable 接口, 并实现其中的 compareTo 方法
// Student 类实现 Comparable 接口, 并实现其中的 compareTo 方法 class Student implements Comparable<Student>{ public String name; public int age; // 构造 public Student(String name, int age) { this.name = name; this.age = age; } // 重写字符串输出 @Override public String toString() { return "Student{" + "name='" + name + '\'' + ", age=" + age + '}'; } // Comparable 重写比较方法 比较以年龄为准 @Override public int compareTo(Student o) { if(this.age - o.age > 0) { // 以 调用该方法的age 与 引用的o的age作比较 return 1; }else if(this.age - o.age < 0) { return -1; }else { return 0; } //return 0; } } public class TEST { // **student1 调用compareTo改写后的比较方法 并且引用 student2 (以年龄比较)** public static void main4(String[] args) { Student student1 = new Student("ccc",10); Student student2 = new Student("hello",40); if(student1.compareTo(student2) > 0) { System.out.println("student1 > student2"); }else { System.out.println("student1 < student2"); } } }2)Comparator
Comparator 比较器 ,类似提供一个比较模板,放在比较方法的后边
// Comparator 比较器 ,类似提供一个比较模板,放在比较方法的后边
class AgeComparator implements Comparator<Student> {

    @Override
    public int compare(Student o1, Student o2) {
        return o1.age - o2.age;
    }
}

class NameComparator implements Comparator<Student> {

    @Override
    public int compare(Student o1, Student o2) {
        return o1.name.compareTo(o2.name);
    }
}

public class TEST {

    // 可以直接调用比较器中的方法进行比较,只需要引用比较双方的对象
    public static void main6(String[] args) {
        Student student1 = new Student("ccc",10);
        Student student2 = new Student("hello",40);

        AgeComparator ageComparator = new AgeComparator();

        if(ageComparator.compare(student1,student2) > 0) {
            System.out.println("student1 > student2");
        }else {
            System.out.println("student1 < student2");
        }
    }

    // new一个比较器对象,放入sort后边,可以达到自己的比较效果
    public static void main5(String[] args) {
        Student[] students = new Student[3];
        students[0] = new Student("ccc",10);
        students[1] = new Student("hello",40);
        students[2] = new Student("gbc",5);

        //AgeComparator ageComparator = new AgeComparator();
        NameComparator nameComparator = new NameComparator();
        Arrays.sort(students,nameComparator);

        System.out.println(Arrays.toString(students));
    }

}
3)实现对象冒泡排序
public class TEST {
    // 自定义的类想要比较,必须实现比较接口,所以冒泡传入的应该是已经完成接口化的Comparable[]数组类型
    public static void bubbleSort(Comparable[] array) {
        for (int i = 0; i < array.length-1; i++) {
            for (int j = 0; j < array.length-1-i; j++) {
                if(array[j].compareTo(array[j+1]) > 0) { // 不能直接大小进行比较,因为他是一个对象,要引用他本身的方法去调用
                    Comparable tmp = array[j];           // 创建存储类型也要是Comparable类型
                    array[j] = array[j+1];
                    array[j+1] = tmp;
                }
            }
        }
    }

    // 提供比较的算法
    public static void main(String[] args) {
        Student[] students = new Student[3];
        students[0] = new Student("ccc",10);
        students[1] = new Student("hello",40);
        students[2] = new Student("gbc",5);

        bubbleSort(students);

        System.out.println(Arrays.toString(students));

    }

}
代码
package demo1;

import java.util.Arrays;
import java.util.Comparator;

class Student implements Comparable<Student>{ // 利用范型改造比较的方法
    public String name;
    public int age;
    // 构造
    public Student(String name, int age) {
        this.name = name;
        this.age = age;
    }
    // 重写字符串输出
    @Override
    public String toString() {
        return "Student{" +
                "name='" + name + '\'' +
                ", age=" + age +
                '}';
    }
    // Comparable 重写比较方法 比较以年龄为准
    @Override
    public int compareTo(Student o) {
        if(this.age - o.age > 0) { // 以 调用该方法的age 与 引用的o的age作比较
            return 1;
        }else if(this.age - o.age < 0) {
            return -1;
        }else {
            return 0;
        }
        //return 0;
    }
}
// Comparator 比较器 ,类似提供一个比较模板,放在比较方法的后边
class AgeComparator implements Comparator<Student> {

    @Override
    public int compare(Student o1, Student o2) {
        return o1.age - o2.age;
    }
}

class NameComparator implements Comparator<Student> {

    @Override
    public int compare(Student o1, Student o2) {
        return o1.name.compareTo(o2.name);
    }
}

public class TEST {
    // 自定义的类想要比较,必须实现比较接口,所以冒泡传入的应该是已经完成接口化的Comparable[]数组类型
    public static void bubbleSort(Comparable[] array) {
        for (int i = 0; i < array.length-1; i++) {
            for (int j = 0; j < array.length-1-i; j++) {
                if(array[j].compareTo(array[j+1]) > 0) { // 不能直接大小进行比较,因为他是一个对象,要引用他本身的方法去调用
                    Comparable tmp = array[j];           // 创建存储类型也要是Comparable类型
                    array[j] = array[j+1];
                    array[j+1] = tmp;
                }
            }
        }
    }

    // 提供比较的算法
    public static void main(String[] args) {
        Student[] students = new Student[3];
        students[0] = new Student("ccc",10);
        students[1] = new Student("hello",40);
        students[2] = new Student("gbc",5);

        bubbleSort(students);

        System.out.println(Arrays.toString(students));

    }
    // 可以直接调用比较器中的方法进行比较,只需要引用比较双方的对象
    public static void main6(String[] args) {
        Student student1 = new Student("ccc",10);
        Student student2 = new Student("hello",40);

        AgeComparator ageComparator = new AgeComparator();

        if(ageComparator.compare(student1,student2) > 0) {
            System.out.println("student1 > student2");
        }else {
            System.out.println("student1 < student2");
        }
    }

    // new一个比较器对象,放入sort后边,可以达到自己的比较效果
    public static void main5(String[] args) {
        Student[] students = new Student[3];
        students[0] = new Student("ccc",10);
        students[1] = new Student("hello",40);
        students[2] = new Student("gbc",5);

        //AgeComparator ageComparator = new AgeComparator();
        NameComparator nameComparator = new NameComparator();
        Arrays.sort(students,nameComparator);

        System.out.println(Arrays.toString(students));
    }

    // student1 调用compareTo改写后的比较方法 并且引用 student2 (以年龄比较)
    public static void main4(String[] args) {
        Student student1 = new Student("ccc",10);
        Student student2 = new Student("hello",40);

        if(student1.compareTo(student2) > 0) {
            System.out.println("student1 > student2");
        }else {
            System.out.println("student1 < student2");
        }
    }

    // 基本的字符串比较方法
    public static void main2(String[] args) {
        String[] strings = {"abc","hello","bcd"};
        Arrays.sort(strings);
        System.out.println(Arrays.toString(strings));
    }

    // 原方法无法成功调用比较,会报错
    public static void main3(String[] args) {
        Student[] students = new Student[3];
        students[0] = new Student("ccc",10);
        students[1] = new Student("hello",40);
        students[2] = new Student("gbc",5);

        Arrays.sort(students);

        System.out.println(Arrays.toString(students));
    }

    // 正常数组比较
    public static void main1(String[] args) {
        int[] array = {1,4,2,7,3,8,5};
        Arrays.sort(array);
        System.out.println(Arrays.toString(array));
    }
}
10、自定义对象克隆
理解
Object 类中存在一个 clone 方法, 调用这个方法可以创建一个对象的 "拷贝". 但是要想合法调用 clone 方法, 必须要先实现 Clonable 接口, 否则就会抛出CloneNotSupportedException 异常
内容
1、实现克隆接口
implement Cloneable{}2、重写克隆方法
 @Override
    protected Object clone() throws CloneNotSupportedException {
        //return super.clone();
        Person tmp = (Person) super.clone();
        tmp.money = (Money) this.money.clone();
        return tmp;
    }
3、解决异常,以及强转类型
Person tmp = (Person) super.clone();// super调用后的类型是Object的,需要强转
tmp.money = (Money) this.money.clone();
代码
class Money implements Cloneable{
    public double m = 12.5;
    // 调用父类的clone接口
    @Override
    protected Object clone() throws CloneNotSupportedException {
        return super.clone();
    }

}

class Person implements Cloneable{
    public int id;
    public Money money = new Money();
    // 重写克隆方法(深拷贝)
    @Override
    protected Object clone() throws CloneNotSupportedException {
        //return super.clone();
        Person tmp = (Person) super.clone(); // 调用父类的克隆方法先浅拷贝一个副本
        tmp.money = (Money) this.money.clone();// 将副本里的元素money类调用自己的clone方法也进行拷贝处理(因为money类中已经调用了父类的拷贝方法)
        return tmp;
    }

    @Override
    public String toString() {
        return "Person{" +
                "id=" + id +
                '}';
    }
}
public class Test2 {
    public static void main(String[] args) throws CloneNotSupportedException{
        Person person = new Person();

        Person person2 = (Person)person.clone();
        person2.money.m = 1999;

        System.out.println("person:"+person.money.m);

        System.out.println("person2:"+person2.money.m);
    }
}