spring boot 开发单体应用
文章目录
- 探究· Web开发
- 静态资源处理
- 静态资源映射规则·结论
- 自定义静态资源路径
- Thymeleaf
- 模板引擎
- 引入Thymeleaf
- 使用分析·thymeleaf
- 注意事项
- 表达式
- MVC自动配置原理【建议跳过】
- ContentNegotiatingViewResolver·内容协商视图解析器
- 实现
- 配置项目环境及首页
- 依赖
- mybatis整合·代码·依赖
- 其他依赖
- 导入·实体类
- 伪造·数据
- controller层
- 注意Maven资源导出问题
- 导入静态资源
- 首页实现
- 页面国际化
- 准备工作
- 配置页面国际化值
- 设置按钮切换中英文
- 登录+拦截器
- 禁用模板缓存
- 登录
探究· Web开发
静态资源处理
静态资源映射规则·结论
- 对于初学者来说,纠结于原理,只会让自己陷入痛苦之中。
- 这里只给出结论,先不探究原理
- 所以得出结论,以下四个目录存放的静态资源可以被我们识别:
"classpath:/META-INF/resources/"
"classpath:/resources/"
"classpath:/static/"
"classpath:/public/"
- 可以在resources根目录下新建对应的文件夹,都可以存放我们的静态文件
自定义静态资源路径
- 也可以自己通过配置文件来指定一下,哪些文件夹是需要我们放静态资源文件的,在application.properties中配置;
spring.resources.static-locations=classpath:/coding/,classpath:/xxx/
一旦自己定义了静态文件夹的路径,原来的自动配置就都会失效了!
Thymeleaf
模板引擎
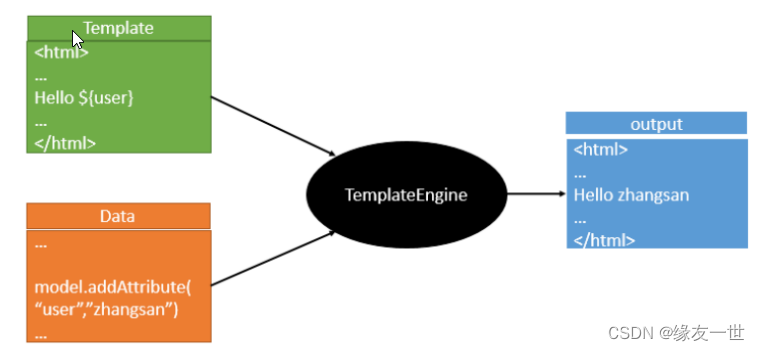
- SpringBoot推荐你可以来使用模板引擎:
- 其实jsp就是一个模板引擎,还有以用的比较多的freemarker,包括SpringBoot给我们推荐的Thymeleaf,模板引擎有非常多,但再多的模板引擎,他们的思想都是一样的,来看一下这张图:
- 其实jsp就是一个模板引擎,还有以用的比较多的freemarker,包括SpringBoot给我们推荐的Thymeleaf,模板引擎有非常多,但再多的模板引擎,他们的思想都是一样的,来看一下这张图:
- 模板引擎的作用
- 写一个页面模板,比如:有些来自在后台封装一些动态的数据值,我们通过书写一些表达式。把这个模板和这个数据交给模板引擎,模板引擎帮我们把这表达式解析、填充到指定的位置,然后把这个数据最终生成一个完整的内容写出去,这就是我们这个模板引擎,不管是jsp还是其他模板引擎,都是这个思想。
引入Thymeleaf
- Thymeleaf 官网
- Thymeleaf 在Github 的主页
- Spring官方文档
使用分析·thymeleaf
- 首先得按照SpringBoot的自动配置原理看一下这个Thymeleaf的自动配置规则,再按照那个规则,进行使用。
- 打开Thymeleaf的自动配置类***【ThymeleafProperties】***
诀窍:双击shift打开全局搜索,输入ThymeleafProperties,然后点开项目->定位图标,即可快速定位。

@ConfigurationProperties(prefix = "spring.thymeleaf")
public class ThymeleafProperties {

	private static final Charset DEFAULT_ENCODING = StandardCharsets.UTF_8;

	public static final String DEFAULT_PREFIX = "classpath:/templates/";

	public static final String DEFAULT_SUFFIX = ".html";

	/**
	 * Whether to check that the template exists before rendering it.
	 */
	private boolean checkTemplate = true;

	/**
	 * Whether to check that the templates location exists.
	 */
	private boolean checkTemplateLocation = true;

	/**
	 * Prefix that gets prepended to view names when building a URL.
	 */
	private String prefix = DEFAULT_PREFIX;

	/**
	 * Suffix that gets appended to view names when building a URL.
	 */
	private String suffix = DEFAULT_SUFFIX;

	/**
	 * Template mode to be applied to templates. See also Thymeleaf's TemplateMode enum.
	 */
	private String mode = "HTML";

	/**
	 * Template files encoding.
	 */
	private Charset encoding = DEFAULT_ENCODING;

	/**
	 * Whether to enable template caching.
	 */
	private boolean cache = true;

	/**
	 * Order of the template resolver in the chain. By default, the template resolver is
	 * first in the chain. Order start at 1 and should only be set if you have defined
	 * additional "TemplateResolver" beans.
	 */
	private Integer templateResolverOrder;
}
- 可以在其中看到默认的前缀和后缀
- 只需要把我们的html页面放在类路径下的templates下,thymeleaf就可以帮我们自动渲染
- 使用thymeleaf什么都不需要配置,只需要将他放在指定的文件夹下
注意事项
- 使用thymeleaf要在html页面引入,命名空间
xmlns:th="http://www.thymeleaf.org"
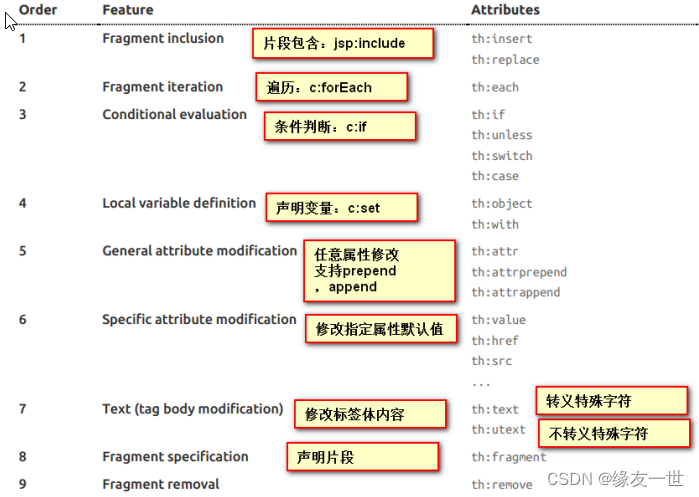
表达式
Simple expressions:(表达式语法)
Variable Expressions: ${...}:获取变量值;OGNL;
1)、获取对象的属性、调用方法
2)、使用内置的基本对象: #18
#ctx : the context object.
#vars: the context variables.
#locale : the context locale.
#request : (only in Web Contexts) the HttpServletRequest object.
#response : (only in Web Contexts) the HttpServletResponse object.
#session : (only in Web Contexts) the HttpSession object.
#servletContext : (only in Web Contexts) the ServletContext object.
3)、内置的一些工具对象:
#execInfo : information about the template being processed.
#uris : methods for escaping parts of URLs/URIs
#conversions : methods for executing the configured conversionservice (if any).
#dates : methods for java.util.Date objects: formatting, componentextraction, etc.
#calendars : analogous to #dates , but for java.util.Calendarobjects.
#numbers : methods for formatting numeric objects.
#strings : methods for String objects: contains, startsWith,prepending/appending, etc.
#objects : methods for objects in general.
#bools : methods for boolean evaluation.
#arrays : methods for arrays.
#lists : methods for lists.
#sets : methods for sets.
#maps : methods for maps.
#aggregates : methods for creating aggregates on arrays orcollections.
Selection Variable Expressions: *{...}:选择表达式:和${}在功能上是一样;
Message Expressions: #{...}:获取国际化内容
Link URL Expressions: @{...}:定义URL;
Fragment Expressions: ~{...}:片段引用表达式
Literals(字面量)
Text literals: 'one text' , 'Another one!' ,…
Number literals: 0 , 34 , 3.0 , 12.3 ,…
Boolean literals: true , false
Null literal: null
Literal tokens: one , sometext , main ,…
Text operations:(文本操作)
String concatenation: +
Literal substitutions: |The name is ${name}|
Arithmetic operations:(数学运算)
Binary operators: + , - , * , / , %
Minus sign (unary operator): -
Boolean operations:(布尔运算)
Binary operators: and , or
Boolean negation (unary operator): ! , not
Comparisons and equality:(比较运算)
Comparators: > , < , >= , <= ( gt , lt , ge , le )
Equality operators: == , != ( eq , ne )
Conditional operators:条件运算(三元运算符)
If-then: (if) ? (then)
If-then-else: (if) ? (then) : (else)
Default: (value) ?: (defaultvalue)
Special tokens:
No-Operation: _
MVC自动配置原理【建议跳过】
- 非常抱歉,由于作者的水平有限,这一部分讲解的比较模糊。
- 在进行项目编写前,我们还需要知道一个东西,就是SpringBoot对我们的SpringMVC还做了哪些配置,包括如何扩展,如何定制。
- 只有把这些都搞清楚了,我们在之后使用才会更加得心应手。 途径一:源码分析,途径二:官方文档!
Spring MVC Auto-configuration
// Spring Boot为Spring MVC提供了自动配置,它可以很好地与大多数应用程序一起工作。
Spring Boot provides auto-configuration for Spring MVC that works well with
most applications.
// 自动配置在Spring默认设置的基础上添加了以下功能:
The auto-configuration adds the following features on top of Spring’s
defaults:
// 包含视图解析器
Inclusion of ContentNegotiatingViewResolver and BeanNameViewResolver beans.
// 支持静态资源文件夹的路径,以及webjars
Support for serving static resources, including support for WebJars
// 自动注册了Converter:
// 转换器,这就是我们网页提交数据到后台自动封装成为对象的东西,比如把"1"字符串自动转换为
int类型
// Formatter:【格式化器,比如页面给我们了一个2019-8-10,它会给我们自动格式化为Date对
象】
Automatic registration of Converter, GenericConverter, and Formatter beans.
// HttpMessageConverters
// SpringMVC用来转换Http请求和响应的的,比如我们要把一个User对象转换为JSON字符串,可以
去看官网文档解释;
Support for HttpMessageConverters (covered later in this document).
// 定义错误代码生成规则的
Automatic registration of MessageCodesResolver (covered later in this
document).
// 首页定制
Static index.html support.
// 图标定制
Custom Favicon support (covered later in this document).
// 初始化数据绑定器:帮我们把请求数据绑定到JavaBean中!
Automatic use of a ConfigurableWebBindingInitializer bean (covered later in
this document).
/*
如果您希望保留Spring Boot MVC功能,并且希望添加其他MVC配置(拦截器、格式化程序、视图控制
器和其他功能),则可以添加自己
的@configuration类,类型为webmvcconfiguer,但不添加@EnableWebMvc。如果希望提供
RequestMappingHandlerMapping、RequestMappingHandlerAdapter或
ExceptionHandlerExceptionResolver的自定义
实例,则可以声明WebMVCregistrationAdapter实例来提供此类组件。
*/
If you want to keep Spring Boot MVC features and you want to add additional
MVC configuration
(interceptors, formatters, view controllers, and other features), you
can add your own
@Configuration class of type WebMvcConfigurer but without @EnableWebMvc.
If you wish to provide
custom instances of RequestMappingHandlerMapping,
RequestMappingHandlerAdapter, or
ExceptionHandlerExceptionResolver, you can declare a
WebMvcRegistrationsAdapter instance to provide such components.
// 如果您想完全控制Spring MVC,可以添加自己的@Configuration,并用@EnableWebMvc进行
注释。
If you want to take complete control of Spring MVC, you can add your own
@Configuration annotated with @EnableWebMvc.
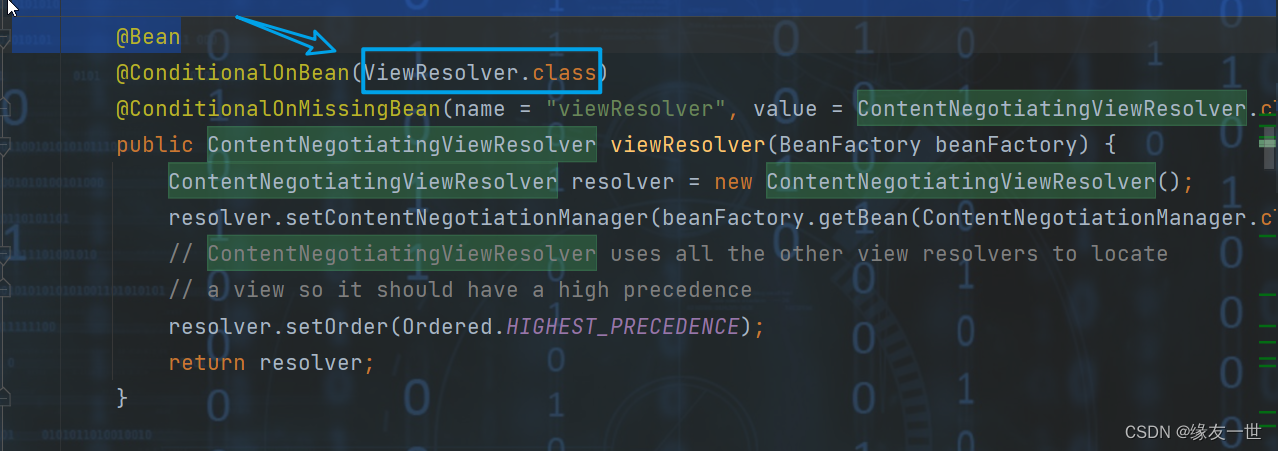
ContentNegotiatingViewResolver·内容协商视图解析器
- 自动配置了ViewResolver,就是我们之前学习的SpringMVC的视图解析器;
- 即根据方法的返回值取得视图对象(View),然后由视图对象决定如何渲染(转发,重定向)。
- 找到 WebMvcAutoConfiguration , 然后搜索ContentNegotiatingViewResolver
	@Bean
		@ConditionalOnBean(ViewResolver.class)
		@ConditionalOnMissingBean(name = "viewResolver", value = ContentNegotiatingViewResolver.class)
		public ContentNegotiatingViewResolver viewResolver(BeanFactory beanFactory) {
			ContentNegotiatingViewResolver resolver = new ContentNegotiatingViewResolver();
			resolver.setContentNegotiationManager(beanFactory.getBean(ContentNegotiationManager.class));
			// ContentNegotiatingViewResolver uses all the other view resolvers to locate
			// a view so it should have a high precedence
			// ContentNegotiatingViewResolver使用所有其他视图解析器来定位视图,因此它应该具有较高的优先级
			resolver.setOrder(Ordered.HIGHEST_PRECEDENCE);
			return resolver;
		}
- 我们可以点进这类看看!找到对应的解析视图的代码;
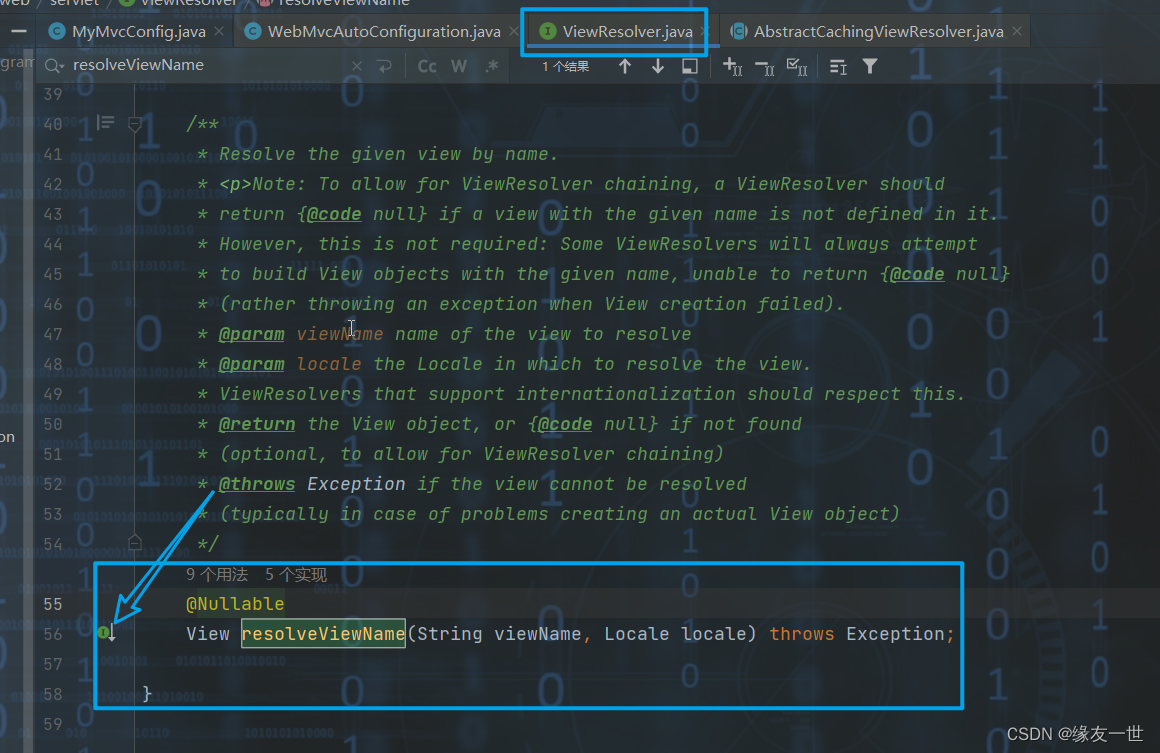
	@Override
	@Nullable  // 注解说明:@Nullable 即参数可为null
	public View resolveViewName(String viewName, Locale locale) throws Exception {
		if (!isCache()) {
			return createView(viewName, locale);
		}
		else {
			Object cacheKey = getCacheKey(viewName, locale);
			View view = this.viewAccessCache.get(cacheKey);
			if (view == null) {
				synchronized (this.viewCreationCache) {
					view = this.viewCreationCache.get(cacheKey);
					if (view == null) {
						// Ask the subclass to create the View object.
						view = createView(viewName, locale);
						if (view == null && this.cacheUnresolved) {
							view = UNRESOLVED_VIEW;
						}
						if (view != null && this.cacheFilter.filter(view, viewName, locale)) {
							this.viewAccessCache.put(cacheKey, view);
							this.viewCreationCache.put(cacheKey, view);
						}
					}
				}
			}
			else {
				if (logger.isTraceEnabled()) {
					logger.trace(formatKey(cacheKey) + "served from cache");
				}
			}
			return (view != UNRESOLVED_VIEW ? view : null);
		}
	}
- 很抱歉到这里之后,新版的内容和旧版的内容,有很大的不同,大家可以跳过这一部分的内容。不要拘泥于剖析源码。
- 但是把最终的结论放在这里:ContentNegotiatingViewResolver 这个视图解析器就是用来组合所有的视图解析器的
实现
 //ViewResolver 实现了视图解析器接口的类,就可以看作视图解析器
    @Bean
    public ViewResolver myViewResolver() {
        return new MyViewResolver();
    }

    //自定义一个自己的视图解析器MyViewResolver
    public static class MyViewResolver implements ViewResolver {
        @Override
        public View resolveViewName(String viewName, Locale locale) throws Exception {
            return null;
        }
    }
    //视图跳转


    @Override
    public void addViewControllers(ViewControllerRegistry registry) {
        registry.addViewController("/yang").setViewName("test");
    }
配置项目环境及首页
依赖
mybatis整合·代码·依赖
<!--thymeleaf-->
        <dependency>
            <groupId>org.thymeleaf</groupId>
            <artifactId>thymeleaf-spring5</artifactId>
        </dependency>
        <dependency>
            <groupId>org.thymeleaf.extras</groupId>
            <artifactId>thymeleaf-extras-java8time</artifactId>
        </dependency>
其他依赖
		<!--作弊工具-->
		<dependency>
            <groupId>org.projectlombok</groupId>
            <artifactId>lombok</artifactId>
		</dependency>
		<!-- 数据层 -->
 <!-- mybatis-spring-boot-starter -->
        <dependency>
            <groupId>org.mybatis.spring.boot</groupId>
            <artifactId>mybatis-spring-boot-starter</artifactId>
            <version>2.2.2</version>
        </dependency>
        <!--jdbc-->
        <dependency>
            <groupId>org.springframework.boot</groupId>
            <artifactId>spring-boot-starter-jdbc</artifactId>
        </dependency>
       <!--mysql驱动-->
        <dependency>
            <groupId>mysql</groupId>
            <artifactId>mysql-connector-java</artifactId>
            <scope>runtime</scope>
        </dependency>
导入·实体类
package com.yang.pojo;

/**
 * @author 缘友一世
 * date 2022/9/10-10:25
 */

import lombok.AllArgsConstructor;
import lombok.Data;
import lombok.NoArgsConstructor;

@Data
@AllArgsConstructor
@NoArgsConstructor
public class Department {
    private Integer id;
    private String DepartmentName;
}
package com.yang.pojo;

import lombok.AllArgsConstructor;
import lombok.Data;
import lombok.NoArgsConstructor;
import sun.util.calendar.LocalGregorianCalendar;

import java.util.Date;

/**
 * @author 缘友一世
 * date 2022/9/10-10:27
 */
@Data
@NoArgsConstructor

public class Employee {
    private Integer id;
    private String lastName;
    private String email;
    private Integer gender;//1 男 0 女
    private Department department;
    private Date birth;

    public Employee(Integer id, String lastName, String email, Integer gender, Department department) {
        this.id = id;
        this.lastName = lastName;
        this.email = email;
        this.gender = gender;
        this.department = department;
        //默认日期实现
        this.birth = new Date();
    }
}
伪造·数据
- EmployeeDao.java
package com.yang.Dao;

import com.yang.pojo.Department;
import com.yang.pojo.Employee;
import org.springframework.beans.factory.annotation.Autowired;
import org.springframework.stereotype.Repository;

import java.util.Collection;
import java.util.HashMap;
import java.util.Map;

/**
 * @author 缘友一世
 * date 2022/9/10-10:41
 */
@Repository
public class EmployeeDao {
    //模拟数据库中的数据
    private static Map<Integer, Employee> employees;
    @Autowired
    //员工有所属的部门
    private DepartmentDao departmentDao;
    static {
        //创建一个员工表
        employees=new HashMap<Integer,Employee>();

        employees.put(1001,new Employee(1001,"小明", "1558975826@qq.com",1,new Department(101,"教学部")));
        employees.put(1002,new Employee(1002,"小李", "1568975826@qq.com",1,new Department(102,"包装部")));
        employees.put(1003,new Employee(1003,"小红", "1578975826@qq.com",0,new Department(103,"销售部")));
        employees.put(1004,new Employee(1004,"小华", "1588975826@qq.com",1,new Department(104,"人事部")));
        employees.put(1005,new Employee(1005,"小王", "1598975826@qq.com",1,new Department(105,"主管部")));
        employees.put(1006,new Employee(1006,"小张", "1518975826@qq.com",0,new Department(106,"生产部")));
    }
    //主键自增
    private static Integer initId=1007;
    //增加一个员工
    public void add(Employee employee) {
        if(employee.getId()==null) {
            employee.setId(initId++);
        }
        employee.setDepartment(departmentDao.getDepartmentById(employee.getDepartment().getId()));

        employees.put(employee.getId(),employee);
    }
    //查询全部员工信息
    public Collection<Employee> getAll() {
        return employees.values();
    }
    //通过id查询员工
    public Employee getEmployeeById(Integer id) {
        return employees.get(id);
    }
    //删除员工通过id
    public void delete(Integer id) {
        employees.remove(id);
    }
}
- DepartmentDao.java
package com.yang.Dao;

import com.yang.pojo.Department;
import org.springframework.stereotype.Repository;

import java.util.Collection;
import java.util.HashMap;
import java.util.Map;

/**
 * @author 缘友一世
 * date 2022/9/10-10:32
 */
@Repository
public class DepartmentDao {
    //模拟数据库中的数据
    private static Map<Integer, Department> departments=null;
    static {
        departments=new HashMap<Integer,Department>();//创建一个部门表
        departments.put(101,new Department(101,"教学部"));
        departments.put(102,new Department(102,"包装部"));
        departments.put(103,new Department(103,"销售部"));
        departments.put(104,new Department(104,"人事部"));
        departments.put(105,new Department(105,"主管部"));
        departments.put(106,new Department(106,"生产部"));
    }
    //获得所有部门信息
    public static Collection<Department> getDepartments() {
        return departments.values();
    }
    //通过id获得部门
    public Department getDepartmentById(Integer id) {
        return departments.get(id);
    }
}
controller层
- EmployeeController
package com.yang.config;

import com.yang.Dao.DepartmentDao;
import com.yang.Dao.EmployeeDao;
import com.yang.pojo.Department;
import com.yang.pojo.Employee;
import org.springframework.beans.factory.annotation.Autowired;
import org.springframework.stereotype.Controller;
import org.springframework.ui.Model;
import org.springframework.web.bind.annotation.*;

import javax.jws.WebParam;
import java.util.Collection;

/**
 * @author 缘友一世
 * date 2022/9/10-20:46
 */
@Controller
public class EmployeeController {
    @Autowired
    EmployeeDao employeeDao;
    @RequestMapping("/emps")
    public String list(Model model) {
        Collection<Employee> employees = employeeDao.getAll();
        model.addAttribute("emps",employees);
        return "emp/list";
    }
    @GetMapping("/emp")
    public String toAddPage(Model model) {
        //查询出所有部门信息
        Collection<Department> departments = DepartmentDao.getDepartments();
        model.addAttribute("departments",departments);
        return "emp/add";
    }
    @PostMapping("/emp")
    public String addEmp(Employee employee) {
        employeeDao.add(employee);
        return "redirect:/emps";
    }
    @GetMapping("/emp/{id}")
    public String toUpdate(@PathVariable("id")Integer id, Model model) {
        //查出原来的数据
        Employee employee = employeeDao.getEmployeeById(id);
        model.addAttribute("emp",employee);
        Collection<Department> departments = DepartmentDao.getDepartments();
        model.addAttribute("departments",departments);
        return "emp/update";
    }
    @PostMapping("/updateEmp")
    public String updateEmp(Employee employee) {
        employeeDao.add(employee);
        return "redirect:/emps";
    }
    @GetMapping("/delemp/{id}")
    public String deleteEmp(@PathVariable("id") int id) {
        employeeDao.delete(id);
        return "redirect:/emps";
    }
}
注意Maven资源导出问题
- build标签内
<resources>
            <resource>
                <directory>src/main/java</directory>
                <includes>
                    <include>**/*.xml</include>
                </includes>
                <filtering>true</filtering>
            </resource>
        </resources>
导入静态资源
- css,js等放在static文件夹下
- html 放在 templates文件夹下
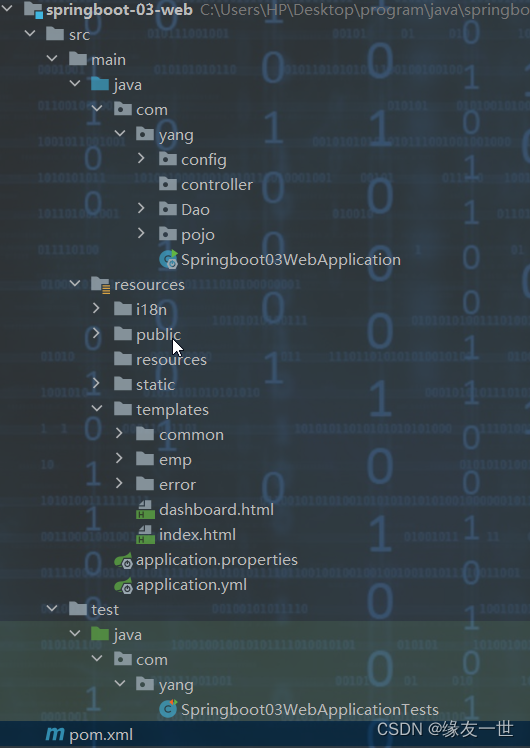
- 结构图
首页实现
- 自己编写MVC的扩展配置
 @Override
    public void addViewControllers(ViewControllerRegistry registry) {
        registry.addViewController("/").setViewName("index");
        registry.addViewController("/index.html").setViewName("index");
        registry.addViewController("/main.html").setViewName("dashboard");
    }
- 解决了首页问题,我们还需要解决一个资源导入的问题;
- 为了保证资源导入稳定,我们建议在所有资源导入时候使用 th:去替换原有的资源路径!这也是模板规范
<html lang="en" xmlns:th="http://www.thymeleaf.org">
<link th:href="@{/asserts/css/bootstrap.min.css}" rel="stylesheet">
页面国际化
准备工作
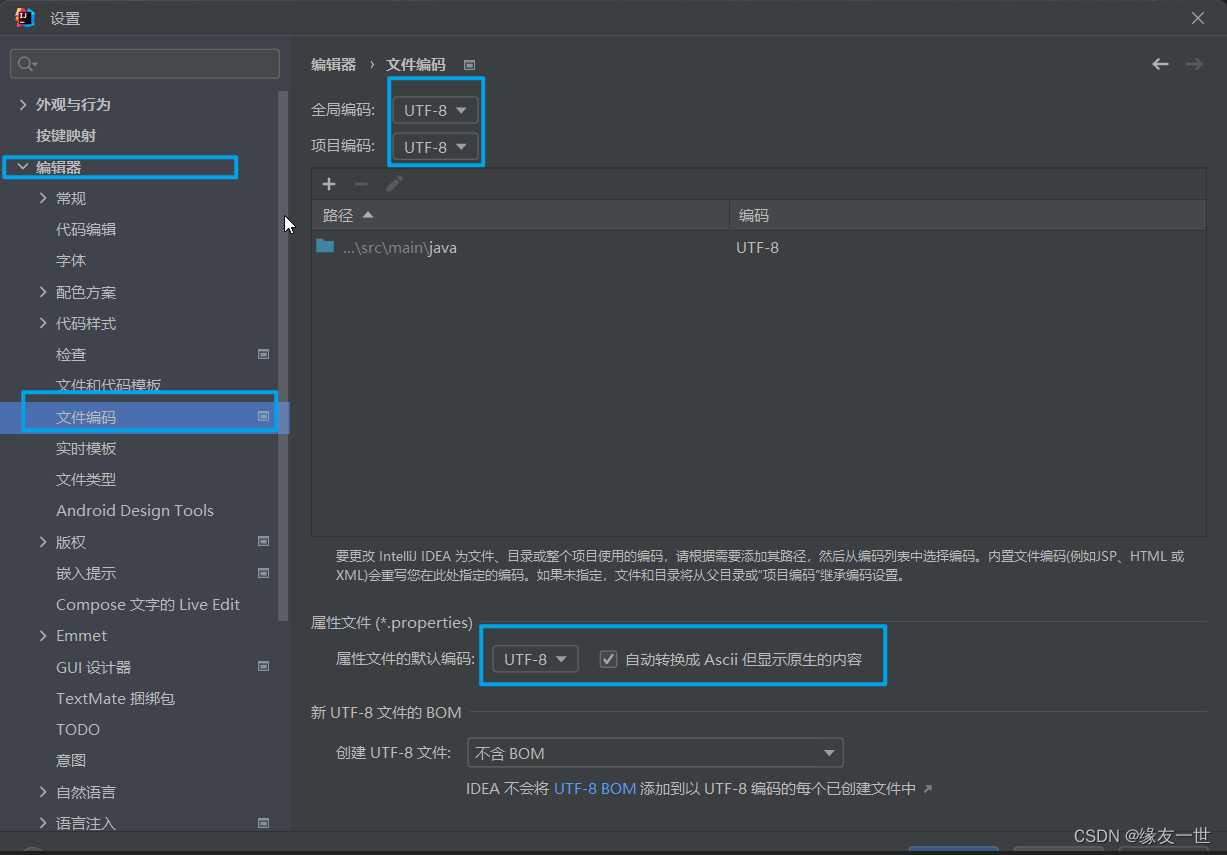
- 先在IDEA中统一设置properties的编码问题
- 配置文件编写
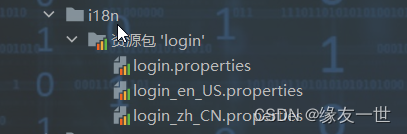
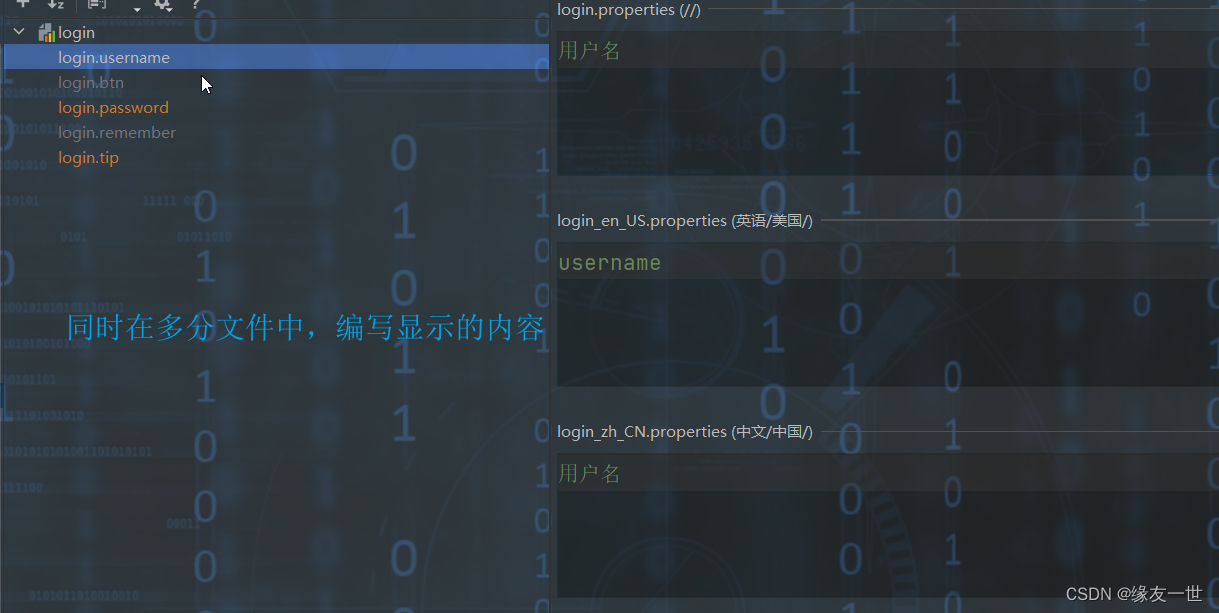
- 在resources资源文件下新建一个i18n目录,存放国际化配置文件
- 建立一个login.properties文件,还有一个login_zh_CN.properties;发现IDEA自动识别了我们要做
国际化操作;文件夹变了!

- 接下来,我们就来编写配置
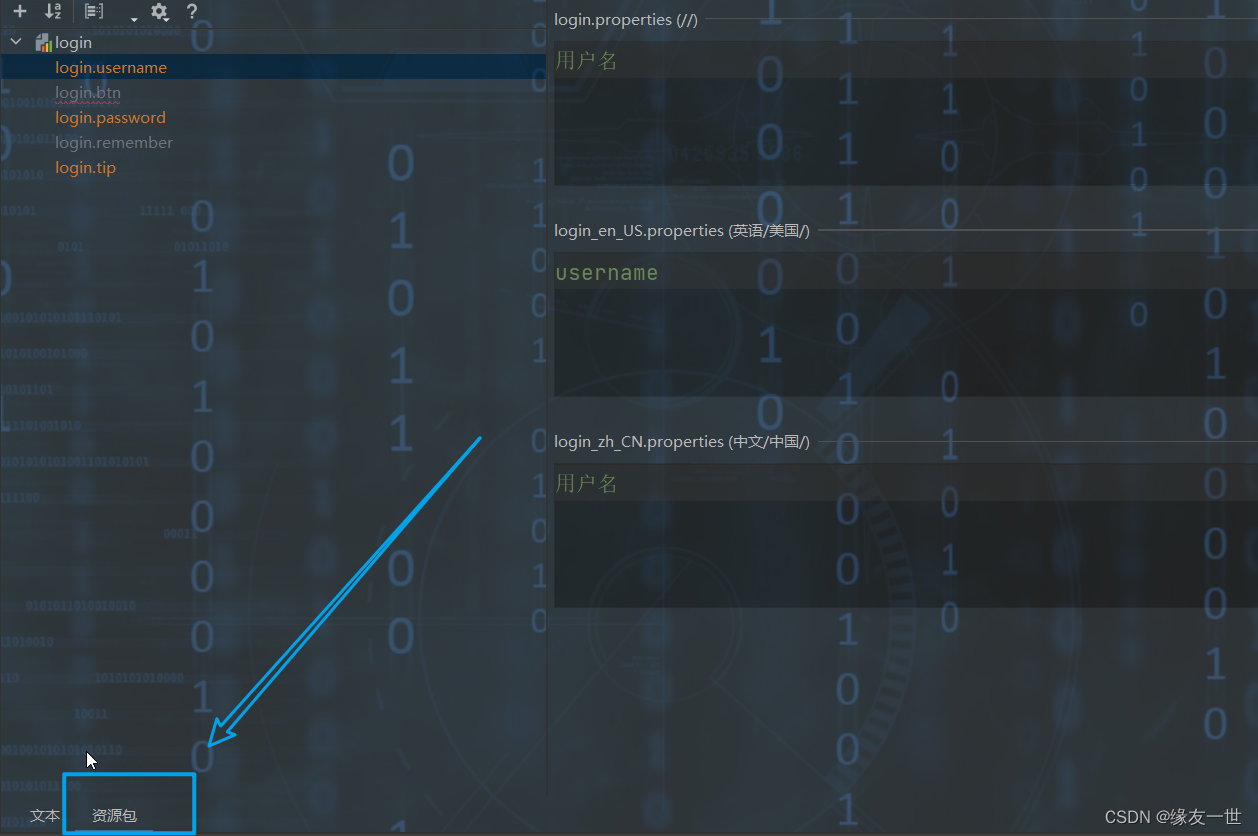
- 这个视图我们点击 + 号就可以直接添加属性了;我们新建一个login.tip,可以看到边上有三个文件框可以输入
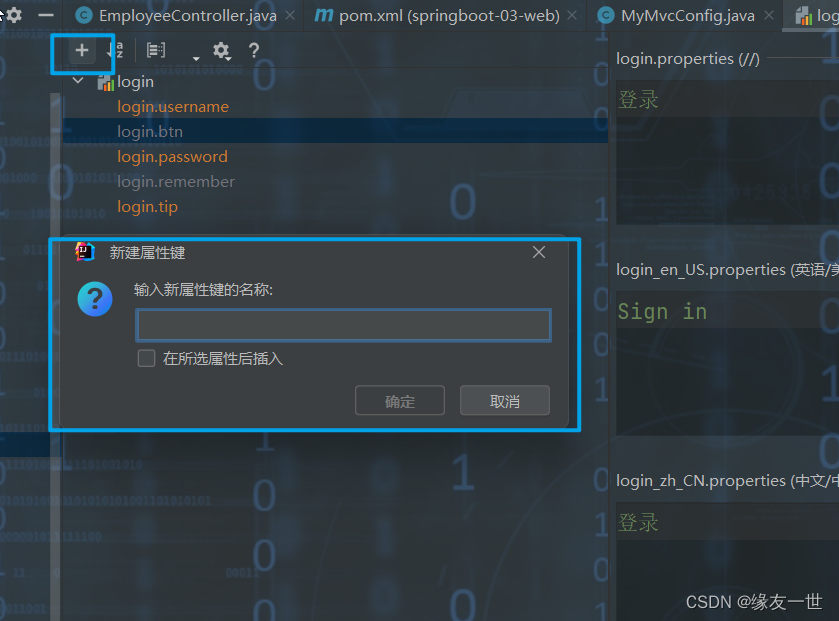
- 然后去查看我们的配置文件
- login.properties : 默认
login.username=用户名
login.btn=登录
login.password=密码
login.remember=记住我
login.tip=请登录
- 英文login.username=username login.btn=Sign in login.password=Password login.remember=Remember me login.tip=Please sign in- 中文login.username=用户名 login.btn=登录 login.password=密码 login.remember=记住我 login.tip=请登录
配置页面国际化值
- 去页面获取国际化的值,查看Thymeleaf的文档,找到message取值操作为: #{…}
<!DOCTYPE html>
<html lang="en" xmlns:th="http://www.thymeleaf.org">
	<head>
		<meta http-equiv="Content-Type" content="text/html; charset=UTF-8">
		<meta name="viewport" content="width=device-width, initial-scale=1, shrink-to-fit=no">
		<meta name="description" content="">
		<meta name="author" content="">
		<title>Sign in Template for Bootstrap</title>
		<!-- Bootstrap core CSS -->
		<link th:href="@{/css/bootstrap.min.css}" rel="stylesheet">
		<!-- Custom styles for this template -->
		<link th:href="@{/css/signin.css}" rel="stylesheet">
		<style>
			#tip {
				color: red;
			}
		</style>
	</head>

	<body class="text-center">
		<form class="form-signin" th:action="@{/user/login}">
			<img class="mb-4" th:src="@{/img/bootstrap-solid.svg}" alt="" width="72" height="72">
			<h1 class="h3 mb-3 font-weight-normal" th:text="#{login.tip}">Please sign in</h1>

			<!--如果msg的值为空,则不提示信息-->
			<p id="tip" th:text="${msg}" th:if="${not #strings.isEmpty(msg)}"></p>

			<label class="sr-only" >Username</label>
			<input type="text" class="form-control" name="username" th:placeholder="#{login.username}"  required="" autofocus="">
			<label class="sr-only" name="password" >Password</label>
			<input type="password" class="form-control" name="password" th:placeholder="#{login.password}" required="">
			<div class="checkbox mb-3">
				<label>
          <input type="checkbox" value="remember-me">[[#{login.remember}]]
        </label>
			</div>
			<button class="btn btn-lg btn-primary btn-block" type="submit" >[[#{login.btn}]]</button>
			<p class="mt-5 mb-3 text-muted">© 2017-2018</p>
			<a class="btn btn-sm" th:href="@{/index.html(l='zh_CN')}">中文</a>
			<a class="btn btn-sm" th:href="@{/index.html(l='en_US')}">English</a>
		</form>

	</body>

</html>
设置按钮切换中英文
- 配置国际化解析
- 在Spring中有一个国际化的Locale (区域信息对象);里面有一个叫做LocaleResolver (获取区域信息对象)的解析器!
- 我们去我们webmvc自动配置文件,寻找一下!看到SpringBoot默认配置:
@Bean
@ConditionalOnMissingBean
@ConditionalOnProperty(prefix = "spring.mvc", name = "locale")
public LocaleResolver localeResolver() {
	// 容器中没有就自己配,有的话就用用户配置的
	if (this.mvcProperties.getLocaleResolver() ==
	WebMvcProperties.LocaleResolver.FIXED) {
		return new FixedLocaleResolver(this.mvcProperties.getLocale());
	}
	// 接收头国际化分解
	AcceptHeaderLocaleResolver localeResolver = new
	AcceptHeaderLocaleResolver();
	localeResolver.setDefaultLocale(this.mvcProperties.getLocale());
	return localeResolver;
}
- AcceptHeaderLocaleResolver 这个类中有一个方法
public Locale resolveLocale(HttpServletRequest request) {
	Locale defaultLocale = this.getDefaultLocale();
	// 默认的就是根据请求头带来的区域信息获取Locale进行国际化
	if (defaultLocale != null && request.getHeader("Accept-Language") ==
null) {
	return defaultLocale;
} else {
	Locale requestLocale = request.getLocale();
	List<Locale> supportedLocales = this.getSupportedLocales();
	if (!supportedLocales.isEmpty() && !supportedLocales.contains(requestLocale)) {
		Locale supportedLocale = this.findSupportedLocale(request,supportedLocales);
		if (supportedLocale != null) {
			return supportedLocale;
		} else {
			return defaultLocale != null ? defaultLocale :requestLocale;
			}
		} else {
			return requestLocale;
		}
	}
}
- 如果想点击链接让我们的国际化资源生效,就需要让我们自己的Locale生效!
- 我们去自己写一个自己的LocaleResolver,可以在链接上携带区域信息!
- 修改一下前端页面的跳转连接:
<a class="btn btn-sm" th:href="@{/index.html(l='zh_CN')}">中文</a>
<a class="btn btn-sm" th:href="@{/index.html(l='en_US')}">English</a>
- 处理的组件类
package com.yang.config;

import org.springframework.util.StringUtils;
import org.springframework.web.servlet.LocaleResolver;

import javax.servlet.http.HttpServletRequest;
import javax.servlet.http.HttpServletResponse;
import java.util.Locale;

/**
 * @author 缘友一世
 * date 2022/9/10-13:15
 */
public class MyLocalResolver implements LocaleResolver {
    @Override
    public Locale resolveLocale(HttpServletRequest request) {
        //获取请求中的语言参数
        String language = request.getParameter("l");
        Locale locale = Locale.getDefault(); // 如果没有获取到就使用系统默认的
        //如果请求链接不为空
        if (!StringUtils.isEmpty(language)){
            //分割请求参数
            String[] split = language.split("_");
            //国家,地区
            locale = new Locale(split[0],split[1]);
        }
        return locale;
    }

    @Override
    public void setLocale(HttpServletRequest request, HttpServletResponse response, Locale locale) {

    }

}
- 为了让我们的区域化信息能够生效,我们需要再配置一下这个组件!在我们自己的MvcConofig下添加
bean;
@Bean
    public LocaleResolver localeResolver(){
        return new MyLocalResolver();
    }
登录+拦截器
禁用模板缓存
说明:页面存在缓存,所以我们需要禁用模板引擎的缓存
spring:
  thymeleaf:
    cache: false #关闭模板引擎的缓存
模板引擎修改后,想要实时生效!页面修改完毕后,IDEA小技巧 : Ctrl + F9 重新编译!即可生效!
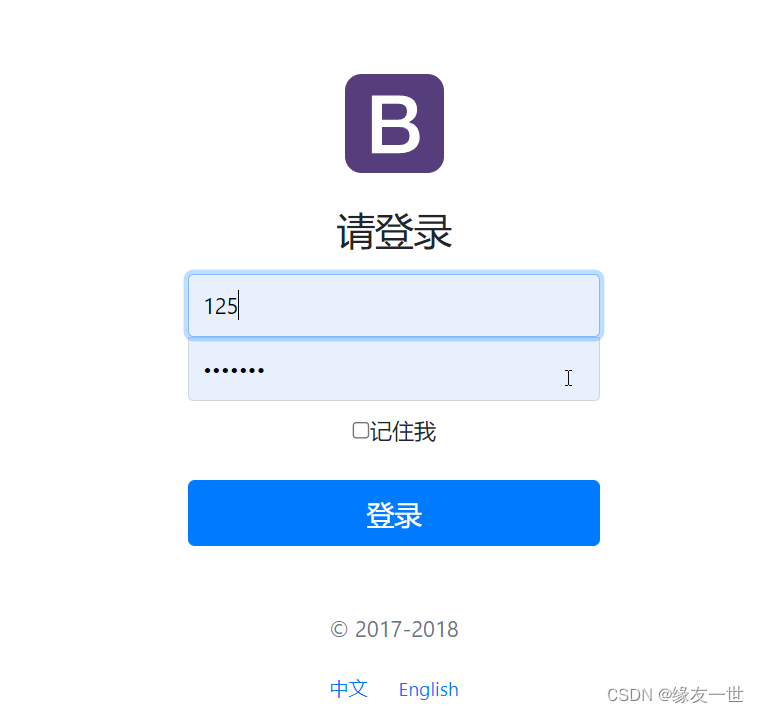
登录
- 把登录页面的表单提交地址写一个controller
<form class="form-signin" th:action="@{/user/login}" method="post">
		//这里面的所有表单标签都需要加上一个name属性
</form>
- 编写对应的controller
package com.yang.config;

import org.springframework.stereotype.Controller;
import org.springframework.ui.Model;
import org.springframework.util.ObjectUtils;
import org.springframework.util.StringUtils;
import org.springframework.web.bind.annotation.RequestMapping;
import org.springframework.web.bind.annotation.RequestParam;
import org.springframework.web.bind.annotation.ResponseBody;

import javax.servlet.http.HttpSession;

/**
 * @author 缘友一世
 * date 2022/9/10-15:18
 */
@Controller
public class LoginController {
    @RequestMapping("/user/login")
    public String login(
            @RequestParam("username") String username,
            @RequestParam("password") String password,
            Model model, HttpSession httpSession) {
        //业务逻辑
        if(!ObjectUtils.isEmpty(username) && "5201314".equals(password)) {
            httpSession.setAttribute("loginUser",username);
            return "redirect:/main.html";
        }else {
            //告诉用户,登陆失败
            model.addAttribute("msg","用户名或者密码错误!");
            return "index";
        }
    }
    @RequestMapping("/user/logout")
    public String logout(HttpSession session) {
        //session 的作用域是在一个会话期间,多个用户访问服务器,就会有多个session
        //session.invalidate(),它实际上调用的是session对象中的destroy方法,也就是说你下次要再使用session,得再重新创建
        session.invalidate();
        return "direct:/index.html";
    }
}
- 登录拦截器
- 我们可以直接登录到后台主页,不用登录也可以实现!怎么处理这个问题呢?我们可以使用拦截器机制,实现登录检查!
- 先自定义一个拦截器:
public class LoginHandlerInterceptor implements HandlerInterceptor { @Override public boolean preHandle(HttpServletRequest request, HttpServletResponse response, Object handler) throws Exception { //登录之后,应该有用户的session Object loginUser = request.getSession().getAttribute("loginUser"); if(loginUser==null) { request.setAttribute("msg","没有权限,请先登录"); request.getRequestDispatcher("/index.html").forward(request,response); return false; }else { return true; } } }- 然后将拦截器注册到我们的SpringMVC配置类当中
@Override public void addInterceptors(InterceptorRegistry registry) { registry.addInterceptor(new LoginHandlerInterceptor()). addPathPatterns("/**").excludePathPatterns("/index.html","/","/user/login","/js/**","/css/**","/img/**"); }- 然后在后台主页,获取用户登录的信息
<a class="navbar-brand col-sm-3 col-md-2 mr-0" href="http://getbootstrap.com/docs/4.0/examples/dashboard/#">[[${session.loginUser}]]</a>
- 结束了
