Netty 入门学习(1)
文章目录
- 写在前面
- 1、快速开始
- 1.1、ServerBootstrap 服务端启动器
- 1.2、Bootstrap 客户端启动器
- 2、netty中的组件
- 2.1、EventLoopGroup 事件组
- 2.2、handler 定义IO事件
- 2.3、pipeline 事件链表
- 2.4、Channel 数据通道
- 2.5、ChannelFuture 事件结果
- 2.6、Future & Promise
- 2.7、ByteBuf
写在前面
Netty 是一个基于NIO的异步的网络服务器和客户端。
netty官网:https://netty.io/
NIO基础知识:https://blog.csdn.net/a__int__/article/details/123963492
1、快速开始
maven依赖
<dependency>
    <groupId>io.netty</groupId>
    <artifactId>netty-all</artifactId>
    <version>4.1.39.Final</version>
</dependency>
1.1、ServerBootstrap 服务端启动器
代码简化结构
new ServerBootstrap()
    .group(new NioEventLoopGroup())                                     // 处理任务的线程组
    .channel(NioServerSocketChannel.class)                              // 通道类型
    .childHandler(new ChannelInitializer<NioSocketChannel>() {...})     // 数据如何处理在这里写
    .bind(端口号);                                                      // 定义端口号


new ServerBootstrap()
    .group(new NioEventLoopGroup(1), new NioEventLoopGroup())          // 一组处理accept请求,一组处理read和write
    .channel(NioServerSocketChannel.class)
    ...
实例
    public static void main(String[] args) {
        new ServerBootstrap()
                .group(new NioEventLoopGroup())
                .channel(NioServerSocketChannel.class)
                .childHandler(new ChannelInitializer<NioSocketChannel>() {
                    protected void initChannel(NioSocketChannel ch) {
                        ch.pipeline().addLast(new StringDecoder()); //将ByteBuf转换为字符串
                        ch.pipeline().addLast(new SimpleChannelInboundHandler<String>() {  //自定义handler
                            @Override  //读事件
                            protected void channelRead0(ChannelHandlerContext ctx, String msg) {
                                System.out.println("8080 接收到的消息: " + msg);
                            }
                        });
                    }
                })
                .bind(8080);
    }
1.2、Bootstrap 客户端启动器
代码简化结构
new Bootstrap()
         .group(new NioEventLoopGroup())                              // 处理任务的线程组
         .channel(NioSocketChannel.class)                             // 通道类型
         .handler(new ChannelInitializer<Channel>() {...})            // 数据如何处理在这里写
         .connect("127.0.0.1", 8080)                                  // 链接端口号
         .sync()                                                      // 阻塞,知道链接成功
         .channel()                                                   // 获取通道
         .writeAndFlush("服务器你收到了吗");                           // 发送消息
实例
    public static void main(String[] args) throws InterruptedException {
        new Bootstrap()
                .group(new NioEventLoopGroup())
                .channel(NioSocketChannel.class)
                .handler(new ChannelInitializer<Channel>() {
                    @Override
                    protected void initChannel(Channel ch) {
                        ch.pipeline().addLast(new StringEncoder());
                    }})
                .connect("127.0.0.1", 8080)
                .sync()
                .channel()
                .writeAndFlush("服务器你收到了吗");
    }
2、netty中的组件
2.1、EventLoopGroup 事件组
ServerBootstrap、Bootstrap调用的第一个方法group,传的参数是new NioEventLoopGroup()。
它内部是一个线程组,数据处理时会自动分配线程、调用。
NioEventLoopGroup 继承自 EventLoopGroup,可以指定创建线程数量
        new ServerBootstrap()
                .group(new NioEventLoopGroup())            // 默认线程数是本机cpu的两倍
                .channel(NioServerSocketChannel.class)
                ....

        new ServerBootstrap()
                .group(new NioEventLoopGroup(2))            // 创建两个线程
                .channel(NioServerSocketChannel.class)
                ....
EventLoop 处理普通任务与定时任务
        NioEventLoopGroup group = new NioEventLoopGroup();

        System.out.println(group.next());              // 获取下一个EventLoop对象
        System.out.println(group.next());
        System.out.println(group.next());              // 假设有1、2两个EventLoop对象,那第三次获取到的是1

		group.next().submit(new Runnable() {...});     // 执行一个任务,有返回值
		group.next().execute(new Runnable() {...});    // 执行一个任务,没有返回值
		group.next().scheduleWithFixedDelay(new Runnable() {...}, 停留时间, 间隔时间, TimeUnit.时间单位);  // 定时任务
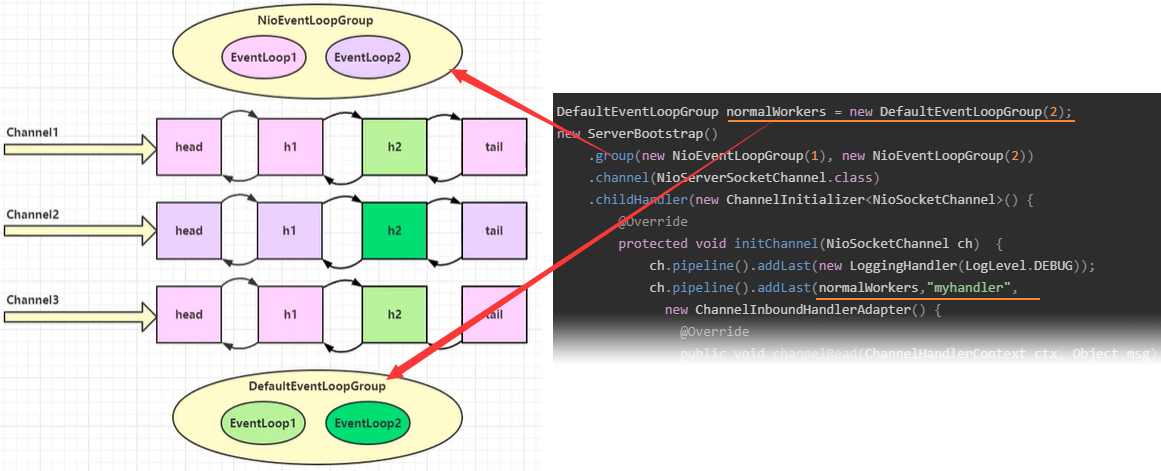
DefaultEventLoopGroup 单独处理事件 :
添加 DefaultEventLoopGroup 单独处理一些io事件
DefaultEventLoopGroup normalWorkers = new DefaultEventLoopGroup(2);
new ServerBootstrap()
    .group(new NioEventLoopGroup(1), new NioEventLoopGroup(2))
    .channel(NioServerSocketChannel.class)
    .childHandler(new ChannelInitializer<NioSocketChannel>() {
        @Override
        protected void initChannel(NioSocketChannel ch)  {
            ch.pipeline().addLast(new LoggingHandler(LogLevel.DEBUG));
            ch.pipeline().addLast(normalWorkers,"myhandler",
              new ChannelInboundHandlerAdapter() {
                @Override
                public void channelRead(ChannelHandlerContext ctx, Object msg) {
                    ByteBuf byteBuf = msg instanceof ByteBuf ? ((ByteBuf) msg) : null;
                    if (byteBuf != null) {
                        byte[] buf = new byte[16];
                        ByteBuf len = byteBuf.readBytes(buf, 0, byteBuf.readableBytes());
                        log.debug(new String(buf));
                    }
                }
            });
        }
    }).bind(8080).sync();
如上代码,处理IO的顺序如下图:
2.2、handler 定义IO事件
handler / childHandler 方法中定义的事件,最后是由NioEventLoopGroup去执行的。

handler 里面定义多个事件,每产生一次IO,就会按顺序执行一次。
2.3、pipeline 事件链表
pipeline 是一个双向链表,pipeline中有入站处理 ChannelInboundHandler 和出站处理器 ChannelOutboundHandler
出站处理器是倒序执行的
        new ServerBootstrap()
                .group(new NioEventLoopGroup())
                .channel(NioServerSocketChannel.class)
                .childHandler(new ChannelInitializer<NioSocketChannel>() {
                    @Override
                    protected void initChannel(NioSocketChannel ch) {
                        ch.pipeline().addLast(new StringDecoder()); //将ByteBuf转换为字符串

                        // 下面三个是入站处理器
                        ch.pipeline().addLast("h1", new ChannelInboundHandlerAdapter() {
                            @Override
                            public void channelRead(ChannelHandlerContext ctx, Object msg) throws Exception {
                                log.info("h1");
                                msg = " h1:" + msg;
                                super.channelRead(ctx, msg);  // super.channelRead 保证了 ctx, msg 向下一个处理器传递
                            }
                        });
                        ch.pipeline().addLast("h2", new ChannelInboundHandlerAdapter() {
                            @Override
                            public void channelRead(ChannelHandlerContext ctx, Object msg) throws Exception {
                                log.info("h2");
                                msg = " h2:" + msg;
                                super.channelRead(ctx, msg);
                            }
                        });
                        ch.pipeline().addLast("h3", new ChannelInboundHandlerAdapter() {
                            @Override
                            public void channelRead(ChannelHandlerContext ctx, Object msg) throws Exception {
                                log.info("h3");
                                msg = " h3:" + msg;
                                ch.writeAndFlush(ctx.alloc().buffer().writeBytes("service : ".getBytes())); // 写入了,才会触发下面三个出站管理器
                            }
                        });

                        // 下面三个是出战处理器
                        ch.pipeline().addLast("o1", new ChannelOutboundHandlerAdapter() {
                            @Override
                            public void write(ChannelHandlerContext ctx, Object msg,ChannelPromise promise) throws Exception {
                                log.info("o1");
                                super.write(ctx,msg,promise);
                            }
                        });
                        ch.pipeline().addLast("o2", new ChannelOutboundHandlerAdapter() {
                            @Override
                            public void write(ChannelHandlerContext ctx, Object msg,ChannelPromise promise) throws Exception {
                                log.info("o2");
                                super.write(ctx,msg,promise);
                            }
                        });
                        ch.pipeline().addLast("o3", new ChannelOutboundHandlerAdapter() {
                            @Override
                            public void write(ChannelHandlerContext ctx, Object msg,ChannelPromise promise) throws Exception {
                                log.info("o3");
                                super.write(ctx,msg,promise);
                            }
                        });
                    }
                })
                .bind(8080);
入站处理器将数据传递给下一个handler的方式有两种
// 1
super.channelRead(ctx, msg);
// 2
ctx.fireChannelRead(msg);
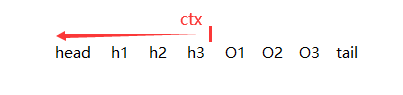
ch.writeAndFlush() 调用后从尾部往前找出站执行器
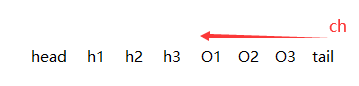
ctx.writeAndFlush() 调用后从单前执行器往前找出站执行器
2.4、Channel 数据通道
每一个Channel都与一个Pipeline关联。
channel.close();                  // 关闭通道
channel.flush();                  // 刷新并发送数据
channel.writeAndFlush("hello");   // 刷新并发送当前数据
实例
public static void main(String[] args) throws InterruptedException {
Channel channel = new Bootstrap()
.group(new NioEventLoopGroup())
.channel(NioSocketChannel.class)
.handler(new ChannelInitializer<Channel>() {
@Override
protected void initChannel(Channel ch) {
ch.pipeline().addLast(new StringEncoder());
}
})
.connect("127.0.0.1", 8080)
.sync()
.channel();
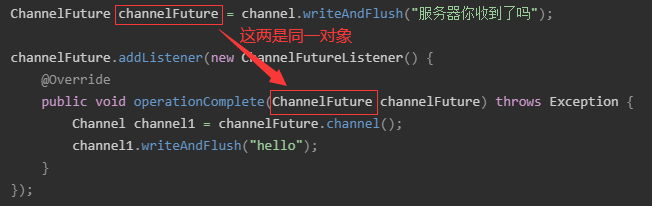
ChannelFuture channelFuture = channel.writeAndFlush("服务器你收到了吗");
}
2.5、ChannelFuture 事件结果
channelFuture.addListenner(…) 方法可以异步处理结果,例:
        Channel channel = new Bootstrap()
                .group(new NioEventLoopGroup())
				...      (此处代码省略)
				.channel();
        ChannelFuture channelFuture = channel.writeAndFlush("服务器你收到了吗");

        channelFuture.addListener(new ChannelFutureListener() {
            @Override
            public void operationComplete(ChannelFuture channelFuture) throws Exception {
                Channel channel1 = channelFuture.channel();
                channel1.writeAndFlush("hello");
            }
        });
里面的channelFuture和外面的channelFuture是同一个对象
2.6、Future & Promise
eventLoop 调用 submit() 方法后,可以返回一个结果 Future 类型的 ,这里的Future和JDK中的Future类似。
        NioEventLoopGroup group = new NioEventLoopGroup();
        EventLoop eventLoop = group.next();

        Future<?> future = eventLoop.submit(new Callable<Integer>() {
            @Override
            public Integer call() throws Exception {
                return 0;
            }
        });

         // future.get();

		// 监听到有结果返回时,打印结果
        future.addListener(new GenericFutureListener<Future<? super Integer>>() {

            @Override
            public void operationComplete(Future<? super Integer> future) throws Exception {
                System.out.println(future.getNow());
            }
        });
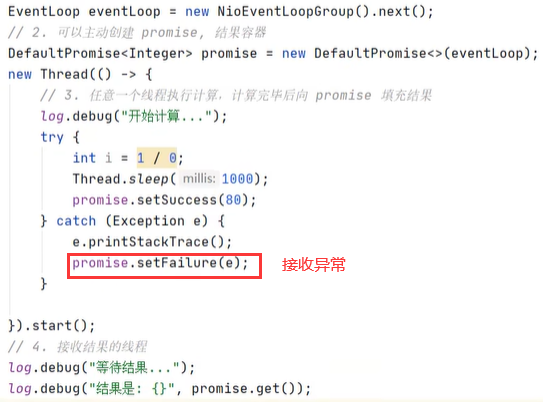
Promise 接口继承自 Future 接口, 在 Future 基础上提供了设置处理结果的功能
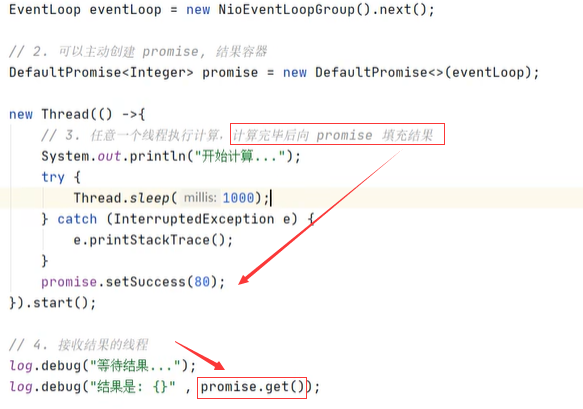
也可以填充异常信息
2.7、ByteBuf
ByteBuf 是对 ByteBuffer的增强,
1、ByteBuf的容量是可以动态扩容的。
2、ByteBuf有读指针和写指针
如下方法,可以打印ByteBuf里的内容
    private static void log(ByteBuf buf){
        StringBuilder sb=new StringBuilder();
        sb.append(" read index:").append(buf.readerIndex());  //读索引
        sb.append(" write index:").append(buf.writerIndex()); //写索引
        sb.append(" capacity :").append(buf.capacity()) ; //容量
        ByteBufUtil.appendPrettyHexDump(sb,buf);
        System.out.println(sb.toString());
    }