线程同步——互斥量解锁、解锁
类似与进程间通信信号量的加锁解锁。
对互斥量进行加锁后,任何其他试图在此对互斥量加锁的线程都会被阻塞,直到当前线程释放该互斥锁。如果释放互斥锁时有多个线程被阻塞,所有在该互斥锁上的阻塞线程都会变成可运行状态,第一个变为可运行状态的线程可以对互斥量加锁,其他线程将会看到互斥量依旧被锁住,只能回去等待它重新变为可用。在这种方式下,每次只有一个线程可以向前运行。
在设计时需要规定所有的线程必须遵守相同的数据访问规则,只有这样,互斥机制才能正常工作。如果允许其中的某个线程在没有得到锁的情况下也可以访问共享资源,那么即使其他的线程在使用共享资源前都获取了锁,也还是会出现数据不一致的问题。
互斥变量用pthread_mutex_t数据类型表示。在使用互斥变量前必须对它进行初始化,可以把它置为常量。
PTREAD_MUTEX-INITIALIZWE(只对静态分配的互斥量),也可以通过调用pthread_mutex_init函数对其进行初始化。如果动态的分配互斥量(例如调用malloc),那么在释放内存前需要调用pthread_mutex_destory。
创建互斥锁
函数原型
int pthread_mutex_init(pthread_mutex_t *restrict mutex, const pthread_mutexattr_t *restrict attr);
参数
pthread_mutex_t *restrict mutex:锁的地址。
onst pthread_mutexattr_t *restrict attr:锁的属性,可以是NULL,默认属性创建锁
返回值
若成功返回0,否则返回错误编号
销毁互斥锁
函数原型
int pthread_mutex_destroy(pthread_mutex_t *mutex);
参数
pthread_mutex_t *mutex:锁的地址。
返回值
若成功返回0,否则返回错误编号
加锁、解锁
函数原型:
int pthread_mutex_lock(pthread_mutex_t *mutex);
int pthread_mutex_trylock(pthread_mutex_t *mutex);
int pthread_mutex_unlock(pthread_mutex_t *mutex);
返回值:
若成功返回0,否则返回错误编号
如果线程不希望被阻塞,它可以使用pthread_mutex_trylock尝试对互斥量进行加锁。如果调用pthread_mutex_trylock时互斥量处于未锁住状态,那么pthread_mutex_trylock将锁住互斥量,不会出现阻塞并返回0,否则pthread_mutex_trylock就会失败,不能锁住互斥量,而返回EBUSY。
示例1:
在前面一节,提出了一个问题,怎么保证t1线程先运行,我们可以把g_data作为一个互斥量,对它进行加锁、解锁就可以实现。
#include <stdio.h>
#include <pthread.h>
//int pthread_mutex_init(pthread_mutex_t *restrict mutex, const pthread_mutexattr_t *restrict attr);
//int pthread_mutex_destroy(pthread_mutex_t *mutex);
//int pthread_mutex_lock(pthread_mutex_t *mutex);
//int pthread_mutex_trylock(pthread_mutex_t *mutex);
//int pthread_mutex_unlock(pthread_mutex_t *mutex);
int g_data=0;pthread_mutex_t mutex;void *func1(void *arg)
{int i;pthread_mutex_lock(&mutex);for(i=0;i<3;i++){printf("t1:%ld thread is creart\n",(unsigned long)pthread_self());printf("t1:param is %d\n",*((int *)arg));sleep(1);}pthread_mutex_unlock(&mutex);
}void *func2(void *arg)
{pthread_mutex_lock(&mutex);printf("t2:%ld thread is creart\n",(unsigned long)pthread_self());printf("t2:param is %d\n",*((int *)arg));pthread_mutex_unlock(&mutex);
}int main()
{int param=100;char *pret=NULL;int ret1;int ret2; pthread_t t1;pthread_t t2;pthread_mutex_init(&mutex,NULL);ret1=pthread_create(&t1, NULL,func1, (void *)¶m);ret2=pthread_create(&t1, NULL,func2, (void *)¶m);if(ret1 == 0){printf("main:create t1 successed\n");}if(ret2 == 0){printf("main:create t2 successed\n");}printf("main:%ld\n",(unsigned long)pthread_self());pthread_join(t1,NULL);printf("main: t1 quit:%s\n",pret);pthread_join(t2,NULL);printf("main: t2 quit:%s\n",pret);pthread_mutex_destroy(&mutex);return 0;
}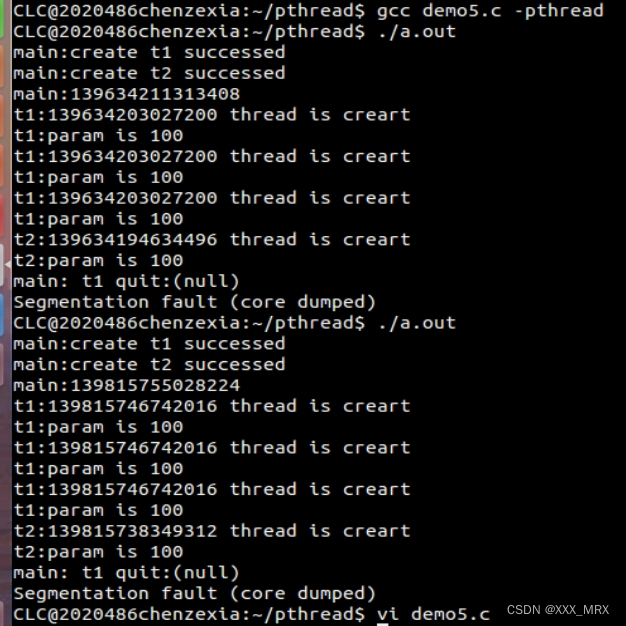
上面代码运行的结果来看,无论运行多少次代码,都是t1线程运行完毕后,t2线程才运行。main函数不在t1后运行的原因时,main线程并没有参与互斥锁的加锁解锁。
示例2:互斥锁限制共享资源的访问
前面一节还提到了一个问题,如何保证g_data=3 时 t1 线程退出
#include <stdio.h>
#include <pthread.h>
//int pthread_mutex_init(pthread_mutex_t *restrict mutex, const pthread_mutexattr_t *restrict attr);
//int pthread_mutex_destroy(pthread_mutex_t mutex);
//int pthread_mutex_lock(pthread_mutex_t mutex);
//int pthread_mutex_trylock(pthread_mutex_t mutex);
//int pthread_mutex_unlock(pthread_mutex_t mutex);int g_data=0;void *func1(void *arg)
{printf("t1:%ld thread is creart\n",(unsigned long)pthread_self());printf("t1:param is %d\n",*((int *)arg));pthread_mutex_lock(&mutex);while(1){printf("t1:%d\n",g_data++);sleep(1);if(g_data==3){printf("==================\n");pthread_mutex_unlock(&mutex);pthread_exit(NULL);}}}void *func2(void *arg)
{printf("t2:%ld thread is creart\n",(unsigned long)pthread_self());printf("t2:param is %d\n",*((int *)arg));while(1){printf("t2:%d\n",g_data);pthread_mutex_lock(&mutex);g_data++;pthread_mutex_unlock(&mutex);sleep(1);}
}int main()
{int param=100;char *pret=NULL;int ret1;int ret2;pthread_t t1;pthread_t t2;pthread_mutex_init(&mutex,NULL);ret1=pthread_create(&t1, NULL,func1, (void *)¶m);ret2=pthread_create(&t1, NULL,func2, (void *)¶m);if(ret1 == 0){printf("main:create t1 successed\n");}if(ret2 == 0){printf("main:create t2 successed\n");}printf("main:%ld\n",(unsigned long)pthread_self());while(1){printf("main:%d\n",g_data);sleep(1);}pthread_join(t1,NULL);pthread_join(t2,NULL);pthread_mutex_destroy(&mutex);return 0;
}
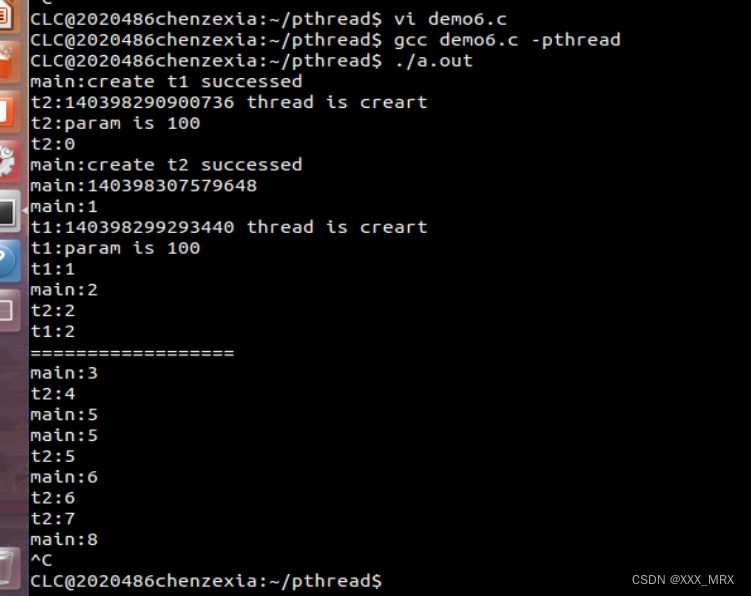
因为在g_data到达3之前,t1至少会被运行一次,所以可以运行t1时加锁,直到g_data=3,t1退出在解锁就可以实现。可以看到以上戴拿运行情况,只要运行到t1线程,g_data=3时就退出,再去运行t2和main。