【C++数据结构】异常简介与异常类的构建
文章目录
- 前言
- 一、异常简介
- 1.1 异常是什么
- 1.2 为什么需要异常?
- 1.3 异常使用示例
- 二、异常类族的构建
- 2.1 为什么需要异常类族
- 2.2 异常类族的好处
- 2.3 如何设计异常类族
- 三、异常类族的实现
- 3.1 顶层父类的实现
- 为什么需要加init函数
- 实现init函数
- 实现构造函数
- 拷贝构造和赋值操作符
- 拷贝构造
- 复制操作运算符
- 获取message和location
- 析构函数
- 纯虚析构函数为什么可以实现
- 实现代码
- 3.2 异常子类的实现
- 子类实现代码
- 总结
前言
异常处理是C++编程中至关重要的一个方面,它允许程序在运行时发生错误时进行适当的处理,而不会导致程序崩溃。异常是一种用于处理错误情况的机制,使代码更具可维护性和可靠性。在本文中,我们将首先介绍什么是异常,为什么需要它,以及如何在C++中使用异常。然后,我们将讨论如何构建自定义异常类,提供给我们自己的数据结构使用,并提供一些示例代码来说明异常的使用。
一、异常简介
1.1 异常是什么
异常是在程序执行期间发生的错误或异常情况的一种信号。这些异常可能包括除以零、访问无效内存、文件未找到等情况。异常的存在使我们能够捕获和处理这些错误,而不是简单地让程序崩溃。
1.2 为什么需要异常?
异常处理有以下几个重要优势:
可维护性:异常允许程序员将错误处理代码与正常业务逻辑分离。这使得代码更加清晰和可维护。
可靠性:异常处理可以防止程序崩溃,即使在出现错误时,程序仍然能够继续执行。这有助于提高程序的可靠性。
错误传递:异常允许错误信息从发生错误的地方传递到处理错误的地方,这样错误处理代码可以采取适当的措施。
1.3 异常使用示例
在C++中,异常是通过try、catch和throw关键字来处理的。以下是异常处理的基本用法示例:
try {// 有可能引发异常的代码if (someCondition) {throw SomeException(); // 抛出异常}
} catch (const SomeException& ex) {// 处理异常的代码std::cerr << "Caught an exception: " << ex.what() << std::endl;
}

在这个示例中,我们在try块中放置可能引发异常的代码,如果异常发生,它将被catch块捕获,然后我们可以在catch块中处理异常。
总之,异常处理是C++编程中的重要组成部分,它允许我们更好地处理错误情况,提高代码的可维护性和可靠性。
二、异常类族的构建
2.1 为什么需要异常类族
对于我们现代的C++库而言,必然包含充要的异常类族
2.2 异常类族的好处
结构化异常处理:异常类族提供了一种结构化的方法来处理不同类型的异常。通过继承关系,异常可以被分类,从而使程序员能够针对特定类型的异常编写适当的处理代码。
类型安全:每个异常类都是具体的异常类型,这意味着在异常抛出和捕获时,编译器可以确保异常的类型匹配。这提供了更高的类型安全,防止混淆不同类型的异常。
可读性和可维护性:异常类具有描述性的名称,使代码更易阅读和理解。程序员可以明确了解出现了什么类型的异常,而不需要深入分析异常的字符串消息。
异常信息传递:异常类通常包含有关异常的详细信息,例如错误消息。这使得在捕获异常后,可以轻松获取关于异常发生的情况的信息,以便进行日志记录、错误报告或其他处理。
自定义异常:程序员可以轻松创建自定义异常类,以满足其特定需求。这允许在应用程序中定义特定的异常类型,以便更好地处理特定情况。
标准库支持:C++标准库提供了一组标准异常类,如 std::runtime_error 和 std::logic_error,这些异常类覆盖了许多常见的错误情况,使异常处理更加方便。
多态性:异常类的继承体系允许多态性。这意味着可以捕获通用的基类异常,也可以捕获派生类异常,以实现更具体的处理。
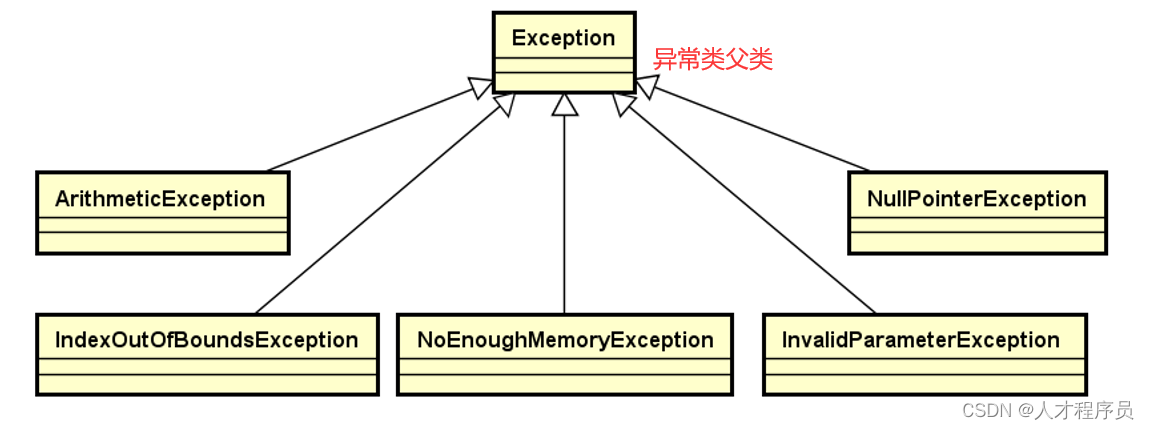
2.3 如何设计异常类族
因为我们是面向对象的C++,设计一些东西就会用上继承,我们这里也不例外,我们首先需要一个Exception的顶层父类,然后根据我们的数据结构的需要抽象出下面这些子异常类。
三、异常类族的实现
3.1 顶层父类的实现
对于我们的异常类顶层父类可以抽象成下面这种形式:
class Exception
{
protected:char* m_message;char* m_location;void init(const char* message, const char* file, int line);
public:Exception(const char* message);Exception(const char* file, int line);Exception(const char* message, const char* file, int line);Exception(const Exception& e);Exception& operator= (const Exception& e);virtual const char* message() const;virtual const char* location() const;virtual ~Exception() = 0;
};

这段代码定义了一个名为 Exception 的C++类,它是一个抽象基类,意味着不能直接创建 Exception 类的对象,而只能通过它的派生类来创建对象。
让我逐个解释这个类的成员和函数:
1.protected 成员变量:
2.char* m_message;:这是一个指向字符数组的指针,用于存储异常消息的文本。
3.char* m_location;:这是一个指向字符数组的指针,用于存储异常的位置信息(例如文件名、行号等)。
4.protected 函数:
5.void init(const char* message, const char* file, int line);:这是一个用于初始化异常对象的辅助函数。它接受异常消息、文件名和行号作为参数,并将它们存储在对应的成员变量中。
6.public 构造函数:
7.Exception(const char* message);:接受一个异常消息作为参数的构造函数。它调用了 init 函数来初始化成员变量。
8.Exception(const char* file, int line);:接受文件名和行号作为参数的构造函数。它也调用了 init 函数来初始化成员变量。
9.Exception(const char* message, const char* file, int line);:接受异常消息、文件名和行号作为参数的构造函数。它同样调用了 init 函数来初始化成员变量。
10.public 拷贝构造函数和赋值运算符重载:
11.Exception(const Exception& e);:拷贝构造函数,用于从另一个 Exception 对象创建一个新对象。
12.Exception& operator= (const Exception& e);:赋值运算符重载,用于将一个 Exception 对象的值赋给另一个对象。
13.public 虚拟成员函数:
14.virtual const char* message() const;:返回异常的消息文本。这是一个虚拟函数,意味着它可以在派生类中被覆盖以提供特定的实现。
15.virtual const char* location() const;:返回异常的位置信息。同样也是一个虚拟函数。
16.public 纯虚析构函数:
17.virtual ~Exception() = 0;:定义了一个纯虚析构函数。这使得 Exception 类成为一个抽象基类,因为派生类必须提供自己的析构函数实现。
总的来说,这个 Exception 类提供了一个基本的框架,用于派生出特定类型的异常类。它包含了用于初始化成员变量的辅助函数、构造函数和一些虚拟函数,以及一个纯虚析构函数,以保证它是一个抽象基类。派生类可以继承这个基类,并根据需要实现自己的异常类型。
为什么需要加init函数
因为我们这几个构造函数的实现逻辑都是差不多的,使用这种方法可以简化我们代码的可阅读性。
实现init函数
void Exception::init(const char* message, const char* file, int line)
{m_message = message;
}

由于我们的参数是外部传进来的,我们无法得知其生命周期,所以我们这种直接m_message = message他是不安全的。
那么如何解决呢?我们可以拷贝一份字符串出来,那么两个字符串之间就互不干扰了。
void Exception::init(const char* message, const char* file, int line)
{m_message = strdup(message);
}

使用strdup即可复制字符串到堆空间.
接下来,我们需要把file和line放到m_location里面。
但是file并不是必须要填写的,所以我们需要判断file是否是空
if (file != nullptr)
{}
如果是空,则下面这样处理:
if (file != nullptr)
{}
else
{m_location = nullptr;
}
接下来需要我们定义一个sl变量,用于存储line字符串
然后我们使用itoa函数把line这个int类型的变量变成字符串。
接下来,使用malloc申请m_location变量。
有同学就有疑问了:为什么需要+2呢,不是只需要把file和sl填进去不就ok啦?
不是这样的,我们的file文件名肯定需要和我们的line隔开,所以我们需要+1
因为还要有个\0,所以+1
最后的结果就是+2
我们申请完空间之后,然后进行字符串操作即可。
char sl[16] = { 0 };_itoa(line, sl, 10);m_location = static_cast<char *>(malloc(sizeof(strlen(file) + strlen(sl) + 2)));
m_location = strcpy(m_location, file);
m_location = strcat(m_location, ":");
m_location = strcat(m_location, sl);

实现构造函数
因为上面我们实现了init函数,我们只需要调用init函数即可快速解决问题
Exception::Exception(const char* message)
{init(message, NULL, 0);
}Exception::Exception(const char* file, int line)
{init(NULL, file, line);
}Exception::Exception(const char* message, const char* file, int line)
{init(message, file, line);
}

拷贝构造和赋值操作符
因为我们这里涉及到指针,所以肯定需要使用深拷贝,所以我们需要自己实现拷贝构造函数和赋值操作符
拷贝构造
拷贝构造非常简单,只需要把e.m_message和e.m_location复制一份即可
Exception::Exception(const Exception& e)
{m_message = strdup(e.m_message);m_location = strdup(e.m_location);
}

复制操作运算符
他和拷贝构造的区别:
要先判断是否为自赋值,自赋值直接返回自己即可。
我们赋值m_message和m_location的时候,要先free调原来的东西,万一我们里面已经有东西了,
赋值之后,那原来的东西没了,不就内存泄露了吗,所以需要先free调原来的东西,以防万一
Exception& Exception::operator= (const Exception& e){if (this != &e){free(m_message);free(m_location);m_message = _strdup(e.m_message);m_location = _strdup(e.m_location);}return *this;}

获取message和location
这两个函数非常简单,直接返回即可。
const char* Exception::message() const
{return m_message;
}const char* Exception::location() const
{return m_location;
}

析构函数
有同学就会疑问:上面的析构函数不是纯虚函数吗,为什么还可以去实现析构函数呢。
纯虚析构函数为什么可以实现
在C++中,纯虚析构函数(pure virtual destructor)是一种特殊的虚函数,通常用于定义抽象基类(abstract base class)。纯虚析构函数本身不需要提供实际的实现,但它可以在派生类中提供实现。这可能会让人感到疑惑,为什么可以这样做。
这种情况下,允许在基类中声明一个纯虚析构函数的主要原因是确保派生类在销毁时能够正确地释放资源。当一个对象被销毁时,C++会沿着继承层次结构的反向顺序依次调用每个类的析构函数。如果基类的析构函数是纯虚函数而没有提供实际实现,派生类必须提供自己的析构函数,否则编译器将报错。
派生类提供实现的好处是,它可以执行特定于派生类的清理操作,然后调用基类的析构函数以确保所有层次的对象都被正确地销毁。这种机制对于资源管理非常有用,例如在派生类中释放内存或关闭文件句柄等。
下面是一个示例,说明如何使用纯虚析构函数:
class Base {
public:virtual ~Base() = 0; // 纯虚析构函数的声明
};Base::~Base() {// 这是纯虚析构函数的默认实现
}class Derived : public Base {
public:~Derived() {// 在派生类中提供实际的析构函数实现// 执行特定于派生类的清理操作}
};int main() {Base* obj = new Derived;delete obj; // 通过基类指针删除对象,派生类的析构函数将被调用return 0;
}
在上面的示例中,Base 类中声明了一个纯虚析构函数,而 Derived 类提供了实际的析构函数实现。当通过基类指针删除 Derived 类的对象时,派生类的析构函数将被调用,确保资源得到正确释放。这种方式允许使用多态性来管理对象的生命周期,同时确保正确的资源清理。
实现代码
Exception::~Exception()
{free(m_message);free(m_location);
}

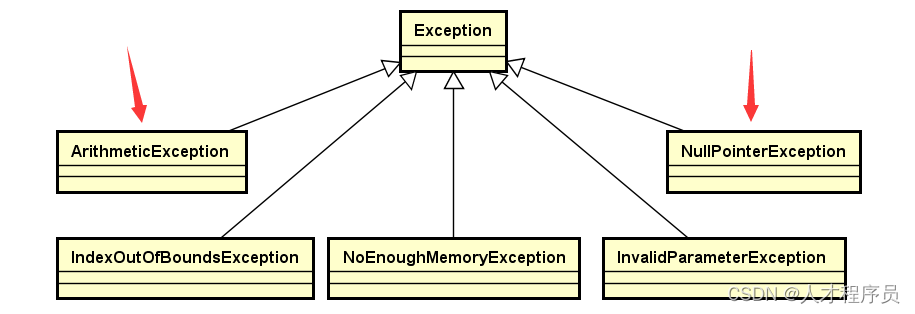
3.2 异常子类的实现
我们已经实现完我们的父类了,接下来就需要实现我们的子类。子类非常简单,我们只需要调用父类的构造函数就可以,接下来是其代码。
子类实现代码
class ArithmeticException : public Exception
{
public:ArithmeticException() : Exception(0) { }ArithmeticException(const char* message) : Exception(message) { }ArithmeticException(const char* file, int line) : Exception(file, line) { }ArithmeticException(const char* message, const char* file, int line) : Exception(message, file, line) { }ArithmeticException(const ArithmeticException& e) : Exception(e) { }ArithmeticException& operator= (const ArithmeticException& e){Exception::operator=(e);return *this;}
};class NullPointerException : public Exception
{
public:NullPointerException() : Exception(0) { }NullPointerException(const char* message) : Exception(message) { }NullPointerException(const char* file, int line) : Exception(file, line) { }NullPointerException(const char* message, const char* file, int line) : Exception(message, file, line) { }NullPointerException(const NullPointerException& e) : Exception(e) { }NullPointerException& operator= (const NullPointerException& e){Exception::operator=(e);return *this;}
};class IndexOutOfBoundsException : public Exception
{
public:IndexOutOfBoundsException() : Exception(0) { }IndexOutOfBoundsException(const char* message) : Exception(message) { }IndexOutOfBoundsException(const char* file, int line) : Exception(file, line) { }IndexOutOfBoundsException(const char* message, const char* file, int line) : Exception(message, file, line) { }IndexOutOfBoundsException(const IndexOutOfBoundsException& e) : Exception(e) { }IndexOutOfBoundsException& operator= (const IndexOutOfBoundsException& e){Exception::operator=(e);return *this;}
};class NoEnoughMemoryException : public Exception
{
public:NoEnoughMemoryException() : Exception(0) { }NoEnoughMemoryException(const char* message) : Exception(message) { }NoEnoughMemoryException(const char* file, int line) : Exception(file, line) { }NoEnoughMemoryException(const char* message, const char* file, int line) : Exception(message, file, line) { }NoEnoughMemoryException(const NoEnoughMemoryException& e) : Exception(e) { }NoEnoughMemoryException& operator= (const NoEnoughMemoryException& e){Exception::operator=(e);return *this;}
};class InvalidParameterException : public Exception
{
public:InvalidParameterException() : Exception(0) { }InvalidParameterException(const char* message) : Exception(message) { }InvalidParameterException(const char* file, int line) : Exception(file, line) { }InvalidParameterException(const char* message, const char* file, int line) : Exception(message, file, line) { }InvalidParameterException(const InvalidParameterException& e) : Exception(e) { }InvalidParameterException& operator= (const InvalidParameterException& e){Exception::operator=(e);return *this;}
};class InvalidOperationException : public Exception
{
public:InvalidOperationException() : Exception(0) { }InvalidOperationException(const char* message) : Exception(message) { }InvalidOperationException(const char* file, int line) : Exception(file, line) { }InvalidOperationException(const char* message, const char* file, int line) : Exception(message, file, line) { }InvalidOperationException(const InvalidOperationException& e) : Exception(e) { }InvalidOperationException& operator= (const InvalidOperationException& e){Exception::operator=(e);return *this;}
};

总结
异常处理是C++编程中至关重要的一个方面,它允许程序在运行时发生错误时进行适当的处理,而不会导致程序崩溃。异常是一种用于处理错误情况的机制,使代码更具可维护性和可靠性。在本文中,我们将首先介绍什么是异常,为什么需要它,以及如何在C++中使用异常。然后,我们将讨论如何构建自定义异常类,提供给我们自己的数据结构使用,并提供一些示例代码来说明异常的使用。