【T690 之十一】基于方寸EVB2开发板,结合 Eclipse+gdb+gdbserver 调试 CCAT 的流程总结
目录
- 1. 准备工作
- 1.1 Eclipse
- 1.2 工程编译
- 1.3 烧写固件
- 2. 创建工程
- 2.1 搭建调试工程
- 2.2 配置Dbug调试信息
- 3. 调试
- 4. 手动调试过程
- 4. 总结
备注:
1,假设您已对方寸微电子的T690系列芯片的使用方式都有了一定的了解,可以根据此文的配置进行Linux用户态代码的调试;
2,若您对方寸微电子的T690芯片不了解,但想进一步了解它,那您可以在gitee上获取相关资料,gitee的网址为:https://gitee.com/tihchip;
3,本文中关于gdb、gdbserver的使用方式都是通用的,不仅局限于调试基于T690的工程,希望该文章能对您起到积极的作用;
1. 准备工作
1.1 Eclipse
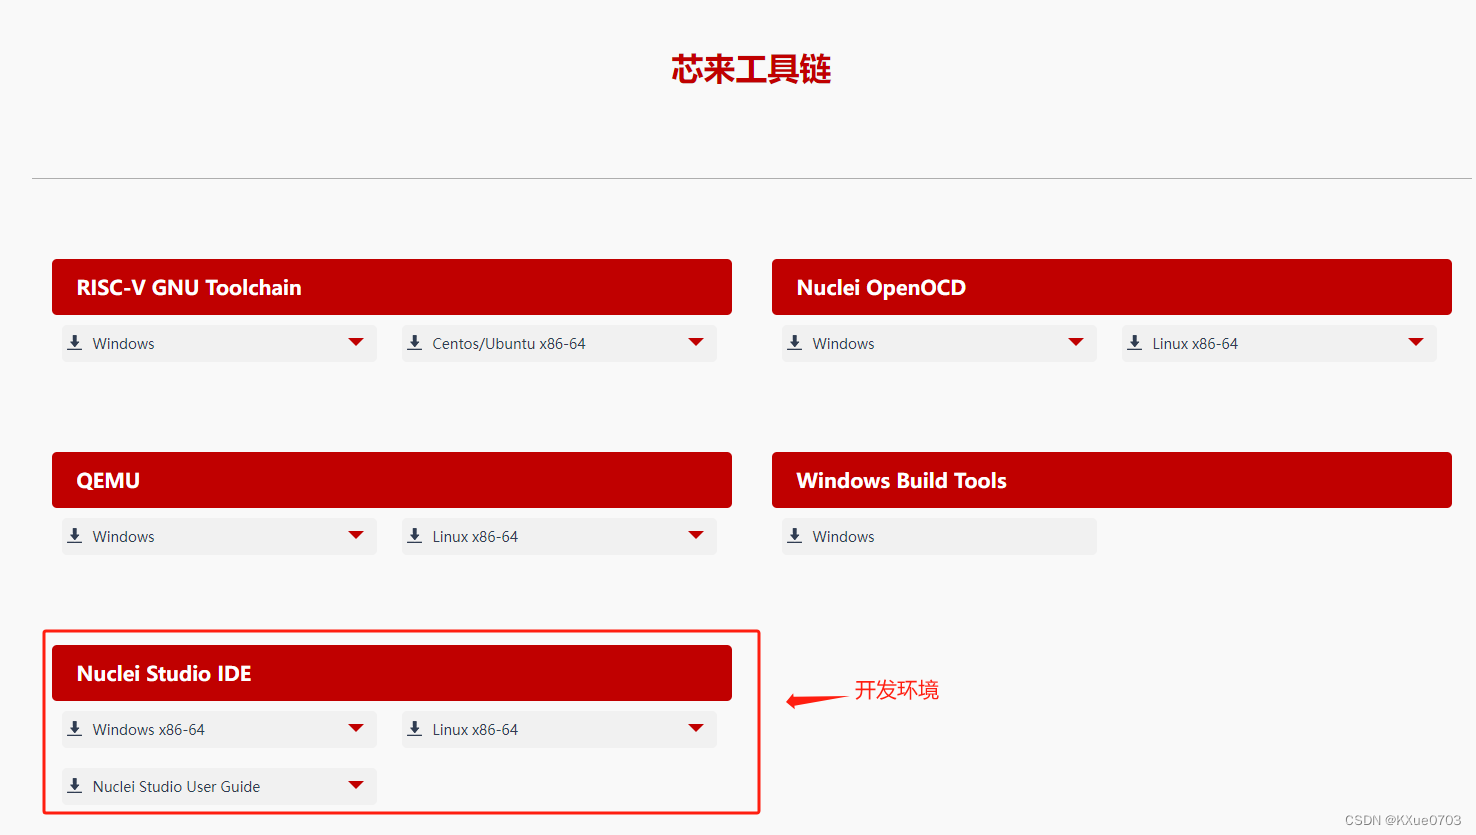
本文中使用的Eclipse为芯来的 NucleiStudio_IDE_202212,关于Eclipse安装方式不在此累述。
下载地址:https://www.nucleisys.com/download.php
1.2 工程编译
对于一个全新的测试的话,需要编译一个全新的文件系统(rootfs),在编译文件系统时已经默认编译了 OpenSBI、U-Boot、Kernel、OpenSSL、CCAT-Engine、CCAT等,但是为了更好的了解使用这些工程,也可以独自编译它们。
下面采用 yocto 的方式编译文件系统等。
- 编译文件系统(rootfs)
注:在编译文件系统之前,必须首先修改U-Boot 及 Kernel 的配置项,参考章节 “
编译U-Boot” 及 “编译Kernel” 中的说明
root@t690mp-evb2-va: MACHINE=t690mp-evb2-va bitbake tih-full-cli-debug-image -c cleanall
root@t690mp-evb2-va: MACHINE=t690mp-evb2-va bitbake tih-full-cli-debug-image
root@t690mp-evb2-va: mkdir /share/samba/public/shared/jack/rootfs_gmssl
root@t690mp-evb2-va: cp /localhdd/jack/tmp-glibc/deploy/images/t690mp-evb2-va/tih-full-cli-debug-image-t690mp-evb2-va.tar.gz /share/samba/public/shared/jack/rootfs_gmssl
root@t690mp-evb2-va: cd /share/samba/public/shared/jack/rootfs_gmssl
root@t690mp-evb2-va: tar -vxzf tih-full-cli-debug-image-t690mp-evb2-va.tar.gz
(1)tih-full-cli-debug-image :表示编译带有调试信息的文件系统,tih-full-cli-image表示编译不带调试信息的文件系统。我们进行gdb调试时,需要编译带有调试信息的文件系统;
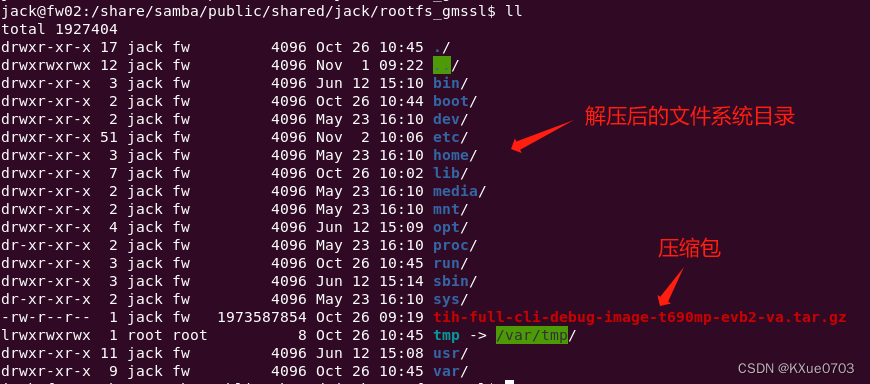
(2)在 /share/samba/public/shared/jack/ 目录下创建一个名为 rootfs_gmssl 的文件夹(需要保证该文件夹时nfs的挂载路径才行),并将生成的文件系统复制到此文件夹下,解压后,如下所示:
- 编译OpenSBI
root@t690mp-evb2-va: MACHINE=t690mp-evb2-va bitbake opensbi -c cleanall
root@t690mp-evb2-va: MACHINE=t690mp-evb2-va bitbake opensbi
root@t690mp-evb2-va: cp -rf /localhdd/jack/tmp-glibc/deploy/images/t690mp-evb2-va/fw_jump.bin /share/samba/public/shared/jack/
- 编译U-Boot
root@t690mp-evb2-va: MACHINE=t690mp-evb2-va bitbake u-boot -c cleanall
root@t690mp-evb2-va: MACHINE=t690mp-evb2-va bitbake u-boot
root@t690mp-evb2-va: cp /localhdd/jack/tmp-glibc/deploy/images/t690mp-evb2-va/u-boot.bin /share/samba/public/shared/jack/
- 编译Kernel
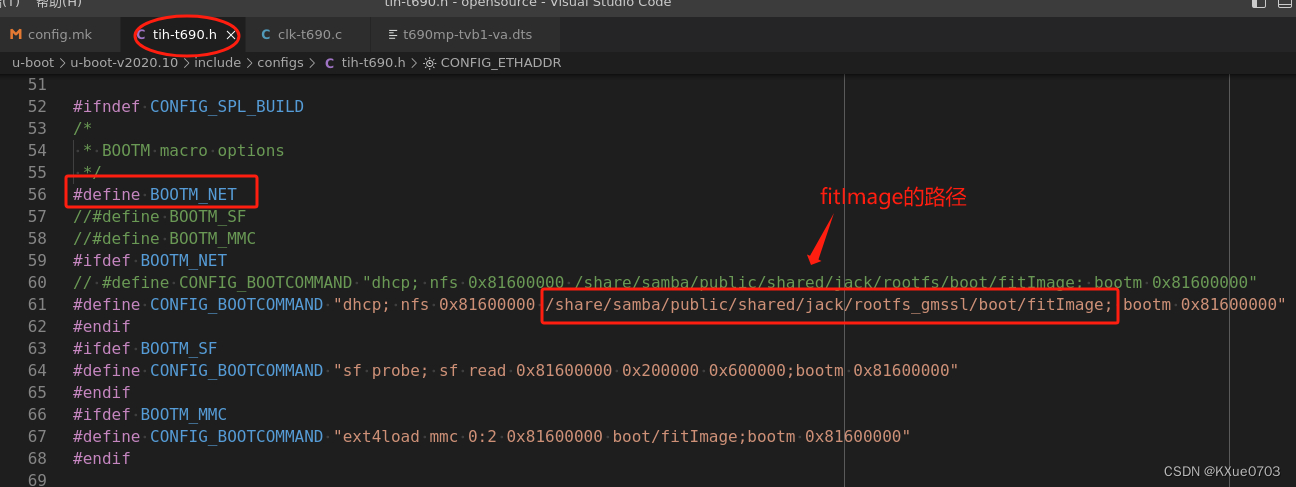
修改设备树,配置文件系统的挂载路径如下:

root@t690mp-evb2-va: MACHINE=t690mp-evb2-va bitbake linux-mainline -c cleanall
root@t690mp-evb2-va: MACHINE=t690mp-evb2-va bitbake linux-mainline
root@t690mp-evb2-va: cp /localhdd/jack/tmp-glibc/deploy/images/t690mp-evb2-va/fitImage /share/samba/public/shared/jack/rootfs_gmssl/boot/
- 编译GMSSL 或 OpenSSL
备注:若使用yocto编译GMSSL,必须采用迂回的路线,即将GMSSL的bb文件中的内容全部替换到OpenSSL的bb文件中去,通过编译OpenSSL的方式实现对GMSSL的编译。
root@t690mp-evb2-va: MACHINE=t690mp-evb2-va bitbake openssl -c cleanall
root@t690mp-evb2-va: MACHINE=t690mp-evb2-va bitbake openssl
root@t690mp-evb2-va: cp -rf /localhdd/jack/tmp-glibc/work/riscv64-tih-linux/openssl/1.1.1q-r0/image/* /share/samba/public/shared/jack/rootfs_gmssl/
root@t690mp-evb2-va: cp -rf /localhdd/jack/tmp-glibc/work/riscv64-tih-linux/openssl/1.1.1q-r0/packages-split/openssl-dbg/* /share/samba/public/shared/jack/rootfs_gmssl/
- 编译CCAT
root@t690mp-evb2-va: MACHINE=t690mp-evb2-va bitbake ccat -c cleanall
root@t690mp-evb2-va: MACHINE=t690mp-evb2-va bitbake ccat
root@t690mp-evb2-va: cp -rf /localhdd/jack/tmp-glibc/work/t690mp_evb2_va-tih-linux/ccat/1.0-r0/image/* /share/samba/public/shared/jack/rootfs_gmssl/
root@t690mp-evb2-va: cp -rf /localhdd/jack/tmp-glibc/work/t690mp_evb2_va-tih-linux/ccat/1.0-r0/packages-split/ccat-dbg/* /share/samba/public/shared/jack/rootfs_gmssl/
- 编译CCAT-Engine
root@t690mp-evb2-va: MACHINE=t690mp-evb2-va bitbake ccat-engine -c cleanall
root@t690mp-evb2-va: MACHINE=t690mp-evb2-va bitbake ccat-engine
root@t690mp-evb2-va: cp -rf /localhdd/jack/tmp-glibc/work/riscv64-tih-linux/ccat-engine/1.0-r0/image/* /share/samba/public/shared/jack/rootfs_gmssl/
root@t690mp-evb2-va: cp -rf /localhdd/jack/tmp-glibc/work/riscv64-tih-linux/ccat-engine/1.0-r0/packages-split/ccat-engine-dbg/* /share/samba/public/shared/jack/rootfs_gmssl/
1.3 烧写固件
参考方寸微电子提供的快速启动文档《TIH64V690 SDK Quick Start.pdf》
下载地址:https://e.gitee.com/tihchip_priv/repos/tihchip/doc/sources

2. 创建工程
2.1 搭建调试工程
创建并导入待调试的工程的目的是:方便跟踪、查看、并修改源码(切记:这里导入的是源码工作的链接文件,而不是源文件)
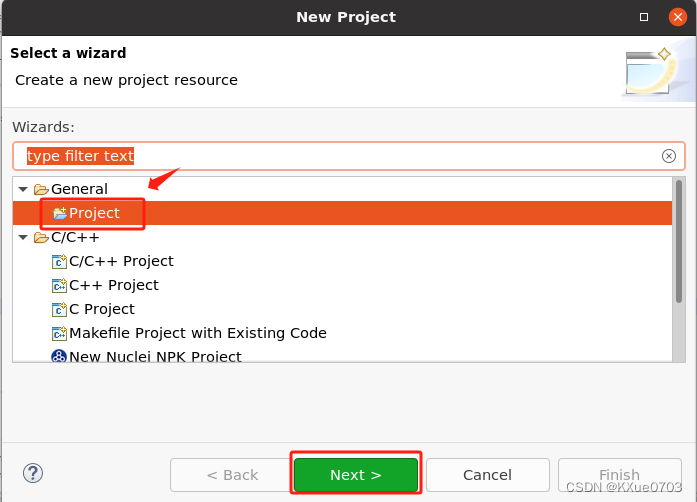
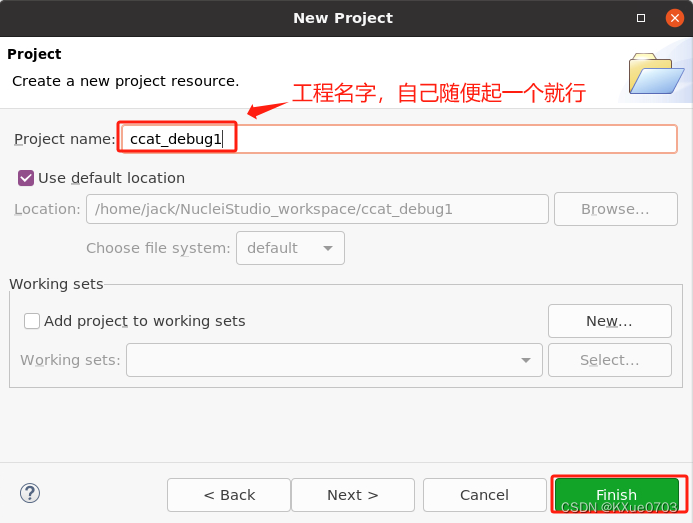
- 点击:File/New/Project
- 导入工程(ccat、ccat_engine、openssl)
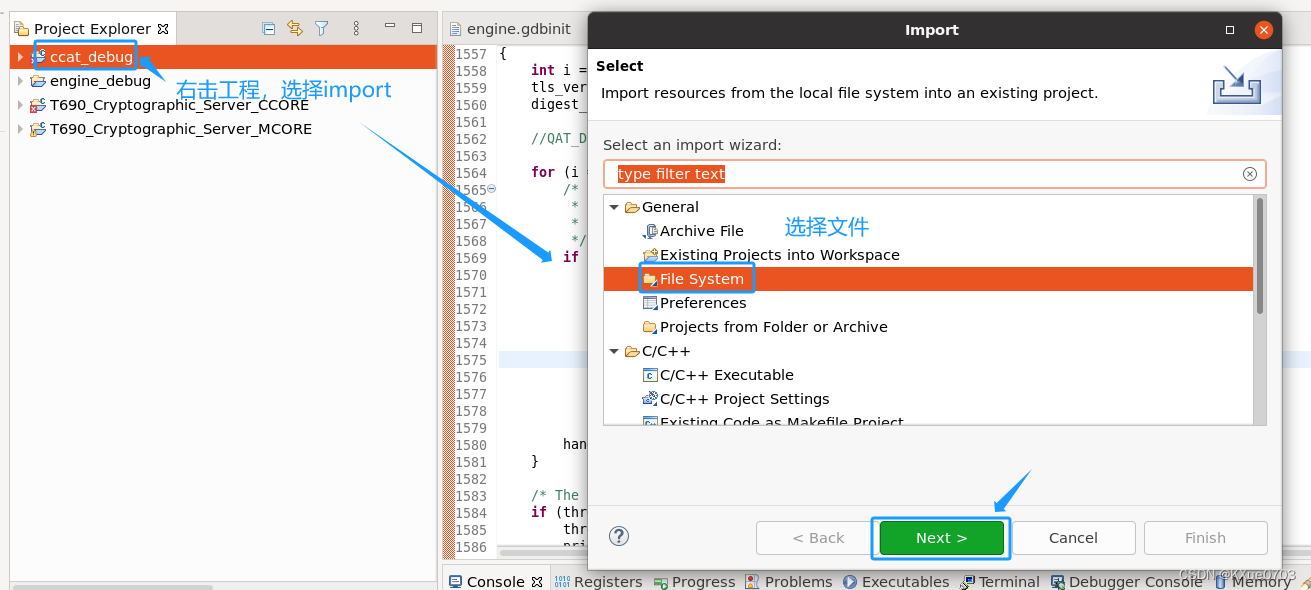
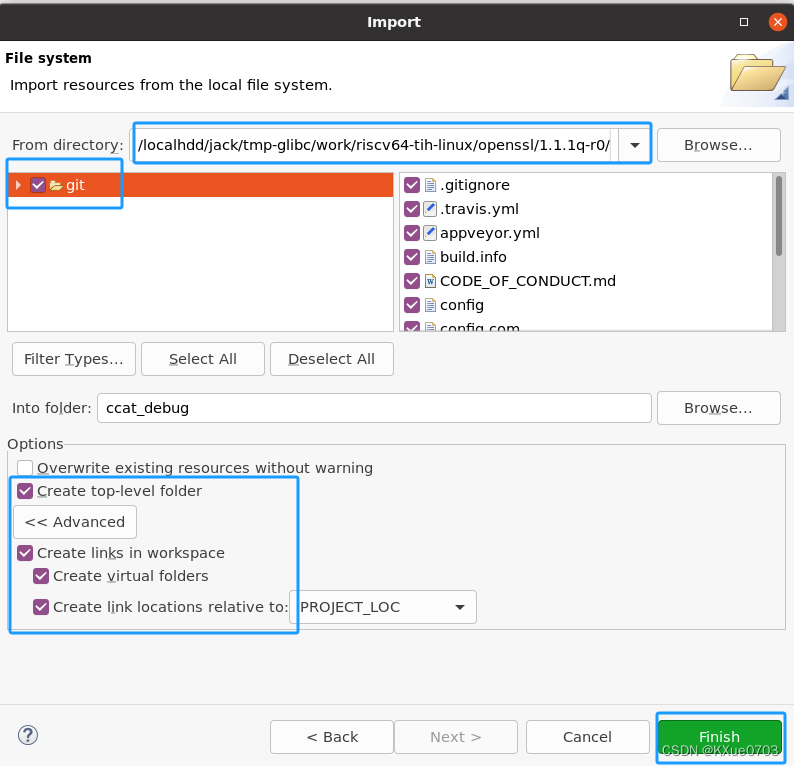
依次导入CCAT、CCAT_Engine、OpenSSL的源码工程链接。
2.2 配置Dbug调试信息
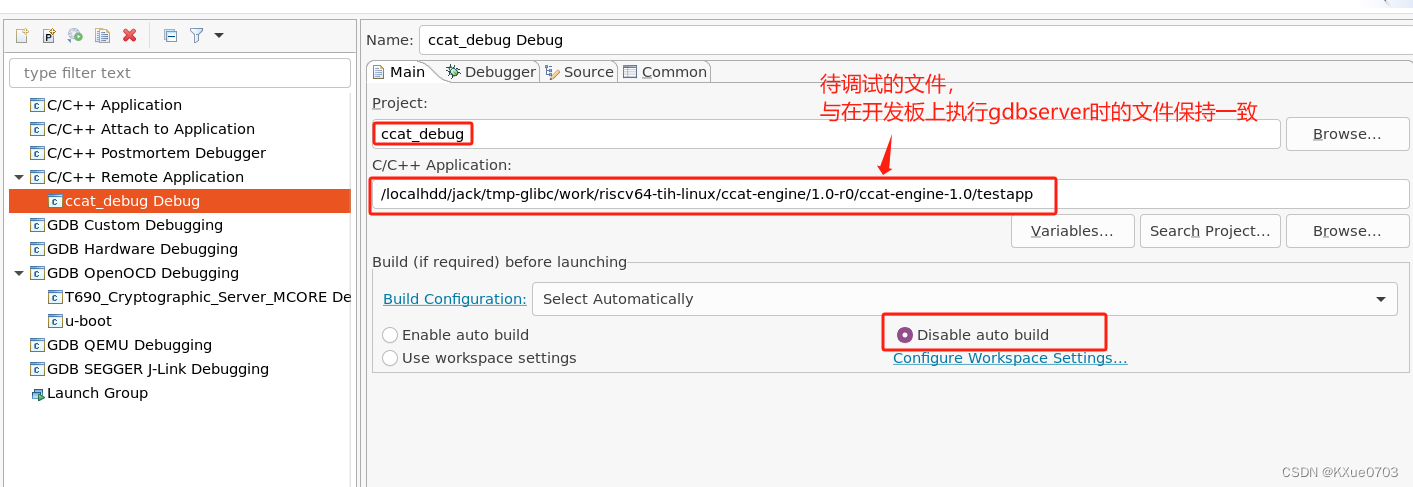
在“debug工程”右键选择“Debug As \ Debug Configurations”,进入如下配置界面。按照下面图示进行配置:
- 配置可执行程序(testapp)的路径
/* 当前测试case的可执行程序路径如下: */
/localhdd/jack/tmp-glibc/work/riscv64-tih-linux/ccat-engine/1.0-r0/ccat-engine-1.0/testapp
- 配置GDB及GDB调试信息
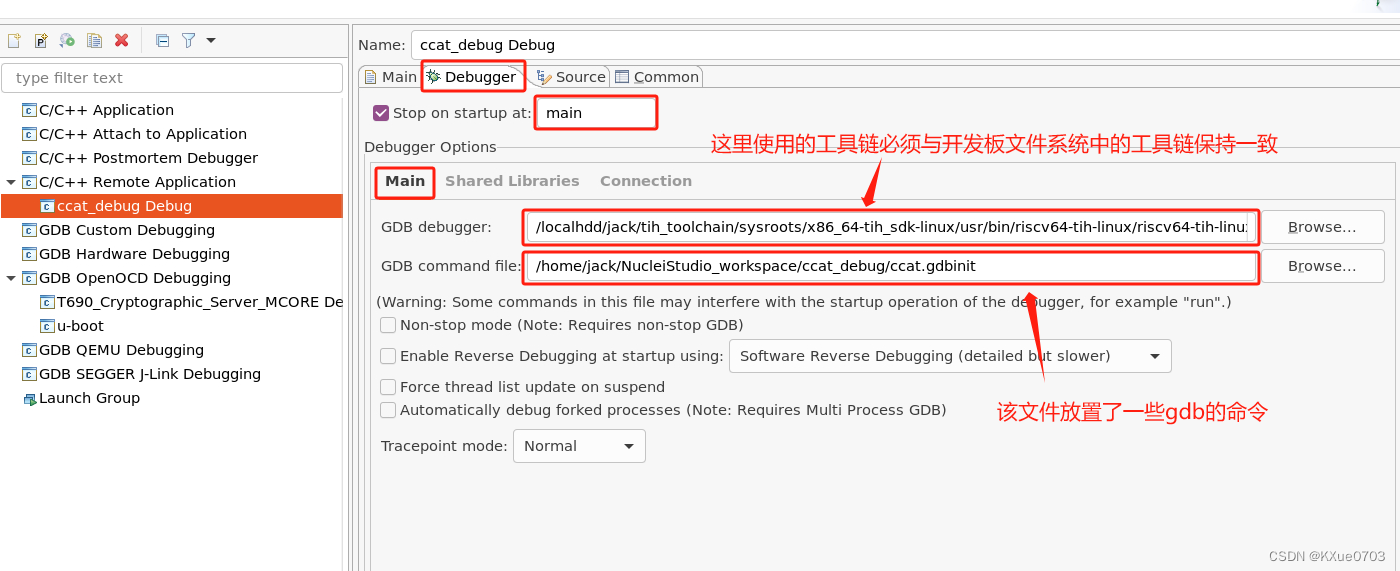
备注:此处配置的工具链必须与开发板上的工具链保持一致,建议直接使用我们导出的工具链
工具链的位置:/localhdd/jack/tih_toolchain/sysroots/x86_64-tih_sdk-linux/usr/bin/riscv64-tih-linux/riscv64-tih-linux-gdb
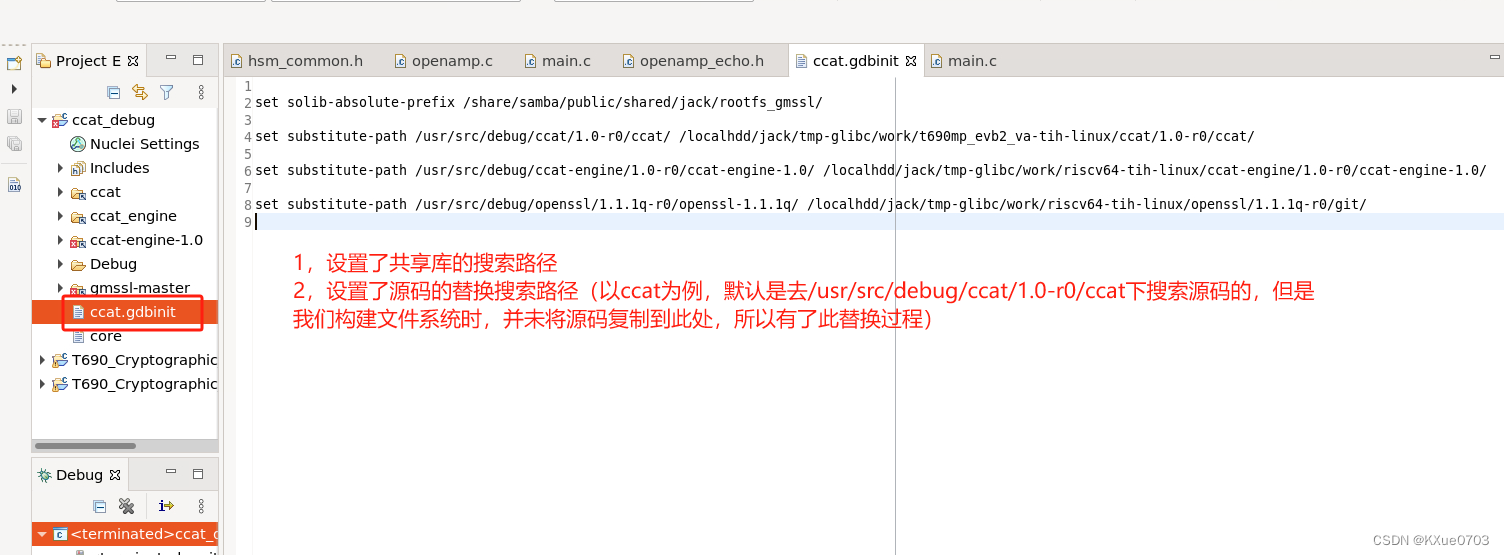
ccat.gdbinit:记录了GDB的命令,启动GDB时会解析该命令,该文件的内容如下:
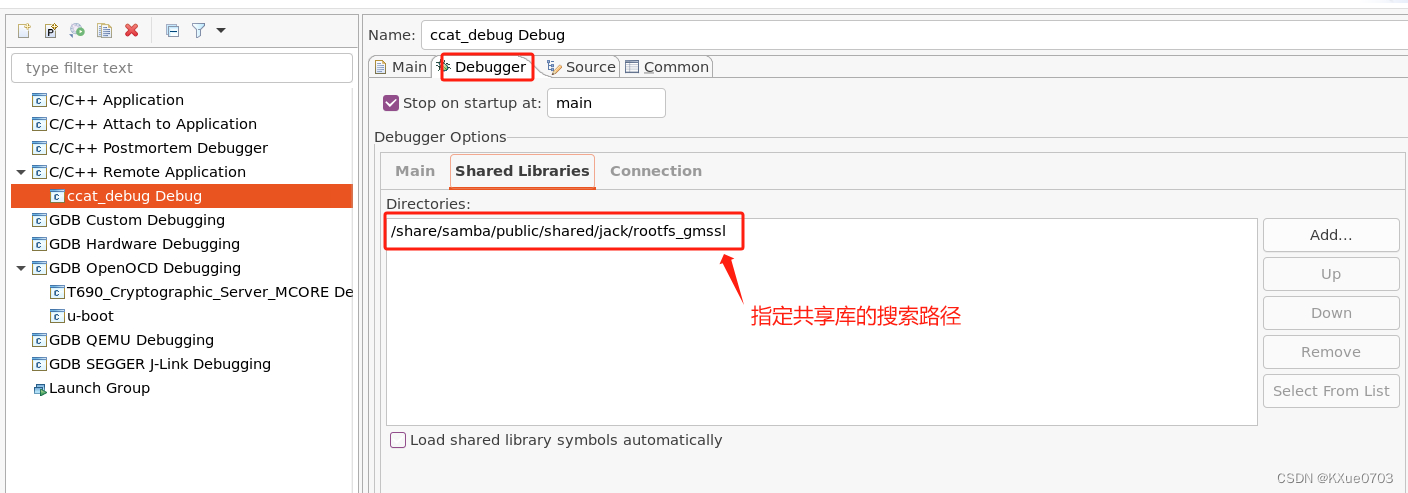
/* 设置共享库的搜索路径 */
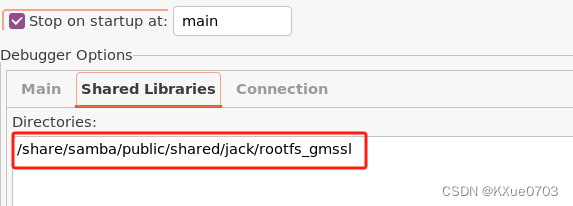
set solib-absolute-prefix /share/samba/public/shared/jack/rootfs_gmssl//* 设置ccat源码的替换搜索路径 */
set substitute-path /usr/src/debug/ccat/1.0-r0/ccat/ /localhdd/jack/tmp-glibc/work/t690mp_evb2_va-tih-linux/ccat/1.0-r0/ccat//* 设置ccat-engine源码的替换搜索路径 */
set substitute-path /usr/src/debug/ccat-engine/1.0-r0/ccat-engine-1.0/ /localhdd/jack/tmp-glibc/work/riscv64-tih-linux/ccat-engine/1.0-r0/ccat-engine-1.0//* 设置OpenSSL源码的替换搜索路径 */
set substitute-path /usr/src/debug/openssl/1.1.1q-r0/openssl-1.1.1q/ /localhdd/jack/tmp-glibc/work/riscv64-tih-linux/openssl/1.1.1q-r0/git/
- 设置共享库的搜索路径
- 设置IP及端口号
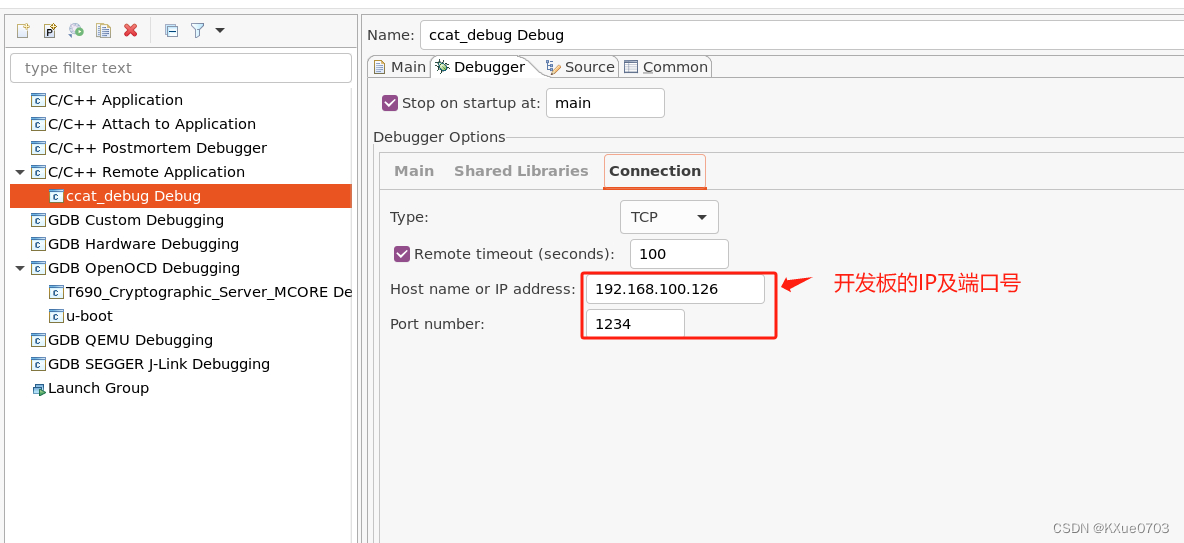
3. 调试
- 开发板启动成功之后,启动
qat_service服务(命令:/etc/init.d/qat_service start)
root@t690mp-evb2-va:~# /etc/init.d/qat_service start
usdm_drv: loading out-of-tree module taints kernel.
usdm_drv: Loading USDM Module Version 0.7.1 ...
usdm_drv: IOCTLs: c0507100, c0507101, 7102, c0047104
tih_ccat_platform tih_ccat_platform.0: c1xxx - adf_probe
tih_ccat_platform tih_ccat_platform.0: create asym rings - section:KERNEL - name:Cy0BankNumber - bank[0]
tih_ccat_platform tih_ccat_platform.0: create  sym rings - section:KERNEL - name:Cy0BankNumber - bank[0]
tih_ccat_platform tih_ccat_platform.0: create asym rings - section:KERNEL - name:Cy1BankNumber - bank[1]
tih_ccat_platform tih_ccat_platform.0: create  sym rings - section:KERNEL - name:Cy1BankNumber - bank[1]
Restarting all dQevices.AT: Stopping all acceleration devices.Processing /etc/c1xxx_dev0.conf
tih_ccat_platform tih_ccat_platform.0: init device with bundle[0] information
tih_ccat_platform tih_ccat_platform.0: init bundle[0] ring - ring number:4
tih_ccat_platform tih_ccat_platform.0: init the bundle[0] with instance:CRYPTO
tih_ccat_platform tih_ccat_platform.0: init the bundle[0] with instance:COMP
tih_ccat_platform tih_ccat_platform.0: init device with bundle[1] information
tih_ccat_platform tih_ccat_platform.0: init bundle[1] ring - ring number:4
tih_ccat_platform tih_ccat_platform.0: init the bundle[1] with instance:CRYPTO
tih_ccat_platform tih_ccat_platform.0: init the bundle[1] with instance:COMP
tih_ccat_platform tih_ccat_platform.0: Process section GENERAL
tih_ccat_platform tih_ccat_platform.0: Process section KERNEL
tih_ccat_platform tih_ccat_platform.0: Process section SSL
tih_ccat_platform tih_ccat_platform.0: add derived section:SSL_INT_0 to the adf cfg
tih_ccat_platform tih_ccat_platform.0: copy section:SSL to the derived section:SSL_INT_0
tih_ccat_platform tih_ccat_platform.0: Set InterruptCoalescingEnabled value with error -14
tih_ccat_platform tih_ccat_platform.0: Set InterruptCoalescingTimerNs value with error -14
tih_ccat_platform tih_ccat_platform.0: Set InterruptCoalescingNumResponses value with error -14
tih_ccat_platform tih_ccat_platform.0: Clean up section GENERAL
tih_ccat_platform tih_ccat_platform.0: Clean up section KERNEL
tih_ccat_platform tih_ccat_platform.0: Clean up section SSL
tih_ccat_platform tih_ccat_platform.0: Clean up section Accelerator0
tih_ccat_platform tih_ccat_platform.0: Starting acceleration device ccat_dev0.
tih_ccat_platform tih_ccat_platform.0: bundle(uio)=0, hw_bundle_number(bank)=0
uio dts irq number matched
tih_ccat_platform tih_ccat_platform.0: bundle(uio)=1, hw_bundle_number(bank)=1
uio dts irq number matched
Checking status of all devices.
There is 1 QAT acceleration device(s) in the system:ccat_dev0 - type: c1xxx,  instance_id: 0,  #num_logical_accel:1 #banks_per_accle:2,  device sysname: tih_ccat_platform.0,  #accel: 11 #engines: 120,  state: up
- 查询开发板的IP地址(命令:
ifconfig),如下当前开发板的IP地址为:192.168.100.126
root@t690mp-evb2-va:~# ifconfig
eth0: flags=4163<UP,BROADCAST,RUNNING,MULTICAST>  mtu 1500  metric 1inet 192.168.100.126  netmask 255.255.255.0  broadcast 192.168.100.255inet6 fe80::2c61:41ff:fe8b:df4e  prefixlen 64  scopeid 0x20<link>inet6 fdfc:4fec:614e:0:2c61:41ff:fe8b:df4e  prefixlen 64  scopeid 0x0<global>ether 2e:61:41:8b:df:4e  txqueuelen 1000  (Ethernet)RX packets 27875  bytes 19035304 (18.1 MiB)RX errors 0  dropped 236  overruns 0  frame 0TX packets 6772  bytes 1078732 (1.0 MiB)TX errors 0  dropped 0 overruns 0  carrier 0  collisions 0device interrupt 113  memory 0x5000000-50ffffflo: flags=73<UP,LOOPBACK,RUNNING>  mtu 65536  metric 1inet 127.0.0.1  netmask 255.0.0.0inet6 ::1  prefixlen 128  scopeid 0x10<host>loop  txqueuelen 1000  (Local Loopback)RX packets 0  bytes 0 (0.0 B)RX errors 0  dropped 0  overruns 0  frame 0TX packets 0  bytes 0 (0.0 B)TX errors 0  dropped 0 overruns 0  carrier 0  collisions 0
- 在开发板(串口终端)上运行
gdbserver,启动gdbserver服务,如下所示,此时开发板一直侦听端口1234
命令:gdbserver 192.168.100.126:1234 testapp -v aes128_ecb
说明:
1)192.168.100.126 :终端的IP地址
2)1234:端口号(随意设置,只要与gdb端保持一致即可)
3)testapp:待调试的可执行程序
4)-v aes128_ecb:可执行程序的参数
root@t690mp-evb2-va:~# gdbserver 192.168.100.126:1234 testapp -v aes128_ecb
Process testapp created; pid = 475
Listening on port 1234
- 主机端修改配置信息,配置开发板的IP地址,如下:
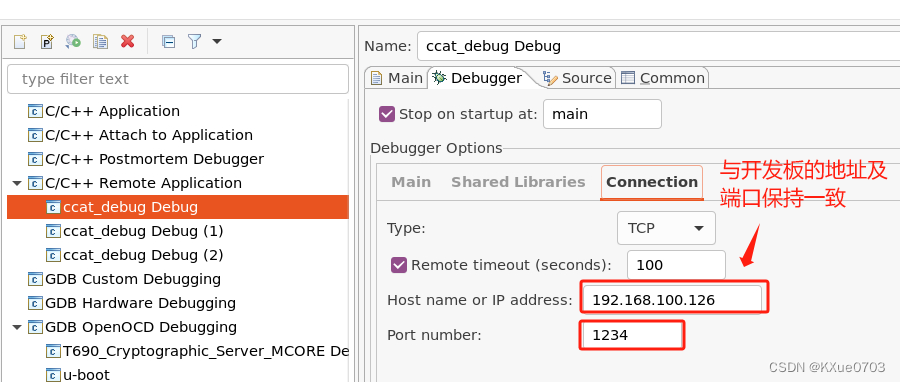
- 主机端,启动调试,如下图所示:
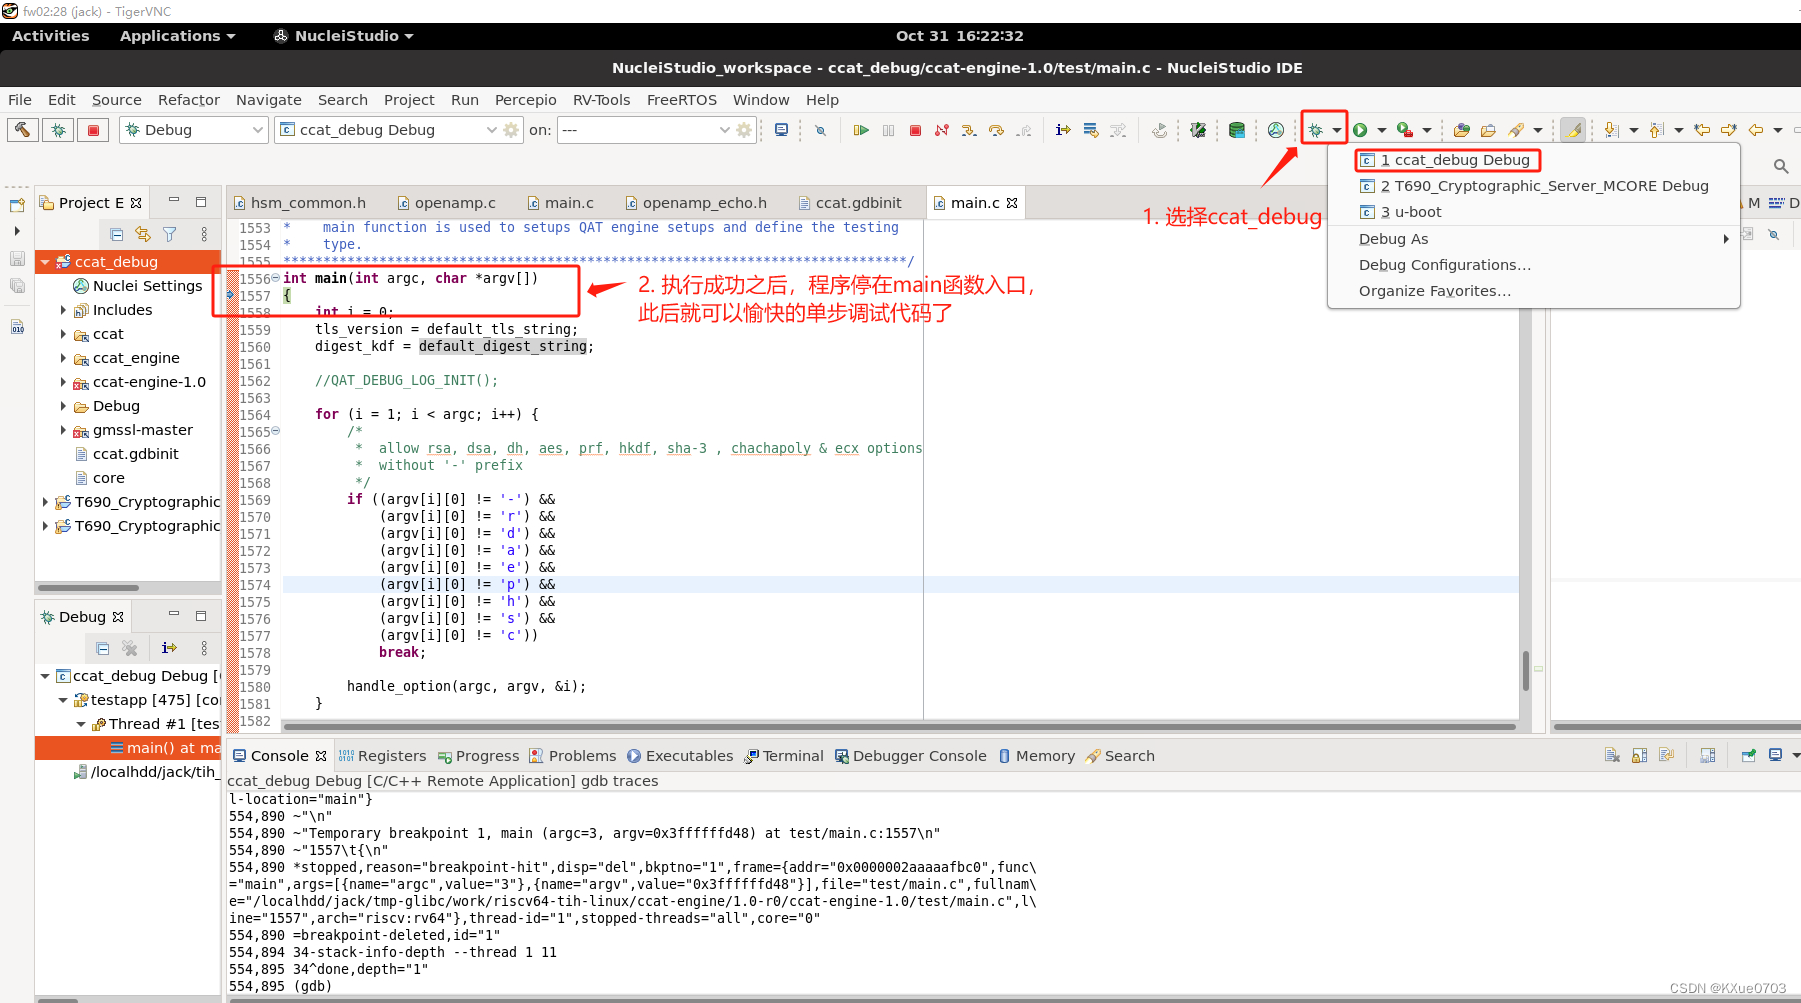
- 主机端启动成功之后,开发板串口的打印信息如下:

至此,说明整个连接已通,可以愉快的调试代码了。
4. 手动调试过程
章节3中介绍了,怎么使用Eclipse调试的方式,也可以使用纯手动的方式进行调试,这里也记录一下这种调试过程(假设板子都已经正常运行,此处仅描述 gdb 的过程)。
- 在串口终端执行gdbsever命令
gdbserver 192.168.100.49:1234 testapp -engine ccatengine -v sm2

- 服务器端,开启一个新的终端,执行命令:
/localhdd/jack/tih_toolchain/sysroots/x86_64-tih_sdk-linux/usr/bin/riscv64-tih-linux/riscv64-tih-linux-gdb /localhdd/jack/tmp-glibc/work/riscv64-tih-linux/ccat-engine/1.0-r0/ccat-engine-1.0/testapp - 输入命令:
target remote 192.168.100.49:1234 - 修改查询共享库的路径:
set solib-absolute-prefix /share/samba/public/shared/jack/rootfs_gmssl/ - 设置CCAT源码的路径:
set substitute-path /usr/src/debug/ccat/1.0-r0/ccat/ /localhdd/jack/tmp-glibc/work/t690mp_evb2_va-tih-linux/ccat/1.0-r0/ccat/ - 设置Engine源码的路径:
set substitute-path /usr/src/debug/ccat-engine/1.0-r0/ccat-engine-1.0/ /home/jack/svn_project/t690/sdk/trunk/linux/pkg/tih/lib/ccat_engine/ - 设置GMSSL源码的路径:
set substitute-path /usr/src/debug/openssl/1.1.1q-r0/openssl-1.1.1q/ /localhdd/jack/tmp-glibc/work/riscv64-tih-linux/openssl/1.1.1q-r0/git/ - 设置断点
b main - 后面就可以使用gdb的命令进行愉快的调试了。整过过程执行代码如下所示:
jack@fw02:~$ /localhdd/jack/tih_toolchain/sysroots/x86_64-tih_sdk-linux/usr/bin/riscv64-tih-linux/riscv64-tih-linux-gdb /localhdd/jack/tmp-glibc/work/riscv64-tih-linux/ccat-engine/1.0-r0/ccat-engine-1.0/testapp
GNU gdb (GDB) 10.2
Copyright (C) 2021 Free Software Foundation, Inc.
License GPLv3+: GNU GPL version 3 or later <http://gnu.org/licenses/gpl.html>
This is free software: you are free to change and redistribute it.
There is NO WARRANTY, to the extent permitted by law.
Type "show copying" and "show warranty" for details.
This GDB was configured as "--host=x86_64-tih_sdk-linux --target=riscv64-tih-linux".
Type "show configuration" for configuration details.
For bug reporting instructions, please see:
<https://www.gnu.org/software/gdb/bugs/>.
Find the GDB manual and other documentation resources online at:<http://www.gnu.org/software/gdb/documentation/>.For help, type "help".
Type "apropos word" to search for commands related to "word"...
Reading symbols from /localhdd/jack/tmp-glibc/work/riscv64-tih-linux/ccat-engine/1.0-r0/ccat-engine-1.0/testapp...
(gdb) target remote 192.168.100.49:1234
Remote debugging using 192.168.100.49:1234
Reading /lib/ld-linux-riscv64-lp64d.so.1 from remote target...
warning: File transfers from remote targets can be slow. Use "set sysroot" to access files locally instead.
Reading /lib/ld-linux-riscv64-lp64d.so.1 from remote target...
Reading symbols from target:/lib/ld-linux-riscv64-lp64d.so.1...
Reading /lib/ld-2.31.so from remote target...
Reading /lib/.debug/ld-2.31.so from remote target...
Reading /lib/.debug/ld-2.31.so from remote target...
Reading symbols from target:/lib/.debug/ld-2.31.so...
0x0000001555557020 in _start () from target:/lib/ld-linux-riscv64-lp64d.so.1
(gdb) set solib-absolute-prefix /share/samba/public/shared/jack/rootfs_gmssl/
warning: .dynamic section for "/share/samba/public/shared/jack/rootfs_gmssl/lib/ld-linux-riscv64-lp64d.so.1" is not at the expected address (wrong library or version mismatch?)
Reading symbols from /share/samba/public/shared/jack/rootfs_gmssl/lib/ld-linux-riscv64-lp64d.so.1...
Reading symbols from /share/samba/public/shared/jack/rootfs_gmssl/lib/.debug/ld-2.31.so...
Reading symbols from /share/samba/public/shared/jack/rootfs_gmssl/lib/ld-linux-riscv64-lp64d.so.1...
Reading symbols from /share/samba/public/shared/jack/rootfs_gmssl/lib/.debug/ld-2.31.so...
(gdb) set substitute-path /usr/src/debug/ccat/1.0-r0/ccat/ /localhdd/jack/tmp-glibc/work/t690mp_evb2_va-tih-linux/ccat/1.0-r0/ccat/
(gdb) set substitute-path /usr/src/debug/ccat-engine/1.0-r0/ccat-engine-1.0/ /home/jack/svn_project/t690/sdk/trunk/linux/pkg/tih/lib/ccat_engine/
(gdb) set substitute-path /usr/src/debug/openssl/1.1.1q-r0/openssl-1.1.1q/ /localhdd/jack/tmp-glibc/work/riscv64-tih-linux/openssl/1.1.1q-r0/git/
(gdb)
(gdb)
(gdb)
(gdb) b main
Breakpoint 1 at 0x2aaaaafbc0: file test/main.c, line 1557.
(gdb) c
Continuing.Breakpoint 1, main (argc=5, argv=0x3ffffffd28) at test/main.c:1557
1557	{
(gdb) n
1559	    tls_version = default_tls_string;
(gdb)
1560	    digest_kdf = default_digest_string;
(gdb)
1564	    for (i = 1; i < argc; i++) {
(gdb) r
The "remote" target does not support "run".  Try "help target" or "continue".
(gdb) c
Continuing.
[Inferior 1 (process 503) exited normally]
(gdb) q
jack@fw02:~$
4. 总结
- gdb与gdbserver必须使用同一个版本的。
- 在使用Eclipse进行调试时,当配置文件中指定了共享库的搜索路径之后,在ccat.gdbinit中可以不再指定共享库的搜索路径了。但是若在该文件中指定共享库的搜索路径,则启动调试到调试环境就绪所消耗的时间要比在配置选项中指定共享库所消耗的时间少的多。
