【Qt之Quick模块】8. Quick基础、布局管理、布局管理器
1. 前言
Qt Quick编程,提供了多种布局方式。
如,静态布局,可以使用组件的x、y属性进行设置,或者进行绑定。
还可以使用锚anchors进行布局。
此外,还可以使用定位器以及定位管理器为多组件进行布局。
但使用布局管理器和锚会占用内存和实例化时间,若使用x、y、width、height等属性能完成需求,两者相较取其轻,则尽量就不要用布局管理器和锚进行布局了。
2. 定位器
定位器(Positioner)是管理声明式用户界面中项目位置的容器项目。位置定位器的行为方式类似于用于标准Qt小部件的布局管理器,但它们本身也是容器。
当需要按照规律的布局安排许多项目时,位置定位器使得工作更加简单。
Qt Quick布局也可以用于在用户界面中布置Qt Quick项目。它们管理声明式用户界面上项目的位置和大小,非常适合可调整大小的用户界面。
包含一些布局:
| 布局 | 描述 |
|---|---|
| Column | 将其子项在垂直方向上进行排列。 |
| Flow | 将其子项并排放置,必要时进行换行。 |
| Grid | 以网格形式排列其子项。 |
| LayoutMirroring | 用于反转布局行为的属性。 |
| Positioner | 提供附加属性,包含有关项在位置定位器中所在位置的详细信息。 |
| Row | 将其子项在水平方向上进行排列。 |
2.1. Column布局
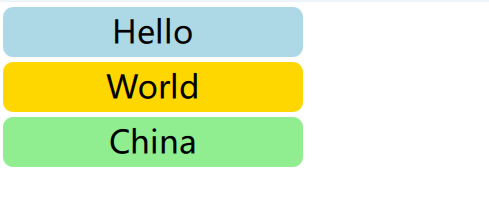
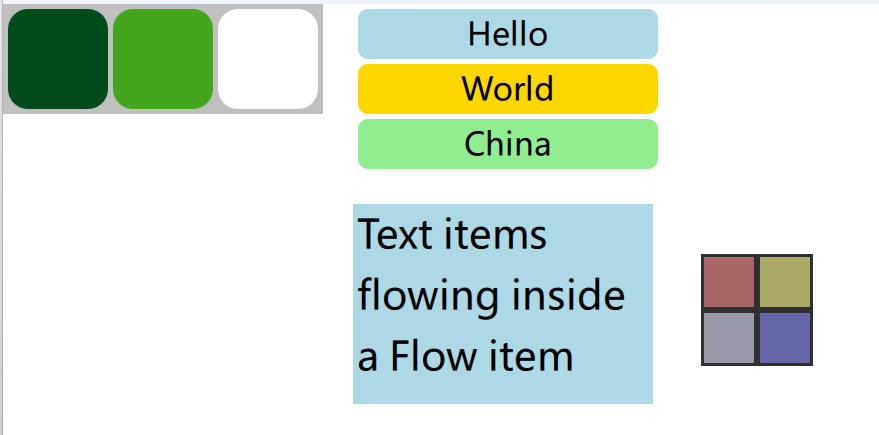
Column布局用于垂直排列项。以下示例使用列项在外部项定义的区域中排列三个矩形项。spacing属性设置各矩形间的间隔。
import QtQuickWindow {width: 640height: 480visible: truetitle: qsTr("Hello World")Item {width: 310; height: 170Column {anchors.horizontalCenter: parent.horizontalCenteranchors.verticalCenter: parent.verticalCenterspacing: 5Rectangle { color: "lightblue"; radius: 10.0width: 300; height: 50Text { anchors.centerIn: parentfont.pointSize: 24; text: "Hello" } }Rectangle { color: "gold"; radius: 10.0width: 300; height: 50Text { anchors.centerIn: parentfont.pointSize: 24; text: "World" } }Rectangle { color: "lightgreen"; radius: 10.0width: 300; height: 50Text { anchors.centerIn: parentfont.pointSize: 24; text: "China" } }}}
}
2.2. Row布局
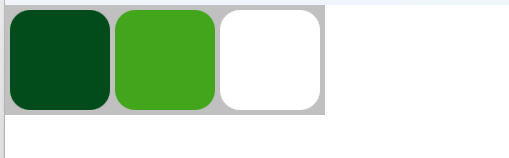
Row布局用于水平排列项。以下示例使用行项在由外部彩色矩形定义的区域中排列三个带有圆角的矩形项。spacing属性设置为在矩形项之间包含一小段空间。
要确保父矩形足够大,以便在水平居中的行项周围留有一些空间。
import QtQuickWindow {width: 640height: 480visible: truetitle: qsTr("Hello World")Rectangle {width: 320; height: 110color: "#c0c0c0"Row {anchors.horizontalCenter: parent.horizontalCenteranchors.verticalCenter: parent.verticalCenterspacing: 5Rectangle { width: 100; height: 100; radius: 20.0color: "#024c1c" }Rectangle { width: 100; height: 100; radius: 20.0color: "#42a51c" }Rectangle { width: 100; height: 100; radius: 20.0color: "white" }}}
2.3. Grid布局
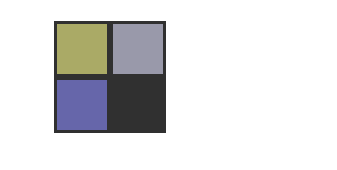
Grid布局用于将项以网格或表格形式放置。以下示例使用网格项将四个矩形项放置在一个2x2的网格中。与其他位置管理器一样,可以使用spacing属性指定项之间的间距。
import QtQuick 2.0Rectangle {width: 112; height: 112color: "#303030"Grid {anchors.horizontalCenter: parent.horizontalCenteranchors.verticalCenter: parent.verticalCentercolumns: 2spacing: 6Rectangle { color: "#aa6666"; width: 50; height: 50 }Rectangle { color: "#aaaa66"; width: 50; height: 50 }Rectangle { color: "#9999aa"; width: 50; height: 50 }Rectangle { color: "#6666aa"; width: 50; height: 50 }}}

水平和垂直间距之间没有任何区别,因此任何额外的空间都必须在项本身内添加。
网格中的任何空单元格都必须通过在网格定义的适当位置定义占位符项来创建。
2.4. Flow布局
Flow布局用于在页面上放置像单词一样的项,其中行或列中的项不重叠。
Flow布局以类似于网格项的方式排列项,项沿一个轴(次要轴)排列在一行中,并且以另一个轴(主要轴)沿着彼此放置的项的线排列。流动的方向以及项之间的间距由流和间距属性控制。
以下示例显示包含多个文本子项的Flow布局。这些项以类似于屏幕截图中显示的方式排列。
Rectangle {color: "lightblue"width: 300; height: 200x : parent.x + 350y : 200Flow {anchors.fill: parentanchors.margins: 4spacing: 10Text { text: "Text"; font.pixelSize: 40 }Text { text: "items"; font.pixelSize: 40 }Text { text: "flowing"; font.pixelSize: 40 }Text { text: "inside"; font.pixelSize: 40 }Text { text: "a"; font.pixelSize: 40 }Text { text: "Flow"; font.pixelSize: 40 }Text { text: "item"; font.pixelSize: 40 }}}
2.5. Transition使用过渡
以上四个定位器添加或删除一个子项目时,可以使用过渡(Transition),使操作具有动画效果。
四个定位都有add、move、populate属性,在给属性分配一个Transition对象。
add过渡:在定位器创建完毕后,向定位器添加一个子项,或是将子项通过更换父对象的方式变为定位器的子孩子时;
move过渡:在删除定位器中的子项时,或将子项更换父对象从定位器移除时;
populate过渡:定位器第一次创建时,只会运行一次。
此外,将项目的透明度设置为0时,会使用move过渡隐藏项目;当项目的透明度设为非0时,使用add过渡显示项目,定位器过渡只会影响项目的位置(x,y)。
import QtQuickWindow {width: 640height: 480visible: truetitle: qsTr("Hello World")Rectangle {width: 112; height: 112anchors.centerIn: parentcolor: "#303030"Grid {anchors.horizontalCenter: parent.horizontalCenteranchors.verticalCenter: parent.verticalCentercolumns: 2spacing: 6Rectangle { id:aa6666; color: "#aa6666"; width: 50; height: 50 }Rectangle { color: "#aaaa66"; width: 50; height: 50 }Rectangle { color: "#9999aa"; width: 50; height: 50 }Rectangle { color: "#6666aa"; width: 50; height: 50 }move: Transition {NumberAnimation{properties: "x,y"duration: 2000}}focus:trueKeys.onSpacePressed: aa6666.visible = ! aa6666.visible}}
}
当按下空格键时,矩形的visible值会改变,矩形会使用move过渡进行移动
初始化:

按下:

结果:
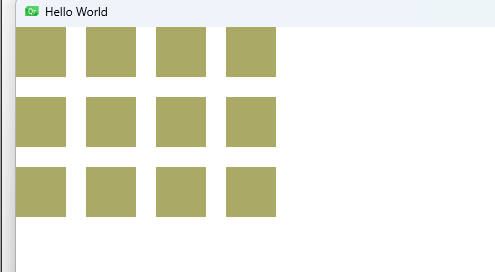
2.6. Repeater
Repeater类型用来创建大量重复或相似的项目。Repeater包含一个model和一个delegate属性。
delegate属性用来将model中的每个项进行可视化显示,Repeater通常会用于定位器中进行布局。
import QtQuickWindow {width: 640height: 480visible: truetitle: qsTr("Hello World")Grid{columns: 4spacing: 20Repeater{model: 12Rectangle {width: 50; height: 50color: "#aaaa66"}}}
}
设置model为12,列是4列,会自动计算为3行,可以用count属性获取项目数量,该属性为只读。
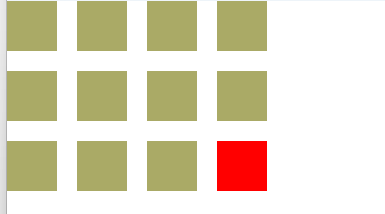
2.7. Positioner
Column、Row、Grid、Flow这四个定位器都会附加一个Positioner类型的对象作为顶层子项,Positioner可以提供子项的索引等信息。
如下代码所示:
import QtQuickWindow {width: 640height: 480visible: truetitle: qsTr("Hello World")Grid{columns: 4spacing: 20Repeater{model: 12Rectangle {width: 50; height: 50color: Positioner.isLastItem ?"red" : "#aaaa66"}}}
}
创建12个子项,当是最后一个子项时,设置为red,其他为aaaa66
#3. 锚anchors布局
除了更传统的Grid、Row和Column之外,Qt Quick还提供了一种使用锚的概念来布局项目的方法。每个项目都有7条不可见的“锚线”:左、水平中心、右、顶、垂直中心、基线和底。
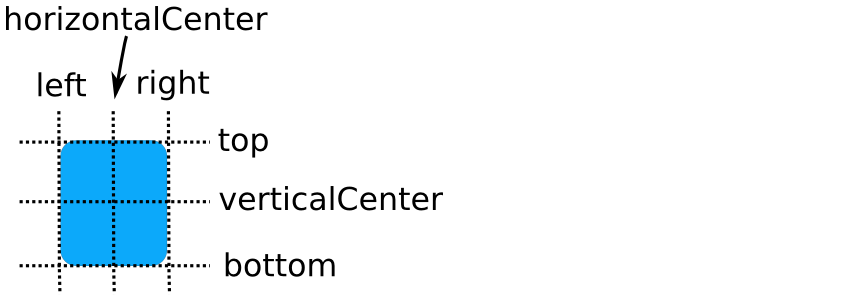
基线对应于文本所在的想象线。对于没有文本的项目,它与top相同。
Qt快速锚定系统允许定义不同项目的锚线之间的关系。例如,可以这样写:
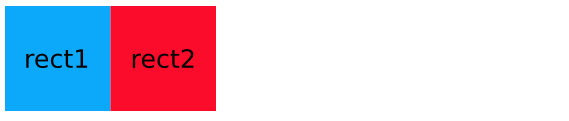
Rectangle { id: rect1; ... }Rectangle { id: rect2; anchors.left: rect1.right; ... }
rect2的左边缘绑定到rect1的右边缘,如下:
或者
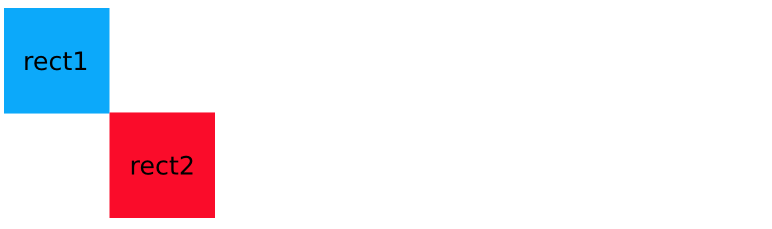
Rectangle { id: rect1; ... }Rectangle { id: rect2; anchors.left: rect1.right; anchors.top: rect1.bottom; ... }
通过指定多个水平或垂直锚点,可以控制项的大小。下面,rect2锚定在rect1的右侧和rect3的左侧。如果其中一个蓝色矩形被移动,rect2将根据需要拉伸和收缩:
Rectangle { id: rect1; x: 0; ... }Rectangle { id: rect2; anchors.left: rect1.right; anchors.right: rect3.left; ... }Rectangle { id: rect3; x: 150; ... }

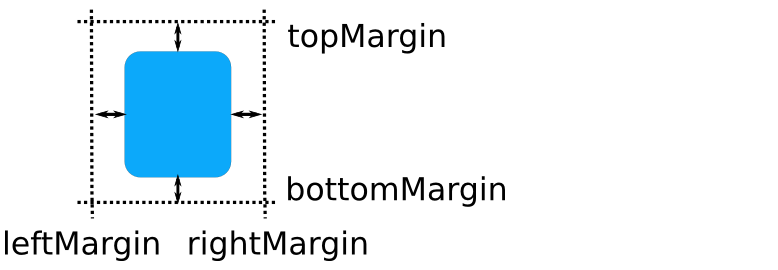
锚定系统还允许为一个项目的锚指定边距和偏移量。边距指定要留给项目锚点外部的空白量,而偏移量允许使用中心锚线来操纵定位。一个项目可以通过leftMargin、rightMargin、topMargin和bottomMargin分别指定锚边距,或者使用锚。为所有四条边指定相同的边距值。锚点偏移量由horizontalCenterOffset, verticalCenterOffset和baselineOffset指定。
如:
Rectangle { id: rect1; ... }Rectangle { id: rect2; anchors.left: rect1.right; anchors.leftMargin: 5; ... }

4. 布局管理器
Qt Quick布局管理器与定位器不同,布局管理器继承于Item,因此可以嵌套。Qt Quick 布局管理器与传统Qt Widgets 应用中的布局管理器很相似。
使用:
import QtQuick.Layouts
4.1 特性
布局管理器有一些关键特性。这些特性使得开发者可以更灵活地控制组件(例如按钮、标签等UI元素)在界面上的排列和尺寸。
- 对齐方式:通过
Layout.alignment属性,开发者可以指定组件的对齐方式。这决定了组件在网格中的位置。 - 可调整大小:
Layout.fillWidth和Layout.fillHeight属性允许开发者设置组件的尺寸可以随着容器尺寸的变化而变化,以填充整个行或列。 - 尺寸约束:
Layout.minimumWidth、Layout.preferredWidth和Layout.maximumWidth属性允许开发者设置组件的最小、首选和最大宽度。这些属性可以用于确保组件不会太小或太大。同样,对于高度,可以将“Width”替换为“Height”。 - 间距:
spacing、rowSpacing或columnSpacing属性允许开发者设置组件之间的间距,行与行之间的间距,以及列与列之间的间距。 - 网格坐标:通过
Layout.row和Layout.column属性,开发者可以指定组件所在的网格行和列。 - 自动网格坐标:结合使用
flow,rows, 和columns属性,GridLayout可以自动确定组件的行和列位置。 - 跨行或跨列:通过
Layout.rowSpan和Layout.columnSpan属性,开发者可以指定组件跨越的行数或列数。这使得组件可以在网格中跨越多个行或列。
4.2 大小
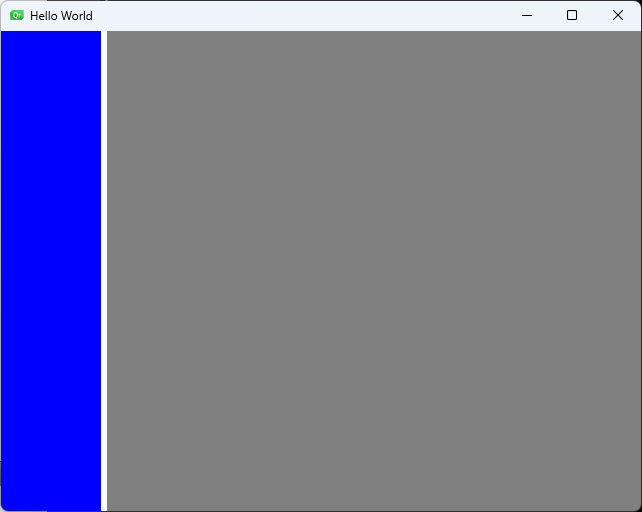
通过布局管理器调整大小,需要指定最小宽高,最佳宽高,最大宽高,如下:
import QtQuick
import QtQuick.LayoutsWindow {width: 640height: 480visible: truetitle: qsTr("Hello World")RowLayout {anchors.fill: parentspacing: 6Rectangle {color: 'blue'Layout.preferredWidth: 100Layout.preferredHeight: 150}Rectangle {color: "plum"Layout.fillWidth: trueLayout.fillHeight: true}}
}
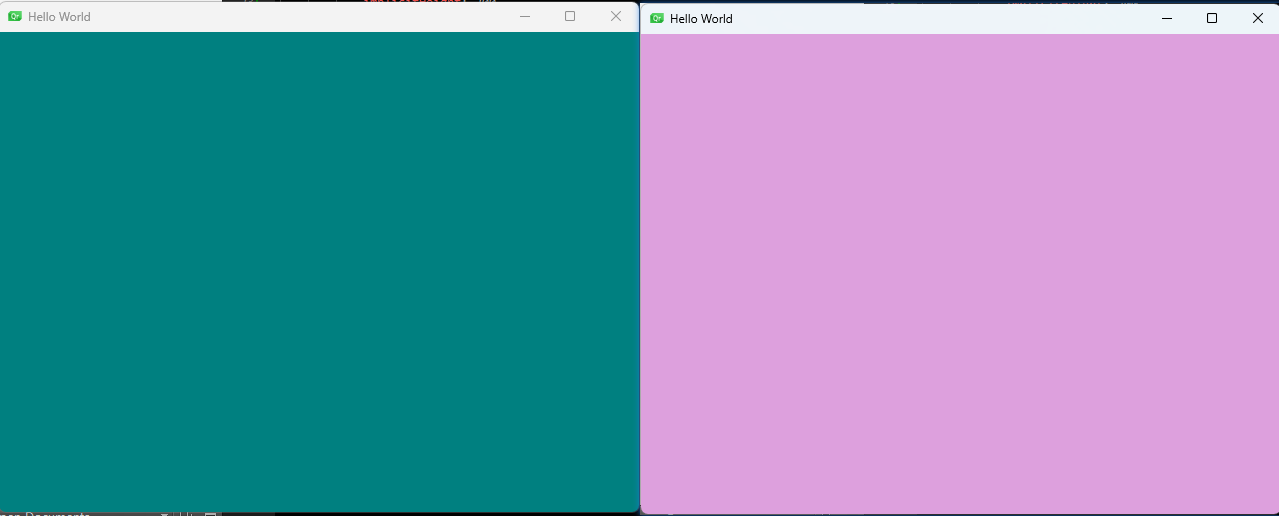
4.3 stackLayout
StackLayout栈控件可以管理多个项目,但只能显示一个,如下:
import QtQuick
import QtQuick.LayoutsWindow {width: 640height: 480visible: truetitle: qsTr("Hello World")StackLayout {id: layoutanchors.fill: parentcurrentIndex: 1Rectangle {color: 'teal'implicitWidth: 200implicitHeight: 200}Rectangle {color: 'plum'implicitWidth: 300implicitHeight: 200}}MouseArea{anchors.fill: parentonClicked: {if(layout.currentIndex === 1){layout.currentIndex = 0;}else{layout.currentIndex = 1;}}}
}
当点击屏幕时,来回切换视图
5. 布局镜像
布局镜像属性用来在水平方向上镜像项目的锚布局、定位器和视图等。
LayoutMirroring.enabled: true:默认镜像只影响项目本身;
LayoutMirroring.childrenInherit: true:该项目下的所有子项目都会启用镜像
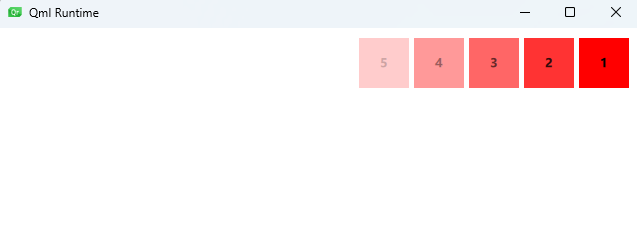
如下:将Rectangle从右往左显示
import QtQuickRectangle {width: 640height: 480visible: trueLayoutMirroring.enabled: trueLayoutMirroring.childrenInherit: trueRow{anchors{left:parent.left;margins: 5}y:5; spacing: 5; padding: 5Repeater{model: 5Rectangle{color:"red"opacity: (5-index)/5width: 50;height: 50Text {text: index +1anchors.centerIn: parentfont{bold: true}}}}}
}