双目测距工程Stereo-Vision-master学习笔记
硬件:
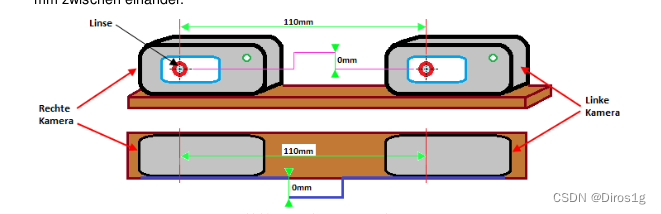
首先要要把两个摄像头固定到支架上,并且两个摄像头的间距应该在110mm,两个摄像头没有落差
相机的内参数包括焦距、主点坐标、像素尺寸等,这些参数决定了相机成像的几何变换关系。内参数是相机固有的属性,不会随着相机在空间中的位置和方向而改变。
相机的外参数包括相机的旋转矩阵和平移向量,用来描述相机在世界坐标系中的位置和方向。相机的外参数可以将相机坐标系中的点转换到世界坐标系中,或者将世界坐标系中的点转换到相机坐标系中。
步骤一:
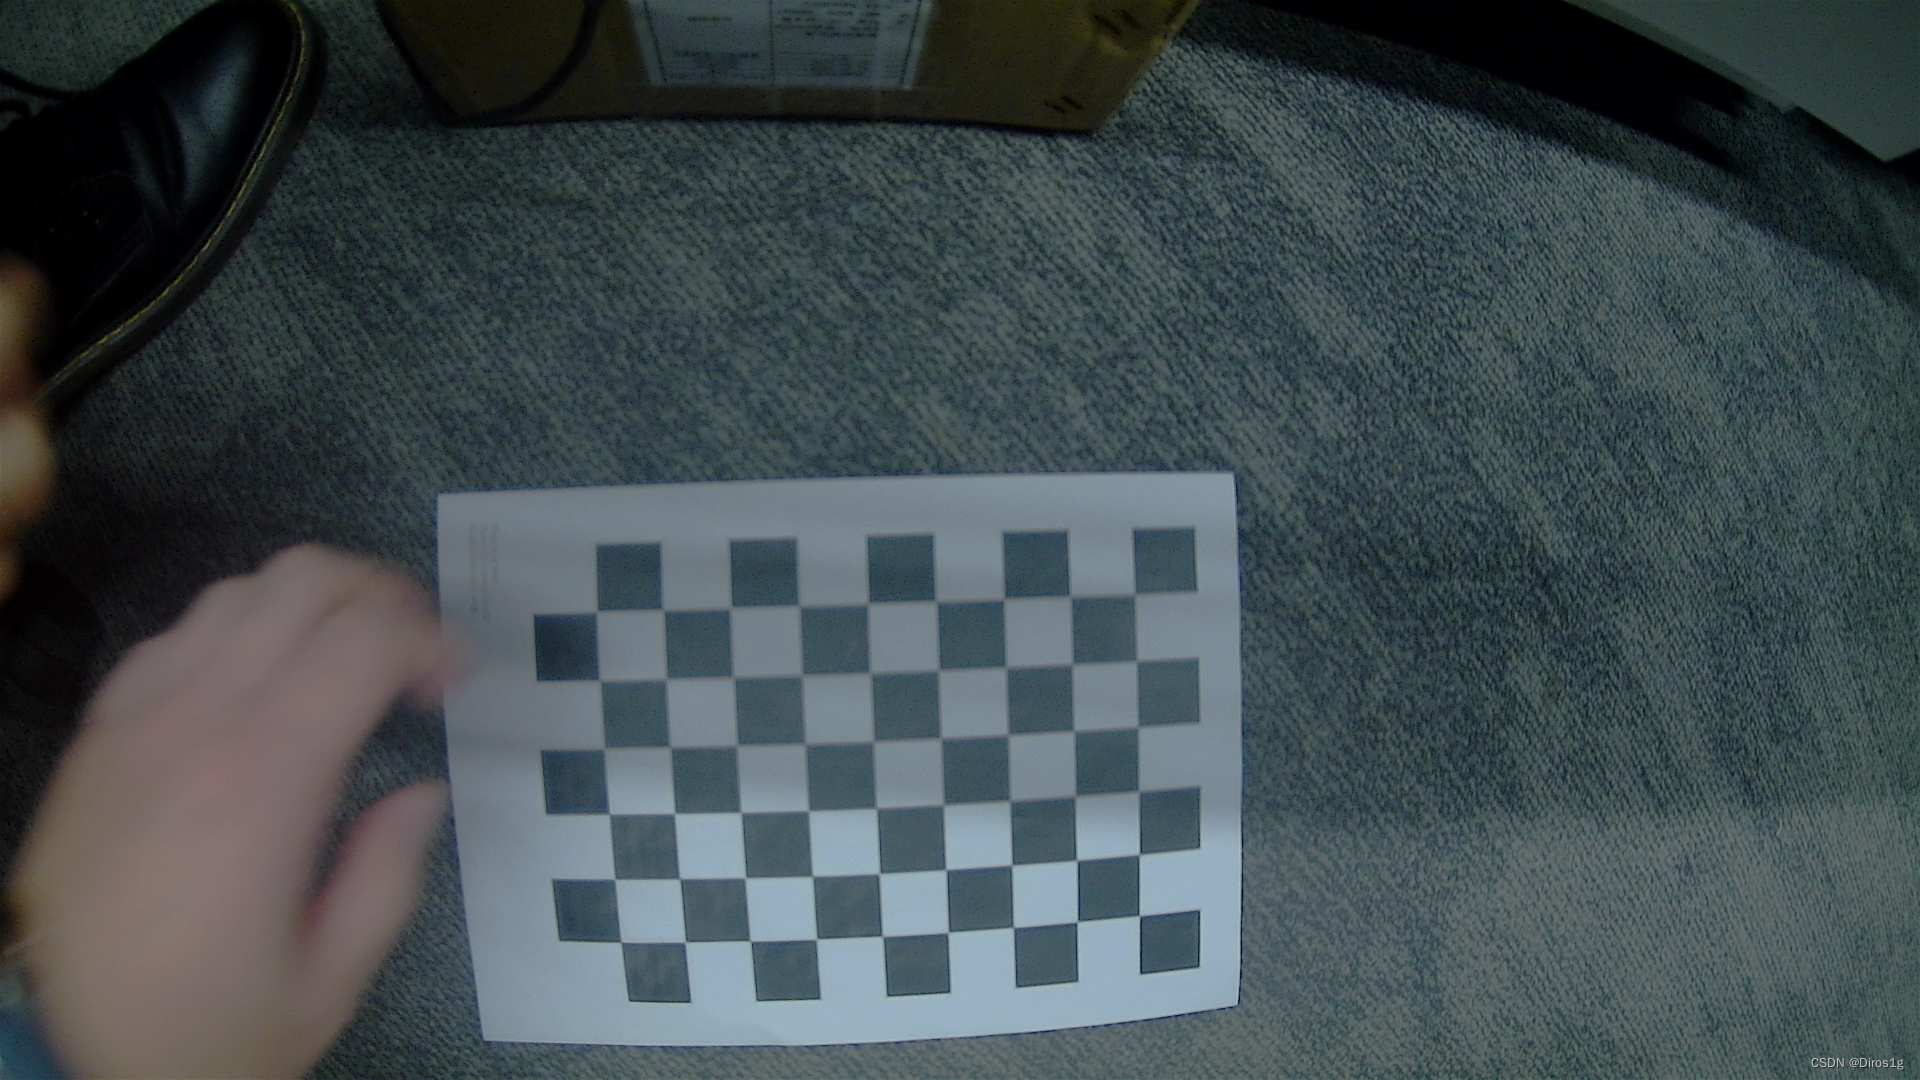
首先要通过/Take_images_for_calibration_thread.py来保存正畸用的棋盘格图像;代码的逻辑是只要通过findChessboardCorners找到充足且满足预设个数的棋盘格脚点时保存双目的图像。
核心代码
retL, frameL= CamL.read()
grayR= cv2.cvtColor(frameL,cv2.COLOR_BGR2GRAY)
retL, cornersL = cv2.findChessboardCorners(grayL,(9,6),None)
cv2.cornerSubPix(grayL,cornersL,(11,11),(-1,-1),criteria)
cv2.drawChessboardCorners(grayR,(9,6),corners2R,retR)if(retL)& 0xFF == ord('q'):
cv2.imwrite('chessboard-L'+str_id_image+'.png',frameL)
如果存在角点且符合预设个数,会打印绘制完角点图后的图像,并且允许按键保存。
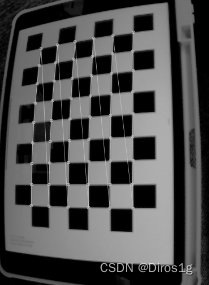
左摄像头:
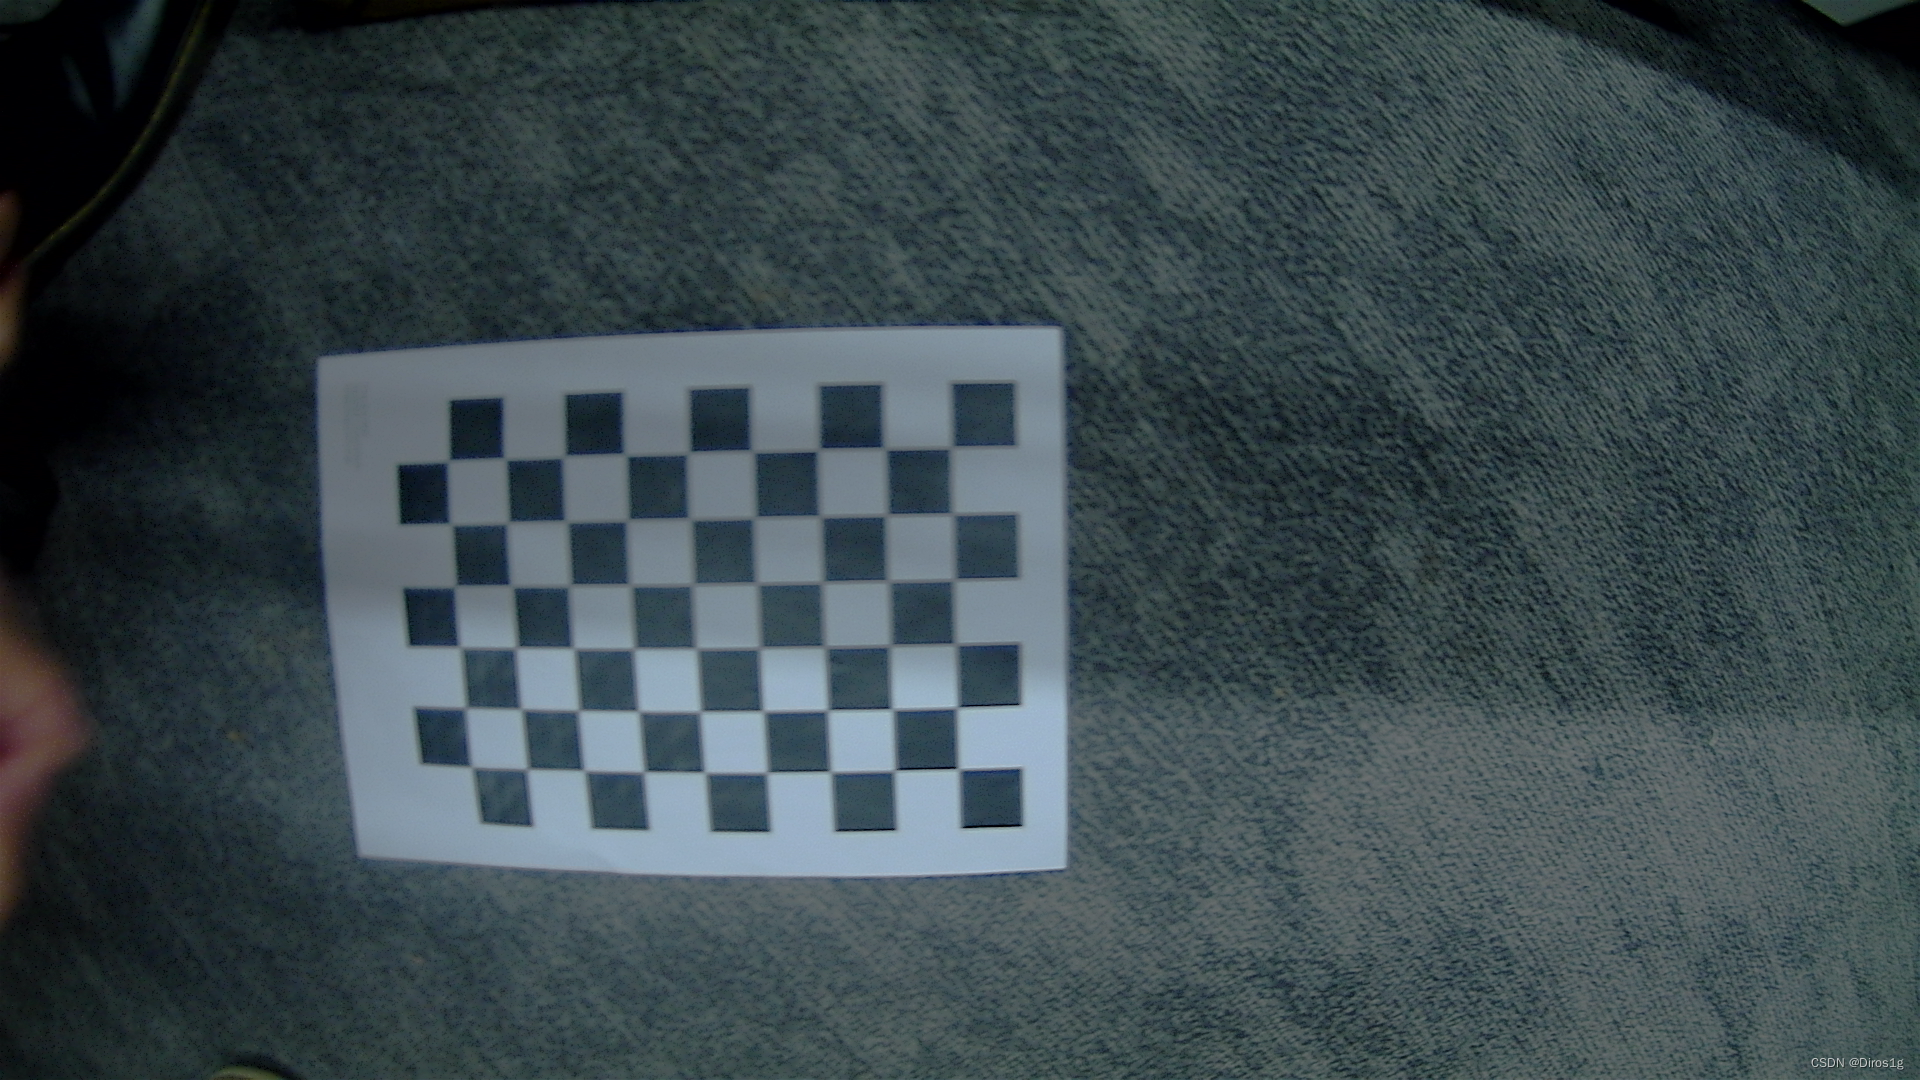
右摄像头:
步骤二:消除畸变
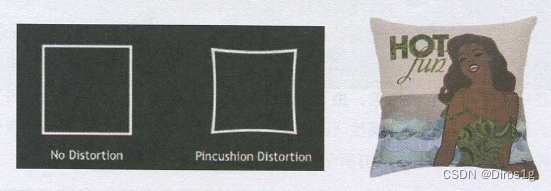
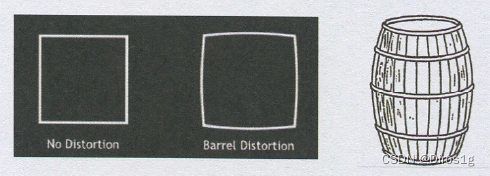
常见的相机失真类型有径向失真(radial distortion)和切向失真(tangential distortion)。
径向失真包括:桶型和枕性,实际的相机使用弯曲的镜头来形成图像,并且光线通常在这些镜头的边缘弯曲得太多或太少。 这会产生扭曲图像边缘的效果,从而使线条或对象看起来比实际弯曲的程度或大或小。 这称为径向变形 ,这是最常见的变形类型。
另一类失真是切向失真 。 当相机镜头未完全平行于相机胶卷或传感器所在的成像平面对齐时,就会发生这种情况。 这会使图像看起来倾斜,从而使某些对象看起来比实际位置更远或更近。

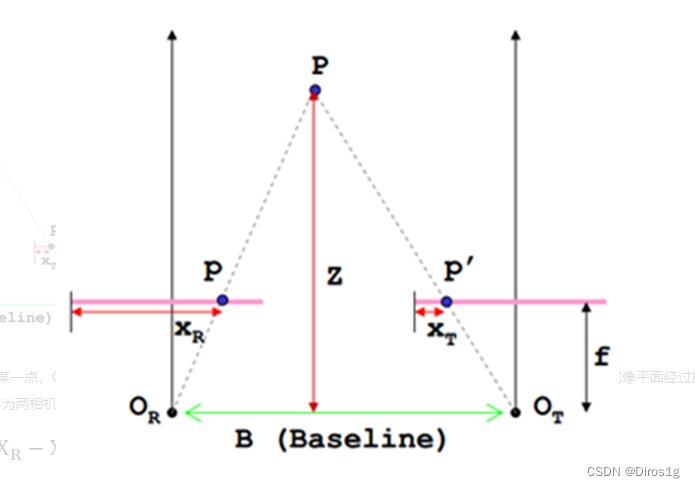
步骤三 对极几何
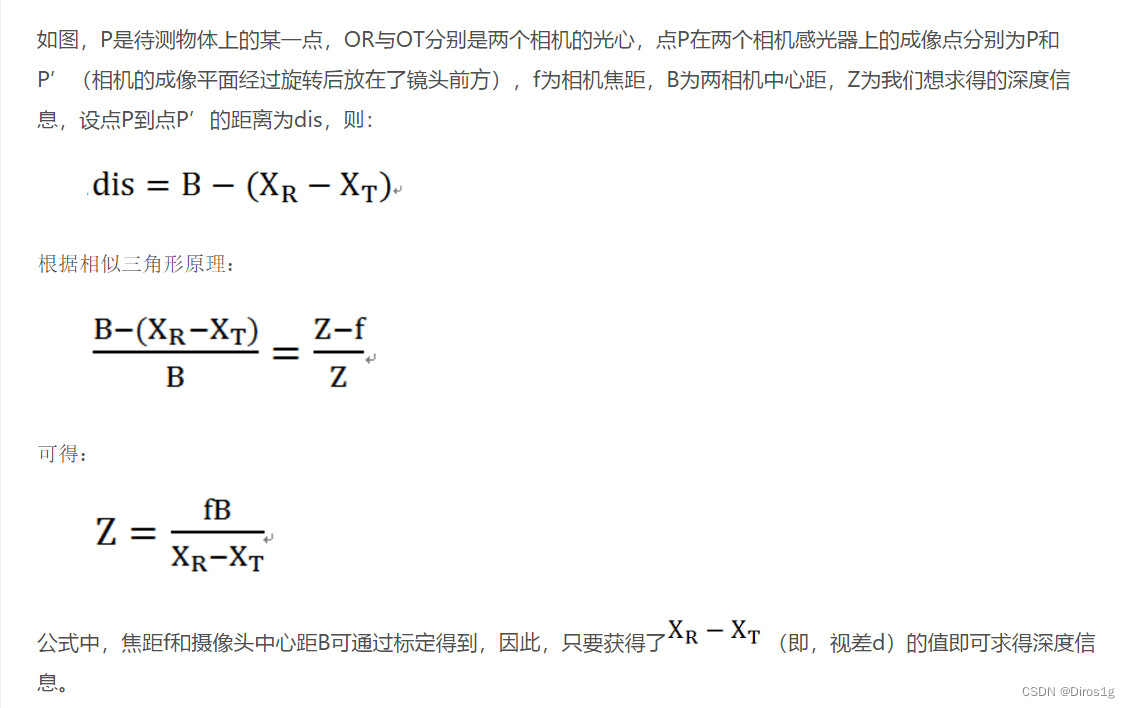
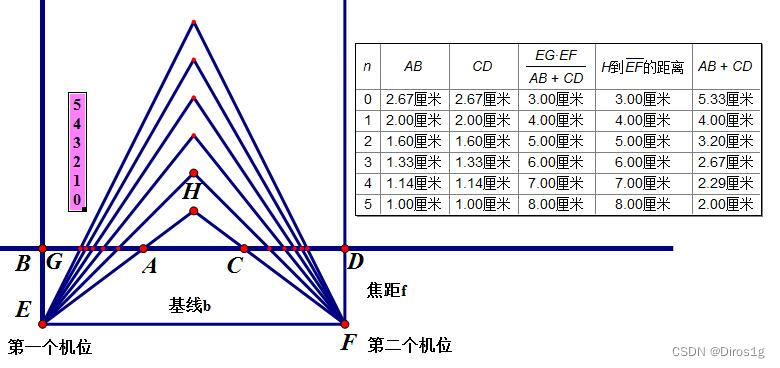
但是在实际测距中,计算视差被转换成了,计算两个对应像素位置之间的不同(distance),没有解析解,只能算一个数值解。
参考:
https://www.cnblogs.com/clarenceliang/p/6704970.
htmlhttps://cloud.tencent.com/developer/article/2054308
代码
- 首先,程序会对摄像头进行畸变校正和立体标定,以获得相机的内参和外参。
- 程序会打开两个摄像头,并循环读取左右眼的图像。
- 对图像进行矫正,消除旋转和对齐带来的畸变。
- 将彩色图像转为灰度图像。
- 使用StereoSGBM算法计算出视差图。
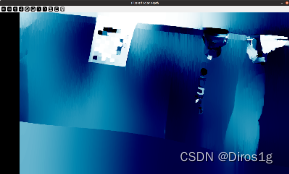
- 使用WLS滤波器对视差图进行滤波,获得更加准确的深度图。
- 对深度图进行颜色映射,显示出深度信息。
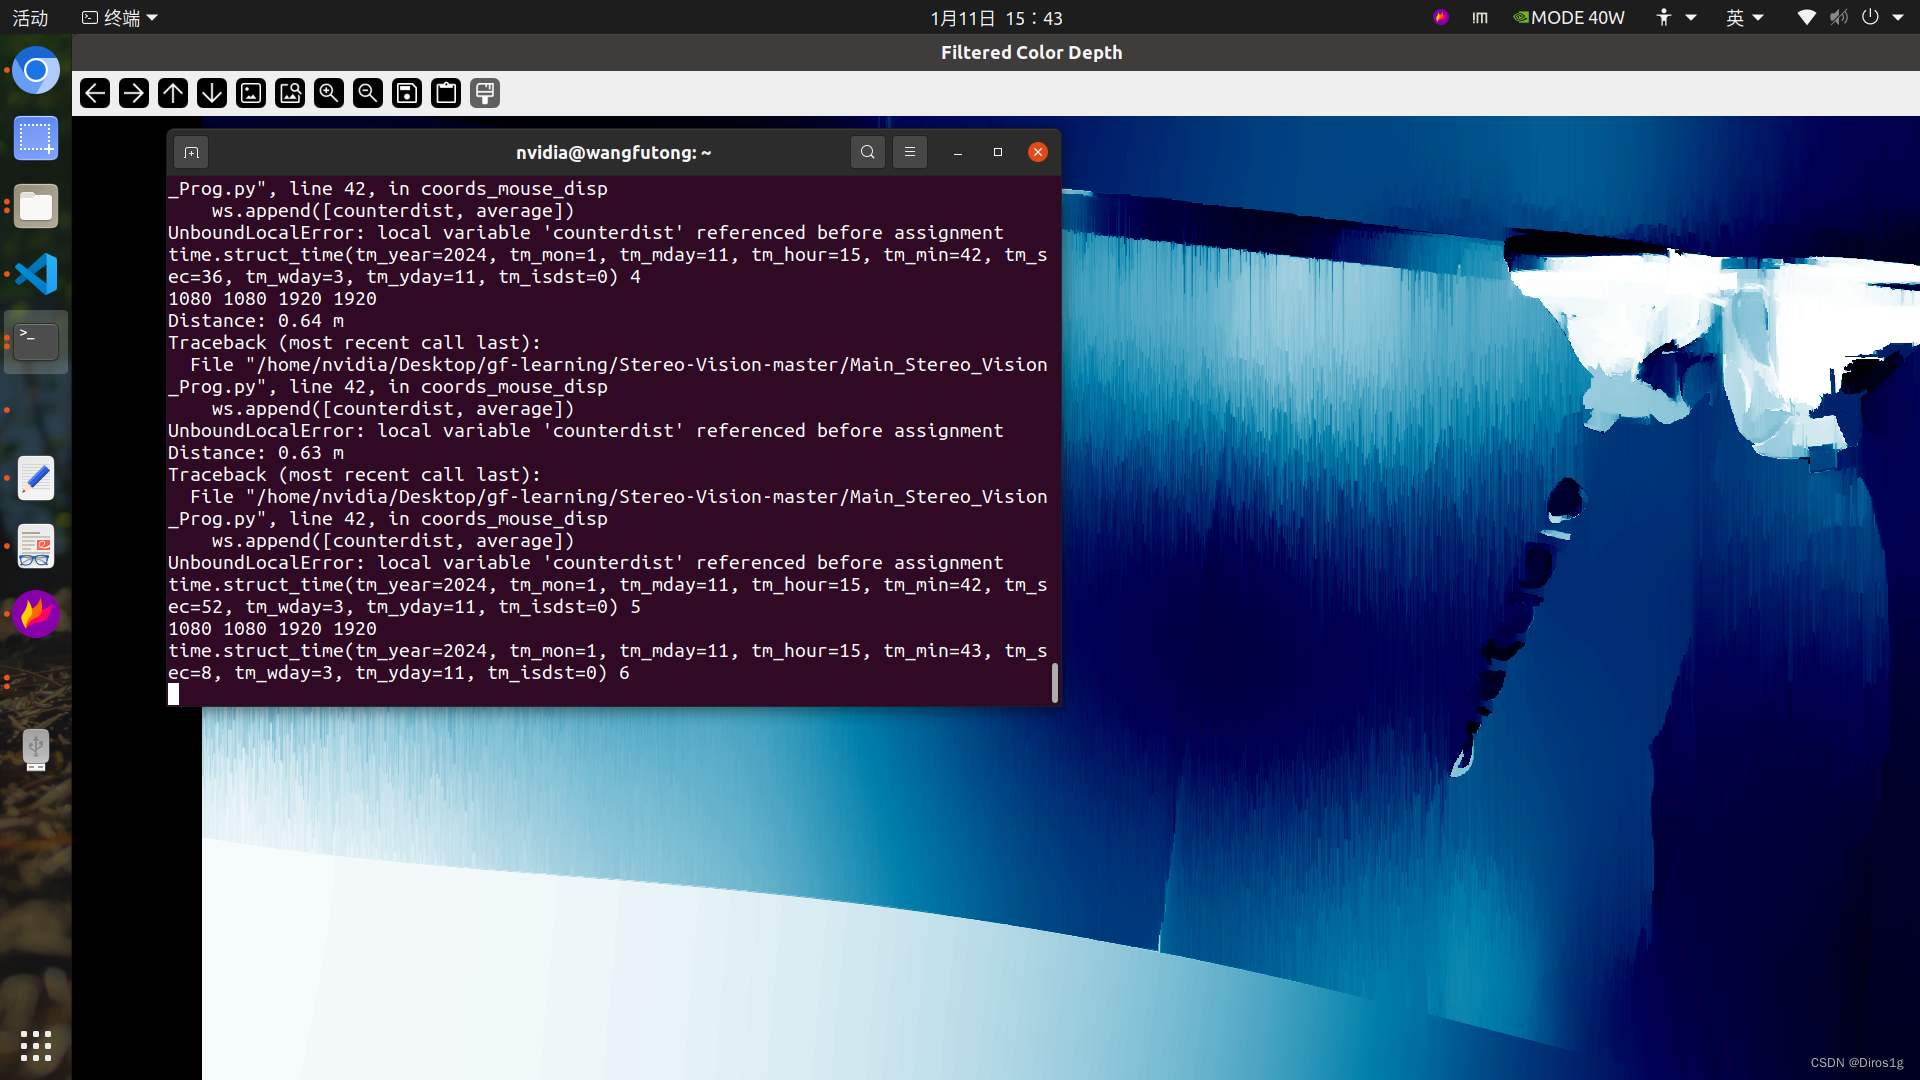
- 通过鼠标双击深度图中的点,可以在控制台输出该点的实际距离。
- 按空格键退出程序。
# ▄▀▄ ▄▀▄
# ▄█░░▀▀▀▀▀░░█▄
# ▄▄ █░░░░░░░░░░░█ ▄▄
#█▄▄█ █░░▀░░┬░░▀░░█ █▄▄█###################################
##### Authors: #####
##### Stephane Vujasinovic #####
##### Frederic Uhrweiller #####
##### #####
##### Creation: 2017 #####
####################################***********************
#**** Main Programm ****
#***********************# Package importation
import numpy as np
import cv2
from openpyxl import Workbook # Used for writing data into an Excel file
from sklearn.preprocessing import normalize
import time
# Filtering
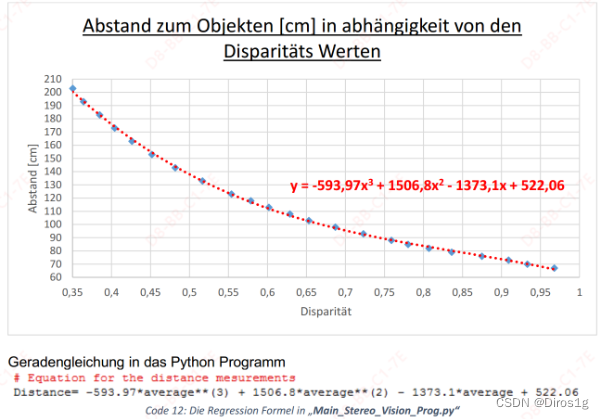
kernel= np.ones((3,3),np.uint8)def coords_mouse_disp(event,x,y,flags,param):if event == cv2.EVENT_LBUTTONDBLCLK:#左键双击#print x,y,disp[y,x],filteredImg[y,x]average=0for u in range (-1,2):for v in range (-1,2):average += disp[y+u,x+v]average=average/9Distance= -593.97*average**(3) + 1506.8*average**(2) - 1373.1*average + 522.06Distance= np.around(Distance*0.01,decimals=2)print('Distance: '+ str(Distance)+' m')# This section has to be uncommented if you want to take mesurements and store them in the excelws.append([counterdist, average])print('Measure at '+str(counterdist)+' cm, the dispasrity is ' + str(average))if (counterdist <= 85):counterdist += 3elif(counterdist <= 120):counterdist += 5else:counterdist += 10print('Next distance to measure: '+str(counterdist)+'cm')
#将测量结果写入excel
# Mouseclick callback
wb=Workbook()
ws=wb.active #*************************************************
#***** Parameters for Distortion Calibration *****
#*************************************************# Termination criteria
#设置了相机校准的参数,误差小于0.001或者迭代30次就停止
criteria =(cv2.TERM_CRITERIA_EPS + cv2.TERM_CRITERIA_MAX_ITER, 30, 0.001)
criteria_stereo= (cv2.TERM_CRITERIA_EPS + cv2.TERM_CRITERIA_MAX_ITER, 30, 0.001)# Prepare object points棋盘格座标点初始化
objp = np.zeros((9*6,3), np.float32)
objp[:,:2] = np.mgrid[0:9,0:6].T.reshape(-1,2)# Arrays to store object points and image points from all images
objpoints= [] # 3d points in real world space
imgpointsR= [] # 2d points in image plane
imgpointsL= []# Start calibration from the camera
print('Starting calibration for the 2 cameras... ')
# Call all saved images
#重新检测棋盘格角点
print(time.localtime())
for i in range(0,60): # Put the amount of pictures you have taken for the calibration inbetween range(0,?) wenn starting from the image number 0t= str(i)ChessImaR= cv2.imread('/home/nvidia/Desktop/gf-learning/Stereo-Vision-master/save_image/chessboard-R'+t+'.png',0) # Right sideChessImaL= cv2.imread('/home/nvidia/Desktop/gf-learning/Stereo-Vision-master/save_image/chessboard-L'+t+'.png',0) # Left sideretR, cornersR = cv2.findChessboardCorners(ChessImaR,(9,6),None) # Define the number of chees corners we are looking forretL, cornersL = cv2.findChessboardCorners(ChessImaL,(9,6),None) # Left sideif (True == retR) & (True == retL):objpoints.append(objp)cv2.cornerSubPix(ChessImaR,cornersR,(11,11),(-1,-1),criteria)cv2.cornerSubPix(ChessImaL,cornersL,(11,11),(-1,-1),criteria)imgpointsR.append(cornersR)imgpointsL.append(cornersL)#保存角点信息
print(time.localtime())# Determine the new values for different parameters
# Right Side
#右相机标定,ret:标定结果的精度,mtx内参矩阵,dist畸变系数;外参数:rvecs旋转向量:描述相机坐标系相对于世界坐标系的旋转关系,tvecs平移向量:描述相机坐标系相对于世界坐标系的平移关系。
retR, mtxR, distR, rvecsR, tvecsR = cv2.calibrateCamera(objpoints,imgpointsR,ChessImaR.shape[::-1],None,None)
hR,wR= ChessImaR.shape[:2]
#畸变矫正,motx经过优化后相机内参,roi优化后有效区域的ROI坐标
OmtxR, roiR= cv2.getOptimalNewCameraMatrix(mtxR,distR,(wR,hR),1,(wR,hR))# Left Side
retL, mtxL, distL, rvecsL, tvecsL = cv2.calibrateCamera(objpoints,imgpointsL,ChessImaL.shape[::-1],None,None)
hL,wL= ChessImaL.shape[:2]
OmtxL, roiL= cv2.getOptimalNewCameraMatrix(mtxL,distL,(wL,hL),1,(wL,hL))print('Cameras Ready to use')#********************************************
#***** Calibrate the Cameras for Stereo *****
#********************************************# StereoCalibrate function
flags = 0
flags |= cv2.CALIB_FIX_INTRINSIC#相机立体校准,stereoCalibrate计算立体校准所需要的参数,R两个相机间旋转矩阵,T平移矩阵,E本质矩阵,F基本矩阵
retS, MLS, dLS, MRS, dRS, R, T, E, F= cv2.stereoCalibrate(objpoints,#真实世界下坐标imgpointsL,#相机下投影角点左边imgpointsR,mtxL,#内参distL,#畸变系数mtxR,distR,ChessImaR.shape[::-1],criteria = criteria_stereo,flags = cv2.CALIB_FIX_INTRINSIC)# StereoRectify function
rectify_scale= 0 # if 0 image croped, if 1 image nor croped
#R用于校正图像的旋转矩阵、P用于校正图像的投影矩阵、Q重投影矩阵,可以用于计算深度信息
RL, RR, PL, PR, Q, roiL, roiR= cv2.stereoRectify(MLS, dLS, MRS, dRS,ChessImaR.shape[::-1], R, T,rectify_scale,(0,0)) # last paramater is alpha, if 0= croped, if 1= not croped
# initUndistortRectifyMap function
#初始化图像校正映射
Left_Stereo_Map= cv2.initUndistortRectifyMap(MLS, dLS, RL, PL,ChessImaR.shape[::-1], cv2.CV_16SC2) # cv2.CV_16SC2 this format enables us the programme to work faster
Right_Stereo_Map= cv2.initUndistortRectifyMap(MRS, dRS, RR, PR,ChessImaR.shape[::-1], cv2.CV_16SC2)
#*******************************************
#***** Parameters for the StereoVision *****
#*******************************************# Create StereoSGBM and prepare all parameters
window_size = 3
min_disp = 2
num_disp = 130-min_disp
stereo = cv2.StereoSGBM_create(minDisparity = min_disp,#最小视差值numDisparities = num_disp,#视差范围blockSize = window_size,uniquenessRatio = 10,speckleWindowSize = 100,speckleRange = 32,disp12MaxDiff = 5,P1 = 8*3*window_size**2,P2 = 32*3*window_size**2)# Used for the filtered image
#计算右视角图像中每个像素与左视角图像中对应像素的差异,视差计算
stereoR=cv2.ximgproc.createRightMatcher(stereo) # Create another stereo for right this time# WLS FILTER Parameters
lmbda = 80000# 平滑度惩罚系数
sigma = 1.8
visual_multiplier = 1.0#提高深度估计的精度
wls_filter = cv2.ximgproc.createDisparityWLSFilter(matcher_left=stereo)
wls_filter.setLambda(lmbda)
wls_filter.setSigmaColor(sigma)#*************************************
#***** Starting the StereoVision *****
#*************************************# Call the two cameras
CamR= cv2.VideoCapture(6) # Wenn 6 then Right Cam and wenn 7 Left Cam
CamL= cv2.VideoCapture(7)CamR.set(cv2.CAP_PROP_FRAME_WIDTH, 1920)
CamR.set(cv2.CAP_PROP_FRAME_HEIGHT, 1080)
CamR.set(cv2.CAP_PROP_FPS, 30)CamL.set(cv2.CAP_PROP_FRAME_WIDTH, 1920)
CamL.set(cv2.CAP_PROP_FRAME_HEIGHT, 1080)
CamL.set(cv2.CAP_PROP_FPS, 30)while True:# Start Reading Camera imagesretR, frameR= CamR.read()retL, frameL= CamL.read()# Rectify the images on rotation and alignement重映射是一种将图像从一个坐标系统映射到另一个坐标系统的过程Left_nice= cv2.remap(frameL,Left_Stereo_Map[0],Left_Stereo_Map[1], interpolation = cv2.INTER_LANCZOS4, borderMode = cv2.BORDER_CONSTANT) # Rectify the image using the kalibration parameters founds during the initialisationRight_nice= cv2.remap(frameR,Right_Stereo_Map[0],Right_Stereo_Map[1], interpolation = cv2.INTER_LANCZOS4, borderMode = cv2.BORDER_CONSTANT)# Convert from color(BGR) to graygrayR= cv2.cvtColor(Right_nice,cv2.COLOR_BGR2GRAY)grayL= cv2.cvtColor(Left_nice,cv2.COLOR_BGR2GRAY)# Compute the 2 images for the Depth_image计算深度信息disp= stereo.compute(grayL,grayR)#.astype(np.float32)/ 16dispL= dispdispR= stereoR.compute(grayR,grayL)dispL= np.int16(dispL)dispR= np.int16(dispR)# Using the WLS filter加权最小二乘滤波平滑filteredImg= wls_filter.filter(dispL,grayL,None,dispR)filteredImg = cv2.normalize(src=filteredImg, dst=filteredImg, beta=0, alpha=255, norm_type=cv2.NORM_MINMAX);filteredImg = np.uint8(filteredImg)#cv2.imshow('Disparity Map', filteredImg)#归一化:这个操作的目的是将原始的视差值映射到一定范围内的浮点数。通常,在计算机视觉中,视差图的像素值表示了对应像素点的深度信息,而视差值的范围通常较大。为了方便处理和可视化,我们需要将其缩放到一个合适的范围,以便更好地表达深度差异。disp= ((disp.astype(np.float32)/ 16)-min_disp)/num_disp # Calculation allowing us to have 0 for the most distant object able to detect## # Resize the image for faster executions
## dispR= cv2.resize(disp,None,fx=0.7, fy=0.7, interpolation = cv2.INTER_AREA)# Filtering the Results with a closing filter#用一矩阵去噪closing= cv2.morphologyEx(disp,cv2.MORPH_CLOSE, kernel) # Apply an morphological filter for closing little "black" holes in the picture(Remove noise) # Colors mapdispc= (closing-closing.min())*255dispC= dispc.astype(np.uint8) # Convert the type of the matrix from float32 to uint8, this way you can show the results with the function cv2.imshow()disp_Color= cv2.applyColorMap(dispC,cv2.COLORMAP_OCEAN) # Change the Color of the Picture into an Ocean Color_Mapfilt_Color= cv2.applyColorMap(filteredImg,cv2.COLORMAP_OCEAN) # Show the result for the Depth_image#cv2.imshow('Disparity', disp)#cv2.imshow('Closing',closing)#cv2.imshow('Color Depth',disp_Color)cv2.imshow('Filtered Color Depth',filt_Color)# Mouse clickscv2.setMouseCallback("Filtered Color Depth",coords_mouse_disp,filt_Color)# End the Programmeif cv2.waitKey(1) & 0xFF == ord(' '):break# Save excel
wb.save("data4.xlsx")# Release the Cameras
CamR.release()
CamL.release()
cv2.destroyAllWindows()