第一个 Angular 项目 - 静态页面
第一个 Angular 项目 - 静态页面
之前的笔记:
-
[Angular 基础] - Angular 渲染过程 & 组件的创建
-
[Angular 基础] - 数据绑定(databinding)
-
[Angular 基础] - 指令(directives)
这是在学完了上面这三个内容后能够完成的项目,目前因为还没有学到数据在不同组件之前的传输,因此只会有一个 UI 的渲染,而不会涉及到事件的实现
业务需求
wireframe 如下:
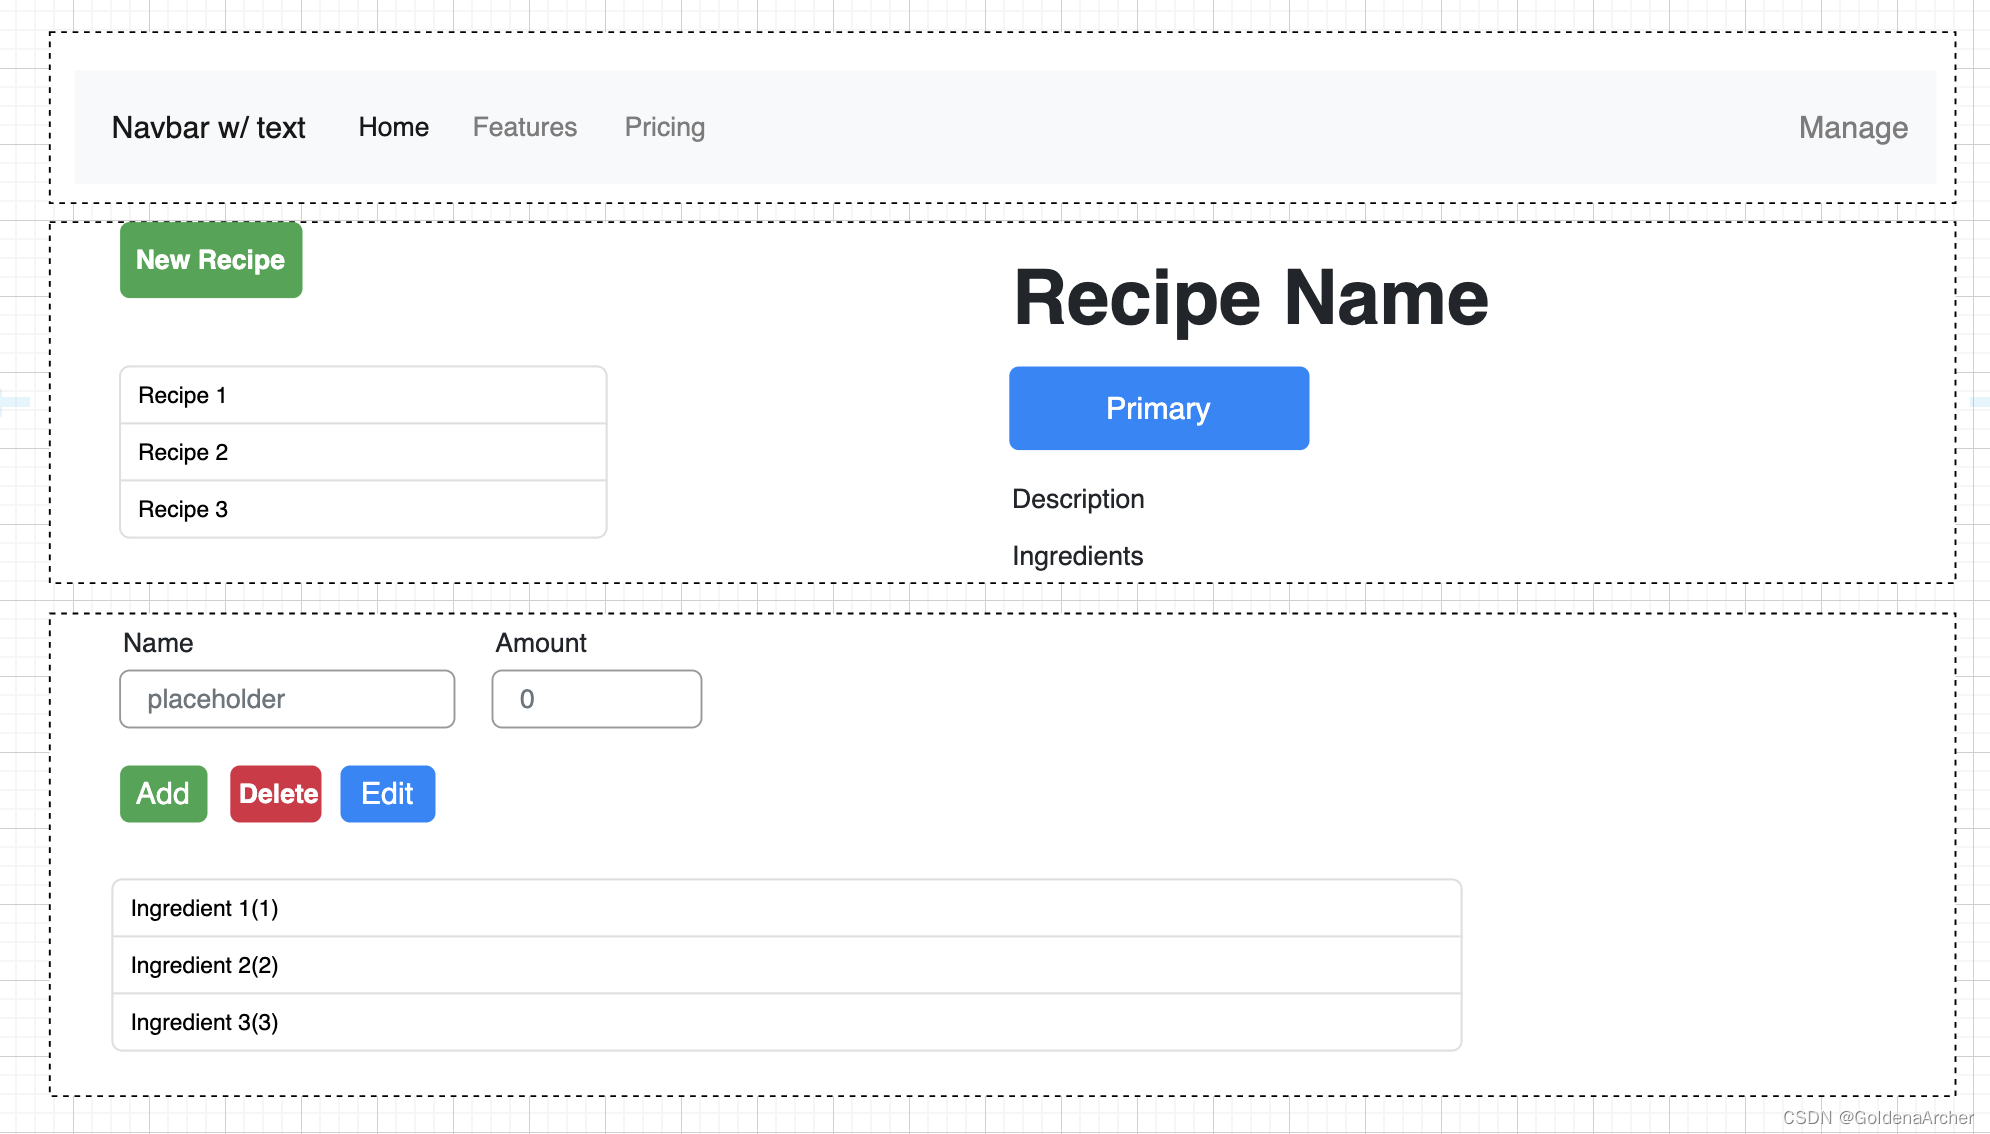
简单的说起来就是当前页面需要包含一个 Header,一个部分列举出所有的食谱(recipe),另外一个部分则列举出对应食谱的购物清单(shopping list)
虚线边框框起来的则是我认为的组件构成,将其转化成 Venn Diagram 则如下:
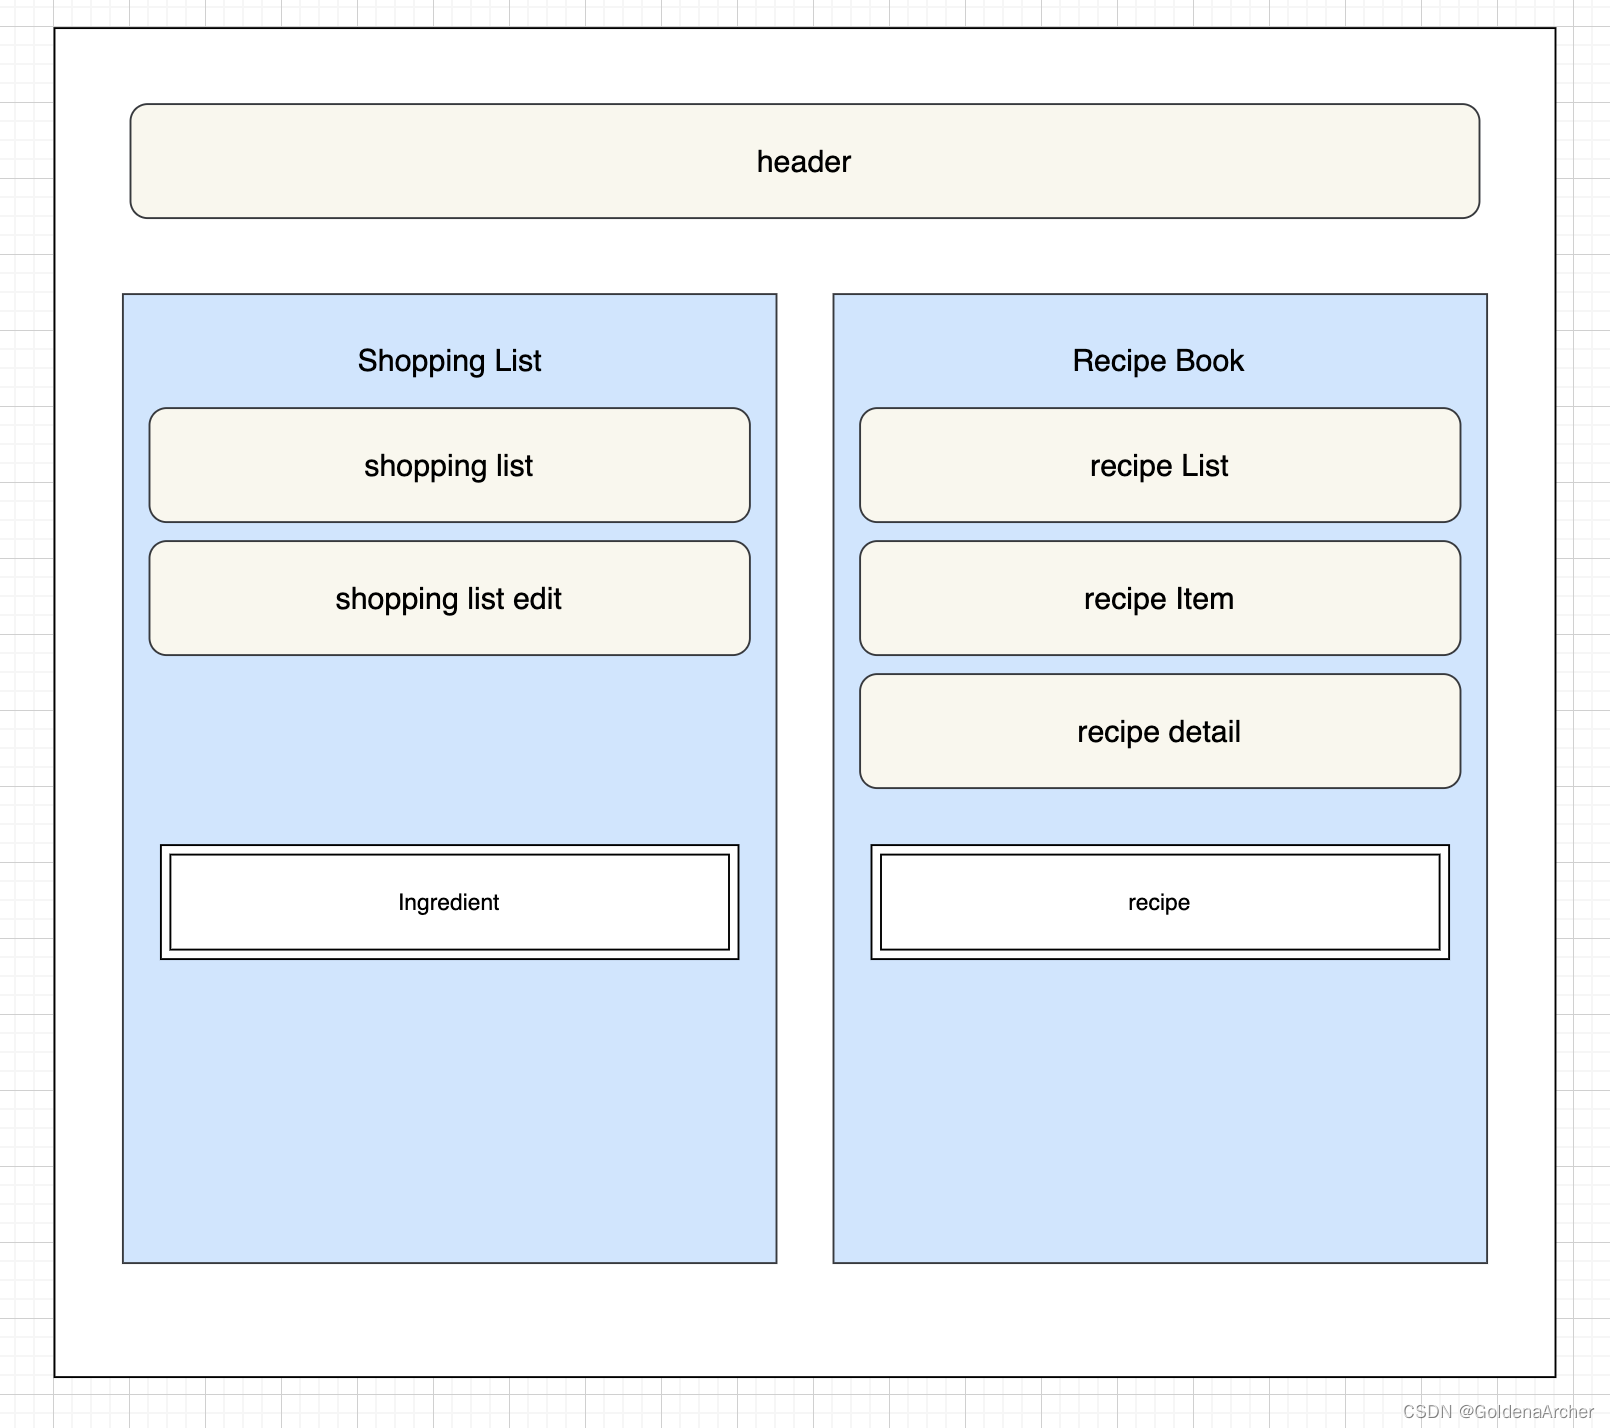
ingrident 和 recipe 为 Model,也就是 MVVM 中一直没讨论的部分(之前一直讨论的都是 VM 层和 V 层之间的互动)
根据需求也就可以开始下一步的实现了
创建项目
主要通过 bash 实现:
❯ ng new recipe-book --no-strict --standalone false --routing false
❯ cd recipe-book
# 在 angular.json 中配置对应的 bootstrap CSS 文件,第一篇笔记中有提
❯ npm i bootstrap@3
❯ ng g c header --skip-tests
❯ ng g c recipes --skip-tests
❯ ng g c recipes/recipe-list --skip-tests
❯ ng g c recipes/recipe-list/recipe-item --skip-tests
❯ ng g c shopping-list --skip-tests
❯ ng g c shopping-list/shopping-edit --skip-tests# 这是当前目录的结构
❯ tree src/app/
src/app/
├── app.component.css
├── app.component.html
├── app.component.spec.ts
├── app.component.ts
├── app.module.ts
├── header
│   ├── header.component.css
│   ├── header.component.html
│   └── header.component.ts
├── recipes
│   ├── recipe-detail
│   │   ├── recipe-detail.component.css
│   │   ├── recipe-detail.component.html
│   │   └── recipe-detail.component.ts
│   ├── recipe-list
│   │   ├── recipe-item
│   │   │   ├── recipe-item.component.css
│   │   │   ├── recipe-item.component.html
│   │   │   └── recipe-item.component.ts
│   │   ├── recipe-list.component.css
│   │   ├── recipe-list.component.html
│   │   └── recipe-list.component.ts
│   ├── recipes.component.css
│   ├── recipes.component.html
│   └── recipes.component.ts
└── shopping-list├── shopping-edit│   ├── shopping-edit.component.css│   ├── shopping-edit.component.html│   └── shopping-edit.component.ts├── shopping-list.component.css├── shopping-list.component.html└── shopping-list.component.ts8 directories, 26 files
component 的创建主要则是根据上面提到的业务需求进行实现,目前还没有创建对应 Model 对应的文件
实现功能
这里会用 bootstrap 内置的 class 实施不少功能,而 bootstrap 的部分不会细谈,主要还是针对 Angular 的学习
添加骨架
修改的部分为这里的 V 层:
src/app/
├── app.component.html
修改内容如下:
<app-header></app-header>
<div class="container"><div class="row"><div class="col-md-12"><app-recipes></app-recipes><app-shopping-list></app-shopping-list></div></div>
</div>
这里主要提供的是一个结构,并且展示三大组件:header, recipe 和 shopping list
header
修改的部分为这里的 V 层:
src/app/
├── header
│   ├── header.component.html
实现如下:
<nav class="navbar navbar-default"><div class="container-fluid"><div class="navbar-header"><a href="#" class="navbar-brand">Recipe Book</a></div><div class="collapse navbar-collapse"><ul class="nav navbar-nav"><li><a href="#">Recipes</a></li><li><a href="#">Shopping List</a></li></ul><ul class="nav navbar-nav navbar-right"><li class="dropdown"><ahref="#"class="dropdown-toggle"data-toggle="dropdown"role="button"aria-haspopup="true"aria-expanded="false">Manage <span class="caret"></span></a><ul class="dropdown-menu"><li><a href="#">Save Data</a></li><li><a href="#">Fetch Data</a></li></ul></li></ul></div></div>
</nav>
这里全都是 bootstrap 就不多赘述了,实现后效果如下:

recipe
recipe 部分的结构通过上面的文件结构也能看出来了,简化一下如下:
├── recipes
│   ├── recipe-detail
│   ├── recipe-list
│   │   ├── recipe-item
│   ├── recipe.model.ts # 即将创建的 model
recipes V 层
这个文件就是 recipes.component.html 这个文件,实现比较简单,只是导入 recipe-list 和当前选中的 recipe-detail:
<div class="row"><div class="col-md-5"><app-recipe-list></app-recipe-list></div><div class="col-md-7"><app-recipe-detail></app-recipe-detail></div>
</div>
这个会让 recipe-list 和 recipe-detail 出现在同一行
接下来就可以处理细节了
recipe model
这里主要就是定义了 recipe 应该有的数据,实现如下:
export class Recipe {constructor(public name: string,public description: string,public imagePath: string) {}
}
这代表着 Recipe 对象会有名字、描述和图片三个属性
recipe list VM 层
VM 层目前的逻辑也比较简单,它只需要存储一个 recipes 的数组,让 V 层可以渲染即可,代码如下:
import { Component } from '@angular/core';
import { Recipe } from '../recipe.model';@Component({selector: 'app-recipe-list',templateUrl: './recipe-list.component.html',styleUrl: './recipe-list.component.css',
})
export class RecipeListComponent {recipes: Recipe[] = [{name: 'Recipe 1',description: 'Description 1',imagePath: 'http://picsum.photos/200/200',},{name: 'Recipe 2',description: 'Description 2',imagePath: 'http://picsum.photos/200/200',},];
}
这里没用 new Recipe() 创建也不会报错,本质上来说 TS 的类型检查是检查数据是否对的上,而不是真的会检查 a instanceof A,而是做 a 有 name, a 有 description, a 有 imagePath -> a 是 A ✅ 这样一个检查
⚠️:picsum.photos 是我在 placeimg.com 上找到的代替网站。placeimg.com 于去年年中正式关站了(🕯️)
recipe list V 层
这一层要做的也比较简单,主要就是跑一个 ngFor 去渲染当前 list 中包含的数据,并且正确的渲染 recipe.name, recipe.description 和 recipe.imagePath 即可,这里主要用到的还是 string interpolation 和 property binding
实现代码如下:
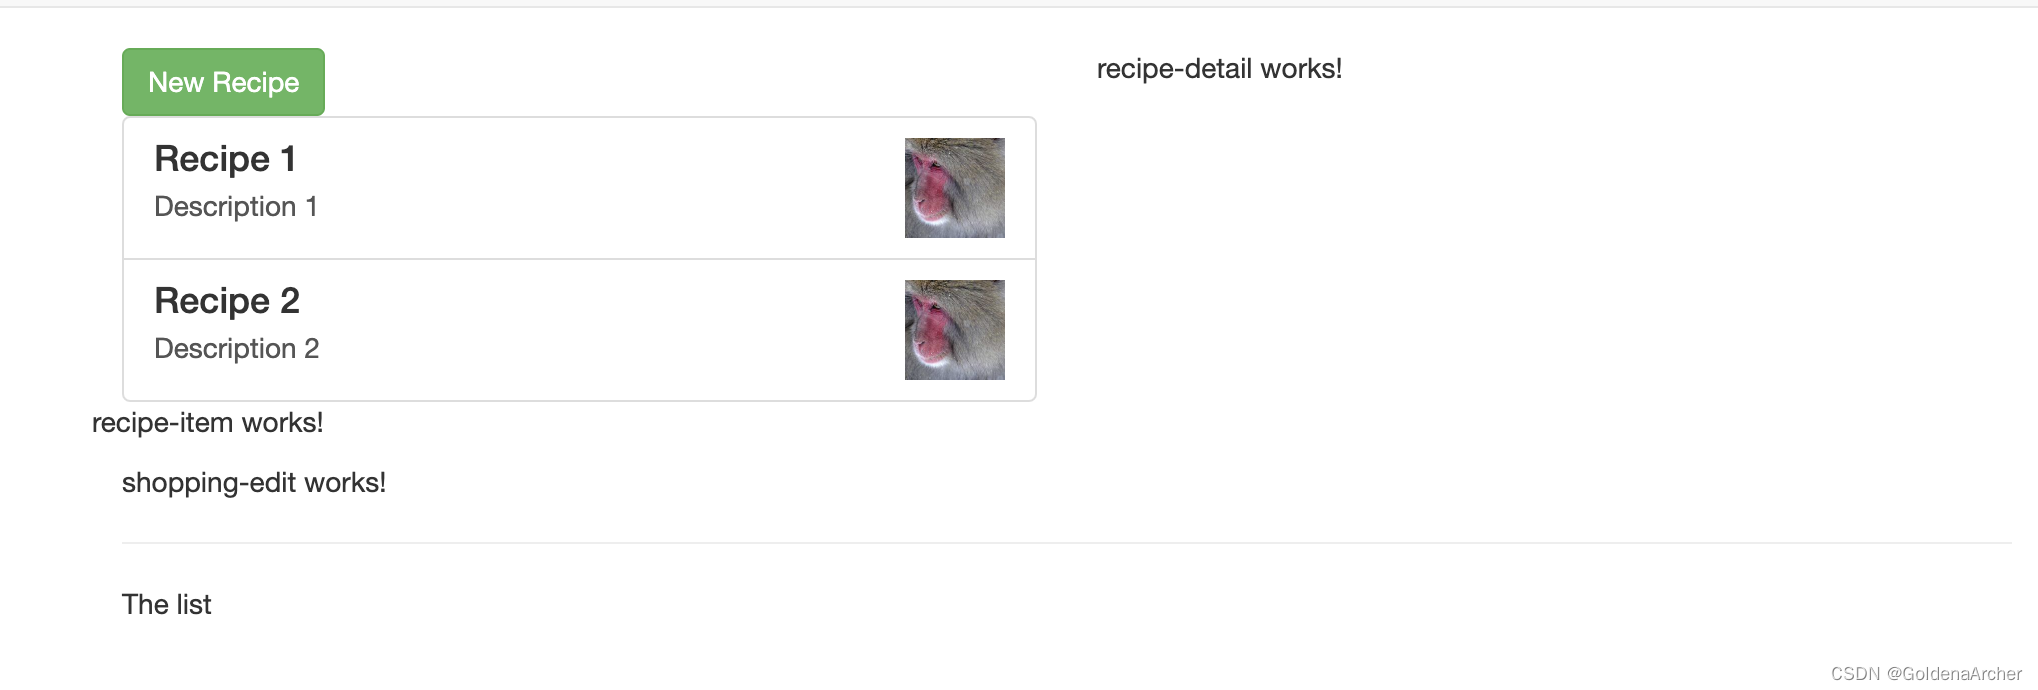
<div class="row"><div class="col-xs-12"><button class="btn btn-success">New Recipe</button></div>
</div>
<div class="row"><div class="col-xs-12"><a href="#" class="list-group-item clearfix" *ngFor="let recipe of recipes"><div class="pull-left"><h4 class="list-group-item-heading">{{ recipe.name }}</h4><p class="list-group-item-text">{{ recipe.description }}</p></div><span class="pull-right"><img[src]="recipe.imagePath"[alt]="recipe.name"class="image-responsive"style="max-height: 50px"/></span></a></div><app-recipe-item></app-recipe-item>
</div>
完成后的效果:
⚠️:这里的 ngFor + 输出所有的数据在 ngFor 是因为还没有实现跨组件交流,否则直接在 ngFor 中渲染 app-recipe-item,并传递对应对象即可
recipe detail V 层
同样因为跨组件交流还没实现,目前只会渲染一个静态且不会动的 V 层:
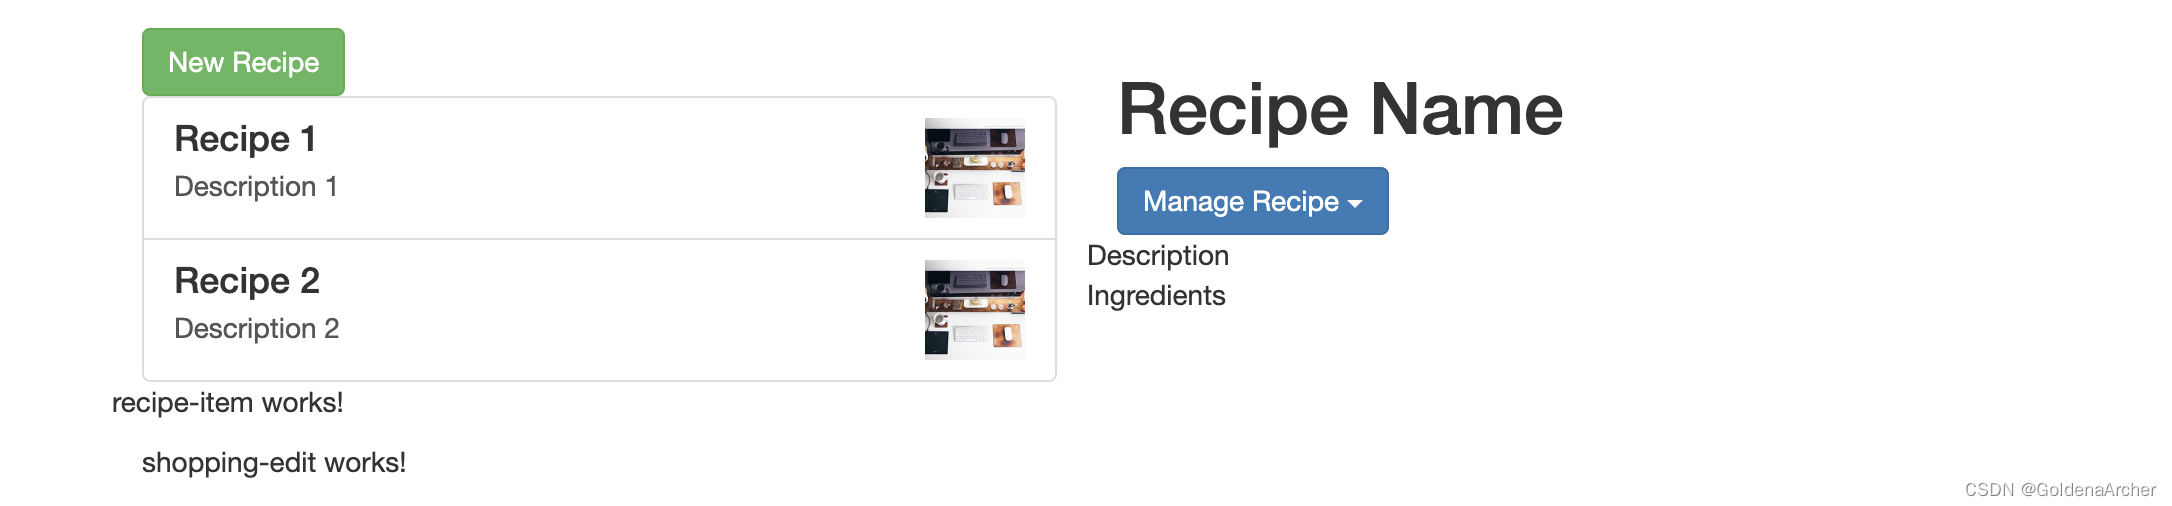
<div class="row"><div class="col-sx-12"><img [src]="" [alt]="" class="img-responsive" style="max-height: 300px" /></div>
</div>
<div class="row"><div class="col-xs-12"><h1>Recipe Name</h1></div>
</div>
<div class="row"><div class="col-xs-12"><div class="btn-group"><button type="button" class="btn btn-primary dropdown-toggle">Manage Recipe <span class="caret"></span></button><ul class="dropdown-menu"><li><a href="#">To Shopping List</a></li><li><a href="#">Edit Recipe</a></li><li><a href="#">Delete Recipe</a></li></ul></div></div>
</div><div class="row"><div class="col-sx-12">Description</div>
</div><div class="row"><div class="col-sx-12">Ingredients</div>
</div>
完成后效果:
至此 recipe 部分结束
shopping-list
shopping-list 的实现和 recipe 差不多,也是创建 model,随后填充 VM 层
ingredient model
这个 model 在的目录不太一样:
src/app/
├── shared
│   └── ingredient.model.ts
个人的话,大概便好创建一个新的 src/app/model 用来存放所有的 model 吧,不过这种有点看个人便好/项目规定了。实现如下:
export class Ingredient {constructor(public name: string, public amount: number) {}
}
shopping-list VM 层
这个和 recipe VM 层差不多,添加 Ingredient[] 即可
import { Component } from '@angular/core';
import { Ingredient } from '../shared/ingredient.model';@Component({selector: 'app-shopping-list',templateUrl: './shopping-list.component.html',styleUrl: './shopping-list.component.css',
})
export class ShoppingListComponent {ingredients: Ingredient[] = [new Ingredient('Apples', 5),new Ingredient('Tomatoes', 10),];
}
shopping-list V 层
这里的实现也和上面 recipe list 的实现对应:
<div class="row"><div class="col-xs-10"><app-shopping-edit></app-shopping-edit><hr /><ul class="list-group"><aclass="list-group-item"style="cursor: pointer"*ngFor="let ingredient of ingredients">{{ ingredient.name }} ({{ ingredient.amount }})</a></ul></div>
</div>
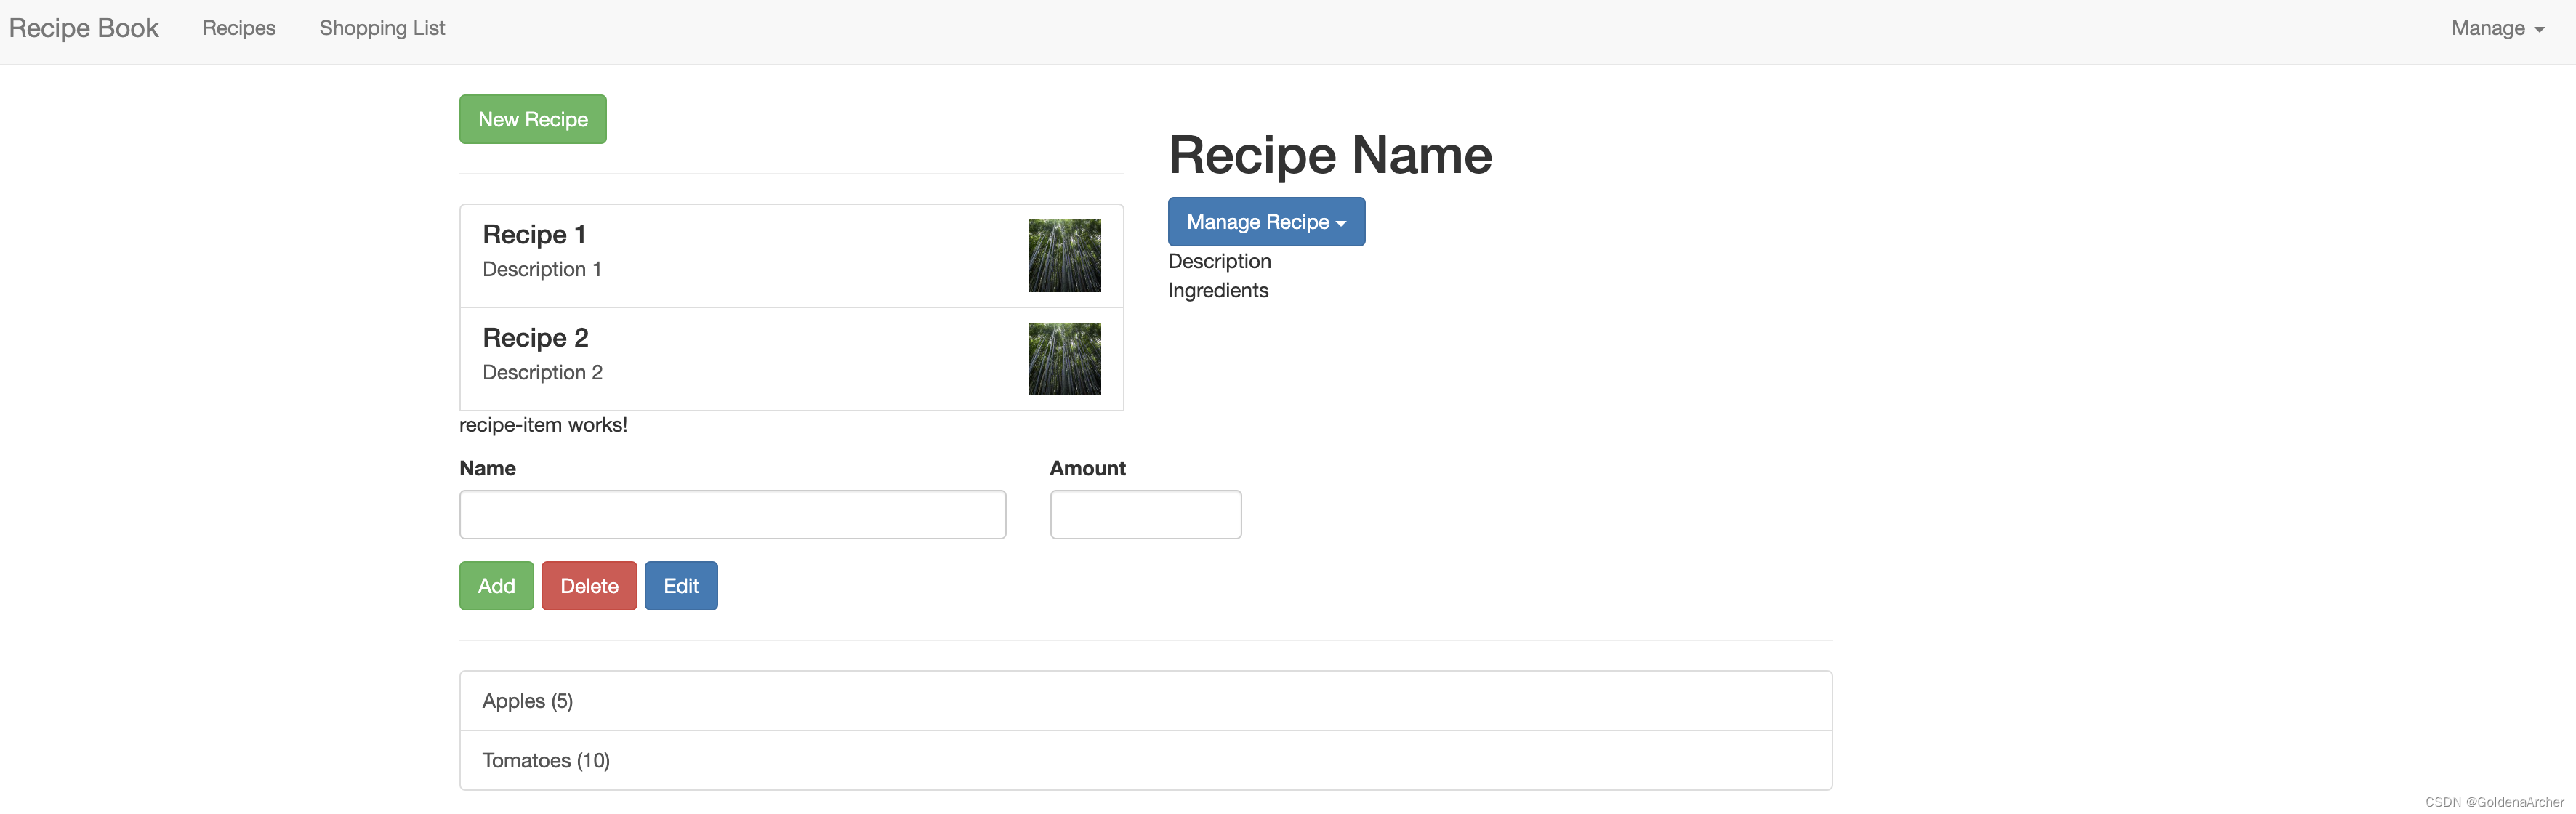
实现后效果如下:

shopping-list edit V 层
出于同样的原因,这里只有 V 层,实现如下:
<div class="row"><div class="col-xs-12"><form><div class="row"><div class="col-sm-5 form-group"><label for="name">Name</label><input type="text" id="name" class="form-control" /></div><div class="col-sm-2 form-group"><label for="amount">Amount</label><input type="number" id="amount" class="form-control" /></div></div><div class="row"><div class="col-xs-12"><div class="btn-toolbar"><button class="btn btn-success mr-2" type="submit">Add</button><button class="btn btn-danger mr-2" type="button">Delete</button><button class="btn btn-primary" type="button">Edit</button></div></div></div></form></div>
</div>
最终结果:
下个章节开始数据传输之类的,也就是让页面动起来的部分