Docker 笔记(五)--链接
这篇笔记记录了Docker 的Link。
官方文档: Legacy container links - Communication across links
目录
- 参考
- Legacy container links
- Connect using network port mapping
- Connect with the linking system
- The importance of naming
- Communication across links
- Environment variables
- Important notes on Docker environment variables
- Updating the /etc/hosts file
参考
- 链接: docker官方文档
- 链接: Docker 入门到实战教程(四)容器链接
Legacy container links
遗留的容器链接
Warning
The --link flag is a legacy feature of Docker. It may eventually be removed. Unless you absolutely need to continue using it, we recommend that you use user-defined networks to facilitate communication between two containers instead of using --link. One feature that user-defined networks do not support that you can do with --link is sharing environment variables between containers. However, you can use other mechanisms such as volumes to share environment variables between containers in a more controlled way.
See Differences between user-defined bridges and the default bridge for some alternatives to using --link.
–link标志是Docker的遗留功能。它最终可能会被移除。除非您绝对需要继续使用它,否则我们建议您使用用户定义的网络实现两个容器之间的通信,而不是使用–link。用户定义的网络不支持在容器之间共享环境变量,但–link可以。但是,您可以使用其他机制(如卷)以更可控的方式在容器之间共享环境变量。。
有关使用–link的一些替代方法,请参阅用户定义网桥和默认网桥之间的差异。
The information in this section explains legacy container links within the Docker default bridge network which is created automatically when you install Docker.
本节中的信息解释了Docker默认网桥网络中的遗留容器链接,该网络是在安装Docker时自动创建的。。
Before the Docker networks feature, you could use the Docker link feature to allow containers to discover each other and securely transfer information about one container to another container. With the introduction of the Docker networks feature, you can still create links but they behave differently between default bridge network and user defined networks.
在使用Docker网络功能之前,您可以使用Docker链接功能来允许容器互相发现,并将有关一个容器的信息安全地传输到另一个容器。随着Docker网络功能的引入,您仍然可以创建链接,但它们在默认网桥网络和用户定义网络之间的行为不同。。
This section briefly discusses connecting via a network port and then goes into detail on container linking in default bridge network.
本节简要讨论通过网络端口进行连接,然后详细介绍默认网桥网络中的容器链接。。
Connect using network port mapping
使用网络端口映射进行连接
Let’s say you used this command to run a simple Python Flask application:
假设您使用此命令来运行一个简单的Python Flask应用程序:

Note
Containers have an internal network and an IP address. Docker can have a variety of network configurations. You can see more information on Docker networking here.
注意
容器有一个内部网络和一个IP地址。Docker可以有多种网络配置。你可以在这里看到更多关于Docker网络的信息。
When that container was created, the -P flag was used to automatically map any network port inside it to a random high port within an ephemeral port range on your Docker host. Next, when docker ps was run, you saw that port 5000 in the container was bound to port 49155 on the host.
创建该容器时,-P标志用于自动将内部任意网络端口临时映射到Docker主机的随机高端口上。接下来,当docker ps运行时,您看到容器中的端口5000绑定到主机上的端口49155。

You also saw how you can bind a container’s ports to a specific port using the -p flag. Here port 80 of the host is mapped to port 5000 of the container:
您还看到,您可以使用-p标志将容器的端口绑定到指定端口上。这里,主机的端口80被映射到容器的端口5000:

And you saw why this isn’t such a great idea because it constrains you to only one container on that specific port.
您看到了这不是一个好主意,因为它将限制只有一个容器可以使用这个指定端口。
Instead, you may specify a range of host ports to bind a container port to that is different than the default ephemeral port range:
相反,您可以指定一系列主机端口来绑定容器端口,这些端口不同于默认的临时端口范围:

This would bind port 5000 in the container to a randomly available port between 8000 and 9000 on the host.
这将把容器中的端口5000绑定到主机上8000到9000之间的随机可用端口。
There are also a few other ways you can configure the -p flag. By default the -p flag binds the specified port to all interfaces on the host machine. But you can also specify a binding to a specific interface, for example only to the localhost.
还有一些其他方法可以配置-p标志。默认情况下,-p标志将指定的端口绑定到主机上的所有接口。但是,您也可以指定绑定到特定接口上,例如仅指定到localhost的绑定。

This would bind port 5000 inside the container to port 80 on the localhost or 127.0.0.1 interface on the host machine.
这将把容器内的5000端口绑定到本地主机localhost或127.0.0.1的80端口上。
Or, to bind port 5000 of the container to a dynamic port but only on the localhost, you could use:
或者,要将容器的5000端口绑定到在本地主机的动态端口上,您可以使用:

You can also bind UDP and SCTP (typically used by telecom protocols such as SIGTRAN, Diameter, and S1AP/X2AP) ports by adding a trailing /udp or /sctp. For example:
您还可以通过添加尾部/udp或/sctp来绑定UDP和SCTP(一般SIGTRAN、Diameter和S1AP/X2AP等协议会使用)的端口。例如 :

You also learned about the useful docker port shortcut which showed us the current port bindings. This is also useful for showing you specific port configurations. For example, if you’ve bound the container port to the localhost on the host machine, then the docker port output reflects that.
您还了解了docker端口速查方式,它向我们展示了当前的端口绑定。这对于显示指定端口的配置也很有用。例如,如果您已经将容器端口绑定到主机上的localhost,那么docker端口输出就会反映这一点。

Note
The -p flag can be used multiple times to configure multiple ports.
注意
-p标志可以多次用于配置多个端口。
Connect with the linking system
使用链接系统进行连接
Note
This section covers the legacy link feature in the default bridge network. Refer to differences between user-defined bridges and the default bridge for more information on links in user-defined networks.
注意
本节介绍默认bridge网络中的link功能。关于用户自定义网络中的用法,请参阅用户定义网桥和默认网桥之间的差异。
Network port mappings are not the only way Docker containers can connect to one another. Docker also has a linking system that allows you to link multiple containers together and send connection information from one to another. When containers are linked, information about a source container can be sent to a recipient container. This allows the recipient to see selected data describing aspects of the source container.
网络端口映射并不是Docker容器相互连接的唯一方式。Docker还有一个链接系统,可以将多个容器链接在一起,并将连接信息从一个容器发送到另一个容器。当链接容器时,可以将源容器的信息发送到接收容器。这允许接收容器查看描述源容器各方面的选定数据。。
The importance of naming
To establish links, Docker relies on the names of your containers. You’ve already seen that each container you create has an automatically created name; indeed you’ve become familiar with our old friend nostalgic_morse during this guide. You can also name containers yourself. This naming provides two useful functions:
为了建立链接,Docker依赖于容器的名称。您已经看到,您创建的每个容器都有一个自动创建的名称;事实上,在本指南中,您已经熟悉了我们的老朋友"nostalgic_morse"。您也可以自己命名容器。此命名提供了两个有用的功能:。
- It can be useful to name containers that do specific functions in a way that makes it easier for you to remember them, for example naming a container containing a web application web.
- It provides Docker with a reference point that allows it to refer to other containers, for example, you can specify to link the container web to container db.
1.以一种更容易记住的方式命名执行特定功能的容器会很有用,例如命名一个包含web应用程序的容器叫web。
2.它为Docker提供了一个参照点,允许它引用其他容器,例如,您可以指定将容器web链接到容器db。。
You can name your container by using the --name flag, for example:
您能使用–name标识命名您的容器,举个例子:。
 This launches a new container and uses the --name flag to name the container web. You can see the container’s name using the docker ps command.
启动一个新容器,使用–name标识命名它web。您可以使用docker ps命令查看容器的名称。。

You can also use docker inspect to return the container’s name.
您也可以使用docker inspect命令查看容器的名称。。
Note
Container names must be unique. That means you can only call one container web. If you want to re-use a container name you must delete the old container (with docker container rm) before you can create a new container with the same name. As an alternative you can use the --rm flag with the docker run command. This deletes the container immediately after it is stopped.
容器名称必须唯一。这意味着您只能定义一个容器叫web。如果要重复使用容器名称,则必须删除旧容器(使用docker容器rm),然后才能创建具有相同名称的新容器。作为一种选择,您可以将–rm标志与docker run命令一起使用。这会在容器停止后立即删除它。。
Communication across links
通过链接通讯。
Links allow containers to discover each other and securely transfer information about one container to another container. When you set up a link, you create a conduit between a source container and a recipient container. The recipient can then access select data about the source. To create a link, you use the --link flag. First, create a new container, this time one containing a database.
链接允许容器发现彼此,并将有关一个容器的信息安全地传输到另一个容器。设置链接时,将在源容器和接收容器之间创建管道。然后,接收容器可以访问有关源的选定数据。要创建链接,可以使用–link标识。首先,创建一个新的容器,这次是一个包含数据库的容器。。
 This creates a new container called db from the training/postgres image, which contains a PostgreSQL database.
这次使用training/postgres映像创建一个名为db的新容器,它包含一个PostgreSQL数据库。
Now, you need to delete the web container you created previously so you can replace it with a linked one:
现在,您需要删除之前创建的web容器,以便将其替换为链接的容器:。
 Now, create a new web container and link it with your db container.
现在,创建一个新web容器,并将它与db容器链接:。

This links the new web container with the db container you created earlier. The --link flag takes the form:
–link <name or id>:alias
这将新的web容器与您之前创建的数据库容器链接起来。–link标识采用以下形式:
–link <name or id> :alias
Where name is the name of the container we’re linking to and alias is an alias for the link name. That alias is used shortly. The --link flag also takes the form:
–link <name or id>
其中name是我们链接到的容器的名称,alias是链接名称的别名。这个别名也可以省略。–link标识也采用以下形式:
–link <name or id>
In this case the alias matches the name. You could write the previous example as:
在这种情况下,别名与名称一致。您可以将前面的示例写成:

Next, inspect your linked containers with docker inspect:
接下来,使用docker inspect命令查看您链接的容器:

You can see that the web container is now linked to the db container web/db. Which allows it to access information about the db container.
您可以看到web容器现在已链接到db容器-web/db。这允许web容器访问有关db容器的信息。
So what does linking the containers actually do? You’ve learned that a link allows a source container to provide information about itself to a recipient container. In our example, the recipient, web, can access information about the source db. To do this, Docker creates a secure tunnel between the containers that doesn’t need to expose any ports externally on the container; when we started the db container we did not use either the -P or -p flags. That’s a big benefit of linking: we don’t need to expose the source container, here the PostgreSQL database, to the network.
那么,链接容器实际上是做什么的呢?您已经了解到,链接允许源容器向接收容器提供有关其自身的信息。在我们的示例中,接收容器web可以访问有关源容器db的信息。为此,Docker在容器之间创建了一个安全隧道,不需要在容器外部暴露任何端口;当我们启动db容器时,我们没有使用-P或-P标识。这是链接的一大好处:我们不需要向网络暴露源容器,也就是示例中的PostgreSQL数据库。
Docker exposes connectivity information for the source container to the recipient container in two ways:
- Environment variables,
- Updating the /etc/hosts file.
Docker通过两种方式向接收容器暴露源容器的连接信息:
- 环境变量
- 正在更新/etc/hosts文件
Environment variables
环境变量
Docker creates several environment variables when you link containers. Docker automatically creates environment variables in the target container based on the --link parameters. It also exposes all environment variables originating from Docker from the source container. These include variables from:
Docker在链接容器时会创建多个环境变量。Docker根据–link参数自动在目标容器中创建环境变量。它还暴露了源容器中源自Docker的所有环境变量。其中包括以下变量:
- the ENV commands in the source container’s Dockerfile
- the -e, --env, and --env-file options on the docker run command when the source container is started
- 源容器的Dockerfile中的ENV命令
- 源容器启动时,docker run命令中的-e、-env和-env文件选项
These environment variables enable programmatic discovery from within the target container of information related to the source container.
这些环境变量可以在目标容器内对与源容器相关的信息中发现。
Warning
It is important to understand that all environment variables originating from Docker within a container are made available to any container that links to it. This could have serious security implications if sensitive data is stored in them.
一定要清楚的知道,容器中源自Docker的所有环境变量都可被任何链接它的容器获取。如果敏感数据存储在其中,这可能会产生严重的安全影响。
Docker sets an _NAME environment variable for each target container listed in the --link parameter. For example, if a new container called web is linked to a database container called db via --link db:webdb, then Docker creates a WEBDB_NAME=/web/webdb variable in the web container.
Docker为–link参数中列出的每个目标容器设置一个<alias>_NAME环境变量。例如,如果名为web的新容器通过–link db:webdb链接到名为db的数据库容器,则Docker会在web容器中创建一个WEBDB_NAME=/web/webdb变量。
Docker also defines a set of environment variables for each port exposed by the source container. Each variable has a unique prefix in the form <name>PORT<port>_<protocol>
Docker还为源容器暴露的每个端口定义了一组环境变量。每个变量都有一个唯一的前缀,格式为<name>PORT<PORT>_<protocol>。
The components in this prefix are:
- the alias <name> specified in the --link parameter (for example, webdb)
- the <port> number exposed
- a <protocol> which is either TCP or UDP
此前缀中的组件包括:
- 在 --link参数中指定的别名<name>(例如,webdb)
- 暴露的<port>号
- 一个<协议>,TCP或UDP
Docker uses this prefix format to define three distinct environment variables:
- The prefix_ADDR variable contains the IP Address from the URL, for example WEBDB_PORT_5432_TCP_ADDR=172.17.0.82.
- The prefix_PORT variable contains just the port number from the URL for example WEBDB_PORT_5432_TCP_PORT=5432.
- The prefix_PROTO variable contains just the protocol from the URL for example WEBDB_PORT_5432_TCP_PROTO=tcp.
Docker使用这个前缀格式来定义三个不同的环境变量:
- prefix_ADDR变量包含URL中的IP地址,例如WEBDB_PORT_5432_TCP_ADDR=172.17.0.82。
- prefix_PORT变量仅包含URL的端口号,例如WEBDB_PORT_5432_TCP_PORT=5432。
- prefix_PROTO变量仅包含URL中的协议,例如WEBDB_PORT_5432_TCP_PROTO=TCP。
If the container exposes multiple ports, an environment variable set is defined for each one. This means, for example, if a container exposes 4 ports that Docker creates 12 environment variables, 3 for each port.
如果容器暴露了多个端口,则为每个端口定义一个环境变量集。这意味着,例如,如果一个容器暴露了4个端口,Docker会创建12个环境变量,每个端口3个。
Additionally, Docker creates an environment variable called _PORT. This variable contains the URL of the source container’s first exposed port. The ‘first’ port is defined as the exposed port with the lowest number. For example, consider the WEBDB_PORT=tcp://172.17.0.82:5432 variable. If that port is used for both tcp and udp, then the tcp one is specified.
此外,Docker还创建了一个名为<alias>_PORT的环境变量。该变量包含源容器的第一个暴露端口的URL。“第一”端口被定义为编号最低的暴露端口。例如,考虑WEBDB_PORT=tcp://172.17.0.82:5432变量。如果该端口同时用于tcp和udp,则指定tcp端口。
Finally, Docker also exposes each Docker originated environment variable from the source container as an environment variable in the target. For each variable Docker creates an ENV variable in the target container. The variable’s value is set to the value Docker used when it started the source container.
最后,Docker还将源容器中每个源自Docker的环境变量公开为目标容器中的环境变量。对于每个变量,Docker在目标容器中创建一个<alias>_ENV_<name>变量。变量的值设置为Docker启动源容器时使用的值。
Returning back to our database example, you can run the env command to list the specified container’s environment variables.
回到我们的数据库示例,您可以运行env命令来列出指定容器的环境变量。
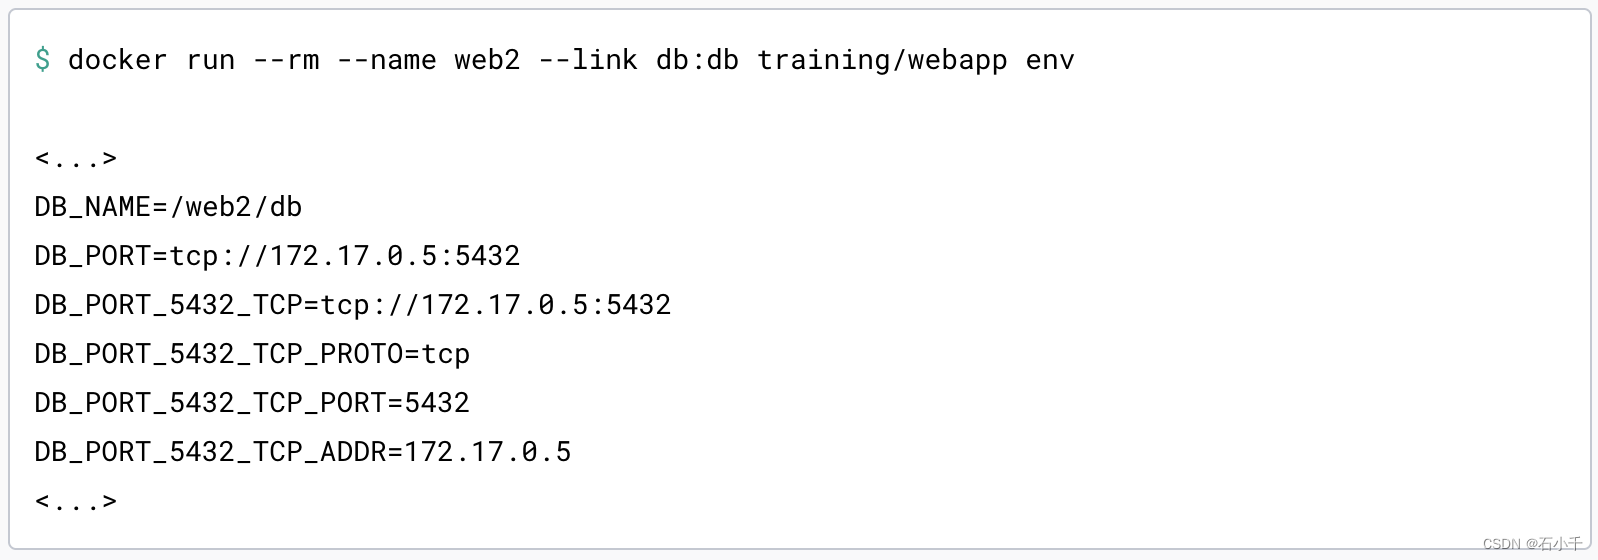
You can see that Docker has created a series of environment variables with useful information about the source db container. Each variable is prefixed with DB_, which is populated from the alias you specified above. If the alias were db1, the variables would be prefixed with DB1_. You can use these environment variables to configure your applications to connect to the database on the db container. The connection is secure and private; only the linked web container can communicate with the db container.
您可以看到Docker创建了一系列环境变量,其中包含有关源db容器的有用信息。每个变量都以DB_为前缀,DB_由您在上面指定的别名构成。如果别名是db1,则变量将以db1_为前缀。您可以使用这些环境变量,配置应用程序连接到db容器上的数据库。连接是安全和私有的;只有链接的web容器才能与db容器通信。
Important notes on Docker environment variables
Docker环境变量的重要注意事项
Unlike host entries in the /etc/hosts file, IP addresses stored in the environment variables are not automatically updated if the source container is restarted. We recommend using the host entries in /etc/hosts to resolve the IP address of linked containers.
不同于/etc/hosts文件中的主机条目,如果源容器重启,存储在环境变量中的IP地址不会自动更新。我们建议使用/etc/hosts中的主机条目来解析链接容器的IP地址。
These environment variables are only set for the first process in the container. Some daemons, such as sshd, scrub them when spawning shells for connection.
这些环境变量仅为容器中的第一个进程设置。某些守护进程(如sshd)在生成连接的shell时会对其进行清理。
Updating the /etc/hosts file
更新/etc/hosts文件
In addition to the environment variables, Docker adds a host entry for the source container to the /etc/hosts file. Here’s an entry for the web container:
除了环境变量之外,Docker还在/etc/hosts文件中添加了源容器的主机条目。以下是web容器的条目:
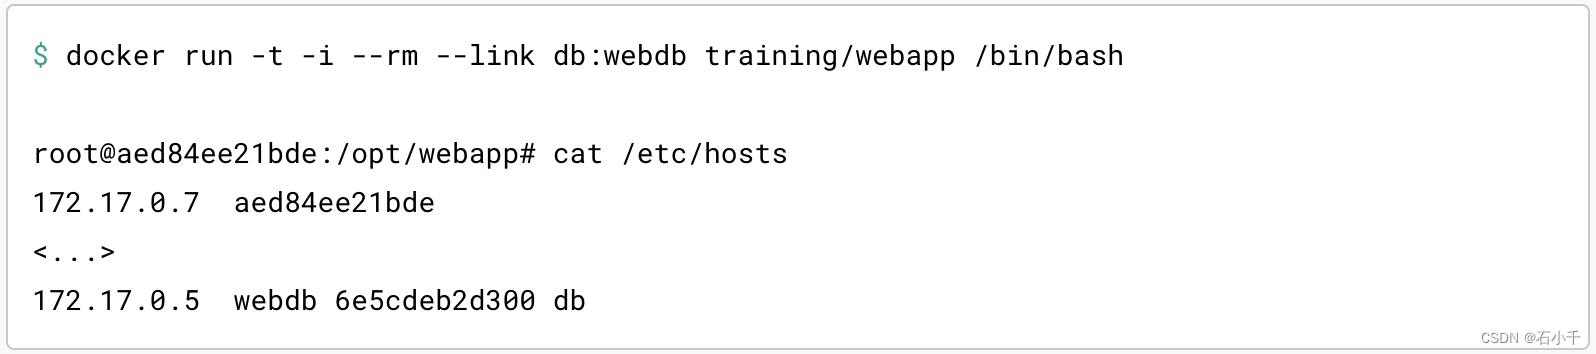
You can see two relevant host entries. The first is an entry for the web container that uses the Container ID as a host name. The second entry uses the link alias to reference the IP address of the db container. In addition to the alias you provide, the linked container’s name, if unique from the alias provided to the --link parameter, and the linked container’s hostname are also added to /etc/hosts for the linked container’s IP address. You can ping that host via any of these entries:
您可以看到两个相关的主机条目。第一个是使用container ID作为主机名的web容器的条目。第二个条目使用链接别名来引用db容器的IP地址。除了您提供的别名之外,链接容器的名称(如果与–link参数提供的别名不一致)和链接容器的主机名也会添加到/etc/hosts中,映射链接容器的IP地址。您可以通过这些条目中任何一种ping该主机:
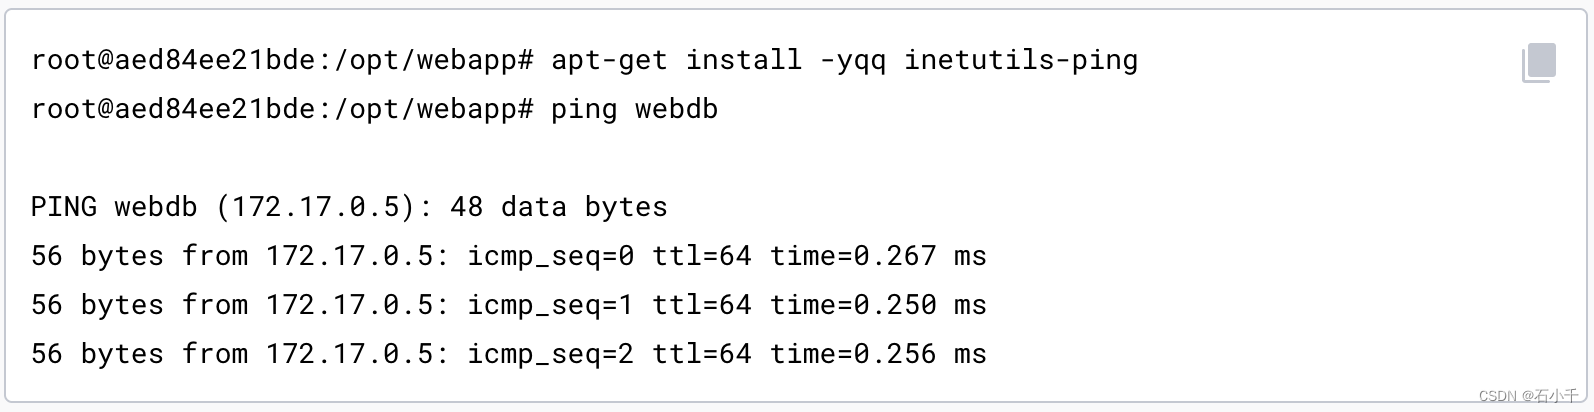
Note
In the example, you had to install ping because it was not included in the container initially.
注意
在上述示例中,您必须安装ping,它最初是不包含在容器内的
Here, you used the ping command to ping the db container using its host entry, which resolves to 172.17.0.5. You can use this host entry to configure an application to make use of your db container.
在这里,您使用主机条目对db容器进行ping,该条目解析为172.17.0.5。您可以使用此主机条目来配置应用程序,以使用db容器。
Note
You can link multiple recipient containers to a single source. For example, you could have multiple (differently named) web containers attached to your db container.
注意
您可以将多个接收容器链接到一个源容器。例如,您可以将多个(不同名称的)web容器连接到db容器。
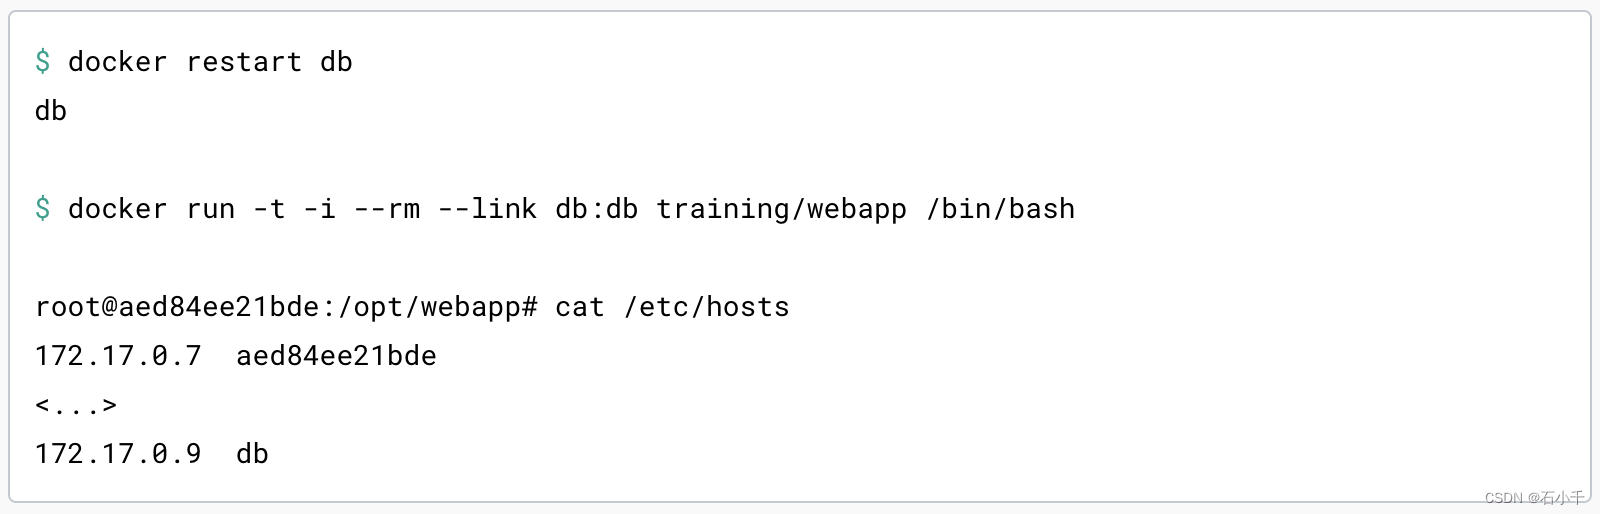
If you restart the source container, the /etc/hosts files on the linked containers are automatically updated with the source container’s new IP address, allowing linked communication to continue.
注意
如果重启源容器,那么链接容器上的/etc/hosts文件会自动更新为源容器的新IP地址,从而允许继续链接通信。