RabbitMQ详细讲解
目录
4.0 AMQP协议的回顾
4.1 RabbitMQ支持的消息模型
4.2 引入依赖
4.3 第一种模型(直连)
1. 开发生产者
2. 开发消费者
3. 参数的说明
4.4 第二种模型(work quene)
1. 开发生产者
2.开发消费者-1
3.开发消费者-2
4.测试结果
5.消息自动确认机制
4.5 第三种模型(fanout)
1. 开发生产者
2. 开发消费者-1
3. 开发消费者-2
4.开发消费者-3
5. 测试结果
4.6 第四种模型(Routing)
4.6.1 Routing 之订阅模型-Direct(直连)
1. 开发生产者
2.开发消费者-1
3.开发消费者-2
4.测试生产者发送Route key为error的消息时
5.测试生产者发送Route key为info的消息时
4.6.2 Routing 之订阅模型-Topic
1.开发生产者
2.开发消费者-1
3.开发消费者-2
4.测试结果
5. SpringBoot中使用RabbitMQ
5.0 搭建初始环境
1. 引入依赖
2. 配置配置文件
5.1 第一种hello world模型使用
开发生产者
开发消费者
5.2 第二种work模型使用
开发生产者
开发消费者
5.3 Fanout 广播模型
开发生产者
开发消费者
5.4 Route 路由模型
开发生产者
开发消费者
5.5 Topic 订阅模型(动态路由模型)
开发生产者
开发消费者
6. MQ的应用场景
6.1 异步处理
6.2 应用解耦
6.3 流量削峰
4.0 AMQP协议的回顾
4.1 RabbitMQ支持的消息模型


4.2 引入依赖
<dependency><groupId>com.rabbitmq</groupId><artifactId>amqp-client</artifactId><version>5.7.2</version>
</dependency>
4.3 第一种模型(直连)

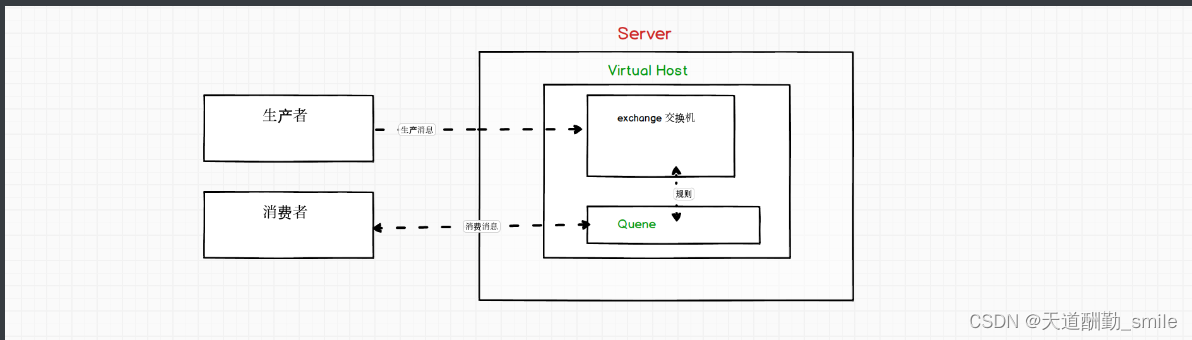
在上图的模型中,有以下概念:
-
P:生产者,也就是要发送消息的程序
-
C:消费者:消息的接受者,会一直等待消息到来。
-
queue:消息队列,图中红色部分。类似一个邮箱,可以缓存消息;生产者向其中投递消息,消费者从其中取出消息。
1. 开发生产者
//创建连接工厂ConnectionFactory connectionFactory = new ConnectionFactory();connectionFactory.setHost("10.15.0.9");connectionFactory.setPort(5672);connectionFactory.setUsername("ems");connectionFactory.setPassword("123");connectionFactory.setVirtualHost("/ems");Connection connection = connectionFactory.newConnection();//创建通道Channel channel = connection.createChannel();//参数1: 是否持久化 参数2:是否独占队列 参数3:是否自动删除 参数4:其他属性channel.queueDeclare("hello",true,false,false,null);channel.basicPublish("","hello", null,"hello rabbitmq".getBytes());channel.close();connection.close();2. 开发消费者
3. 参数的说明
channel.queueDeclare("hello",true,false,false,null);'参数1':用来声明通道对应的队列'参数2':用来指定是否持久化队列'参数3':用来指定是否独占队列'参数4':用来指定是否自动删除队列'参数5':对队列的额外配置
4.4 第二种模型(work quene)
Work queues,也被称为(Task queues),任务模型。当消息处理比较耗时的时候,可能生产消息的速度会远远大于消息的消费速度。长此以往,消息就会堆积越来越多,无法及时处理。此时就可以使用work 模型:让多个消费者绑定到一个队列,共同消费队列中的消息。队列中的消息一旦消费,就会消失,因此任务是不会被重复执行的。

角色:
-
P:生产者:任务的发布者
-
C1:消费者-1,领取任务并且完成任务,假设完成速度较慢
-
C2:消费者-2:领取任务并完成任务,假设完成速度快
1. 开发生产者
channel.queueDeclare("hello", true, false, false, null);
for (int i = 0; i < 10; i++) {channel.basicPublish("", "hello", null, (i+"====>:我是消息").getBytes());
}
2.开发消费者-1
channel.queueDeclare("hello",true,false,false,null);
channel.basicConsume("hello",true,new DefaultConsumer(channel){@Overridepublic void handleDelivery(String consumerTag, Envelope envelope, AMQP.BasicProperties properties, byte[] body) throws IOException {System.out.println("消费者1: "+new String(body));}
});
3.开发消费者-2
channel.queueDeclare("hello",true,false,false,null);
channel.basicConsume("hello",true,new DefaultConsumer(channel){@Overridepublic void handleDelivery(String consumerTag, Envelope envelope, AMQP.BasicProperties properties, byte[] body) throws IOException {try {Thread.sleep(1000); //处理消息比较慢 一秒处理一个消息} catch (InterruptedException e) {e.printStackTrace();}System.out.println("消费者2: "+new String(body)); }
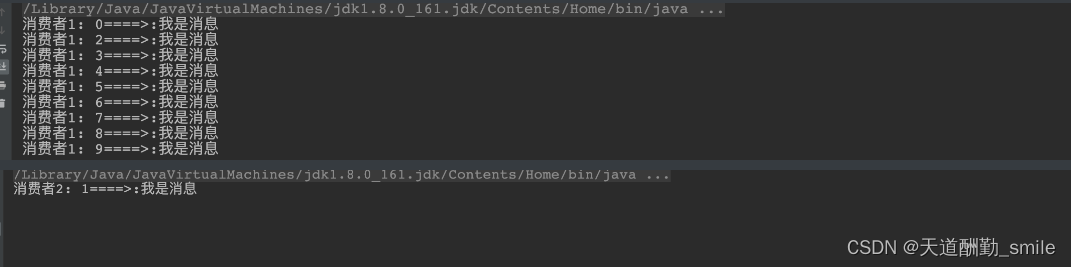
});4.测试结果

总结:默认情况下,RabbitMQ将按顺序将每个消息发送给下一个使用者。平均而言,每个消费者都会收到相同数量的消息。这种分发消息的方式称为循环。
5.消息自动确认机制
Doing a task can take a few seconds. You may wonder what happens if one of the consumers starts a long task and dies with it only partly done. With our current code, once RabbitMQ delivers a message to the consumer it immediately marks it for deletion. In this case, if you kill a worker we will lose the message it was just processing. We'll also lose all the messages that were dispatched to this particular worker but were not yet handled.
But we don't want to lose any tasks. If a worker dies, we'd like the task to be delivered to another worker.
channel.basicQos(1);//一次只接受一条未确认的消息
//参数2:关闭自动确认消息
channel.basicConsume("hello",false,new DefaultConsumer(channel){@Overridepublic void handleDelivery(String consumerTag, Envelope envelope, AMQP.BasicProperties properties, byte[] body) throws IOException {System.out.println("消费者1: "+new String(body));channel.basicAck(envelope.getDeliveryTag(),false);//手动确认消息}
});-
设置通道一次只能消费一个消息
-
关闭消息的自动确认,开启手动确认消息
4.5 第三种模型(fanout)
fanout 扇出 也称为广播

在广播模式下,消息发送流程是这样的:
-
可以有多个消费者
-
每个消费者有自己的queue(队列)
-
每个队列都要绑定到Exchange(交换机)
-
生产者发送的消息,只能发送到交换机,交换机来决定要发给哪个队列,生产者无法决定。
-
交换机把消息发送给绑定过的所有队列
-
队列的消费者都能拿到消息。实现一条消息被多个消费者消费
1. 开发生产者
//声明交换机
channel.exchangeDeclare("logs","fanout");//广播 一条消息多个消费者同时消费
//发布消息
channel.basicPublish("logs","",null,"hello".getBytes());
2. 开发消费者-1
//绑定交换机
channel.exchangeDeclare("logs","fanout");
//创建临时队列
String queue = channel.queueDeclare().getQueue();
//将临时队列绑定exchange
channel.queueBind(queue,"logs","");
//处理消息
channel.basicConsume(queue,true,new DefaultConsumer(channel){@Overridepublic void handleDelivery(String consumerTag, Envelope envelope, AMQP.BasicProperties properties, byte[] body) throws IOException {System.out.println("消费者1: "+new String(body));}
});
3. 开发消费者-2
//绑定交换机
channel.exchangeDeclare("logs","fanout");
//创建临时队列
String queue = channel.queueDeclare().getQueue();
//将临时队列绑定exchange
channel.queueBind(queue,"logs","");
//处理消息
channel.basicConsume(queue,true,new DefaultConsumer(channel){@Overridepublic void handleDelivery(String consumerTag, Envelope envelope, AMQP.BasicProperties properties, byte[] body) throws IOException {System.out.println("消费者2: "+new String(body));}
});
4.开发消费者-3
//绑定交换机
channel.exchangeDeclare("logs","fanout");
//创建临时队列
String queue = channel.queueDeclare().getQueue();
//将临时队列绑定exchange
channel.queueBind(queue,"logs","");
//处理消息
channel.basicConsume(queue,true,new DefaultConsumer(channel){@Overridepublic void handleDelivery(String consumerTag, Envelope envelope, AMQP.BasicProperties properties, byte[] body) throws IOException {System.out.println("消费者3: "+new String(body));}
5. 测试结果

4.6 第四种模型(Routing)
4.6.1 Routing 之订阅模型-Direct(直连)
在Fanout模式中,一条消息,会被所有订阅的队列都消费。但是,在某些场景下,我们希望不同的消息被不同的队列消费。这时就要用到Direct类型的Exchange。
在Direct模型下:
-
队列与交换机的绑定,不能是任意绑定了,而是要指定一个
RoutingKey(路由key) -
消息的发送方在 向 Exchange发送消息时,也必须指定消息的
RoutingKey。 -
Exchange不再把消息交给每一个绑定的队列,而是根据消息的
Routing Key进行判断,只有队列的Routingkey与消息的Routing key完全一致,才会接收到消息
流程:

图解:
-
P:生产者,向Exchange发送消息,发送消息时,会指定一个routing key。
-
X:Exchange(交换机),接收生产者的消息,然后把消息递交给 与routing key完全匹配的队列
-
C1:消费者,其所在队列指定了需要routing key 为 error 的消息
-
C2:消费者,其所在队列指定了需要routing key 为 info、error、warning 的消息
1. 开发生产者
//声明交换机  参数1:交换机名称 参数2:交换机类型 基于指令的Routing key转发
channel.exchangeDeclare("logs_direct","direct");
String key = "";
//发布消息
channel.basicPublish("logs_direct",key,null,("指定的route key"+key+"的消息").getBytes());
2.开发消费者-1
//声明交换机
channel.exchangeDeclare("logs_direct","direct");
//创建临时队列
String queue = channel.queueDeclare().getQueue();
//绑定队列和交换机
channel.queueBind(queue,"logs_direct","error");
channel.queueBind(queue,"logs_direct","info");
channel.queueBind(queue,"logs_direct","warn");
//消费消息
channel.basicConsume(queue,true,new DefaultConsumer(channel){@Overridepublic void handleDelivery(String consumerTag, Envelope envelope, AMQP.BasicProperties properties, byte[] body) throws IOException {System.out.println("消费者1: "+new String(body));}
});3.开发消费者-2
//声明交换机
channel.exchangeDeclare("logs_direct","direct");
//创建临时队列
String queue = channel.queueDeclare().getQueue();
//绑定队列和交换机
channel.queueBind(queue,"logs_direct","error");
//消费消息
channel.basicConsume(queue,true,new DefaultConsumer(channel){@Overridepublic void handleDelivery(String consumerTag, Envelope envelope, AMQP.BasicProperties properties, byte[] body) throws IOException {System.out.println("消费者2: "+new String(body));}
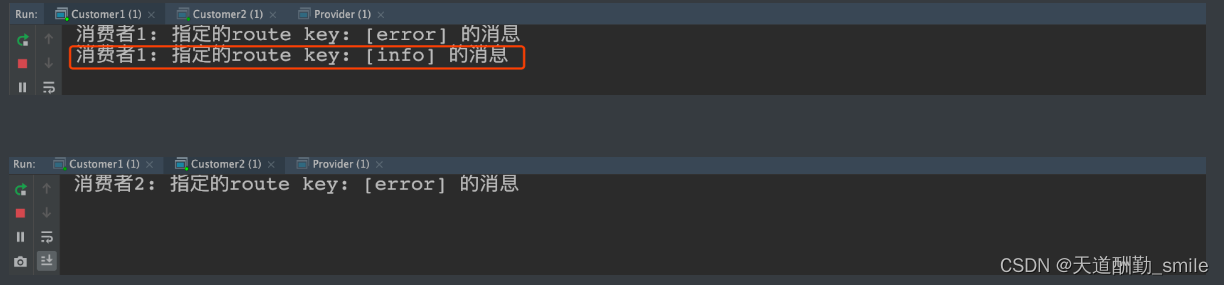
});4.测试生产者发送Route key为error的消息时

5.测试生产者发送Route key为info的消息时
4.6.2 Routing 之订阅模型-Topic
Topic类型的Exchange与Direct相比,都是可以根据RoutingKey把消息路由到不同的队列。只不过Topic类型Exchange可以让队列在绑定Routing key 的时候使用通配符!这种模型Routingkey 一般都是由一个或多个单词组成,多个单词之间以”.”分割,例如: item.insert

# 统配符* (star) can substitute for exactly one word.    匹配不多不少恰好1个词# (hash) can substitute for zero or more words.  匹配一个或多个词
# 如:audit.#    匹配audit.irs.corporate或者 audit.irs 等audit.*   只能匹配 audit.irs
1.开发生产者
//生命交换机和交换机类型 topic 使用动态路由(通配符方式)
channel.exchangeDeclare("topics","topic");
String routekey = "user.save";//动态路由key
//发布消息
channel.basicPublish("topics",routekey,null,("这是路由中的动态订阅模型,route key: ["+routekey+"]").getBytes());
2.开发消费者-1
Routing Key中使用*通配符方式//声明交换机
channel.exchangeDeclare("topics","topic");
//创建临时队列
String queue = channel.queueDeclare().getQueue();
//绑定队列与交换机并设置获取交换机中动态路由
channel.queueBind(queue,"topics","user.*");
//消费消息
channel.basicConsume(queue,true,new DefaultConsumer(channel){@Overridepublic void handleDelivery(String consumerTag, Envelope envelope, AMQP.BasicProperties properties, byte[] body) throws IOException {System.out.println("消费者1: "+new String(body));}
});3.开发消费者-2
Routing Key中使用#通配符方式//声明交换机
channel.exchangeDeclare("topics","topic");
//创建临时队列
String queue = channel.queueDeclare().getQueue();
//绑定队列与交换机并设置获取交换机中动态路由
channel.queueBind(queue,"topics","user.#");
//消费消息
channel.basicConsume(queue,true,new DefaultConsumer(channel){@Overridepublic void handleDelivery(String consumerTag, Envelope envelope, AMQP.BasicProperties properties, byte[] body) throws IOException {System.out.println("消费者2: "+new String(body));}
});4.测试结果

5. SpringBoot中使用RabbitMQ
5.0 搭建初始环境
1. 引入依赖
<dependency><groupId>org.springframework.boot</groupId><artifactId>spring-boot-starter-amqp</artifactId>
</dependency>
2. 配置配置文件
spring:application:name: springboot_rabbitmqrabbitmq:host: ********port: 5672username: emspassword: 123virtual-host: /emsRabbitTemplate 用来简化操作 使用时候直接在项目中注入即可使用
5.1 第一种hello world模型使用
-
开发生产者
@Autowired private RabbitTemplate rabbitTemplate; @Test public void testHello(){rabbitTemplate.convertAndSend("hello","hello world"); } -
开发消费者
@Component @RabbitListener(queuesToDeclare = @Queue("hello")) public class HelloCustomer { @RabbitHandlerpublic void receive1(String message){System.out.println("message = " + message);} }
5.2 第二种work模型使用
-
开发生产者
@Autowired private RabbitTemplate rabbitTemplate; @Test public void testWork(){for (int i = 0; i < 10; i++) {rabbitTemplate.convertAndSend("work","hello work!");} } -
开发消费者
@Component public class WorkCustomer {@RabbitListener(queuesToDeclare = @Queue("work"))public void receive1(String message){System.out.println("work message1 = " + message);} @RabbitListener(queuesToDeclare = @Queue("work"))public void receive2(String message){System.out.println("work message2 = " + message);} }说明:默认在Spring AMQP实现中Work这种方式就是公平调度,如果需要实现能者多劳需要额外配置
5.3 Fanout 广播模型
-
开发生产者
@Autowired private RabbitTemplate rabbitTemplate; @Test public void testFanout() throws InterruptedException {rabbitTemplate.convertAndSend("logs","","这是日志广播"); } -
开发消费者
@Component public class FanoutCustomer { @RabbitListener(bindings = @QueueBinding(value = @Queue,exchange = @Exchange(name="logs",type = "fanout")))public void receive1(String message){System.out.println("message1 = " + message);} @RabbitListener(bindings = @QueueBinding(value = @Queue, //创建临时队列exchange = @Exchange(name="logs",type = "fanout") //绑定交换机类型))public void receive2(String message){System.out.println("message2 = " + message);} }
5.4 Route 路由模型
-
开发生产者
@Autowired private RabbitTemplate rabbitTemplate; @Test public void testDirect(){rabbitTemplate.convertAndSend("directs","error","error 的日志信息"); } -
开发消费者
@Component public class DirectCustomer { @RabbitListener(bindings ={@QueueBinding(value = @Queue(),key={"info","error"},exchange = @Exchange(type = "direct",name="directs"))})public void receive1(String message){System.out.println("message1 = " + message);} @RabbitListener(bindings ={@QueueBinding(value = @Queue(),key={"error"},exchange = @Exchange(type = "direct",name="directs"))})public void receive2(String message){System.out.println("message2 = " + message);} }
5.5 Topic 订阅模型(动态路由模型)
-
开发生产者
@Autowired private RabbitTemplate rabbitTemplate; //topic @Test public void testTopic(){rabbitTemplate.convertAndSend("topics","user.save.findAll","user.save.findAll 的消息"); } -
开发消费者
@Component public class TopCustomer {@RabbitListener(bindings = {@QueueBinding(value = @Queue,key = {"user.*"},exchange = @Exchange(type = "topic",name = "topics"))})public void receive1(String message){System.out.println("message1 = " + message);} @RabbitListener(bindings = {@QueueBinding(value = @Queue,key = {"user.#"},exchange = @Exchange(type = "topic",name = "topics"))})public void receive2(String message){System.out.println("message2 = " + message);} }
6. MQ的应用场景
6.1 异步处理
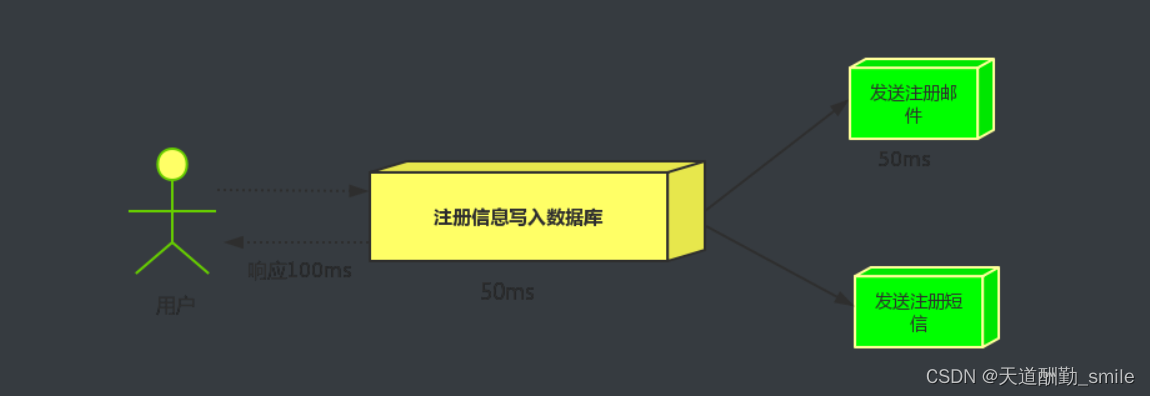
场景说明:用户注册后,需要发注册邮件和注册短信,传统的做法有两种 1.串行的方式 2.并行的方式
-
串行方式:将注册信息写入数据库后,发送注册邮件,再发送注册短信,以上三个任务全部完成后才返回给客户端。 这有一个问题是,邮件,短信并不是必须的,它只是一个通知,而这种做法让客户端等待没有必要等待的东西.

-
并行方式:将注册信息写入数据库后,发送邮件的同时,发送短信,以上三个任务完成后,返回给客户端,并行的方式能提高处理的时间。
-
消息队列:假设三个业务节点分别使用50ms,串行方式使用时间150ms,并行使用时间100ms。虽然并行已经提高的处理时间,但是,前面说过,邮件和短信对我正常的使用网站没有任何影响,客户端没有必要等着其发送完成才显示注册成功,应该是写入数据库后就返回.消息队列: 引入消息队列后,把发送邮件,短信不是必须的业务逻辑异步处理
由此可以看出,引入消息队列后,用户的响应时间就等于写入数据库的时间+写入消息队列的时间(可以忽略不计),引入消息队列后处理后,响应时间是串行的3倍,是并行的2倍。
6.2 应用解耦
场景:双11是购物狂节,用户下单后,订单系统需要通知库存系统,传统的做法就是订单系统调用库存系统的接口.
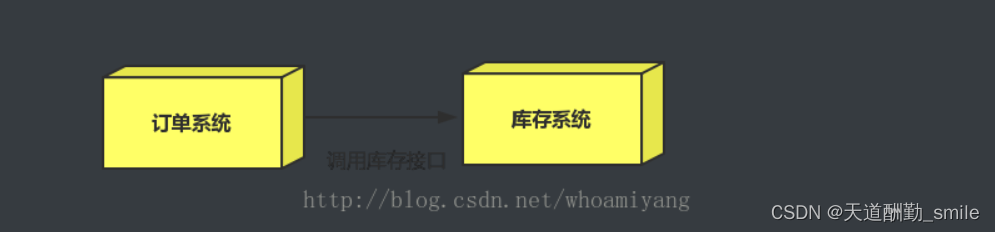
这种做法有一个缺点:
当库存系统出现故障时,订单就会失败。 订单系统和库存系统高耦合. 引入消息队列
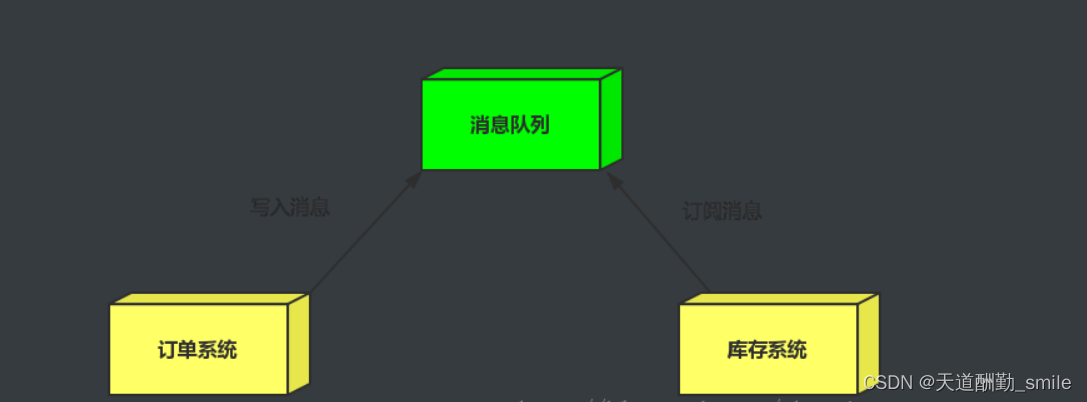
-
订单系统:用户下单后,订单系统完成持久化处理,将消息写入消息队列,返回用户订单下单成功。 -
库存系统:订阅下单的消息,获取下单消息,进行库操作。 就算库存系统出现故障,消息队列也能保证消息的可靠投递,不会导致消息丢失.
6.3 流量削峰
场景: 秒杀活动,一般会因为流量过大,导致应用挂掉,为了解决这个问题,一般在应用前端加入消息队列。
作用:
1.可以控制活动人数,超过此一定阀值的订单直接丢弃(我为什么秒杀一次都没有成功过呢^^)
2.可以缓解短时间的高流量压垮应用(应用程序按自己的最大处理能力获取订单)

1.用户的请求,服务器收到之后,首先写入消息队列,加入消息队列长度超过最大值,则直接抛弃用户请求或跳转到错误页面.
2.秒杀业务根据消息队列中的请求信息,再做后续处理.