Python 全栈系列236 rabbit_agent搭建
说明
通过rabbit_agent, 以接口方式实现对队列的标准操作,将pika包在微服务内,而不必在太多地方重复的去写。至少在服务端发布消息时,不必再去考虑这些问题。
在分布式任务的情况下,客户端本身会启动一个持续监听队列的客户端服务,这些应该是容易通过简单的配置来实现的。
在未来的应用上,我计划使用rabbitmq作为公网的消息队列,满足分布式计算的要求。例如,我部署了n个大模型,希望它们可以处理接口请求。很显然,一台服务器放不下n个大模型,但是用户可以把请求先发到消息队列,然后在不同的机器上启动大模型,分别接受来自队列的消息,处理后返回。
这样,只要在服务端有一个前端,可以转发、收集消息展示在应用前端,那么就可行了。
内容
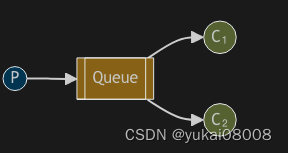
模式1:简单队列,连通性测试
适合简单缓存
有P(Produce)和C(Consumer)两端。

生产端在建立连接后,声明队列,然后往里面发消息。
Connection -> Channel -> Queue -> Message
生产
生产者:将消息发送到队列。
模式:只有在有新的消息要发布时才连接队列。(然后就可以释放连接)
import pika
credentials = pika.PlainCredentials('xxx', 'xxx')
import time
with pika.BlockingConnection(pika.ConnectionParameters('HOST', 11111, '/', credentials)) as connection:channel = connection.channel()channel.queue_declare(queue='hello')# 方式一:基本队列for i in range(100):time.sleep(0.1)channel.basic_publish(exchange='',routing_key='hello',body='Hello World!')print(" [x] Sent 'Hello World!'")
消费
消费者:将消息提取出来并打印。
模式:一直处于监听状态,所以连接需要一直保持。
def callback(ch, method, properties, body):print(f" [x] Received {body}")connection = pika.BlockingConnection(pika.ConnectionParameters('HOST', 11111, '/', credentials))
channel = connection.channel()
channel.queue_declare(queue='hello')
# 方式一:基本队列
channel.basic_consume(queue='hello',auto_ack=True,on_message_callback=callback)print(' [*] Waiting for messages. To exit press CTRL+C')
channel.start_consuming()
模式2:工作队列,区分消费者
适合分布式任务

这个模式下,稍微有点复杂。
简单模式生产者:
import sys
message = ' '.join(sys.argv[1:]) or "Hello World!"
channel.basic_publish(exchange='',routing_key='hello',body=message)
print(f" [x] Sent {message}")
如果这时候rabbitmq挂了,那么数据就会丢失,这时候要在声明队列时声明持久化的。但这要求队列在一开始就声明是持久化的。如果队列一开始没声明,再次声明会报错。
同时在发布消息的时候,也要声明持久化
channel.queue_declare(queue='hello', durable=True)
channel.basic_publish(exchange='',routing_key="hello1",body=message,properties=pika.BasicProperties(delivery_mode = pika.DeliveryMode.Persistent))
配置完重启服务测试
docker restart rabbitmq_24091_24092
ok,生产端的消息被持久化了,即使重启消息也没有丢失。
接下来就是客户端。也就是worker。
考虑到worker同样存在不可靠的情况,有可能消息消费到一半,然后worker挂了。所以这里主要是消息的应答机制。
默认情况下,worker采用自动应答机制。即获取消息就认为被正常消费。这适用于产品的稳定性很高,或者消息的重要性很低的情况(允许漏消息)。
def callback(ch, method, properties, body):print(f" [x] Received {body.decode()}")time.sleep(body.count(b'.'))print(" [x] Done")
# 方式一:基本队列
channel.basic_consume(queue='hello',on_message_callback=callback, auto_ack =True)
如果要做更可靠的确认,可以采取这种手工应答的机制。即消费时声明不自动确认,然后在callback内部确认。
# 手动确认
def callback(ch, method, properties, body):print(f" [x] Received {body.decode()}")time.sleep(body.count(b'.'))print(" [x] Done")ch.basic_ack(delivery_tag = method.delivery_tag)
channel.basic_consume(queue='hello',on_message_callback=callback, auto_ack =False)    print(' [*] Waiting for messages. To exit press CTRL+C')
channel.start_consuming()
最后是负载均衡,在这里,通过消费者声明自己的预取数量来完成。
channel.basic_qos(prefetch_count=3)
channel.basic_consume(queue='hello1',on_message_callback=callback, auto_ack =False)
3 广播
我认为在复杂决策场景下可以用到。
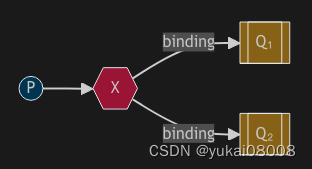
emit_log.py
channel = connection.channel()channel.exchange_declare(exchange='logs', exchange_type='fanout')message = ' '.join(sys.argv[1:]) or "info: Hello World!"
channel.basic_publish(exchange='logs', routing_key='', body=message)
print(f" [x] Sent {message}")
connection.close()'''
如您所见,建立连接后我们声明了交换。此步骤是必要的,因为禁止发布到不存在的交易所。如果还没有队列绑定到交换器,消息将会丢失,但这对我们来说没关系;如果还没有消费者在监听,我们可以安全地丢弃该消息。python3 emit_log.py First message.
'''
receive_logs1.py
channel = connection.channel()channel.exchange_declare(exchange='logs', exchange_type='fanout')result = channel.queue_declare(queue='', exclusive=True)
queue_name = result.method.queuechannel.queue_bind(exchange='logs', queue=queue_name)print(' [*] Waiting for logs. To exit press CTRL+C')def callback(ch, method, properties, body):print(f" [x] {body}")channel.basic_consume(queue=queue_name, on_message_callback=callback, auto_ack=True)channel.start_consuming()'''python3 receive_logs1.py >> logs_from_rabbit1.log
python3 receive_logs2.py >> logs_from_rabbit2.log
'''
在两个终端分别执行
python3 receive_logs1.py >> logs_from_rabbit1.log
python3 receive_logs2.py >> logs_from_rabbit2.log

当关闭后,数据被写入日志
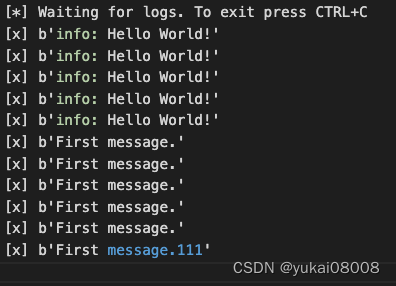
队列被自动删除

4 路由
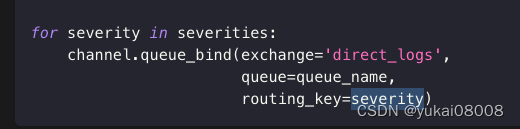
fanout是无意识转发,direct可以通过不同的路由键值决定队列分发,或者消息丢弃(如严重程度低的)。这种过滤和转发是通过路由键来确定的 routing_key
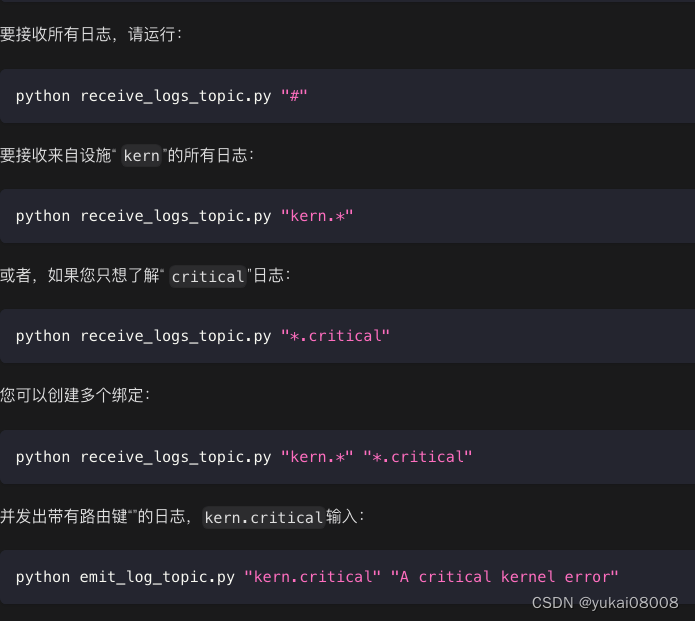
5 主题
有点像正则,实现更复杂的过滤。
5 微服务
命名为rabbit_agent_24098,第一步先实现模式二(worker)和模式三(subscribe)
先获取到基本包,并安装,能省不少事
wget  Basefuncs-1.2-py3-none-any.whl
pip install Basefuncs-1.2-py3-none-any.whl
然后是简单的server_funcs.py,在server_funcs里定义了两个基础文件夹(现在看来也不是特别需要)
# 【创建tornado所需问文件夹】
import os
# 如果路径不存在则创建
def create_folder_if_notexist(somepath):if not os.path.exists(somepath):os.makedirs(somepath)return Truem_static = os.path.join(os.getcwd(),'m_static')
m_template = os.path.join(os.getcwd(),'m_template')create_folder_if_notexist(m_static)
create_folder_if_notexist(m_template)settings = {
'static_path':m_static,
'template_path':m_template
}# 如果需要序列化含np的内容
import json
from json import JSONEncoder
class MyEncoder(JSONEncoder):def default(self, obj):if isinstance(obj, np.integer):return int(obj)elif isinstance(obj, np.floating):return float(obj)elif isinstance(obj, np.ndarray):return obj.tolist()if isinstance(obj, datetime):return obj.__str__()if isinstance(obj, dd.timedelta):return obj.__str__()else:return super(MyEncoder, self).default(obj)# json.dumps(foo, cls=MyJsonEncoder)from Basefuncs import *
# 读取配置
conf_dict = get_conf_dict('configs.conf')
服务端:
from server_funcs import *
import tornado.httpserver  # http服务器
import tornado.ioloop  # ?
import tornado.options  # 指定服务端口和路径解析
import tornado.web  # web模块
from tornado.options import define, options
import os.path  # 获取和生成template文件路径import pika
import json
# 全局配置文件
# rabbit01 = conf_dict['rabbit01']# 应用列表
app_list = []IndexHandler_path = r'/'
class IndexHandler(tornado.web.RequestHandler):def get(self):self.write('【GET】This is Website for Internal API System')self.write('Please Refer to API document')print('Get got a request test')# print(buffer_dict)def post(self):request_body = self.request.bodyprint('Trying Decode Json')some_dict = json.loads(request_body)print(some_dict)msg_dict = {}msg_dict['info'] = '【POST】This is Website for Internal API System'msg_dict['input_dict'] = some_dictself.write(json.dumps(msg_dict))print('Post got a request test')
IndexHandler_tuple = (IndexHandler_path,IndexHandler)
app_list.append(IndexHandler_tuple)# 发布消息:传入对应的队列服务器名称,获取对应的服务器配置,然后进行连接并发布消息
## 模式二:Work Queues
WorkQMessageHandler_path = r'/send_workq_message/'
class WorkQMessageHandler(tornado.web.RequestHandler):def post(self):request_body = self.request.bodysome_dict = json.loads(request_body)# 1 第一层rabbit = some_dict['rabbit']exchange = some_dict.get('exchange') or ''exchange_type = some_dict.get('exchange_type') or ''# queue不可缺少queue = some_dict['queue']durable = some_dict.get('durable') if durable is None:durable = True routing_key = some_dict.get('routing_key') or ''message_list = some_dict['message_list']print(some_dict)the_rabbit_conf_dict = conf_dict[rabbit]credentials = pika.PlainCredentials(the_rabbit_conf_dict['user'], the_rabbit_conf_dict['pwd'])msg_dict = {}with pika.BlockingConnection(pika.ConnectionParameters(the_rabbit_conf_dict['host'], the_rabbit_conf_dict['port'], '/', credentials)) as connection:channel = connection.channel()if len(exchange.strip())>1:channel.exchange_declare(exchange=exchange, exchange_type=exchange_type)# 队列的持久化与否要一开始设置好if durable is True:channel.queue_declare(queue=queue, durable=True)for message in message_list:print('a :',message )channel.basic_publish(exchange= exchange, routing_key=routing_key, body=json.dumps(message),properties=pika.BasicProperties(delivery_mode = pika.DeliveryMode.Persistent))msg_dict['durable'] = Truemsg_dict['status'] = Trueelse:channel.queue_declare(queue=queue)for message in message_list:print('b :',message )channel.basic_publish(exchange= exchange, routing_key=routing_key, body=json.dumps(message) )msg_dict['durable'] = Falsemsg_dict['status'] = Truemsg_dict['messages'] = len(message_list)self.write(json.dumps(msg_dict))
WorkQMessageHandler_tuple = (WorkQMessageHandler_path,WorkQMessageHandler)
app_list.append(WorkQMessageHandler_tuple)## 模式三:Publish/Subscribe
## 模式二:Work Queues
SubscribeMessageHandler_path = r'/send_subscribe_message/'
class SubscribeMessageHandler(tornado.web.RequestHandler):def post(self):request_body = self.request.bodysome_dict = json.loads(request_body)# 1 第一层rabbit = some_dict['rabbit']exchange = some_dict.get('exchange') or ''exchange_type = some_dict.get('exchange_type') or ''routing_key = some_dict.get('routing_key') or ''message_list = some_dict['message_list']print(some_dict)the_rabbit_conf_dict = conf_dict[rabbit]credentials = pika.PlainCredentials(the_rabbit_conf_dict['user'], the_rabbit_conf_dict['pwd'])msg_dict = {}with pika.BlockingConnection(pika.ConnectionParameters(the_rabbit_conf_dict['host'], the_rabbit_conf_dict['port'], '/', credentials)) as connection:channel = connection.channel()if len(exchange.strip())>1:channel.exchange_declare(exchange=exchange, exchange_type=exchange_type)for message in message_list:channel.basic_publish(exchange= exchange, routing_key=routing_key, body=json.dumps(message))            SubscribeMessageHandler_tuple = (SubscribeMessageHandler_path,SubscribeMessageHandler)
app_list.append(SubscribeMessageHandler_tuple)if __name__ == '__main__':#tornado.options.parse_command_line()apps = tornado.web.Application(app_list, **settings)http_server = tornado.httpserver.HTTPServer(apps)define('port', default=8000, help='run on the given port', type=int)http_server.listen(options.port)# 单核# 多核打开注释# 0 是全部核# http_server.start(num_processes=10) # tornado将按照cpu核数来fork进程# ---启动print('Server Started')tornado.ioloop.IOLoop.instance().start()
本地开发测试完之后,发布为镜像,然后启动服务。
docker run -d \--restart=always \--name=rabbit_agent_24098 \-v /etc/localtime:/etc/localtime \-v /etc/timezone:/etc/timezone\-v /etc/hostname:/etc/hostname\-e "LANG=C.UTF-8" \-w /workspace\-p 24098:8000\myregistry.domain.com:24052/server.andy.rabbit_agent_24098:v100 \sh -c "python3 server.py"
模式二测试:WorkerQ
在生产端发送消息。声明了一个不持久化的队列,然后发送消息列表。注意:如果生产端声明非持久队列,那么消费端也要做同样的声明。否则会出现声明错误。另,如果消息ACK失败,RabbitMQ会在TTL之后将消息放回队列。如果消费者的通道断开连接,那么RabbitMQ也会将消息放回队列。
import requests as req
message_list = [{'msg_id':1,'msg':'first msg'},{'msg_id':2,'msg':'second msg'}]# 1 模式2 WorkQ:服务端发送消息
para_dict = {}
para_dict['rabbit'] = 'rabbit01'
para_dict['routing_key'] = 'hello2'
para_dict['durable'] = False
para_dict['message_list'] = message_list
para_dict['queue'] = 'hello2'# res = req.post('http://127.0.0.1:8000/send_workq_message/', json = para_dict)
res = req.post('http://WAN_IP:24098/send_workq_message/', json = para_dict)
在消费端执行消费。默认的情况下,body里存放的是二进制字符串。以下采取了自动和手动方式进行消息确认。
import pika
import json
credentials = pika.PlainCredentials('xxx', 'xxx')
connection = pika.BlockingConnection(pika.ConnectionParameters('HOST', PORT, '/', credentials))channel = connection.channel()import time# 自动确认
# def callback(ch, method, properties, body):
#     print(f" [x] Received {body.decode()}")
#     time.sleep(body.count(b'.'))
#     print(" [x] Done")
# # 方式一:基本队列
# channel.basic_consume(queue='hello',
#                         on_message_callback=callback, auto_ack =True)    # 手动确认
# def callback(ch, method, properties, body):
#     input_data = json.loads(body.decode())
#     print(f" [x] Received ",input_data)
#     # time.sleep(body.count(b'.'))
#     print(" [x] Done")
#     ch.basic_ack(delivery_tag = method.delivery_tag)
def callback(ch, method, properties, body):# input_data = json.loads(body.decode())print(f" [x] Received ",body.decode())# time.sleep(body.count(b'.'))print(" [x] Done")ch.basic_ack(delivery_tag = method.delivery_tag)# channel.queue_declare(queue='hello1')
channel.queue_declare(queue='hello1',durable=True)
channel.basic_qos(prefetch_count=3)
channel.basic_consume(queue='hello1',on_message_callback=callback, auto_ack =False)    print(' [*] Waiting for messages. To exit press CTRL+C')
channel.start_consuming()
模式三测试:订阅模式
para_dict = {}
para_dict['rabbit'] = 'rabbit01'
para_dict['routing_key'] = None
para_dict['durable'] = False
para_dict['message_list'] = message_list
para_dict['exchange'] = 'logs'
para_dict['exchange_type'] = 'fanout'res = req.post('http://127.0.0.1:8000/send_subscribe_message/', json = para_dict)
订阅的worker用了另一种形式:使用系统分配的默认队列,使用完之后自动删除
#!/usr/bin/env python
import pika
credentials = pika.PlainCredentials(xxx, xxx)
connection = pika.BlockingConnection(pika.ConnectionParameters(WAN_IP, PORT, '/', credentials))channel = connection.channel()channel.exchange_declare(exchange='logs', exchange_type='fanout')result = channel.queue_declare(queue='', exclusive=True)
queue_name = result.method.queuechannel.queue_bind(exchange='logs', queue=queue_name)print(' [*] Waiting for logs. To exit press CTRL+C')def callback(ch, method, properties, body):input_data = json.loads(body.decode())print(f" [x] ",input_data)channel.basic_consume(queue=queue_name, on_message_callback=callback, auto_ack=True)channel.start_consuming()
6 结束
到这里第一版就算完成了,可以开始先用RabbitMQ做一些应用。
目前能想到的是用于分布式任务,队列中存放任务的元信息。Worker可以通过直接或者间接方式取数。
直接方式是指worker直接发起数据库的拉取动作,获得数据然后执行。
间接方式则是worker向指定队列反馈消息,由另一个服务来分发数据文件(针对租用算力机没有额外端口的情况)
在应用上,可以
- 1 为任务搭建具有前端的微服务,数据量不大,可以通过RabbitMQ直接传数据
- 2 接受来自量化程序的交易消息