如何在Android设备上运行深度网络
返回:OpenCV系列文章目录(持续更新中......)
上一篇:将OpenCV与gdb驱动的IDE结合使用
下一篇:OpenCV4.9.0开源计算机视觉库安装教程

介绍
在本教程中,您将了解如何使用 OpenCV 深度学习模块在 Android 设备上运行深度学习网络。教程是为 Android Studio 2022.2.1 编写的。
要求
- 从 https://developer.android.com/studio 下载并安装 Android Studio。
- 从 Releases · opencv/opencv · GitHub 获取最新的预构建 OpenCV for Android 版本并解压缩(例如,需要最低版本 4.9)。
opencv-4.X.Y-android-sdk.zip - 从 GitHub - chuanqi305/MobileNet-SSD: Caffe implementation of Google MobileNet SSD detection network, with pretrained weights on VOC0712 and mAP=0.727. 下载MobileNet目标检测模型。配置文件和模型权重是必需的。
MobileNetSSD_deploy.prototxtMobileNetSSD_deploy.caffemodel
创建一个空的 Android Studio 项目并添加 OpenCV 依赖项
使用 Android Development with OpenCV 教程初始化您的项目并添加 OpenCV。
制作应用
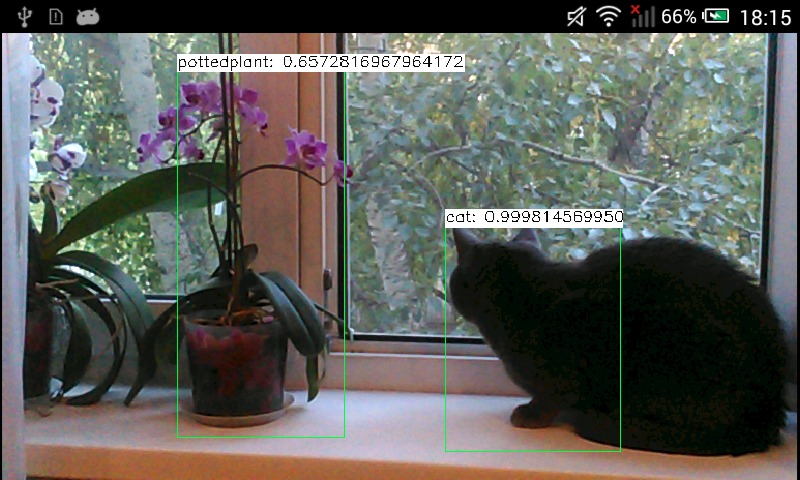
我们的示例将从相机拍摄照片,将其转发到深度网络中,并接收一组矩形、类标识符和置信度值,范围为 [0, 1]。
首先,我们需要添加一个必要的小部件来显示已处理的帧。修改:app/src/main/res/layout/activity_main.xml
<?xml version="1.0" encoding="utf-8"?>
<FrameLayout xmlns:android="http://schemas.android.com/apk/res/android"
xmlns:app="http://schemas.android.com/apk/res-auto"
xmlns:tools="http://schemas.android.com/tools"
android:layout_width="match_parent"
android:layout_height="match_parent"
tools:context="org.opencv.samples.opencv_mobilenet.MainActivity">
<org.opencv.android.JavaCameraView
android:id="@+id/CameraView"
android:layout_width="match_parent"
android:layout_height="match_parent"
android:visibility="visible" />
</FrameLayout>修改/app/src/main/AndroidManifest.xml以启用全屏模式,设置正确的屏幕方向并允许使用相机。
<?xml version="1.0" encoding="utf-8"?>
<manifest xmlns:android="http://schemas.android.com/apk/res/android">
<application
android:label="@string/app_name">
<activity
android:exported="true"
android:name=".MainActivity"
android:screenOrientation="landscape"> <!--Screen orientation-->
<intent-filter>
<action android:name="android.intent.action.MAIN" />
<category android:name="android.intent.category.LAUNCHER" />
</intent-filter>
</activity>
</application>
<!--Allow to use a camera-->
<uses-permission android:name="android.permission.CAMERA"/>
<uses-feature android:name="android.hardware.camera" android:required="false"/>
<uses-feature android:name="android.hardware.camera.autofocus" android:required="false"/>
<uses-feature android:name="android.hardware.camera.front" android:required="false"/>
<uses-feature android:name="android.hardware.camera.front.autofocus" android:required="false"/>
</manifest>- 如有必要,替换
app/src/main/java/com/example/myapplication/MainActivity.java的内容并设置自定义包名称:
package com.example.myapplication;
import android.content.Context;
import android.content.res.AssetManager;
import android.os.Bundle;
import android.util.Log;
import android.widget.Toast;
import org.opencv.android.CameraActivity;
import org.opencv.android.CameraBridgeViewBase;
import org.opencv.android.CameraBridgeViewBase.CvCameraViewFrame;
import org.opencv.android.CameraBridgeViewBase.CvCameraViewListener2;
import org.opencv.android.OpenCVLoader;
import org.opencv.core.Core;
import org.opencv.core.Mat;
import org.opencv.core.MatOfByte;
import org.opencv.core.Point;
import org.opencv.core.Scalar;
import org.opencv.core.Size;
import org.opencv.dnn.Net;
import org.opencv.dnn.Dnn;
import org.opencv.imgproc.Imgproc;
import java.io.InputStream;
import java.io.IOException;
import java.util.Collections;
import java.util.List;
public class MainActivity extends CameraActivity implements CvCameraViewListener2 {
@Override
public void onResume() {
super.onResume();
if (mOpenCvCameraView != null)
mOpenCvCameraView.enableView();
}
@Override
protected void onCreate(Bundle savedInstanceState) {
super.onCreate(savedInstanceState);
if (OpenCVLoader.initLocal()) {
Log.i(TAG, "OpenCV loaded successfully");
} else {
Log.e(TAG, "OpenCV initialization failed!");
(Toast.makeText(this, "OpenCV initialization failed!", Toast.LENGTH_LONG)).show();
return;
}
mModelBuffer = loadFileFromResource(R.raw.mobilenet_iter_73000);
mConfigBuffer = loadFileFromResource(R.raw.deploy);
if (mModelBuffer == null || mConfigBuffer == null) {
Log.e(TAG, "Failed to load model from resources");
} else
Log.i(TAG, "Model files loaded successfully");
net = Dnn.readNet("caffe", mModelBuffer, mConfigBuffer);
Log.i(TAG, "Network loaded successfully");
setContentView(R.layout.activity_main);
// Set up camera listener.
mOpenCvCameraView = (CameraBridgeViewBase)findViewById(R.id.CameraView);
mOpenCvCameraView.setVisibility(CameraBridgeViewBase.VISIBLE);
mOpenCvCameraView.setCvCameraViewListener(this);
}
@Override
public void onPause()
{
super.onPause();
if (mOpenCvCameraView != null)
mOpenCvCameraView.disableView();
}
@Override
protected List<? extends CameraBridgeViewBase> getCameraViewList() {
return Collections.singletonList(mOpenCvCameraView);
}
public void onDestroy() {
super.onDestroy();
if (mOpenCvCameraView != null)
mOpenCvCameraView.disableView();
mModelBuffer.release();
mConfigBuffer.release();
}
// Load a network.
public void onCameraViewStarted(int width, int height) {
}
public Mat onCameraFrame(CvCameraViewFrame inputFrame) {
final int IN_WIDTH = 300;
final int IN_HEIGHT = 300;
final float WH_RATIO = (float)IN_WIDTH / IN_HEIGHT;
final double IN_SCALE_FACTOR = 0.007843;
final double MEAN_VAL = 127.5;
final double THRESHOLD = 0.2;
// Get a new frame
Log.d(TAG, "handle new frame!");
Mat frame = inputFrame.rgba();
Imgproc.cvtColor(frame, frame, Imgproc.COLOR_RGBA2RGB);
// Forward image through network.
Mat blob = Dnn.blobFromImage(frame, IN_SCALE_FACTOR,
new Size(IN_WIDTH, IN_HEIGHT),
new Scalar(MEAN_VAL, MEAN_VAL, MEAN_VAL), /*swapRB*/false, /*crop*/false);
net.setInput(blob);
Mat detections = net.forward();
int cols = frame.cols();
int rows = frame.rows();
detections = detections.reshape(1, (int)detections.total() / 7);
for (int i = 0; i < detections.rows(); ++i) {
double confidence = detections.get(i, 2)[0];
if (confidence > THRESHOLD) {
int classId = (int)detections.get(i, 1)[0];
int left = (int)(detections.get(i, 3)[0] * cols);
int top = (int)(detections.get(i, 4)[0] * rows);
int right = (int)(detections.get(i, 5)[0] * cols);
int bottom = (int)(detections.get(i, 6)[0] * rows);
// Draw rectangle around detected object.
Imgproc.rectangle(frame, new Point(left, top), new Point(right, bottom),
new Scalar(0, 255, 0));
String label = classNames[classId] + ": " + confidence;
int[] baseLine = new int[1];
Size labelSize = Imgproc.getTextSize(label, Imgproc.FONT_HERSHEY_SIMPLEX, 0.5, 1, baseLine);
// Draw background for label.
Imgproc.rectangle(frame, new Point(left, top - labelSize.height),
new Point(left + labelSize.width, top + baseLine[0]),
new Scalar(255, 255, 255), Imgproc.FILLED);
// Write class name and confidence.
Imgproc.putText(frame, label, new Point(left, top),
Imgproc.FONT_HERSHEY_SIMPLEX, 0.5, new Scalar(0, 0, 0));
}
}
return frame;
}
public void onCameraViewStopped() {}
private MatOfByte loadFileFromResource(int id) {
byte[] buffer;
try {
// load cascade file from application resources
InputStream is = getResources().openRawResource(id);
int size = is.available();
buffer = new byte[size];
int bytesRead = is.read(buffer);
is.close();
} catch (IOException e) {
e.printStackTrace();
Log.e(TAG, "Failed to ONNX model from resources! Exception thrown: " + e);
(Toast.makeText(this, "Failed to ONNX model from resources!", Toast.LENGTH_LONG)).show();
return null;
}
return new MatOfByte(buffer);
}
private static final String TAG = "OpenCV-MobileNet";
private static final String[] classNames = {"background",
"aeroplane", "bicycle", "bird", "boat",
"bottle", "bus", "car", "cat", "chair",
"cow", "diningtable", "dog", "horse",
"motorbike", "person", "pottedplant",
"sheep", "sofa", "train", "tvmonitor"};
private MatOfByte mConfigBuffer;
private MatOfByte mModelBuffer;
private Net net;
private CameraBridgeViewBase mOpenCvCameraView;
}- 将下载deploy.prototxt和mobilenet_iter_73000.caffemodel并放入文件夹 app/src/main/res/raw。OpenCV DNN 模型主要用于从文件加载 ML 和 DNN 模型。现代 Android 不允许在没有额外权限的情况下使用它,但提供了 Java API 来从资源加载字节。此示例使用替代 DNN API,该 API 从内存缓冲区而不是文件初始化模型。以下函数从资源中读取模型文件,并将其转换为适合 OpenCV Java API 的MatOfBytes(在 C++ 世界中std::vector<char>的模拟)对象:
private MatOfByte loadFileFromResource(int id) {
byte[] buffer;
try {
// load cascade file from application resources
InputStream is = getResources().openRawResource(id);
int size = is.available();
buffer = new byte[size];
int bytesRead = is.read(buffer);
is.close();
} catch (IOException e) {
e.printStackTrace();
Log.e(TAG, "Failed to ONNX model from resources! Exception thrown: " + e);
(Toast.makeText(this, "Failed to ONNX model from resources!", Toast.LENGTH_LONG)).show();
return null;
}
return new MatOfByte(buffer);
}然后通过以下行完成网络初始化:
mModelBuffer = loadFileFromResource(R.raw.mobilenet_iter_73000);
mConfigBuffer = loadFileFromResource(R.raw.deploy);
if (mModelBuffer == null || mConfigBuffer == null) {
Log.e(TAG, "Failed to load model from resources");
} else
Log.i(TAG, "Model files loaded successfully");
net = Dnn.readNet("caffe", mModelBuffer, mConfigBuffer);
Log.i(TAG, "Network loaded successfully");另请参阅有关资源的 Android 文档
- 看看 DNN 模型输入是如何准备的,推理结果是如何解释的:
Mat blob = Dnn.blobFromImage(frame, IN_SCALE_FACTOR,
new Size(IN_WIDTH, IN_HEIGHT),
new Scalar(MEAN_VAL, MEAN_VAL, MEAN_VAL), /*swapRB*/false, /*crop*/false);
net.setInput(blob);
Mat detections = net.forward();
int cols = frame.cols();
int rows = frame.rows();
detections = detections.reshape(1, (int)detections.total() / 7);
for (int i = 0; i < detections.rows(); ++i) {
double confidence = detections.get(i, 2)[0];
if (confidence > THRESHOLD) {
int classId = (int)detections.get(i, 1)[0];
int left = (int)(detections.get(i, 3)[0] * cols);
int top = (int)(detections.get(i, 4)[0] * rows);
int right = (int)(detections.get(i, 5)[0] * cols);
int bottom = (int)(detections.get(i, 6)[0] * rows);
// Draw rectangle around detected object.
Imgproc.rectangle(frame, new Point(left, top), new Point(right, bottom),
new Scalar(0, 255, 0));
String label = classNames[classId] + ": " + confidence;
int[] baseLine = new int[1];
Size labelSize = Imgproc.getTextSize(label, Imgproc.FONT_HERSHEY_SIMPLEX, 0.5, 1, baseLine);
// Draw background for label.
Imgproc.rectangle(frame, new Point(left, top - labelSize.height),
new Point(left + labelSize.width, top + baseLine[0]),
new Scalar(255, 255, 255), Imgproc.FILLED);
// Write class name and confidence.
Imgproc.putText(frame, label, new Point(left, top),
Imgproc.FONT_HERSHEY_SIMPLEX, 0.5, new Scalar(0, 0, 0));
}
}Dnn.blobFromImage将相机帧转换为神经网络输入张量。应用调整大小和统计归一化。网络输出张量的每一行都包含一个检测到的对象的信息,顺序如下:范围 [0, 1] 的置信度、类 ID、左、上、右、下框坐标。所有坐标都在 [0, 1] 范围内,在渲染前应缩放到图像大小。
- 启动一个应用程序并创造乐趣!
参考文献:
1、《How to run deep networks on Android device》--Dmitry Kurtaev