Vue2(十一):全局事件总线、消息订阅与发布pubsub、TodoList的编辑功能、$nextTick、过渡与动画
一、全局事件总线
1、思路解析
一种组件间通信的方式,适用于任意组件间通信。通俗理解就是一个定义在所有组件之外的公共x,这个x可以有vm或vc上的同款$on、$off、$emit,也可以让所有组件都访问到。

第一个问题:那怎样添加这个x才能让所有组件都看到呢?要想实现这个事情,只能在Vue的原型对象上去添加了!就是在Vue.prototype上添加一个属性,值是vm或vc.
那么Vue.prototype应该放在那里写?应该在main.js中写,因为你在main.js中引入的vue

第二个问题,怎样才能访问到 $on,$off,$emit这些呢?直接去输出x的$on这些,你是找不到的,因为他只是个对象object。其实vue的原型上都有,输出vue.prototype就会发现这些属性全都有。
接下来我们看看如何使用?
2、安装全局事件总线
安装的话用vc也行用vm也行,用vc的话可以在main.js中这么写:
const Demo = Vue.extend({});
const d = new Demo();
Vue.prototype.$bus = d;//这个d其实就是我们的vc
但其实标准的写法不是这样繁琐的,应该是用vm下面这样:
new Vue({......//放这个函数里,是因为模板还未解析,这个函数在自定义事件定义之前,是不会报错滴beforeCreate() {Vue.prototype.$bus = this //安装全局事件总线,起个名叫$bus,把当前vm给特},......
})
3.使用事件总线
接收数据:A组件想接收数据,则在A组件中给$bus绑定自定义事件,事件的回调留在A组件自身
methods(){demo(data){......}
}
......
mounted() {this.$bus.$on('xxxx',this.demo)
}
4.提供数据
任意一个组件,都可以给上面说的A组件传数据
  methods:{sendStudentName(){this.$bus.$emit('xxxx',this.name)}
}
5.组件销毁前最好解绑
最好在beforeDestroy钩子中,用$off去解绑当前组件所用到的事件。
因为接收数据的组件A中定义的回调函数和自定义事件是绑定的,而这个用来接收数据的组件实例A都销毁了,回调函数也没了,那这个xxxx自定义事件也就没用了,你留着会污染全局环境(这块儿有点迷糊)
beforeDestory(){this.$bus.$off('xxxx')
}
二、todolist的孙传父
之前我们孙传父都是父亲传给儿子函数,儿子传给孙子函数,然后孙子再调用函数传值,很麻烦,但是现在我们可以用全局事件总线实现孙子给父亲传数据
1.首先安装全局事件中线
new Vue({el: '#app',render: h => h(App),beforeCreate() {Vue.prototype.$bus = this; //创建全局事件总线}
});
2.在App中绑定全局自定义事件,并使用之前写好的回调
mounted() {//挂载完成后给全局事件总线添加事件this.$bus.$on('changeTodo', this.changeTodo);this.$bus.$on('deleteTodo', this.deleteTodo);
},
beforeDestroy() {//最好在销毁前解绑this.$bus.$off(['changeTodo', 'deleteTodo']);
},
3.Item中触发事件,并把数据id传过去
<input type="checkbox" :checked="todo.done" @click="handleChange(todo.id)" />
<button class="btn btn-danger" @click="handleDelete(todo.id)">删除</button>
handleChange(id) {//触发全局事件总线中的事件this.$bus.$emit('changeTodo', id);
},
handleDelete(id) {if (confirm('确定要删除吗?'))  //点确定是true,取消是falsethis.$bus.$emit('deleteTodo', id);
}
三、消息订阅与发布(pubsub)
1.使用方法
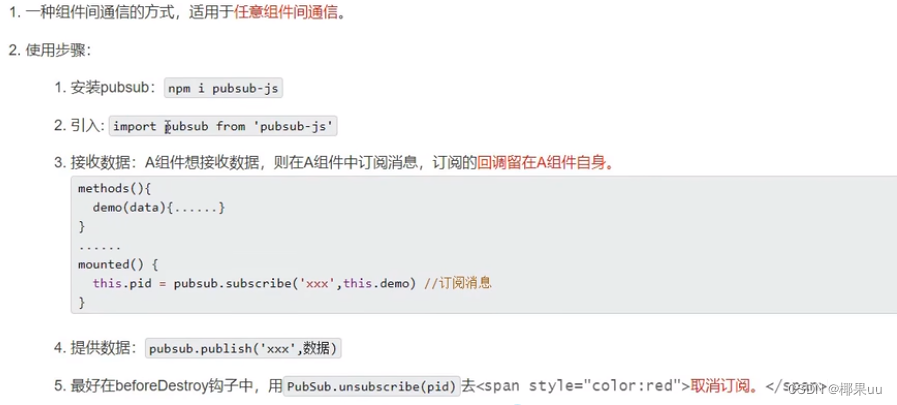
一种组件间的通信方式,适用于任意组件之间。
这玩意儿用的不多,和全局事件总线写法差不多,但是全局事件总线更好,因为是在Vue身上操作,但是这个的话要引入第三方库,库有很多,比如pubsub-js
(1)安装pubsub:npm i pubsub-js
(2)引入:import pubsub from 'pubsub-js
(3)接收数据:A组件想接收数据,则在A组件中订阅消息,订阅的回调留在A组件自身。
接收两个参数,第一个是消息名字,第二个是传过来的数据
methods(){demo(msgName,data){......}
}
......
mounted() {this.pubsubId = pubsub.subscribe('xxx',this.demo) //订阅消息
},
beforeDestroy() {pubsub.unsubscribe(this.pubsubId); //销毁时取消订阅
},
(4)提供数据:
methods: {sendStudentName() {// this.$bus.$emit('hello', this.name);pubsub.publish('hello', this.name); //发布消息并传数据}
},
(5) 销毁:
beforeDestroy(){// this.$bus.$off('hello')pubsub.unsubscribe(this.pubId)}总结:
2.todolist案例
(1)在App.vue中
import pubsub from 'pubsub-js'deleteTodo(_,id)deleteTodo要用_,占个位
mounted(){this.$bus.$on('checkTodo',checkTodo)// this.$bus.$on('deleteTodo', deleteTodo)this.pubId=pubsub.subscribe('deleteTodo',this.deleteTodo)},beforeDestroy(){this.$bus.$off('checkTodo')// this.$bus.$off('deleteTodo')pubsub.unsubscribe(this.pubId)}(2) MyItem.vue
import pubsub from 'pubsub-js'handleDelete(id) {if (confirm('确定删除吗?')) {//通知App组件将对应的todo对象删除// this.deleteTodo(id)// this.$bus.$emit('deleteTodo', id)pubsub.publish('deleteTodo',id)}}四、todolist的编辑功能实现
1.思路
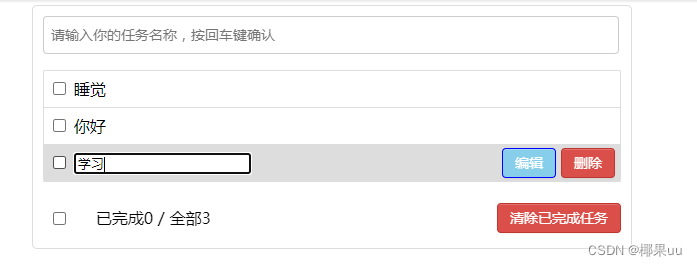
首先得有一个按钮,点击之后出现input框,框里呢是todo.title,而且原来的span要隐藏。然后修改完之后,失去焦点会自动更新数据,并且span出现,input框隐藏。
除此之外还有个细节,那就是点击编辑要自动获取焦点,要不然会有bug(点击编辑,然后突然不想改了,还得手动点一下input,再点下别的地方,才会变回span)
想实现span和input的来回切换,就要给todo添加新的属性,用来标识这个变换,这里起名叫isEdit
所以大致思路:给标签添加事件 => 点击编辑按钮切换span为input => 失去焦点传数据 => App收数据 => 解决焦点bug
2.给标签添加事件
(1)isEdit一上来是没有的,所以todo.isEdit = false,再加上默认上来显示的是span,所以span加个v-show="!todo.isEdit",input加个v-show="todo.isEdit" ,button加v-show="!todo.isEdit"是因为我们一般编辑时,这个按钮应该消失才对,所以和span一致
(2)由于props接过来的数据不能改,所以使用单向数据绑定:value="todo.title" (不过这里很奇怪,明明isEdit也是给todo添加了属性,奇怪奇怪,画个问号?????)
(3)ref="inputTitle" 是为了方便后面拿到input元素然后操作它写的(nextTick)
(4)@blur="handleBlur(todo, $event)"是失去焦点时触发的事件,用来给App传值
<span v-show="!todo.isEdit">{{ todo.title }}</span>
<input
type="text"
v-show="todo.isEdit"
:value="todo.title"
ref="inputTitle" //这个我没写
@blur="handleBlur(todo, $event)"><button class="btn btn-edit" @click="handleEdit(todo)" v-show="!todo.isEdit">编辑</button>
3.点击编辑按钮切换span为input
点击编辑给todo追加属性,用来切换span为input。这里考虑到给todo追加属性的问题,如果想要让Vue监测到这个属性,那么必须使用$set来添加isEdit,且默认值为true(因为编辑的时候显示的时input啊,想想v-show="todo.isEdit")。
但是这里边有点儿问题,如果已经添加过了isEdit,那每次点击编辑按钮,都会添加一次isEdit属性,这样是不太好的,所以要加个判断,添加过了就改成true,没添加过就添加个true
handleEdit(todo) {if (todo.isEdit !== undefined) {console.log('todo里有isEdit属性了')todo.isEdit = true;} else {console.log('todo里没有isEdit属性')this.$set(todo, 'isEdit', true);}this.$nextTick(function () {this.$refs.inputTitle.focus();})},
4.失去焦点传数据
失去焦点首先input得变回span,然后使用全局事件总线传值,传值一定要传当前input框的value值,因为这才是你修改后的值,使用事件对象获取。(当然,别忘了id也要传)
handleBlur(todo, e) {todo.isEdit = false;if (!e.target.value.trim()) return alert('值不能为空!');  //trim去掉空格this.$bus.$emit('editTodo', todo.id, e.target.value);
}
5.App收数据
把input框里你写的东西拿过来,给对应的todo.title
//6.实现编辑todo
methods: {......editTodo(id, newVal) {this.todos.forEach((todo) => {if (todo.id === id) { todo.title = newVal }});}}
mounted() {......//实现编辑功能,接收数据this.$bus.$on('editTodo', this.editTodo);
},
beforeDestroy() {//最好在销毁前解绑this.$bus.$off('editTodo');
},
6、代码总览
App.vue
<template><div id="root"><div class="todo-container"><div class="todo-wrap"><MyHeader @addTodo="addTodo" /><MyList :todos="todos" /><MyFooter :todos="todos" @checkAllTodo="checkAllTodo" @clearAllTodo="clearAllTodo" /></div></div></div>
</template><script>
import pubsub from 'pubsub-js'
import MyHeader from './components/MyHeader'
import MyList from './components/MyList'
import MyFooter from './components/MyFooter.vue'export default {name: 'App',components: { MyHeader, MyList, MyFooter },data() {return {//由于todos是MyHeader组件和MyFooter组件都在使用,所以放在App中(状态提升)todos: JSON.parse(localStorage.getItem('todos')) || []}},methods: {//添加一个todoaddTodo(todoObj) {this.todos.unshift(todoObj)},//勾选or取消勾选一个todocheckTodo(id) {this.todos.forEach((todo) => {if (todo.id === id) todo.done = !todo.done})},// 更新修改一个todoupdateTodo(id,title) {this.todos.forEach((todo) => {if (todo.id === id) todo.title=title})},//删除一个tododeleteTodo(_,id) {this.todos = this.todos.filter(todo => todo.id !== id)},//全选or取消全选checkAllTodo(done) {this.todos.forEach((todo) => {todo.done = done})},//清除所有已经完成的todoclearAllTodo() {this.todos = this.todos.filter((todo) => {return !todo.done})}},watch: {todos: {deep: true,handler(value) {localStorage.setItem('todos', JSON.stringify(value))}}},mounted(){this.$bus.$on('checkTodo',this.checkTodo)this.$bus.$on('updateTodo',this.updateTodo)// this.$bus.$on('deleteTodo', deleteTodo)this.pubId=pubsub.subscribe('deleteTodo',this.deleteTodo)},beforeDestroy(){this.$bus.$off('checkTodo')this.$bus.$off('updateTodo')// this.$bus.$off('deleteTodo')pubsub.unsubscribe(this.pubId)}
}
</script><style>
/*base*/
body {background: #fff;
}.btn {display: inline-block;padding: 4px 12px;margin-bottom: 0;font-size: 14px;line-height: 20px;text-align: center;vertical-align: middle;cursor: pointer;box-shadow: inset 0 1px 0 rgba(255, 255, 255, 0.2), 0 1px 2px rgba(0, 0, 0, 0.05);border-radius: 4px;
}.btn-danger {color: #fff;background-color: #da4f49;border: 1px solid #bd362f;
}
.btn-edit {color: #fff;background-color: skyblue;border: 1px solid blue;margin-right: 5px;
}.btn-danger:hover {color: #fff;background-color: #bd362f;
}.btn:focus {outline: none;
}.todo-container {width: 600px;margin: 0 auto;
}.todo-container .todo-wrap {padding: 10px;border: 1px solid #ddd;border-radius: 5px;
}</style>
MyItem.vue
<template><li><label><input type="checkbox" :checked="todo.done" @change="handleCheck(todo.id)" /><!-- 如下代码也能实现功能,但是不太推荐,因为有点违反原则,因为修改了props --><!-- <input type="checkbox" v-model="todo.done"/> --><span v-show="!todo.isEdit">{{ todo.title }}</span><input v-show="todo.isEdit" type="text" :value="todo.title"@blur="handleBlur(todo,$event)"></label><button class="btn btn-danger" @click="handleDelete(todo.id)">删除</button><button class="btn btn-edit" @click="handleEdit(todo)" v-show="!todoEdit">编辑</button></li>
</template><script>
import pubsub from 'pubsub-js'
export default {name: 'MyItem',//声明接收todoprops: ['todo'],methods: {//勾选or取消勾选handleCheck(id) {//通知App组件将对应的todo对象的done值取反// this.checkTodo(id)this.$bus.$emit('checkTodo',id)},//删除handleDelete(id) {if (confirm('确定删除吗?')) {//通知App组件将对应的todo对象删除// this.deleteTodo(id)// this.$bus.$emit('deleteTodo', id)pubsub.publish('deleteTodo',id)}},// 编辑handleEdit(todo) {if(todo.isEdit !== undefined){todo.isEdit = true}else{console.log('@');this.$set(todo, 'isEdit', true)}},// 失去焦点回调(真正执行修改逻辑)handleBlur(todo,e){todo.isEdit=false// console.log('updateTodo', todo.id, e.target.value);if(!e.target.value.trim()) return alert('输入不能为空!')this.$bus.$emit('updateTodo',todo.id,e.target.value)}},
}
</script><style scoped>
/*item*/
li {list-style: none;height: 36px;line-height: 36px;padding: 0 5px;border-bottom: 1px solid #ddd;
}li label {float: left;cursor: pointer;
}li label li input {vertical-align: middle;margin-right: 6px;position: relative;top: -1px;
}li button {float: right;display: none;margin-top: 3px;
}li:before {content: initial;
}li:last-child {border-bottom: none;
}li:hover {background-color: #ddd;
}li:hover button {display: block;
}
</style>
五、$nextTick
1、语法:this.$nextTick(回调函数)
2、作用:在下一次 DOM 更新结束,v-for循环结束后执行其指定的回调。
3、什么时候用:当改变数据后,要基于更新后的新DOM进行某些操作时(如input自动获取焦点),要在nextTick所指定的回调函数中执行。
4、比如刚才点击编辑后,input框没法自动获取焦点,那么我就得先点一下,再点别处儿才能切换回去,如果直接this.$refs.inputTitle.focus();不行,因为这个函数虽然动了isEdit的值,但是模板重新解析也得等这个函数走完啊,那input还没创建出来呢,就focus了,肯定是不行滴。
有个办法就是用异步,也可以解决,但是更好的办法是$nextTick
ref="inputTitle" handleEdit(todo) {if(todo.isEdit !== undefined){todo.isEdit = true}else{console.log('@');this.$set(todo, 'isEdit', true)}this.$nextTick(function(){this.$refs.inputTitle.focus()})},六、过度与动画
1、作用:在插入、更新或移除 DOM元素时,在合适的时候给元素添加样式类名。
2、写法:
准备好样式:
元素进入的样式:
v-enter:进入的起点
v-enter-active:进入过程中
v-enter-to:进入的终点
元素离开的样式:
v-leave:离开的起点
v-leave-active:离开过程中
v-leave-to:离开的终点
使用<transition>包裹要过度的元素,并配置name属性:
<transition name="hello"><h1 v-show="isShow">你好啊!</h1>
</transition>
3、备注:若有多个元素需要过度,则需要使用:<transition-group>,且每个元素都要指定key值。
也可以引入第三方库,animate.css.打开终端输入npm i animate.css,下载之后在相应的vue文件中引入inport 'animate.css'就可以使用。
<transition-group name="animate_animated animate_bounce" appearenter-active-class="animate_swing"leave-active-class="animate_backOutUp"><!-- 如果写name下面就要用name-enter-active --><!-- appear意思是一上来就有动画效果 --><h1 v-show="!isShow" key="1">你好啊</h1><h1 v-show="isShow" key="2">椰果</h1></transition-group>
OK今天就到这里结束