自动化测试 —— Pytest fixture及conftest详解

前言
fixture是在测试函数运行前后,由pytest执行的外壳函数。fixture中的代码可以定制,满足多变的测试需求,包括定义传入测试中的数据集、配置测试前系统的初始状态、为批量测试提供数据源等等。fixture是pytest的精髓所在,类似unittest中setup/teardown,但是比它们要强大、灵活很多,它的优势是可以跨文件共享。
一、Pytest fixture
1.pytest fixture几个关键特性
- 有独立的命名,并通过声明它们从测试函数、模块、类或整个项目中的使用来激活
- 按模块化的方式实现,每个fixture都可以互相调用
- fixture可以实现unittest不能实现的功能,比如unittest中的测试用例和测试用例之间是无法传递参数和数据的,但是fixture却可以解决这个问题
- fixture的范围从简单的单元扩展到复杂的功能测试,允许根据配置和组件选项对fixture和测试用例进行参数化
2.Pytest fixture定义
- 定义fixture跟定义普通函数差不多,唯一区别就是在函数上加个装饰器@pytest.fixture(),fixture命名不要用test_开头,跟用例区分开。用例才是test_开头的命名;
- fixture装饰器里的scope有四个级别的参数:function(不写默认这个)、class、module、session;
- fixture可以有返回值,如果没有return,默认会是None;用例调用fixture的返回值,就是直接把fixture的函数名称作为参数传入;
- fixture可以返回一个元组、列表或字典;
- 测试用例可传单个、多个fixture参数;
- fixture与fixture间可相互调用;
3.Pytest fixture用法
1)用法一:作为参数使用
fixture的名字直接作为测试用例的参数,用例调用fixture的返回值,直接将fixture的函数名称当做变量名称;如果用例需要用到多个fixture的返回数据,fixture也可以返回一个元祖,list或字典,然后从里面取出对应数据。
① 将fixture函数作为参数传递给测试用例
@pytest.fixture()
def login():print("this is login fixture")user = "chen"pwd = 123456return user, pwddef test_login(login):"""将fixture修饰的login函数作为参数传递给本用例"""print(login)assert login[0] == "chen"assert login[1] == 123456assert "chen" in str(login)
② 同一个用例中传入多个fixture函数
@pytest.fixture()
def user():user = "cris"return user@pytest.fixture()
def pwd():pwd = "123456"return pwddef test_trans_fixture(user, pwd):"""同一条用例中传入多个fixture函数"""print(user, pwd)assert "cris" in str(user)assert pwd == "123456"
③ fixture函数之间的相互传递
@pytest.fixture()
def user2():user = "cris"return user@pytest.fixture()
def login_info(user2):"""fixture与fixture函数之间的相互传递"""pwd = "e10adc3949ba59abbe56e057f20f883e"return user2, pwddef test_assert_login_info(login_info):print(login_info)print(type(login_info))assert login_info[0] == "cris"assert login_info[1] == "e10adc3949ba59abbe56e057f20f883e"
2)用法二:提供灵活的类似setup和teardown功能
Pytest的fixture另一个强大的功能就是在函数执行前后增加操作,类似setup和teardown操作,但是比setup和teardown的操作更加灵活;具体使用方式是同样定义一个函数,然后用装饰器标记为fixture,然后在此函数中使用一个yield语句,yield语句之前的就会在测试用例之前使用,yield之后的语句就会在测试用例执行完成之后再执行。
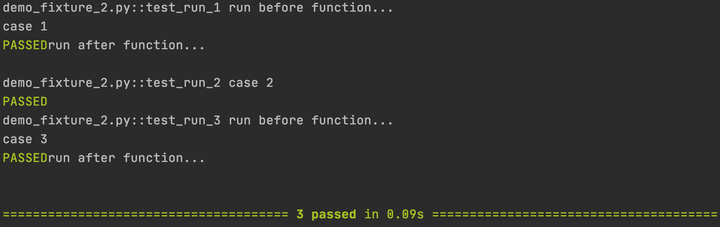
@pytest.fixture()
def run_function():print("run before function...")yieldprint("run after function...")def test_run_1(run_function):print("case 1")def test_run_2():print("case 2")def test_run_3(run_function):print("case 3")
运行结果如下:
常见的应用场景:@pytest.fixture可以用在selenium中测试用例执行前后打开、关闭浏览器的操作:
@pytest.fixture()
def fixture_driver():driver = webdriver.Chrome()yield driverdriver.quit()def test_baidu(fixture_driver):driver = fixture_driverdriver.get("http://www.baidu.com")driver.find_element_by_id('kw').send_keys("python fixture")driver.find_element_by_id('su').click()
3)用法三:利用pytest.mark.usefixtures叠加调用多个fixture
如果一个方法或者一个class用例想要同时调用多个fixture,可以使用@pytest.mark.usefixtures()进行叠加。注意叠加顺序,① 与直接传入fixture不同的是,@pytest.mark.usefixtures无法获取到被fixture装饰的函数的返回值;
② @pytest.mark.usefixtures的使用场景是:被测试函数需要多个fixture做前后置工作时使用;
@pytest.fixture
def func_1():print("用例前置操作---1")yieldprint("用例后置操作---1")@pytest.fixture
def func_2():print("用例前置操作---2")yieldprint("用例后置操作---2")@pytest.fixture
def func_3():print("用例前置操作---3")yieldprint("用例后置操作---3")@pytest.mark.usefixtures("func_3")  # 最后执行func_3
@pytest.mark.usefixtures("func_2")  # 再执行func_1
@pytest.mark.usefixtures("func_1")  # 先执行func_1
def test_func():print("这是测试用例")
执行结果:

4)用法四:fixture自动使用autouse=True
当用例很多的时候,每次都传这个参数,会很麻烦。fixture里面有个参数autouse,默认是False没开启的,可以设置为True开启自动使用fixture功能,这样用例就不用每次都去传参了,autouse设置为True,自动调用fixture功能。所有用例都会生效,包括类中的测试用例和类以外的测试用例。
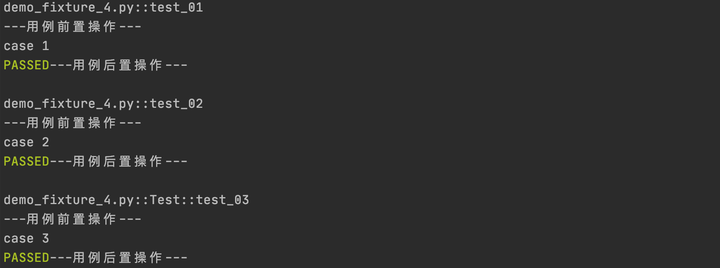
@pytest.fixture(autouse=True, scope="function")
def func_auto():"""autouse为True时,会作用于每一条用例"""print("\n---用例前置操作---")yieldprint("---用例后置操作---")# func_auto函数的autouse=True时,无论是否使用usefixtures引用func_auto,都会执行func_auto
@pytest.mark.usefixtures("func_auto")
def test_01():print("case 1")def test_02():print("case 2")class Test:def test_03(self):print("case 3")
执行结果:
4.Pytest fixture四种作用域
fixture(scope='function',params=None,autouse=False,ids=None,name=None)
fixture里面有个
- function:每一个函数或方法都会调用
- class:每一个类调用一次,一个类中可以有多个方法
- module:每一个.py文件调用一次,该文件内又有多个function和class
- session:多个文件调用一次,可以跨.py文件调用(通常这个级别会结合conftest.py文件使用)
1)function级别
function默认模式为@pytest.fixture() 函数级别,即scope="function",scope可以不写。每一个函数或方法都会调用,每个测试用例执行前都会执行一次function级别的fixture。
# @pytest.fixture(scope="function")等价于@pytest.fixture()
@pytest.fixture(scope="function")
def func_auto():"""用例级别fixture,作用域单个用例"""print("\n---function级别的用例前置操作---")yieldprint("---function级别的用例后置操作---")# test_01会引用func_auto函数,test_02没有用修饰器修饰,故不会引用
def test_func_auto_fixture_1(func_auto):print("func 1 print")def test_func_auto_fixture_2():print("func 2 print")
2)class级别
fixture的scope值还可以是class,此时则fixture定义的动作就会在测试类class的所有用例之前和之后运行,需注意:测试类中只要有一个测试用例的参数中使用了class级别的fixture,则在整个测试类的所有测试用例都会调用fixture函数
① 用例类中的测试用例调用fixture
执行fixture定义的动作,以及此测试类的所有用例结束后同样要运行fixture指定的动作
@pytest.fixture(scope="class")
def class_auto():"""类级别fixture,作用域整个类"""print("\n---class级别的用例前置操作---")yieldprint("---class级别的用例后置操作---")class TestClassAutoFixture:# class级别的fixture任意一个用例引用即可def test_class_auto_fixture_1(self, class_auto):print("class 1 print")def test_class_auto_fixture_2(self):print("class 1 print")
测试类中的第1条测试用例引用了fixture修饰的函数,则整个测试类的所有测试用例都会执行fixture函数的前置操作,在所有用例执行完成后,都会执行fixture函数的后置操作。
② 用例类外的测试用例调用fixture
如果在类外的函数中去使用class级别的fixture,则此时在测试类外每个测试用例中,fixture跟function级别的fixture作用是一致的,即def test_class_auto_fixture(class_auto): print("class 1 print")
如下图所示,测试类外的函数引用了class级别的fixture,则它的作用会等同于function级别的fixture,运行结果如下:

3)module级别
在Python中module即.py文件,当fixture定义为module时,则此fixture将在当前文件中起作用。这里需要特别说明的是,当fixture的scope定义为module时,只要当前文件中有一个测试用例使用了fixture,不管这个用例是在类外,还是在类中,都会在当前文件(模块)的所有测试用例执行之前去执行fixture定义的行为以及当前文件的所有用例结束之后同样去执行fixture定义的对应操作。
@pytest.fixture(scope="module")
def module_auto():"""作用于整个py文件"""print("\n---module级别的用例前置操作---")yieldprint("---module级别的用例后置操作---")# 测试类外和测试类内的函数方法都调用了module级别的fixture,但整个py文件只会生效一次fixture。
def test_module_scope_out_class(module_auto):print("case scope 01")class TestScope1:def test_scope_01(self):print("case scope 01")def test_scope_02(self, module_auto):print("case scope 02")def test_scope_03(self):print("case scope 03")
若类中的方法分别调用了class级别的fixture和module级别的fixture,则会两个fixture都生效:
# 顺序在前面fixture会先执行
def test_scope_01(self, module_auto, class_auto): print("case scope 01")
若类中的方法同时调用了function级别、class级别、module级别的fixture,则3种fixture会同时生效:
# 顺序在前面fixture会先执行
def test_scope_02(self, module_auto, class_auto, func_auto):  print("case scope 02")
4)session级别(使用conftest.py共享fixture)
当fixture的scope定义为session时,是指在当前目录下的所有用例之前和之后执行fixture对应的操作
fixture为session级别是可以跨.py模块调用的,也就是当我们有多个.py文件的用例的时候,如果多个用例只需调用一次fixture,那就可以设置为scope="session",并且写到conftest.py文件里
使用方式:
① 定义测试用例文件
② 在指定目录下创建conftest.py(固定命名,不可修改)文件,然后在conftest.py文件中定义fixture方法,将scope指定为session,此时在当前目录下只要有一个用例使用了此fixture,则就会在当前目录下所有用例之前和之后会执行fixture定义的对应的操作。
@pytest.fixture(scope="session", )
def session_auto():"""session级别的fixture,针对该目录下的所有用例都生效"""print("\n---session级别的用例前置操作---")yieldprint("---session级别的用例后置操作---")
定义了session级别的fixture,存放于该用例文件的同一个目录下的conftest.py文件中,该目录下的任一用例文件中的任一测试用例,引用了这个session级别的fixture,则这个session级别的fixture会针对这整个用例文件会生效。若存放在根目录下,则针对整个工程的所有用例都会生效。
class TestSessionAutoFixture:# session级别的fixture任意一个用例引用即可def test_session_auto_fixture_1(self, session_auto):print("session 1 print")def test_session_auto_fixture_2(self):print("session 1 print")def test_session_auto_fixture():print("session 1 print")运行结果如下:

5.Pytest fixture其他参数用法
1)ids参数-修改用例结果名称
@pytest.mark.parametrize() 还提供了第三个 ids 参数来自定义显示结果。
stars = ["刘德华", "张学友", "黎明", "郭富城"]
# 利用列表生成式生成一个用例名称的列表
ids = [f"test-case-{d}" for d in range(len(stars))]@pytest.mark.parametrize("name", stars, ids=ids)
def test_multi_param(name):print(f"my name is {name}")
注:ids生成的用例名称数量一定要和用例数量一致,否则会报错,执行结果如下:

2)name参数-重命名fixture函数名称
@pytest.fixture(name="rename_get_user_info")
def get_user_info():user_name = "周润发"print(user_name)# 此处需传入重命名后的fixture函数名
@pytest.mark.usefixtures("rename_get_user_info")
def test_parametrize_by_use_fixtures():"""通过usefixtures装饰器传入fixture"""print(f"test parametrize use fixtures")def test_parametrize_by_fixture_name(rename_get_user_info):"""将fixture函数名作为形参传入"""print(f"test parametrize use fixtures")
3)params参数-提供返回值供测试函数调用
示例一
@pytest.fixture(params=[{"name": "周润发"}, {"age": 61}, {"height": 183}])
def fix_func(request):  # request为内建fixture# 使用request.param作为返回值供测试函数调用,params的参数列表中包含了做少元素,该fixture就会被调用几次,分别作用在每个测试函数上return request.param  # request.param为固定写法def test_fix_func(fix_func):print(f"fixture函数fix_func的返回值为:{fix_func}")"""打印结果如下:fixture函数fix_func的返回值为:{'name': '周润发'}fixture函数fix_func的返回值为:{'age': 61}fixture函数fix_func的返回值为:{'height': 183}"""
示例二
params = [{"case_id": 1, "case_title": "验证正常添加车辆", "car_name": "苏C99688", "car_type": 1, "origin": 1, "expected": "200"},{"case_id": 2, "case_title": "验证添加重复车辆", "car_name": "苏C99688", "car_type": 1, "origin": 1, "expected": "500"},{"case_id": 3, "case_title": "验证车牌号为空", "car_name": "", "car_type": 2, "origin": 1, "expected": "500"}]@pytest.fixture(params=params)
def add_car_params(request):return request.paramdef test_add_car(add_car_params):print(f"{add_car_params['case_id']}-{add_car_params['case_title']}-{add_car_params['car_name']}")"""运行结果如下:1-验证正常添加车辆-苏C996882-验证添加重复车辆-苏C996883-验证车牌号为空-"""
6.内置fixture
1)tmpdir和tmpdir_factory
内置的tmpdir和tmpdir_factory负责在测试开始运行前创建临时文件目录,并在测试结束后删除。如果测试代码要对文件进行读/写操作,那么可以使用tmpdir或tmpdir_factory来创建文件或目录。单个测试使用tmpdir,多个测试使用tmpdir_factory。tmpdir的作用范围是函数级别,tmpdir_factory的作用范围是会话级别。
def test_tmpdir(tmpdir):# tmpdir already has a path name associated with it# join() extends the path to include a filename# the file is created when it's written toa_file = tmpdir.join('something.txt')# you can create directoriesa_sub_dir = tmpdir.mkdir('anything')# you can create files in directories (created when written)another_file = a_sub_dir.join('something_else.txt')# this write creates 'something.txt'a_file.write('contents may settle during shipping')# this write creates 'anything/something_else.txt'another_file.write('something different')# you can read the files as wellassert a_file.read() == 'contents may settle during shipping'assert another_file.read() == 'something different'def test_tmpdir_factory(tmpdir_factory):# you should start with making a directory# a_dir acts like the object returned from the tmpdir fixturea_dir = tmpdir_factory.mktemp('mydir')# base_temp will be the parent dir of 'mydir'# you don't have to use getbasetemp()# using it here just to show that it's availablebase_temp = tmpdir_factory.getbasetemp()print('base:', base_temp)# the rest of this test looks the same as the 'test_tmpdir()'# example except I'm using a_dir instead of tmpdira_file = a_dir.join('something.txt')a_sub_dir = a_dir.mkdir('anything')another_file = a_sub_dir.join('something_else.txt')a_file.write('contents may settle during shipping')another_file.write('something different')assert a_file.read() == 'contents may settle during shipping'assert another_file.read() == 'something different'2)pytestconfig
内置的pytestconfig可以通过命令行参数、选项、配置文件、插件、运行目录等方式来控制pytest。pytestconfig是request.config的快捷方式,它在pytest文档里有时候被称为“pytest配置对象”。
要理解pytestconfig如何工作,可以添加一个自定义的命令行选项,然后在测试中读取该选项。
def pytest_addoption(parser):""""添加一个命令行选项"""parser.addoption("--env", default="test", choices=["dev", "test", "pre"], help="enviroment parameter")以pytest_addoption添加的命令行选项必须通过插件来实现,或者在项目顶层目录的conftest.py文件中完成。它所在的conftest.py不能处于测试子目录下。
上述是一个传入测试环境的命令行选项,接下来可以在测试用例中使用这些选项。
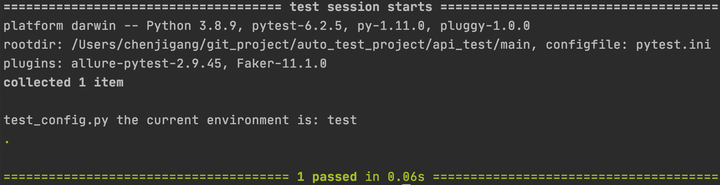
def test_option(pytestconfig):print('the current environment is:', pytestconfig.getoption('env'))
# 运行测试
pytest -s -q test_config.py::test_option
由于前面的pytest_addoption中定义的env的默认参数是test,所以通过pytestconfig.getoption获取到的env的值就是test:
3)其他内置fixture
- cache:作用是存储一段测试会话的信息,在下一段测试会话中使用;
- capsys:capsys 有两个功能:允许使用代码读取 stdout 和 stderr;可以临时禁制抓取日志输出;
- monkeypatch:可以在运行期间对类或模块进行动态修改。在测试中,monkey patch 常用于替换被测试代码的部分运行环境,或者将输入依赖或输出依赖替换成更容易测试的对象或函数;
- doctest_namespace:doctest 模块是 Python 标准库的一部分,借助它,可以在函数的文档字符串中放入示例代码,并通过测试确保有效。你可以使用 --doctest-modules 标识搜寻并运行 doctest 测试用例;
- recwarn:可以用来检查待测代码产生的警告信息;recwarn 的值就像是一个警告信息列表,列表里的每个警告信息都有4个属性 category、message、filename、lineno。警告信息在测试开始后收集,如果你在意的警告信息出现在测试尾部,则可以在信息收集前使用 recwarn.clear() 清除不需要的内容。除了 recwarn,pytest 还可以使用 pytest.warns() 来检查警告信息。
二、Pytest conftest全局作用文件详解
Pytest支持在测试的目录中,创建conftest.py文件,进行全局配置。
conftest.py文件须知:
- 可以跨.py文件调用,有多个.py文件调用时,可让conftest.py只调用了一次fixture,或调用多次fixture;
- conftest.py与运行的用例要在同一个pakage下,并且有__init__.py文件;
- 不需要import导入conftest.py,pytest用例会自动识别该文件,放到项目的根目录下就可以全局目录调用了,如果放到某个package下,那就在package内有效,可有多个conftest.py;
- conftest.py配置脚本名称是固定的,不能改名称;
- conftest.py文件不能被其他文件导入;
- 所有同目录测试文件运行前都会执行conftest.py文件;
行动吧,在路上总比一直观望的要好,未来的你肯定会感 谢现在拼搏的自己!如果想学习提升找不到资料,没人答疑解惑时,请及时加入扣群: 320231853,里面有各种软件测试+开发资料和技术可以一起交流学习哦。
最后感谢每一个认真阅读我文章的人,礼尚往来总是要有的,虽然不是什么很值钱的东西,如果你用得到的话可以直接拿走:

这些资料,对于【软件测试】的朋友来说应该是最全面最完整的备战仓库,这个仓库也陪伴上万个测试工程师们走过最艰难的路程,希望也能帮助到你!
