【SkiaSharp绘图03】SKPaint详解(一)BlendMode混合模式、ColorFilter颜色滤镜
文章目录
- SKPaint
- SKPaint属性
- BlendMode获取或设置混合模式
- SKBlendMode 枚举成员
- 效果预览
- Color/ColorF获取或设置前景色
- ColorFilter 颜色滤镜
- CreateBlendMode 混合模式
- CreateColorMatrix 颜色转换
- CreateCompose 组合滤镜
- CreateHighContrast 高对比度滤镜
- CreateLighting 照明滤镜
- CreateLumaColor
- CreateTable 查表
- 与Window GDI+对比
SKPaint
定义:
public class SKPaint : SkiaSharp.SKObject
构造函数:
public SKPaint ();
public SKPaint (SkiaSharp.SKFont font);
作用:保存有关如何绘制几何图形、文本和位图的样式和颜色等信息。
效果预览:
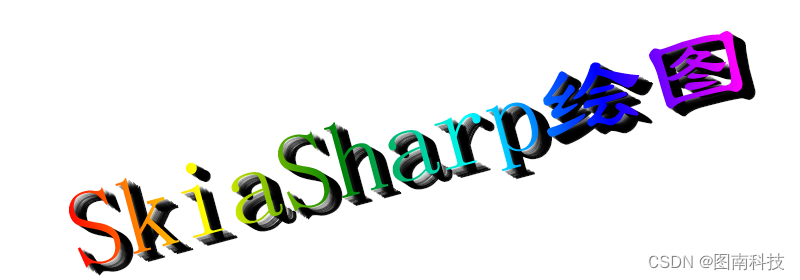
(本以为,SKPaint只是包含了GDI+的Pen、Brush的功能,可随着深入了解,它隐藏着更多功能,都不知道给它一个怎样的合适中文名称了)
var canvas = e.Surface.Canvas;
canvas.Clear(SKColors.White);
using (var paint = new SKPaint())
{paint.Typeface = SKTypeface.FromFamilyName("宋体");paint.TextSize = 48;paint.IsAntialias = true;paint.Color = SKColors.Red;paint.StrokeWidth = 1;paint.Style = SKPaintStyle.Stroke;const string text = "SkiaSharp绘图";canvas.DrawText(text, 10, 48, paint);paint.Color = SKColors.Green;paint.Style = SKPaintStyle.Fill;canvas.DrawText(text, 10, 90, paint);paint.TextScaleX = 1.5f;paint.Color = SKColors.Blue;canvas.DrawText(text, 10, 160, paint);
}
SKPaint属性
BlendMode获取或设置混合模式
SKBlendMode 是 SkiaSharp 中用于指定颜色混合模式的枚举,它决定了绘制操作如何与已有的颜色混合。不同的混合模式可以用来创建各种视觉效果,如透明度、遮罩、滤镜等。
以下是 SKBlendMode 的详细说明,包括每种混合模式的解释及其效果:
SKBlendMode 枚举成员
-
Clear: 完全清除目标区域,绘制结果是透明的。
- 公式:
result = 0 - 效果:目标区域变成透明。
- 公式:
-
Src: 仅显示源颜色,忽略目标颜色。
- 公式:
result = source - 效果:源颜色完全覆盖目标颜色。
- 公式:
-
Dst: 仅显示目标颜色,忽略源颜色。
- 公式:
result = destination - 效果:目标颜色保持不变。
- 公式:
-
SrcOver: 源颜色在目标颜色上绘制,考虑源颜色的透明度。
- 公式:
result = source + (1 - sourceAlpha) * destination - 效果:源颜色在目标颜色上覆盖,源颜色的透明度影响覆盖效果。
- 公式:
-
DstOver: 目标颜色在源颜色上绘制,考虑目标颜色的透明度。
- 公式:
result = destination + (1 - destinationAlpha) * source - 效果:目标颜色在源颜色上覆盖,目标颜色的透明度影响覆盖效果。
- 公式:
-
SrcIn: 仅显示目标颜色被源颜色裁剪的部分。
- 公式:
result = source * destinationAlpha - 效果:源颜色仅在目标颜色不透明的地方绘制。
- 公式:
-
DstIn: 仅显示源颜色被目标颜色裁剪的部分。
- 公式:
result = destination * sourceAlpha - 效果:目标颜色仅在源颜色不透明的地方显示。
- 公式:
-
SrcOut: 仅显示源颜色不被目标颜色覆盖的部分。
- 公式:
result = source * (1 - destinationAlpha) - 效果:源颜色仅在目标颜色透明的地方绘制。
- 公式:
-
DstOut: 仅显示目标颜色不被源颜色覆盖的部分。
- 公式:
result = destination * (1 - sourceAlpha) - 效果:目标颜色仅在源颜色透明的地方显示。
- 公式:
-
SrcATop: 源颜色在目标颜色上方绘制,仅在目标颜色不透明的地方显示源颜色,目标颜色的透明部分显示目标颜色。
- 公式:
result = source * destinationAlpha + destination * (1 - sourceAlpha) - 效果:源颜色在目标颜色上方绘制,目标颜色不透明的部分显示源颜色,透明的部分显示目标颜色。
- 公式:
-
DstATop: 目标颜色在源颜色上方绘制,仅在源颜色不透明的地方显示目标颜色,源颜色的透明部分显示源颜色。
- 公式:
result = destination * sourceAlpha + source * (1 - destinationAlpha) - 效果:目标颜色在源颜色上方绘制,源颜色不透明的部分显示目标颜色,透明的部分显示源颜色。
- 公式:
-
Xor: 仅显示源颜色和目标颜色中不重叠的部分。
- 公式:
result = source * (1 - destinationAlpha) + destination * (1 - sourceAlpha) - 效果:源颜色和目标颜色不重叠的部分显示,重叠部分透明。
- 公式:
-
Plus: 源颜色和目标颜色相加。
- 公式:
result = min(source + destination, 1) - 效果:源颜色和目标颜色相加,颜色值不超过最大值。
- 公式:
-
Modulate: 源颜色和目标颜色相乘。
- 公式:
result = source * destination - 效果:源颜色和目标颜色相乘,创建暗淡效果。
- 公式:
-
Screen: 反相相乘,然后再反相。
- 公式:
result = 1 - (1 - source) * (1 - destination) - 效果:产生浅色、增亮效果。
- 公式:
-
Overlay: 结合 Multiply 和 Screen,根据目标颜色的亮度进行选择。
- 公式:
result = destination < 0.5 ? 2 * source * destination : 1 - 2 * (1 - source) * (1 - destination) - 效果:目标颜色较暗时使用 Multiply,较亮时使用 Screen,增加对比度。
- 公式:
-
Darken: 显示较暗的颜色。
- 公式:
result = min(source, destination) - 效果:显示源颜色和目标颜色中的较暗者。
- 公式:
-
Lighten: 显示较亮的颜色。
- 公式:
result = max(source, destination) - 效果:显示源颜色和目标颜色中的较亮者。
- 公式:
-
ColorDodge: 放大源颜色,直到它们达到白色。
- 公式:
result = destination / (1 - source) - 效果:使颜色变亮。
- 公式:
-
ColorBurn: 放大目标颜色,直到它们达到黑色。
- 公式:
result = 1 - (1 - destination) / source - 效果:使颜色变暗。
- 公式:
-
HardLight: 结合 Multiply 和 Screen,根据源颜色的亮度进行选择。
- 公式:
result = source < 0.5 ? 2 * source * destination : 1 - 2 * (1 - source) * (1 - destination) - 效果:源颜色较暗时使用 Multiply,较亮时使用 Screen,增加对比度。
- 公式:
-
SoftLight: 柔和地结合源颜色和目标颜色。
- 公式:
result = (1 - destination) * source * destination + destination * source * (1 - source) - 效果:柔和地合并颜色,产生轻微增亮或变暗效果。
- 公式:
-
Difference: 计算源颜色和目标颜色的差异。
- 公式:
result = abs(destination - source) - 效果:对比两种颜色的差异。
- 公式:
-
Exclusion: 类似于 Difference,但对比度较低。
- 公式:
result = destination + source - 2 * destination * source - 效果:降低对比度的差异效果。
- 公式:
-
Multiply: 源颜色和目标颜色相乘,结果颜色较暗。
- 公式:
result = source * destination - 效果:颜色相乘,产生较暗的结果。
- 公式:
-
Hue: 使用源颜色的色调,目标颜色的饱和度和亮度。
- 公式:
result = setHue(source, destination) - 效果:混合色调。
- 公式:
-
Saturation: 使用源颜色的饱和度,目标颜色的色调和亮度。
- 公式:
result = setSaturation(source, destination) - 效果:混合饱和度。
- 公式:
-
Color: 使用源颜色的色调和饱和度,目标颜色的亮度。
- 公式:
result = setColor(source, destination) - 效果:混合颜色。
- 公式:
-
Luminosity: 使用源颜色的亮度,目标颜色的色调和饱和度。
- 公式:
result = setLuminosity(source, destination) - 效果:混合亮度。
- 公式:
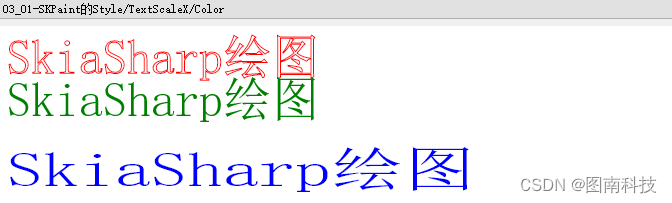
效果预览
枚举BlendMode的各种值,修改BlendMode属性并绘制。
这里使用图像可能更能体现效果,但目前还是先用文字效果做简单的对比吧。
var canvas = e.Surface.Canvas;
canvas.Clear(SKColors.LightGreen.WithAlpha(200));
const float textSize = 24;
float lineHeight = textSize + 2;
using (var paint = new SKPaint())
{paint.Typeface = SKTypeface.FromFamilyName("宋体");paint.TextSize = textSize;paint.IsAntialias = true;paint.Color = SKColors.Red.WithAlpha(127);var blendModes = Enum.GetValues(typeof(SKBlendMode)) as SKBlendMode[];var x = 10;const string text = "SkiaSharp绘图";var offset = paint.MeasureText(text);var defaultVal = paint.BlendMode;//SrcOvervar y = lineHeight;foreach (var blendMode in blendModes){paint.BlendMode = blendMode;canvas.DrawText($"{text}", x, y, paint);paint.BlendMode = defaultVal;canvas.DrawText($" {blendMode}", x + offset, y, paint);y += lineHeight;}
}
Color/ColorF获取或设置前景色
定义:
public SkiaSharp.SKColor Color { get; set; }
public SkiaSharp.SKColorF ColorF { get; set; }
- 32位的ARGB
- 可通过WithAlpha、WithBlue、WithGreen、WithRed方法修改其中一个通道的值。
通过ToHsl、ToHsv转成Hsl与Hsv色彩空间值 - 可通过FromHsl、FromHsv、Parse、TryParse生成SKColor,字符串格式为#AARRGGBB等
ColorFilter 颜色滤镜
定义:
public SkiaSharp.SKColorFilter ColorFilter { get; set; }
作用:获取或设置SKPaint的颜色滤镜。
CreateBlendMode 混合模式
public static SkiaSharp.SKColorFilter CreateBlendMode (SkiaSharp.SKColor c, SkiaSharp.SKBlendMode mode);
作用:创建使用指定颜色和模式的新滤镜。
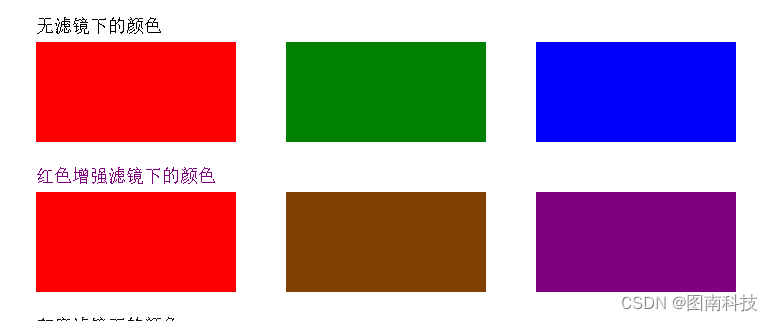
/// <summary>
/// 绘制三个填充矩形
/// </summary>
/// <param name="canvas"></param>
/// <param name="paint"></param>
/// <param name="y">y轴偏移</param>
/// <param name="text">提示文字</param>
private void DrawByColorFilter(SKCanvas canvas,SKPaint paint,int y,string text)
{canvas.DrawText(text, 50, y - 10, paint);paint.Color = SKColors.Red;canvas.DrawRect(50, y, 200, 100, paint);paint.Color = SKColors.Green;canvas.DrawRect(300, y, 200, 100, paint);paint.Color = SKColors.Blue;canvas.DrawRect(550, y, 200, 100, paint);
}
var canvas = e.Surface.Canvas;
var into = e.Info;
canvas.Clear(SKColors.White);using (var paint = new SKPaint())
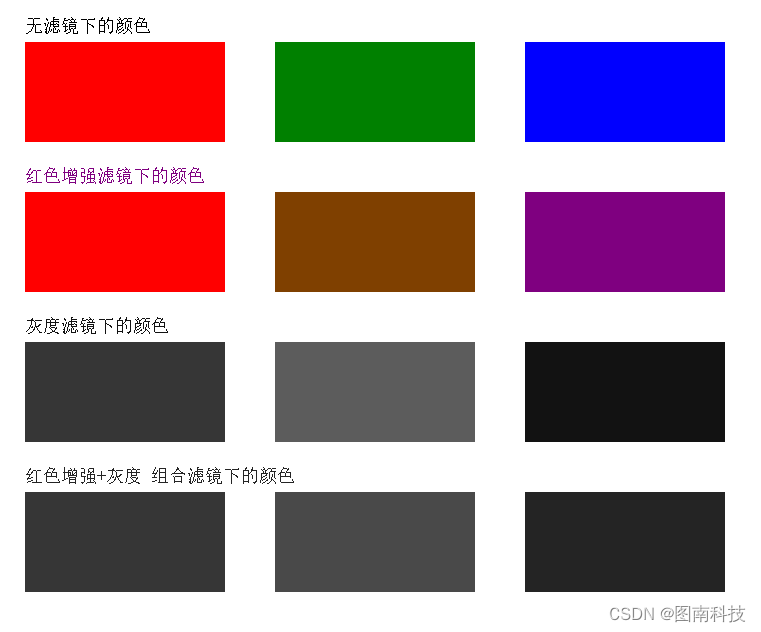
{paint.TextSize = 18;paint.Typeface = SKTypeface.FromFamilyName("宋体");var x = 50;DrawByColorFilter(canvas, paint, x, $"无滤镜下的颜色");// 红色增强var redEnhanceFilter = SKColorFilter.CreateBlendMode(SKColors.Red.WithAlpha(127), SKBlendMode.SrcOver);paint.ColorFilter = redEnhanceFilter;x += 150;DrawByColorFilter(canvas, paint, x, $"红色增强滤镜下的颜色");
}1、定义一个绘制红、绿、蓝三个矩形的函数
2、绘制无滤镜下的三原色矩形
3、创建红色增强滤镜
4、绘制滤镜下的三原色矩形
CreateColorMatrix 颜色转换
public static SkiaSharp.SKColorFilter CreateColorMatrix (float[] matrix);
通过一个4x5的矩阵创建一个颜色滤镜。
// 转灰度var colorMatrix = new float[]{0.2126f, 0.7152f, 0.0722f, 0, 0,0.2126f, 0.7152f, 0.0722f, 0, 0,0.2126f, 0.7152f, 0.0722f, 0, 0,0, 0, 0, 1, 0};var grayFilter= SKColorFilter.CreateColorMatrix(colorMatrix);paint.ColorFilter = grayFilter;x += 150;DrawByColorFilter(canvas, paint, x, $"灰度滤镜下的颜色");
1、定义灰度转换矩阵,并创建滤镜
2、绘制应用灰度滤镜后的三原色矩形

CreateCompose 组合滤镜
public static SkiaSharp.SKColorFilter CreateCompose (SkiaSharp.SKColorFilter outer, SkiaSharp.SKColorFilter inner);
生成组合滤镜,先应用内部(后面的)滤镜,再应用外部(前面的)滤镜。
//红色增强+转灰度 组合滤镜
var composeFilter = SKColorFilter.CreateCompose(grayFilter, redEnhanceFilter);
paint.ColorFilter = composeFilter;
x += 150;
DrawByColorFilter(canvas, paint, x, $"红色增强+灰度 组合滤镜下的颜色");
1、组合红色增强与灰度组合的滤镜(注意顺序)
2、绘制应用组合滤镜后的三原色矩形
CreateHighContrast 高对比度滤镜
public static SkiaSharp.SKColorFilter CreateHighContrast (SkiaSharp.SKHighContrastConfig config);
public static SkiaSharp.SKColorFilter CreateHighContrast (bool grayscale, SkiaSharp.SKHighContrastConfigInvertStyle invertStyle, float contrast);
/// <summary>
/// 绘制提示文字与图像
/// </summary>
/// <param name="bmp"></param>
/// <param name="canvas"></param>
/// <param name="paint"></param>
/// <param name="x"></param>
/// <param name="y"></param>
/// <param name="text"></param>
private void DrawBmpByColorFilter(SKBitmap bmp,SKCanvas canvas, SKPaint paint,float x,float y, string text)
{canvas.DrawText(text, x, y - 10, paint);canvas.DrawBitmap(bmp, new SKRect(x, y, x + 380, y + 380), paint);
}var canvas = e.Surface.Canvas;var into = e.Info;canvas.Clear(SKColors.White);using (var paint = new SKPaint()){paint.TextSize = 18;paint.Typeface = SKTypeface.FromFamilyName("宋体");if(bmp == null){bmp = SKBitmap.Decode(@"images\AIwoman.png");}DrawBmpByColorFilter(bmp, canvas, paint, 20, 30, $"原图");var highContrast = SKColorFilter.CreateHighContrast(false, SKHighContrastConfigInvertStyle.NoInvert, 0.5f);paint.ColorFilter = highContrast;DrawBmpByColorFilter(bmp, canvas, paint, 420, 30, $"高对比度滤镜");}
1、绘制原图
2、创建高对比度滤镜
3、应用滤镜后再次绘制原图
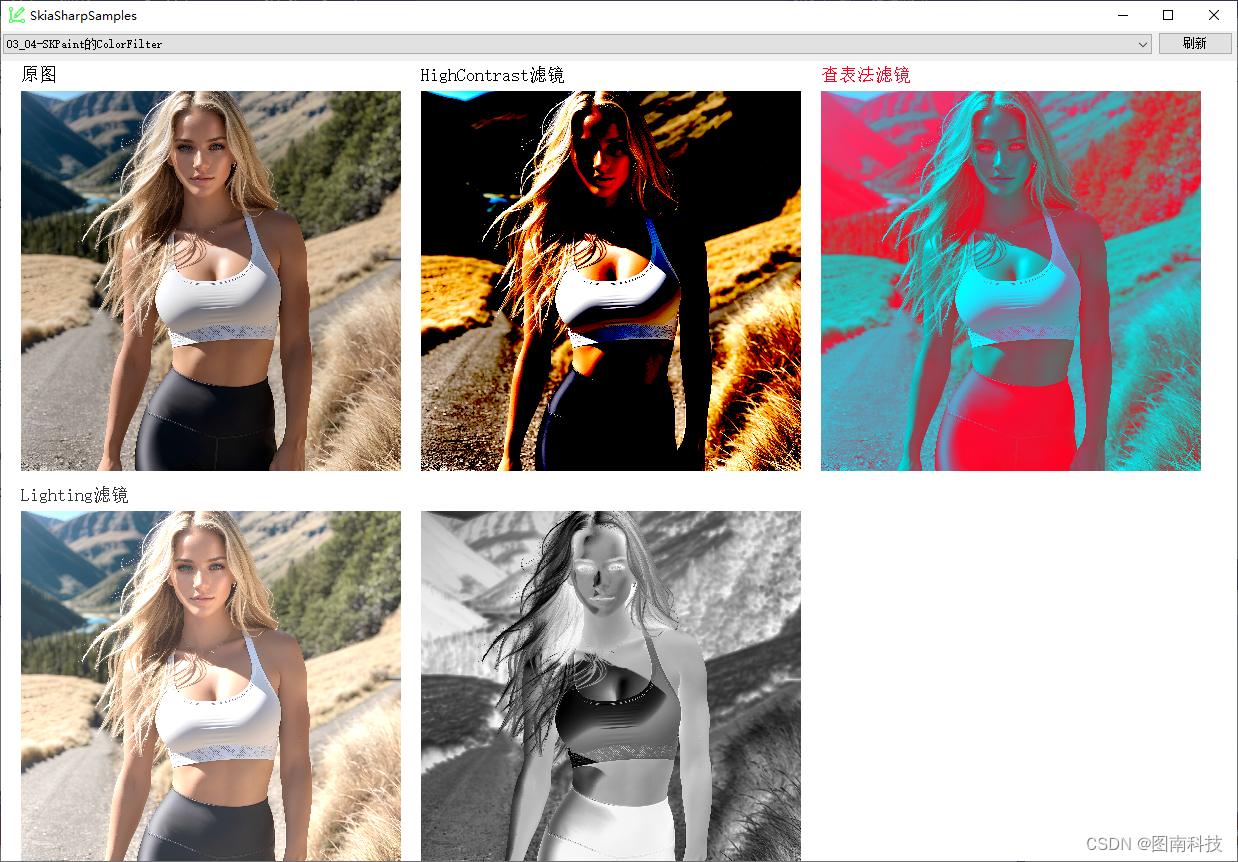
CreateLighting 照明滤镜
public static SkiaSharp.SKColorFilter CreateLighting (SkiaSharp.SKColor mul, SkiaSharp.SKColor add);
将每个像素的RGB通道值,乘第一个颜色,再加第一个颜色,最后结果值范围在[0,255],一般用于调节亮度。
SKColor mul = new SKColor(255, 255, 255); //不改变
SKColor add = new SKColor(50, 50, 50);//调亮
var lightFilter = SKColorFilter.CreateLighting(mul, add);
paint.ColorFilter = lightFilter;
DrawBmpByColorFilter(bmp, canvas, paint, 20, 450, $"Lighting滤镜");
CreateLumaColor
public static SkiaSharp.SKColorFilter CreateLumaColor ();
创建新的亮度至Alpha颜色滤镜。
var lumaFilter = SKColorFilter.CreateLumaColor();
paint.ColorFilter = lumaFilter;
DrawBmpByColorFilter(bmp, canvas, paint, 420, 450, $"Luma滤镜")
CreateTable 查表
public static SkiaSharp.SKColorFilter CreateTable (byte[] table);
public static SkiaSharp.SKColorFilter CreateTable (byte[] tableA, byte[] tableR, byte[] tableG, byte[] tableB);
通过查找表 (LUT) 对每个颜色通道进行映射和转换。它允许你指定每个颜色通道 (红、绿、蓝) 应如何转换。
//创建查找表
byte[] redTable = new byte[256];
byte[] greenTable = new byte[256];
byte[] blueTable = new byte[256];for (int i = 0; i < 256; i++)
{redTable[i] = (byte)(255 - i);  // 红色通道反向greenTable[i] = (byte)i;       // 绿色通道不变blueTable[i] = (byte)(i + 30 > 255 ? 255 : i + 30); // 蓝色调亮
}SKColorFilter colorFilter = SKColorFilter.CreateTable(null, redTable, greenTable, blueTable);
paint.ColorFilter = colorFilter;
DrawBmpByColorFilter(bmp, canvas, paint, 820, 30, $"查表法滤镜");
与Window GDI+对比
写到一半,突然后悔从SKPaint开始深入了解了,个人感觉SKPaint的功能包含了Windows GDI+中多个类的功能如:
-
GDI+ 中的
Pen类:SKPaint可以用于绘制几何图形,类似于Pen类。- 它控制着绘制操作中的笔触样式、颜色、宽度等属性。
-
GDI+ 中的
Brush类:SKPaint用于填充图形,类似于Brush类的功能。- 它定义了填充的颜色、渐变、图案等属性。
-
GDI+ 中的
Font类:SKPaint也负责文本的绘制,类似于Font类。- 它定义了文本的字体、大小、样式等属性,并控制文本的绘制效果。
-
GDI+ 中的
ImageAttributes类:SKPaint颜色滤镜,类似于ImageAttributes类。- 同样可以定义ColorMatrix来使用颜色滤镜
上面这些,也只是目前所了解的,可能还包含了更多GDI+类的功能。所以,一开始就写SKPaint类,都不知道这水会有多深呢!