JavaFX BorderPane布局
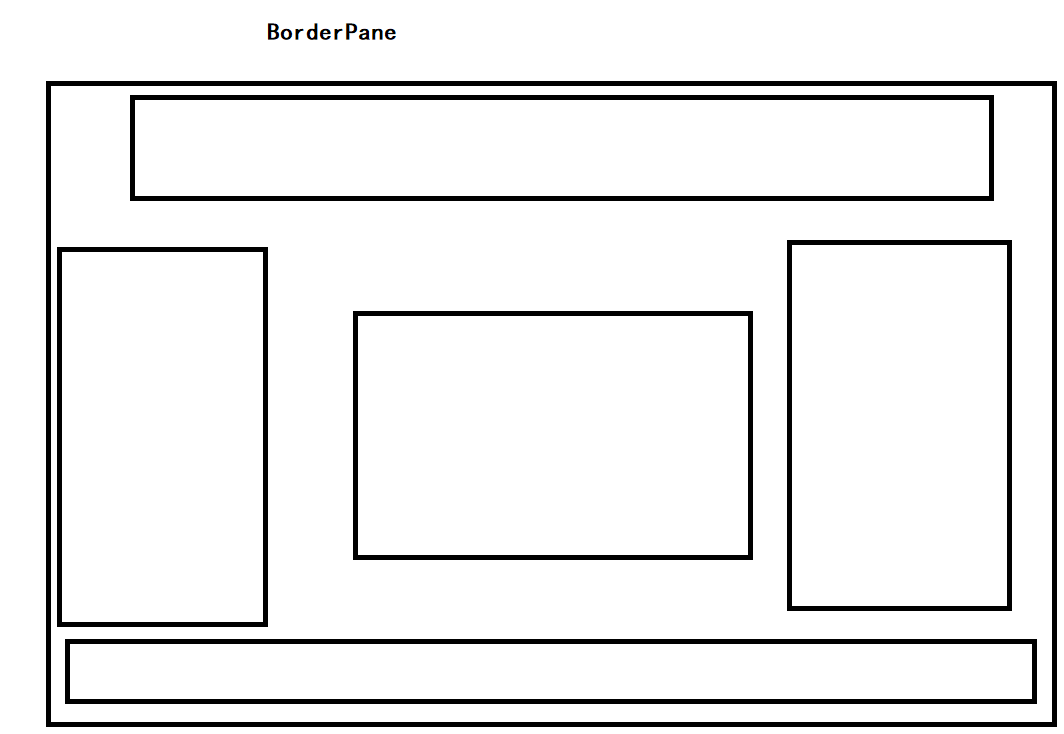
BorderPane布局顶部,底部,左,右或中心区域中的子节点。每个区域只能有一个节点。BorderPane的顶部和底部区域允许可调整大小的节点占用所有可用宽度。
左边界区域和右边界区域占据顶部和底部边界之间的可用垂直空间。
默认情况下,所有边界区域尊重子节点的首选宽度和高度。放置在顶部,底部,左侧,右侧和中心区域中的节点的默认对齐方式如下:
- 顶部: Pos.TOP_LEFT
- 底部: Pos.BOTTOM_LEFT
- 左侧: Pos.TOP_LEFT
- 右侧: Pos.TOP_RIGHT
- 中心: Pos.CENTER
示例1
将按钮添加到BorderPane,如下代码所示
import javafx.application.Application;
import javafx.geometry.Insets;
import javafx.scene.Scene;
import javafx.scene.control.Button;
import javafx.scene.layout.BorderPane;
import javafx.stage.Stage;public class Main extends Application {public static void main(String[] args) {Application.launch(args);}@Overridepublic void start(Stage primaryStage) {primaryStage.setTitle("BorderPane Test");BorderPane bp = new BorderPane();//bp.setPadding(new Insets(10, 20, 10, 20));Button btnTop = new Button("Top");bp.setTop(btnTop);Button btnLeft = new Button("Left");bp.setLeft(btnLeft);Button btnCenter = new Button("Center");bp.setCenter(btnCenter);Button btnRight = new Button("Right");bp.setRight(btnRight);Button btnBottom = new Button("Bottom");bp.setBottom(btnBottom);Scene scene = new Scene(bp, 300, 200);primaryStage.setScene(scene);primaryStage.show();}
}
示例2
package com.javafx03;import javafx.application.Application;
import javafx.scene.Scene;
import javafx.scene.control.Button;
import javafx.scene.layout.Background;
import javafx.scene.layout.BorderPane;
import javafx.scene.paint.Color;
import javafx.stage.Stage;public class JavaFx07 extends Application {@Overridepublic void start(Stage stage) {BorderPane borderPane = new BorderPane();borderPane.setBackground(Background.fill(Color.GRAY));borderPane.setTop(new Button("TOP"));borderPane.setLeft(new Button("LEFT"));borderPane.setRight(new Button("RIGHT"));borderPane.setCenter(new Button("Center"));borderPane.setBottom(new Button("Bottom"));Scene scene = new Scene(borderPane,300,300);stage.setScene(scene);stage.show();}public static void main(String[] args) {launch(args);}
}
复杂布局
package com.javafx03;import javafx.application.Application;
import javafx.geometry.Insets;
import javafx.geometry.Pos;
import javafx.scene.Scene;
import javafx.scene.control.Button;
import javafx.scene.control.Hyperlink;
import javafx.scene.layout.*;
import javafx.scene.paint.Color;
import javafx.scene.text.Font;
import javafx.scene.text.FontWeight;
import javafx.scene.text.Text;
import javafx.stage.Stage;public class JavaFx08 extends Application {@Overridepublic void start(Stage stage) {BorderPane borderPane = new BorderPane();borderPane.setBackground(Background.fill(Color.GRAY));HBox top = new HBox();top.setBackground(Background.fill(Color.BLUE));top.setMinHeight(60);Text text = new Text("Welcome 进销存");text.setFont(Font.font("宋体", FontWeight.BOLD,20));top.setAlignment(Pos.CENTER);top.getChildren().add(text);borderPane.setTop(top);VBox left = new VBox(10);left.setPadding(new Insets(10));left.setBackground(Background.fill(Color.PINK));left.setMinWidth(100);Button system = new Button("系统设置");left.getChildren().addAll(system,new Button("商品管理"),new Button("关于我们"),new Button("联系我们"));borderPane.setLeft(left);GridPane gridPane = new GridPane();gridPane.setBackground(Background.fill(Color.RED));gridPane.setMinWidth(400);gridPane.setMinHeight(240);borderPane.setCenter(gridPane);//borderPane.setRight(new Button("RIGHT"));system.setOnAction(e->{gridPane.setBackground(Background.fill(Color.BLACK));});HBox buttom = new HBox(10);buttom.setPadding(new Insets(10));buttom.setAlignment(Pos.CENTER);buttom.getChildren().addAll(new Button("系统设置"),new Button("商品管理"),new Button("关于我们"),new Button("联系我们"));borderPane.setBottom(buttom);Scene scene = new Scene(borderPane,600,400);stage.setScene(scene);stage.show();}public static void main(String[] args) {launch(args);}
}
此处为语雀视频卡片,点击链接查看:Video_2022-04-27_004131.wmv
菜单导航
使用场景绑定BorderPane宽度和高度
import javafx.application.Application;
import javafx.event.ActionEvent;
import javafx.event.EventHandler;
import javafx.scene.Group;
import javafx.scene.Scene;
import javafx.scene.control.Menu;
import javafx.scene.control.MenuBar;
import javafx.scene.control.MenuItem;
import javafx.scene.layout.BorderPane;
import javafx.scene.paint.Color;
import javafx.stage.Stage;public class Main extends Application {public static void main(String[] args) {Application.launch(args);}@Overridepublic void start(Stage primaryStage) {primaryStage.setTitle("Title");Group root = new Group();Scene scene = new Scene(root, 400, 250, Color.WHITE);MenuBar menuBar = new MenuBar();EventHandler<ActionEvent> action = changeTabPlacement();Menu menu = new Menu("Direction");MenuItem left = new MenuItem("Left");left.setOnAction(action);menu.getItems().add(left);MenuItem right = new MenuItem("Right");right.setOnAction(action);menu.getItems().add(right);MenuItem top = new MenuItem("Top");top.setOnAction(action);menu.getItems().add(top);MenuItem bottom = new MenuItem("Bottom");bottom.setOnAction(action);menu.getItems().add(bottom);menuBar.getMenus().add(menu);BorderPane borderPane = new BorderPane();borderPane.prefHeightProperty().bind(scene.heightProperty());borderPane.prefWidthProperty().bind(scene.widthProperty());borderPane.setTop(menuBar);root.getChildren().add(borderPane);primaryStage.setScene(scene);primaryStage.show();}private EventHandler<ActionEvent> changeTabPlacement() {return new EventHandler<ActionEvent>() {public void handle(ActionEvent event) {MenuItem mItem = (MenuItem) event.getSource();String side = mItem.getText();if ("left".equalsIgnoreCase(side)) {System.out.println("left");} else if ("right".equalsIgnoreCase(side)) {System.out.println("right");} else if ("top".equalsIgnoreCase(side)) {System.out.println("top");} else if ("bottom".equalsIgnoreCase(side)) {System.out.println("bottom");}}};}
}