吴恩达机器学习 第二课 week4 决策树
目录
01 学习目标
02 实现工具
03 问题描述
04 构建决策树
05 总结
01 学习目标
(1)理解“熵”、“交叉熵(信息增益)”的概念
(2)掌握决策树的构建步骤与要点
02 实现工具
(1)代码运行环境
Python语言,Jupyter notebook平台
(2)所需模块
numpy,matplotlib,public_tests
03 问题描述
假设你是犇犇蘑菇集团的总裁,你现在要亲自抽检10只蘑菇,看下里面有几只是毒蘑菇,程序猿出身的你打算采用决策树进行检测,Let's begin!
04 构建决策树
(1)导入所需模块
import numpy as np
import matplotlib.pyplot as plt
from public_tests import *%matplotlib inline
(public_tests是自定义模块,内部包括compute_entropy_test、split_dataset_test、compute_information_gain_test、get_best_split_test共4个函数,是一个 Jupyter Notebook 的魔法命令(Magic Command),用于在 Notebook 单元格中直接显示 Matplotlib 生成的图形)
(2)数据集
抽检的蘑菇采用3个特征,分别是Brown Cap、Tapering Stalk Shape和Solitary,检测结果为是/否有毒。特征及结果采用独热编码(one-hot),如下表:
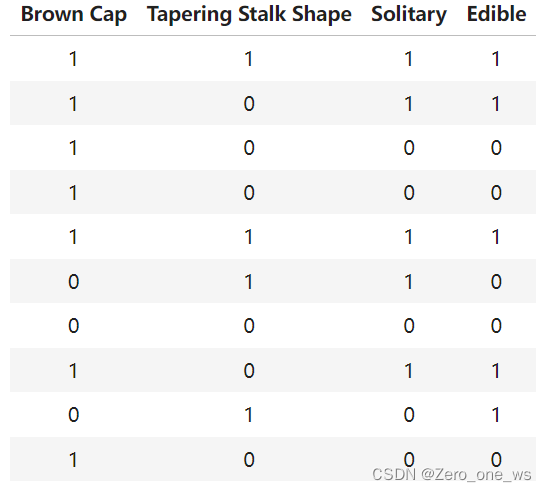
其中,Brown Cap列的1表示“棕色帽”、0表示“红色帽”;Tapering Stalk Shape列的1表示“锥形茎”、0表示“扩口茎”;Solitary列的1表示“单生”、0表示“非单生”;Edible列的1表示“无毒”、0表示“有毒”。
数据定义如下:
X_train = np.array([[1,1,1],[1,0,1],[1,0,0],[1,0,0],[1,1,1],[0,1,1],[0,0,0],[1,0,1],[0,1,0],[1,0,0]])
y_train = np.array([1,1,0,0,1,0,0,1,1,0])
(3)决策树步骤
决策树构建分4步:①选择根节点特征;②计算所有分裂情况的信息增益并选择具有最高信息增益的特征;③根据选择的特征拆分数据集,创建树的左右分支;④继续重复分割过程,直到满足停止条件。
信息增益(又称“交叉熵”)表示由于分裂导致的熵的变化,熵用来衡量信息混乱程度,熵大则乱,信息增益的一般计算公式如下:
其中,Info gain为信息增益,H(P)为概率P的熵,P=k/n,k为目标出现次数,n为总数。
(4)代码实现决策树
①定义熵函数
def compute_entropy(y):entropy = 0.k = 0n = len(y)if n == 0:entropy = 0else:for i in range(n): k += y[i] p = k / nif p == 0 or p == 1:entropy = 0else:entropy = -p * np.log2(p) - (1 - p) * np.log2(1 - p)return entropy②定义分裂函数
def split_dataset(X, node_indices, feature):left_indices = []right_indices = []for id in node_indices:if X[id, feature] == 1:left_indices.append(id)else:right_indices.append(id)return left_indices, right_indices③定义信息增益函数
def compute_information_gain(X, y, node_indices, feature):left_indices, right_indices = split_dataset(X, node_indices, feature)X_node, y_node = X[node_indices], y[node_indices]X_left, y_left = X[left_indices], y[left_indices]X_right, y_right = X[right_indices], y[right_indices]num_left = len(X_left)num_right = len(X_right)num_sum = num_left + num_rightw_left = num_left / num_sumw_right = num_right / num_sumentropy_w = w_left * compute_entropy(y_left) + w_right * compute_entropy(y_right) information_gain = compute_entropy(y_node) - entropy_w return information_gain④定义最优分裂函数
def get_best_split(X, y, node_indices): num_features = X.shape[1]best_feature = -1max_info_gain = 0for feature in range(num_features):info_gain = compute_information_gain(X, y, node_indices, feature)if info_gain > max_info_gain:max_info_gain = info_gainbest_feature = featurereturn best_feature⑤定义决策树函数
tree = []def build_tree_recursive(X, y, node_indices, branch_name, max_depth, current_depth): # 停止分裂的条件if current_depth == max_depth:formatting = " "*current_depth + "-"*current_depthprint(formatting, "%s leaf node with indices" % branch_name, node_indices)returnbest_feature = get_best_split(X, y, node_indices) tree.append((current_depth, branch_name, best_feature, node_indices))formatting = "-"*current_depthprint("%s Depth %d, %s: Split on feature: %d" % (formatting, current_depth, branch_name, best_feature))# 在最优特征处分裂left_indices, right_indices = split_dataset(X, node_indices, best_feature)# 继续分裂build_tree_recursive(X, y, left_indices, "Left", max_depth, current_depth+1)build_tree_recursive(X, y, right_indices, "Right", max_depth, current_depth+1)(分支名称branch_name:'Root', 'Left', 'Right';formatting = "-"*current_depth用于生成与“current_depth”数量相等的“-”,用于缩进)
⑥开始构建决策树
build_tree_recursive(X_train, y_train, root_indices, "Root", max_depth=2, current_depth=0)运行以上代码,结果如下:
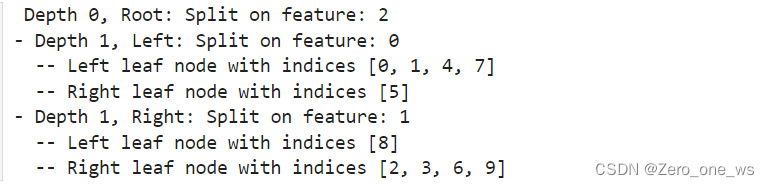
决策树的分类结果如下图所示(自己用PPT绘的):

05 总结
(1)决策树的构建包括:计算熵、信息增益、寻找最优分裂方式3个核心要点。
(2) 决策树要解决的是多特征分类识别问题。