数据结构(Java实现):链表与LinkedList
文章目录
- 1. 单向链表
- 1.1 链表的概念及结构
- 1.2 链表的实现
- 1.2.1 单向链表类和节点
- 1.2.2 打印每个节点的值
- 1.2.3 计算链表长度
- 1.2.4 头插节点
- 1.2.5 尾插节点
- 1.2.6 在指定下标插入新节点
- 1.2.7 判断是否存在某个节点
- 1.2.8 移除某个节点
- 1.2.9 移除所有指定节点
- 1.2.10 清空链表
- 1.2.11 测试代码
- 1.3 链表相关习题及题解
- 2. LinkedList(双向链表)
- 2.1 LinkedList的模拟实现(MyLinkedList)
- 2.1.1 双向链表类和节点
- 2.1.2 前插节点
- 2.1.3 尾插节点
- 2.1.4 指定位置插入节点
- 2.1.5 判断是否有目标节点
- 2.1.6 删除第一次出现的关键字的节点
- 2.1.7 删除所有目标节点
- 2.1.8 链表长度
- 2.1.9 打印链表
- 2.1.10 清空链表
- 2.1.11 测试代码
- 3. LinkedList的使用
- 3.1 什么是LinkedList
- 3.2 LinkedList的使用
- 4. ArrayList和LinkedList的区别
1. 单向链表
1.1 链表的概念及结构
链表是一种物理存储结构上非连续存储结构,数据元素的逻辑顺序是通过链表中的引用链接次序实现的 。


注意:
- 从上图可以看出,链式结构在逻辑上是连续的,但物理上不一定连续。
- 现实中的节点一般都是从堆上申请出来的。
- 从堆上申请的空间,是按照一定的策略来分配的,再次申请的空间可能连续,也可能不连续。
实际中链表的结构非常多样,以下情况组合起来就有8种链表结构:
- 单向或者双向

- 带头或者不带头

- 循环或者非循环

虽然有这么多的链表的结构,但是我们重点掌握两种:
- 无头单向非循环链表:结构简单,一般不会单独用来存数据。实际中更多是作为其他数据结构的子结构,如哈希桶、图的邻接表等等。另外这种结构在笔试面试中出现很多。

- 无头双向链表:在Java的集合框架库中LinkedList底层实现就是无头双向循环链表。

1.2 链表的实现
1.2.1 单向链表类和节点
链表的节点我们通过内部类的方式来实现,这个类包含一个值val和下一节点的地址。外部类需要再定义一个头结点。
public class MySingleLinkedList {static class ListNode{//节点public int val;public ListNode next;//内部类构造方法,给节点赋值public ListNode(int val){this.val=val;this.next=null;}}//链表的头节点public ListNode head = null;
}
下面我们来一步一步分析并实现一些自定义链表的功能,包含在MySingleLinkedList类里面。
1.2.2 打印每个节点的值
我们通过遍历链表来实现每个节点值的打印,注意:我们不能使用头节点去遍历我们的链表,这可能会使我们的链表结构发生改变,所以我们重新创建一个节点cur来遍历链表,下面遍历也是同样的方法。
public void display(){ListNode cur=head;while (cur!=null){//cur走到最后的next为null,停止循环System.out.print(cur.val+" ");cur=cur.next;//遍历}System.out.println();}
1.2.3 计算链表长度
跟打印相同的方式进行遍历,然后使用count计数,每遍历一次就加1。然后返回count。
public int size(){int count=0;//计数ListNode cur=head;while (cur!=null){count++;cur=cur.next;}return count;}
1.2.4 头插节点
头插节点仅需要将新增节点的next指向头节点,然后让新增节点化为头节点。
public void addFirst(int val){ListNode node = new ListNode(val);//新增节点node.next=head;//新增节点的next指向头节点head=node;//新增节点化为头节点}
1.2.5 尾插节点
尾差节点需要将整个链表遍历完,然后让尾节点的next指向新节点。此时要注意,如果头节点为空就要使新增节点划定位头节点。
public void addLast(int val){ListNode node = new ListNode(val);//创建新节点//头节点为空就要使新增节点划定位头节点if(head == null){head = node;return;}//遍历链表ListNode cur = head;while (cur.next!=null){cur=cur.next;}//尾结点指向新节点cur.next=node;}
1.2.6 在指定下标插入新节点
这里要进行一个判断,判断输入的下标是否合法。因此我们自定义了一个受查异常。
public class IndexLegal extends RuntimeException{public IndexLegal(){}public IndexLegal(String arg){super(arg);}
}
然后我们通过遍历定位到指定位置的前一个节点,然后使用新节点的next指向定位节点的下一个节点,定位节点指向新增节点。此处两个步骤不能相反。
public void addIndex(int val, int index){//判断位置是否合法if(index<0||index>this.size()-1){throw new IndexLegal("传入位置不合法!");}//新节点ListNode node=new ListNode(val);ListNode cur=head;//定位到指定节点的前一个节点for (int i = 0; i < index-1; i++) {cur=cur.next;}//新节点的next指向定位节点的下一个节点node.next=cur.next;//定位节点指向新增节点cur.next=node;}
1.2.7 判断是否存在某个节点
此处只需要遍历节点,如果某个节点的值等于传入值就返回true,否则返回false。
public boolean contains(int val){ListNode cur=head;//遍历链表while (cur!=null){if(cur.val==val){return true;//判断为真返回true}cur=cur.next;}return false;//遍历完没有返回就不存在指定节点}
1.2.8 移除某个节点
如果要移除的节点在头节点就将头结点设置为头结点的next。如果为其他节点,先进行遍历,定位到指定节点的前一个节点,然后让定位节点指向定位节点的next的next。
public void remove(int val){//判断指定节点是否为头节点if(head.val==val){//头结点设置为头结点的nexthead=head.next;return;}ListNode cur=head;//遍历链表while (cur.next!=null){//定位到指定节点的前一个节点if(cur.next.val==val){//定位节点指向定位节点的next的next。cur.next=cur.next.next;return;}}}
1.2.9 移除所有指定节点
此时我们可以有两种方法:
- 创建一个虚拟头节点,当遍历到的节点不是指定节点就连接上虚拟头结点的那条链表,然后虚拟头结点的next就是所需节点。这里就不进行写入演示了。
- 通过使用一个前驱节点和遍历节点,前驱节点指向头节点,遍历节点指向头结点的next。然后遍历链表,当遍历到的节点不是目标节点,就让前驱节点指向遍历节点。如果是目标节点,遍历节点就一直遍历下去,前驱节点next指向遍历节点,由此来达到删除目标节点的功能。最后要判断头结点是否为目标节点,如果是就将头结点转换为头结点的next。
public void removeAll(int val){ListNode cur=head.next;//遍历节点ListNode prev=head;//前驱节点//遍历链表while (cur!=null){//当遍历到的节点不是目标节点,就让前驱节点指向遍历节点if (cur.val != val) {prev = cur;}//如果是目标节点,遍历节点就一直遍历下去cur=cur.next;//前驱节点next指向遍历节点,由此来达到删除目标节点的功能prev.next=cur;}if(head.val==val){//判断头结点是否为目标节点//如果为真,就将头结点转换为头结点的nexthead=head.next;}}
1.2.10 清空链表
如果进使用head=null,其他节点并没有得到释放。所以我们需要通过遍历来一个一个释放节点,最后再释放头结点。
public void clear(){ListNode cur=head;while (cur!=null){ListNode curN=head.next;
//如果使用cur=null并不能释放当前节点,因为cur只是当前节点的一个副本。
//对cur的操作并不能影响到当前节点。cur.next=null;//一个一个释放节点cur=curN;}head=null;//最后释放头结点}
1.2.11 测试代码
public static void main(String[] args) {MySingleLinkedList sl=new MySingleLinkedList();//尾插sl.addLast(12);sl.addLast(23);sl.addLast(34);sl.addLast(45);sl.addLast(56);//打印sl.display();System.out.println("==============");//头插sl.addFirst(11);sl.display();System.out.println("==============");//指定位置插sl.addIndex(99,3);sl.display();//大小System.out.println(sl.size());//判断System.out.println(sl.contains(12));}public static void main(String[] args) {MySingleLinkedList sl=new MySingleLinkedList();sl.addLast(11);sl.addLast(12);sl.addLast(11);sl.addLast(14);sl.addLast(11);sl.addLast(11);sl.addLast(15);sl.display();System.out.println("===========");//删除指定节点sl.remove(12);sl.display();System.out.println("===========");//删除所有节点sl.removeAll(11);sl.display();}public static void main(String[] args) {MySingleLinkedList sl=new MySingleLinkedList();//当所有节点都为要删除的节点的情况sl.addLast(11);sl.addLast(11);sl.addLast(11);sl.addLast(11);sl.addLast(11);sl.removeAll(11);sl.display();}public static void main(String[] args) {MySingleLinkedList sl=new MySingleLinkedList();sl.addLast(11);sl.addLast(11);sl.addLast(11);sl.addLast(11);sl.addLast(11);sl.display();//清空链表sl.clear();sl.display();}public static void main(String[] args) {MySingleLinkedList sl=new MySingleLinkedList();} public static void main(String[] args) {MySingleLinkedList sl=new MySingleLinkedList();}

1.3 链表相关习题及题解
链表相关习题及题解
写完这些习题可以更好帮助你迅速掌握和理解链表。(建议去做一下)
2. LinkedList(双向链表)
特点:每一个节点都包含了前驱和后继。
2.1 LinkedList的模拟实现(MyLinkedList)
2.1.1 双向链表类和节点
public class MyLinkedList {static class ListNode{//节点public int val;//节点值public ListNode next;//后继public ListNode prev;//前驱public ListNode(int val){//构造方法this.val=val;this.next=null;this.prev=null;}}public ListNode head;//头节点public ListNode last;//尾节点}
特点:每一个节点都包含了前驱和后继。下面这些方法在这个自定义双向链表实现的。
2.1.2 前插节点
前插节点之前先判断头节点是否为null,如果为空将插入节点设置为头结点和尾结点。不为空就使头节点的前驱指向新节点,新节点的后继指向头结点,然后将新节点设置为头结点。

public void addFirst(int data){ListNode node=new ListNode(data);if(head==null){//先判断头节点是否为null//为空将插入节点设置为头结点和尾结点head=last=node;}else {//不为空head.prev=node;//头节点的前驱指向新节点node.next=head;//新节点的后继指向头结点head=node;//将新节点设置为头结点}}
2.1.3 尾插节点
尾插节点之前先判断尾节点是否为null,如果为空将插入节点设置为头结点和尾结点。如果不为空,尾结点的后继指向新节点,新节点的前驱指向尾节点,将新节点设置为尾节点。

public void addLast(int data){ListNode node=new ListNode(data);//先判断尾节点是否为nullif(last==null){//如果为空将插入节点设置为头结点和尾结点head=last=node;}else {//如果不为空last.next=node;//尾结点的后继指向新节点node.prev=last;//新节点的前驱指向尾节点last=node;//将新节点设置为尾节点}}
2.1.4 指定位置插入节点
在指定位置插入节点需要先判断传入的位置是否合法。如果合法,判断位置是否为头或者尾,如果为头就调用头插法,如果为尾就调用尾插法。如果为中间,需要改变的指向的位置如下。

public void addIndex(int index,int data){//判断位置是否合法if(index<0||index>size()){return;}ListNode node=new ListNode(data);//头插if(index==0) {addFirst(data);}else if(index==size()){//尾插addLast(data);}//找到对应位置的节点ListNode cur = findIndexNode(index);//指针指向转换node.next=cur;cur.prev.next=node;node.prev=cur.prev;cur.prev=node;}//寻找目标节点private ListNode findIndexNode(int index){ListNode cur = head;for (int i = 0; i < index; i++) {cur=cur.next;}return cur;}
2.1.5 判断是否有目标节点
从头遍历链表,如果节点的目标值等于传入值,返回true。遍历完链表没有返回true,就不存在目标节点,返回false。
public boolean contains(int key){ListNode cur=head;while (cur!=null){if(cur.val==key){return true;}cur=cur.next;}return false;}
2.1.6 删除第一次出现的关键字的节点
首先从头遍历整条链表,如果找到关键字的节点,先判断此节点是否为头节点,如果为头节点让头结点设置为头节点的next。然后判断头结点是否为null,如果为null此链表就只存在一个节点,此时将头和尾设置为null就行,否则将头结点的前驱设置为null。如果不是头结点就需要让目标节点的前驱节点的后置节点指向目标节点的后置节点。如果目标节点的后置节点为null(目标节点为尾结点)就将尾结点设置为尾结点的前驱节点。否则让目标节点的后置节点的前驱设置为目标节点的前驱。删除后返回。

public void remove(int key){ListNode cur=head;while (cur!=null){//首先从头遍历整条链表if(cur.val==key){//如果找到关键字的节点if(cur==head){//判断此节点是否为头节点//如果为头节点让头结点设置为头节点的nexthead=head.next;if(head!=null){//判断头结点是否为null//将头结点的前驱设置为nullhead.prev=null;}else {//此链表就只存在一个节点,此时将头和尾设置为nulllast=null;}}else {//不为头节点//让目标节点的前驱节点的后置节点指向目标节点的后置节点cur.prev.next=cur.next;
//目标节点的后置节点为null(目标节点为尾结点)就将尾结点设置为尾结点的前驱节点if(cur.next==null){last=last.prev;}else {//目标节点的后置节点的前驱设置为目标节点的前驱cur.next.prev=cur.prev;}}return;}cur=cur.next;}}
2.1.7 删除所有目标节点
此时只要将上面的返回去掉能达到删除所有目标节点的效果。
public void remove(int key){ListNode cur=head;while (cur!=null){//首先从头遍历整条链表if(cur.val==key){//如果找到关键字的节点if(cur==head){//判断此节点是否为头节点//如果为头节点让头结点设置为头节点的nexthead=head.next;if(head!=null){//判断头结点是否为null//将头结点的前驱设置为nullhead.prev=null;}else {//此链表就只存在一个节点,此时将头和尾设置为nulllast=null;}}else {//不为头节点//让目标节点的前驱节点的后置节点指向目标节点的后置节点cur.prev.next=cur.next;
//目标节点的后置节点为null(目标节点为尾结点)就将尾结点设置为尾结点的前驱节点if(cur.next==null){last=last.prev;}else {//目标节点的后置节点的前驱设置为目标节点的前驱cur.next.prev=cur.prev;}}}cur=cur.next;}}
2.1.8 链表长度
定义一个count,然后遍历链表,每遍历一次count就++。最后返回count就是链表的长度。
public int size(){ListNode cur=head;int count=0;//链表长度while (cur!=null){//遍历链表count++;cur=cur.next;}return count;}
2.1.9 打印链表
遍历链表,然后打印每个节点的值。
public void display(){ListNode cur=head;while (cur!=null){//遍历链表System.out.print(cur.val+" ");//打印节点的值cur=cur.next;}System.out.println();}
2.1.10 清空链表
遍历节点,然后将节点的前驱和后置置为空。
public void clear(){ListNode cur=head;while (cur!=null){//遍历链表ListNode curN=cur.next;cur.prev=null;//前驱置空cur.next=null;//后继置空cur=curN;}head=last=null;}
2.1.11 测试代码
//清空链表测试public static void main(String[] args) {MyLinkedList ll=new MyLinkedList();ll.addFirst(1);ll.addFirst(2);ll.addFirst(3);ll.addFirst(4);ll.addFirst(5);ll.clear();ll.display();}//移除所有目标节点测试public static void main(String[] args) {MyLinkedList ll=new MyLinkedList();ll.addLast(1);ll.addLast(1);ll.addLast(1);ll.addLast(1);ll.addLast(1);ll.addLast(1);ll.display();ll.removeAllKey(1);System.out.println("=========");ll.display();}//移除目标值和判断目标节点测试public static void main(String[] args) {MyLinkedList ll=new MyLinkedList();ll.addLast(1);ll.addLast(2);ll.addLast(3);ll.addLast(4);ll.addLast(5);ll.remove(1);ll.display();ll.remove(3);ll.display();System.out.println(ll.contains(2));System.out.println(ll.contains(3));}//尾插和指定位置插测试public static void main(String[] args) {MyLinkedList ll=new MyLinkedList();ll.addLast(1);ll.addLast(2);ll.addLast(3);ll.addLast(4);ll.addLast(5);ll.display();System.out.println("================");ll.addIndex(2,99);ll.display();}//前插测试public static void main(String[] args) {MyLinkedList ll=new MyLinkedList();ll.addFirst(1);ll.addFirst(2);ll.addFirst(3);ll.addFirst(4);ll.addFirst(5);ll.display();}
3. LinkedList的使用
3.1 什么是LinkedList
LinkedList官方文档
LinkedList的底层是双向链表结构,由于链表没有将元素存储在连续的空间中,元素存储在单独的节点中,然后通过引用将节点连接起来了,因此在在任意位置插入或者删除元素时,不需要搬移元素,效率比较高。LinkedList还被当做双向链表来使用。


【说明】
- LinkedList实现了List接口
- LinkedList的底层使用了双向链表
- LinkedList没有实现RandomAccess接口
- LinkedList的任意位置插入和删除元素时效率比较高,删除时时间复杂度为O(1)
- LinkedList比较适合任意位置插入的场景
知识补充:RandomAccess接口简介
RandomAccess接口是一个标记接口,用以标记实现的List集合具备快速随机访问的能力。
当一个List拥有快速访问功能时,其遍历方法采用for循环最快速。而没有快速访问功能的List,遍历的时候采用Iterator迭代器最快速。
if(list instanceof RandomAccess) {//判断链表是否实现RandomAccess接口// for循环System.out.println("采用for循环遍历");for (int i = 0;i< list.size();i++) {System.out.println(list.get(i));}
} else {// 迭代器System.out.println("采用迭代器遍历");Iterator it = list.iterator();while(it.hasNext()){System.out.println(it.next());}
}
3.2 LinkedList的使用
- LinkedList的构造方法

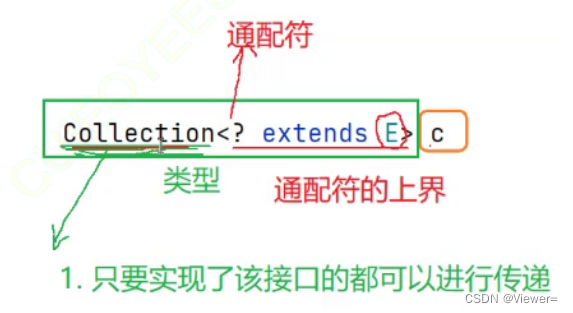
可以看到第二个构造方法有一个参数,解析如下。

有了第二种构造方法,我们可以复制相同类型或相同类型的子类的链表或者顺序表。
public static void main(String[] args) {ArrayList<Integer> list1=new ArrayList<>();list1.add(1);list1.add(2);list1.add(3);LinkedList<Integer> list2=new LinkedList<>(list1);//复制顺序表System.out.println(list2);LinkedList<Integer> list3=new LinkedList<>();list3.add(4);list3.add(5);list3.add(6);LinkedList<Integer> list4=new LinkedList<>(list3);//复制链表System.out.println(list4);}
- LinkedList的其他常用方法介绍

上面的一些常用的方法跟我们第二模块模拟实现LinkedList用法和实现方法相似,可以通过源码查看。
public static void main(String[] args) {LinkedList<Integer> list = new LinkedList<>();list.add(1); // add(elem): 表示尾插list.add(2);list.add(3);list.add(4);list.add(5);list.add(6);list.add(7);System.out.println(list.size());System.out.println(list);// 在起始位置插入0list.add(0, 0); // add(index, elem): 在index位置插入元素elemSystem.out.println(list);list.remove(); // remove(): 删除第一个元素,内部调用的是removeFirst()list.removeFirst(); // removeFirst(): 删除第一个元素list.removeLast(); // removeLast(): 删除最后元素list.remove(1); // remove(index): 删除index位置的元素System.out.println(list);// contains(elem): 检测elem元素是否存在,如果存在返回true,否则返回falseif (!list.contains(1)) {list.add(0, 1);}list.add(1);System.out.println(list);System.out.println(list.indexOf(1)); // indexOf(elem): 从前往后找到第一个elem的位置System.out.println(list.lastIndexOf(1)); // lastIndexOf(elem): 从后往前找第一个1的位置int elem = list.get(0); // get(index): 获取指定位置元素list.set(0, 100); // set(index, elem): 将index位置的元素设置为elemSystem.out.println(list);// subList(from, to): 用list中[from, to)之间的元素构造一个新的LinkedList返回List<Integer> copy = list.subList(0, 3);System.out.println(list);System.out.println(copy);list.clear(); // 将list中元素清空System.out.println(list.size());}
- LinkedList的遍历
public static void main(String[] args) {LinkedList<Integer> list = new LinkedList<>();list.add(1);list.add(2);list.add(3);System.out.println("===for循环===");for (int i = 0; i < list.size(); i++) {System.out.print(list.get(i)+" ");}System.out.println();System.out.println("===for-each===");for (Integer x:list) {System.out.print(x+" ");}System.out.println();System.out.println("===Iterator迭代器===");Iterator<Integer> it1= list.iterator();while (it1.hasNext()){System.out.print(it1.next()+" ");}System.out.println();System.out.println("===ListIterator迭代器===");ListIterator<Integer> it2=list.listIterator();//ListIterator实现Iterator接口,专属于list的迭代器while (it2.hasNext()){System.out.print(it2.next()+" ");}System.out.println();System.out.println("===ListIterator迭代器反向遍历===");ListIterator<Integer> it3=list.listIterator(list.size());//ListIterator的反向遍历(区别于普通Iterator迭代器)while (it3.hasPrevious()){System.out.print(it3.previous()+" ");}System.out.println();}
运行结果

4. ArrayList和LinkedList的区别

