【Flume Kafaka实战】Using Kafka with Flume
一 目标
在Cloudera Manager中创建两个Flume的Agent,Agent1从local file中获取内容,写入到kafka的队列中。Agent2以Agent1的sink作为source,将数据从kafka中读取出来,写入到HDFS中。
二 实战
2.1 Kafka Sink
第一步,在Cloudera Manager中安装Flume,安装时指定两个Agent。这一步很简单。
第二步,创建一个新Role Group。默认情况下,所有的Agent都处于一个叫Agent Default Group的角色组中,处于同一角色组中的Agent共享相同的配置。但是在我们这个例子中,两个Agent要完成不同的工作,需要不同的配置。所有新建一个Role Group,并把其中一个Agent移到到这个新的Group中,如下图所示。

第三步,分别编辑两个Agent的配置文件,我的第一个Agent名字为file2Kafka,配置文件内容如下。不难看出,这个配置的source就是去tail一个本地文件,然后写入到kafka的消息队列中。
即:Kafka Sink
# Name the components on this agent
file2Kafka.sources = file2Kafka_source
file2Kafka.sinks = file2Kafka_sink
file2Kafka.channels = file2Kafka_channel# Describe/configure the source
file2Kafka.sources.file2Kafka_source.type = exec
file2Kafka.sources.file2Kafka_source.command = tail -F /home/demo/flume-exec.txt# Describe the sink
file2Kafka.sinks.file2Kafka_sink.type = org.apache.flume.sink.kafka.KafkaSink
# topic前不加kafka
file2Kafka.sinks.file2Kafka_sink.topic = flumetest
file2Kafka.sinks.file2Kafka_sink.kafka.bootstrap.servers= slave1:9092,slave2:9092
file2Kafka.sinks.file2Kafka_sink.kafka.flumeBatchSize= 20# Use a channel which buffers events in memory
file2Kafka.channels.file2Kafka_channel.type = memory
file2Kafka.channels.file2Kafka_channel.capacity = 1000
file2Kafka.channels.file2Kafka_channel.transactionCapacity = 1000# Bind the source and sink to the channel
file2Kafka.sources.file2Kafka_source.channels = file2Kafka_channel
file2Kafka.sinks.file2Kafka_sink.channel = file2Kafka_channel
2.2 Kafka Source
第二Agent的名字是kafka2Hdfs,配置文件如下。这个配置的内容就是把Agent1中写到kafka的数据读出来,然后写入到HDFS中。注意hdfs.path这个配置,由于在Cloudera Manager中,Flume知道HDFS相关的配置,所以无需去加入hdfs://my-cluster这样的协议前缀。
# Name the components on this agent
kafka2Hdfs.sources = kafka2Hdfs_source
kafka2Hdfs.sinks = kafka2Hdfs_sink
kafka2Hdfs.channels = kafka2Hdfs_channel# Describe/configure the source
kafka2Hdfs.sources.kafka2Hdfs_source.type = org.apache.flume.source.kafka.KafkaSource
kafka2Hdfs.sources.kafka2Hdfs_source.batchSize = 10
kafka2Hdfs.sources.kafka2Hdfs_source.batchDurationMillis = 1000
kafka2Hdfs.sources.kafka2Hdfs_source.kafka.bootstrap.servers = slave1:9092,slave2:9092
kafka2Hdfs.sources.kafka2Hdfs_source.kafka.topics = flumetest
kafka2Hdfs.sources.kafka2Hdfs_source.kafka.consumer.group.id = flume# Describe the sink
kafka2Hdfs.sinks.kafka2Hdfs_sink.type = hdfs
kafka2Hdfs.sinks.kafka2Hdfs_sink.hdfs.path = /flume/
kafka2Hdfs.sinks.kafka2Hdfs_sink.hdfs.fileType = DataStream
kafka2Hdfs.sinks.kafka2Hdfs_sink.hdfs.filePrefix=sxt
kafka2Hdfs.sinks.kafka2Hdfs_sink.hdfs.rollCount=0
kafka2Hdfs.sinks.kafka2Hdfs_sink.hdfs.rollInterval=0# Use a channel which buffers events in memory
kafka2Hdfs.channels.kafka2Hdfs_channel.type = memory
kafka2Hdfs.channels.kafka2Hdfs_channel.capacity = 1000
kafka2Hdfs.channels.kafka2Hdfs_channel.transactionCapacity = 100# Bind the source and sink to the channel
kafka2Hdfs.sources.kafka2Hdfs_source.channels = kafka2Hdfs_channel
kafka2Hdfs.sinks.kafka2Hdfs_sink.channel = kafka2Hdfs_channel
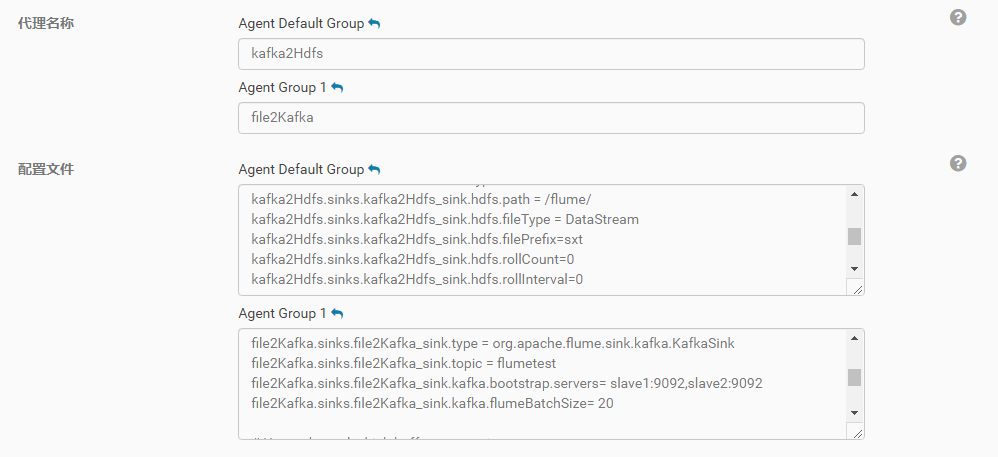
整个配置完成之后,Cloudera Manager中的界面如下图:
在运行中可能会出现一些目录读写的权限问题,需要去修改hdfs中相关目录的权限。比如我的配置中,数据是写到/flume这个目录下的,这个目录我是用root用户去创建的,但flume运行是使用一个叫flume的用户名来运行的,所以用hdfs dfs -chmod 777 /flume把这个目录的读写权限放开了。
这是一个例子,主要演示如何在cloudera manager中把两个flume的agent串联在一起使用。在现实的生产中,如果需要把一个文本数据通过kakfa写入到hdfs中,更合理的做法是使用一个agent,把kafka作为channel来使用。具体可以参考https://www.cloudera.com/documentation/kafka/latest/topics/kafka_flume.html
2.3 Kafka Channel
# Name the components on this agent
kafkaCh.sources = src_1_file
kafkaCh.channels = ch_1_kafka
kafkaCh.sinks = sink_1_hdfs# Describe/configure the source
kafkaCh.sources.src_1_file.type = exec
kafkaCh.sources.src_1_file.command = tail -F /home/demo/flume-exec.txt# Define a kafka channel
kafkaCh.channels.ch_1_kafka.type = org.apache.flume.channel.kafka.KafkaChannel
kafkaCh.channels.ch_1_kafka.kafka.bootstrap.servers = slave1:9092,slave2:9092
kafkaCh.channels.ch_1_kafka.kafka.topic = kafka_channel
kafkaCh.channels.ch_1_kafka.kafka.consumer.group.id = flume-consumer# Describe the sink
kafkaCh.sinks.sink_1_hdfs.type = hdfs
kafkaCh.sinks.sink_1_hdfs.hdfs.path = /flume/kafka/channel
kafkaCh.sinks.sink_1_hdfs.hdfs.fileType = DataStream
kafkaCh.sinks.sink_1_hdfs.hdfs.filePrefix=sxt
kafkaCh.sinks.sink_1_hdfs.hdfs.rollCount=0
kafkaCh.sinks.sink_1_hdfs.hdfs.rollInterval=0# Bind the source and sink to the channel
kafkaCh.sources.src_1_file.channels = ch_1_kafka
kafkaCh.sinks.sink_1_hdfs.channel = ch_1_kafka
将上面两个Agent放在一个Agent中,用Kafka Channel实现。
注意:hdfs.path 必须存在,且有权限进行操作