从零搭建基于SpringBoot的秒杀系统(五):基于Shiro的人员登陆认证
前面实现了抢购的功能,但是人员目前是写死的,关于登陆有许多实现方式,这里采用Shiro来实现人员的登陆认证。Shiro 可以帮助我们完成:认证、授权、加密、会话管理、与 Web 集成、缓存等,在这里我们用shiro进行登陆认证。
两个页面的内容很简单,一个用户名输入框,一个密码输入框,一个登陆或者注册按钮。
<!DOCTYPE html>
<html lang="zh-CN" xmlns:th="http://www.thymeleaf.org">
<meta name="referrer" content="no-referrer" />
<head>
    <meta charset="utf-8">
    <meta http-equiv="X-UA-Compatible" content="IE=edge">
    <title>登陆界面</title>
    <!-- 最新版本的 Bootstrap 核心 CSS 文件 -->
    <link rel="stylesheet" href="https://cdn.jsdelivr.net/npm/bootstrap@3.3.7/dist/css/bootstrap.min.css" integrity="sha384-BVYiiSIFeK1dGmJRAkycuHAHRg32OmUcww7on3RYdg4Va+PmSTsz/K68vbdEjh4u" crossorigin="anonymous">
    <!-- 可选的 Bootstrap 主题文件(一般不用引入) -->
    <link rel="stylesheet" href="https://cdn.jsdelivr.net/npm/bootstrap@3.3.7/dist/css/bootstrap-theme.min.css" integrity="sha384-rHyoN1iRsVXV4nD0JutlnGaslCJuC7uwjduW9SVrLvRYooPp2bWYgmgJQIXwl/Sp" crossorigin="anonymous">
</head>
<body>
<div class="container">
    <form class="form-signin" action="/login" method="post">
        <h2 class="form-signin-heading">Please sign in</h2>
        <label for="username" class="sr-only">Username</label>
        <input type="username" id="username" name="username" class="form-control" placeholder="Username" required autofocus>
        <label for="password" class="sr-only">Password</label>
        <input type="password" id="password" name="password" class="form-control" placeholder="Password" required>
        <button class="btn btn-lg btn-primary btn-block" type="submit">Sign in</button>
        <span><a href="/register" class="register">重新注册一个用户</a></span>
        <h2 th:text="${errormsg}"></h2>
    </form>
</div> <!-- /container -->
<script src="https://cdn.bootcss.com/jquery/3.2.1/jquery.min.js"></script>
<!-- 最新的 Bootstrap 核心 JavaScript 文件 -->
<script src="https://cdn.jsdelivr.net/npm/bootstrap@3.3.7/dist/js/bootstrap.min.js" integrity="sha384-Tc5IQib027qvyjSMfHjOMaLkfuWVxZxUPnCJA7l2mCWNIpG9mGCD8wGNIcPD7Txa" crossorigin="anonymous"></script>
</body>
</html><!DOCTYPE html>
<html lang="zh-CN" xmlns:th="http://www.thymeleaf.org">
<meta name="referrer" content="no-referrer" />
<head>
<meta charset="utf-8">
<meta http-equiv="X-UA-Compatible" content="IE=edge">
<title>注册界面</title>
<!-- 最新版本的 Bootstrap 核心 CSS 文件 -->
<link rel="stylesheet" href="https://cdn.jsdelivr.net/npm/bootstrap@3.3.7/dist/css/bootstrap.min.css" integrity="sha384-BVYiiSIFeK1dGmJRAkycuHAHRg32OmUcww7on3RYdg4Va+PmSTsz/K68vbdEjh4u" crossorigin="anonymous">
<!-- 可选的 Bootstrap 主题文件(一般不用引入) -->
<link rel="stylesheet" href="https://cdn.jsdelivr.net/npm/bootstrap@3.3.7/dist/css/bootstrap-theme.min.css" integrity="sha384-rHyoN1iRsVXV4nD0JutlnGaslCJuC7uwjduW9SVrLvRYooPp2bWYgmgJQIXwl/Sp" crossorigin="anonymous">
</head>
<body>
<div class="container">
<form class="form-signin" action="/register" method="post">
<h2 class="form-signin-heading">Please Register</h2>
<label for="username" class="sr-only">Username</label>
<input type="username" id="username" name="username" class="form-control" placeholder="Username" required autofocus>
<label for="password" class="sr-only">Password</label>
<input type="password" id="password" name="password" class="form-control" placeholder="Password" required>
<button class="btn btn-lg btn-primary btn-block" type="submit">Register</button>
<h2 th:text="${errormsg}"></h2>
</form>
</div> <!-- /container -->
<script src="https://cdn.bootcss.com/jquery/3.2.1/jquery.min.js"></script>
<!-- 最新的 Bootstrap 核心 JavaScript 文件 -->
<script src="https://cdn.jsdelivr.net/npm/bootstrap@3.3.7/dist/js/bootstrap.min.js" integrity="sha384-Tc5IQib027qvyjSMfHjOMaLkfuWVxZxUPnCJA7l2mCWNIpG9mGCD8wGNIcPD7Txa" crossorigin="anonymous"></script>
</body>
</html>shiro中有个比较重要的内容叫做Realm(域),Realm是应用与安全数据之间的连接器,当用于执行登陆认证时,shiro会从Realm中查找用户的信息及权限,你也可以把Realm看成一个安全的数据源,用户数据都是从这里获取。
在Service文件下新建一个CustomRealm ,CustomRealm 需要继承AuthorizingRealm ,并实现其中的doGetAuthorizationInfo方法和doGetAuthenticationInfo方法,认证登录我们用到doGetAuthenticationInfo方法。具体的代码逻辑放在注释里。
package com.sdxb.secondkill.service;

import com.google.common.base.Objects;
import com.sdxb.secondkill.entity.User;
import com.sdxb.secondkill.mapper.UserMapper;
import org.apache.shiro.SecurityUtils;
import org.apache.shiro.authc.*;
import org.apache.shiro.authz.AuthorizationInfo;
import org.apache.shiro.realm.AuthorizingRealm;
import org.apache.shiro.session.Session;
import org.apache.shiro.subject.PrincipalCollection;
import org.springframework.beans.factory.annotation.Autowired;

public class CustomRealm extends AuthorizingRealm {
    @Autowired
    public UserMapper userMapper;
    /**
     * 认证-授权
     * @param principalCollection
     * @return
     */
    @Override
    protected AuthorizationInfo doGetAuthorizationInfo(PrincipalCollection principalCollection) {
        return null;
    }
    /**
     * 认证-登陆
     * @param authenticationToken
     * @return
     * @throws AuthenticationException
     */
    @Override
    protected AuthenticationInfo doGetAuthenticationInfo(AuthenticationToken authenticationToken) throws AuthenticationException {
        //获取UsernamePasswordToken对象,从这个对象中可以获取用户名和密码
        UsernamePasswordToken token= (UsernamePasswordToken) authenticationToken;
        String username = token.getUsername();
        String password = String.valueOf(token.getPassword());
        System.out.println(username+password);
        //根据用户名查找用户信息
        User user = userMapper.SelectByName(username);
        //如果用户为空,向上抛出UnknownAccountException异常
        if (user==null){
            throw new UnknownAccountException("用户名不存在");
        }
        //如果isActive不等于1,向上抛出DisabledAccountException异常
        if (!Objects.equal(1,user.getIsActive().intValue())){
            throw new DisabledAccountException("当前用户已被禁用");
        }
        //如果密码错误,抛出IncorrectCredentialsException异常
        if(!user.getPassword().equals(password)){
            throw new IncorrectCredentialsException("用户密码错误");
        }
        //创建SimpleAuthenticationInfo对象进行校验
        SimpleAuthenticationInfo info=new SimpleAuthenticationInfo(user.getId(),password,getName());
        //将key和对应的value装入shiro的session中,最终交给httpSession进行管理
        setSession("uid",user.getId());
        return info;
    }

    /**
     * 将key和对应的value装入shiro的session中,最终交给httpSession进行管理
     * @param key
     * @param value
     */
    private void setSession(String key, Object value) {
        Session session = SecurityUtils.getSubject().getSession();
        if (session!=null){
            session.setAttribute(key,value);
            session.setTimeout(300000L);
        }
    }
}
简单来讲,就是通过Realm获取用户名和密码进行校验,并装入shiro的session中,接下来就可以写Shiro的通用配置了
package com.sdxb.secondkill.config;
import com.sdxb.secondkill.service.CustomRealm;
import org.apache.shiro.mgt.SecurityManager;
import org.apache.shiro.spring.web.ShiroFilterFactoryBean;
import org.apache.shiro.web.mgt.DefaultWebSecurityManager;
import org.springframework.context.annotation.Bean;
import org.springframework.context.annotation.Configuration;

import java.util.HashMap;
import java.util.Map;

@Configuration
public class ShiroConfig {
    //身份认证的realm
    @Bean
    public CustomRealm customRealm(){
        return new CustomRealm();
    }
    //安全管理器,并设置realm
    @Bean
    public SecurityManager securityManager(){
        DefaultWebSecurityManager manager=new DefaultWebSecurityManager();
        manager.setRealm(customRealm());
        return manager;
    }
    @Bean
    public ShiroFilterFactoryBean shiroFilterFactoryBean(){
        //创建一个ShiroFilter工厂
        ShiroFilterFactoryBean bean=new ShiroFilterFactoryBean();
        //设置安全管理器
        bean.setSecurityManager(securityManager());
        //设置登陆url
        bean.setLoginUrl("/login");
        //设置为认证的url
        bean.setUnauthorizedUrl("/unauth");
        //创建过滤器,在这里可以自定义需要过滤的url
        Map<String,String> filterChainDefinitionMap = new HashMap<String, String>();
        //anon: 无需认证即可访问
        //authc: 需要认证才可访问
        filterChainDefinitionMap.put("/login","anon");
        filterChainDefinitionMap.put("/register","anon");
        filterChainDefinitionMap.put("/item/*","authc");
        filterChainDefinitionMap.put("/kill/execute/*","authc");
        filterChainDefinitionMap.put("/**","authc");
        bean.setFilterChainDefinitionMap(filterChainDefinitionMap);

        return bean;
    }
}
Shiro的通用配置中主要配置了realm以及过滤器,设置相关的过滤条件,anon:表示无需认证即可访问,authc: 表示需要认证才可访问。配置当路径为/login或/register,不需要认证,为其他路径时需要认证。setloginUrl:没有登录的用户请求需要登录的页面时自动跳转到登录页面,setUnauthorizedUrl:没有权限默认跳转的页面,登录的用户访问了没有被授权的资源自动跳转到的页面。
接下来编写业务逻辑,首先在controller下新建UserController,编写登陆和注册的controller
import com.sdxb.secondkill.entity.User;
import com.sdxb.secondkill.mapper.UserMapper;
import org.apache.commons.lang3.StringUtils;
import org.apache.shiro.SecurityUtils;
import org.apache.shiro.authc.DisabledAccountException;
import org.apache.shiro.authc.IncorrectCredentialsException;
import org.apache.shiro.authc.UnknownAccountException;
import org.apache.shiro.authc.UsernamePasswordToken;
import org.springframework.beans.factory.annotation.Autowired;
import org.springframework.stereotype.Controller;
import org.springframework.ui.Model;
import org.springframework.web.bind.annotation.RequestMapping;
import org.springframework.web.bind.annotation.RequestMethod;
import org.springframework.web.bind.annotation.RequestParam;

@Controller
public class UserController {
    @Autowired
    private UserMapper userMapper;

    @RequestMapping(value = {"/login","unauth"},method = RequestMethod.GET)
    public String toLogin(){
        return "login";
    }

    @RequestMapping(value = "/login",method = RequestMethod.POST)
    public String login(@RequestParam("username")String username, @RequestParam("password")String password, Model model){
        System.out.println(username+password);
        //用于记录错误信息
        String msg="";
        try {
            //如果未认证,生成一个UsernamePasswordToken对象,通过login登陆
            if (!SecurityUtils.getSubject().isAuthenticated()){
                UsernamePasswordToken token=new UsernamePasswordToken(username,password);
                SecurityUtils.getSubject().login(token);
            }
        }catch (UnknownAccountException e){
            msg=e.getMessage();
        }catch (DisabledAccountException e){
            msg=e.getMessage();
        }catch (IncorrectCredentialsException e){
            msg=e.getMessage();
        }catch (Exception e){
            msg="用户登陆异常";
            e.printStackTrace();
        }
        //如果msg为空表示没有错误,跳转到首页
        if (StringUtils.isBlank(msg)){
            return "redirect:/item";
        }else {
            model.addAttribute("errormsg",msg);
            return "login";
        }
    }

    @RequestMapping(value = "/register",method = RequestMethod.GET)
    public String toRegister(){
        return "register";
    }

    @RequestMapping(value = "/register",method = RequestMethod.POST)
    public String checkRegister(@RequestParam("username")String username,@RequestParam("password")String password,Model model){
        String msg="";
        User user = userMapper.SelectByName(username);
        if (user!=null){
            msg="当前用户已存在";
            model.addAttribute("errormsg",msg);
            return "register";
        }
        else {
            int res=userMapper.insertuser(username,password);
            if (res>0){
                return "login";
            }else {
                msg="用户创建失败,请联系管理员处理";
                model.addAttribute("errormsg",msg);
                return "register";
            }
        }
    }
    @RequestMapping(value = "/logout",method = RequestMethod.GET)
    public String Logout(){
        SecurityUtils.getSubject().logout();
        return "login";
    }
}
对数据库的操作放在mapper中,在mapper文件下新建Usermapper
@Mapper
public interface UserMapper {
    @Select("select * from user where user_name=#{username}")
    User SelectByName(@Param("username")String username);

    @Insert("insert into user(user_name,password) values(#{username},#{password})")
    int insertuser(@Param("username") String username, @Param("password") String password);
}当输入的url不是/login或/register时,shiro会进行校验,如果发现未通过人员认证,则会跳转到登陆页面进行登陆认证。输入http://localhost:8080/logout则退出登陆。
在前一篇博客中,我们把KillController中的userid写死成10,现在有了人员登陆后需要修改一下之前的代码:
//修改前
//Integer userid=10;
//添加登陆功能后使用这段代码
Object uid=httpSession.getAttribute("uid");
if (uid==null){
    return new BaseResponse(StatusCode.UserNotLog);
}
Integer userid= (Integer) uid;输入网址:http://localhost:8080/item,自动跳转到登陆页面
如果输入错误用户名,显示用户名不存在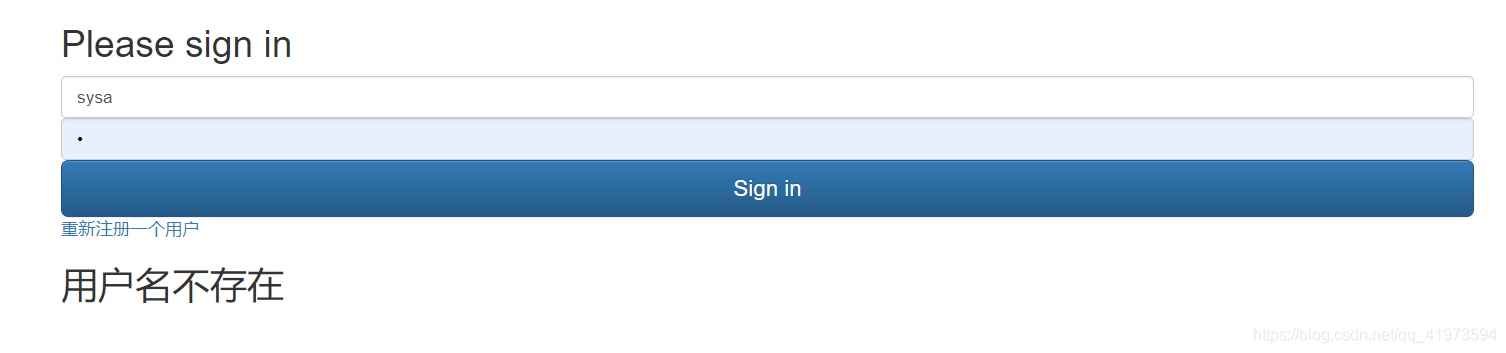
输入错误密码,显示密码错误
输入正确账号密码后,进入首页。点击左下角的重新注册一个用户,进入用户注册页面:
点击注册后即可注册。
到目前为止的代码均放在https://github.com/OliverLiy/SecondKill/tree/version4.0
我搭建了一个微信公众号《Java鱼仔》,分享大量java知识点与学习经历,如果你对本项目有任何疑问,欢迎在公众号中联系我,我会尽自己所能为大家解答。