公司产品的安装包原先是用installshield开发,但是我们采用的installshiled版本是installshiled 2008,无法很好兼容windows 10.公司又不想花钱对其升级。讨论下来有必要使用免费工具重新构建开发包。原来产品安装包是msi格式,比较下,wix是最好的选择。
最终的安装包将会包含5种语言包括界面和EULA.主要功能包括通过custom action检查产品序列号,升级(需要将原先程序退出),自动安装.net 4.0 framework(主要考虑在产品依然需要运行在windows xp和windows 7上)
我们使用wix3.11集成到visual studio 2017中。 wix安装包可以从SourceForge Wix网站下载。
安装包项目结构分为6个目录和一个主文件
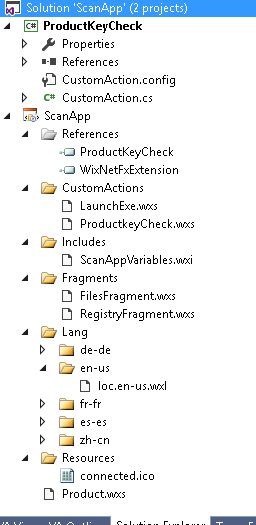
- CustomActions:每个custom action的定义在一个wix fragment中,一个wsx文件包含一个fragment
- Fragments:包含由heat.exe自动生成的fragment和手动生成的修改注册表的fragment
- Includes:定义变量的wix文件,每个wsx文件都应该include这个wix文件
- Lang:字符串国际化
- Packages:保存生成的msi文件
- Resources:msi需要的资源文件,如icon,bmp
- Product.wsx:安装包主文件
wix文件
主要定义安装包脚本需要用到变量,使用这些变量的wsx文件应该include 这个头文件
<?include "..\includes\ScanAppVariables.wxi"?>
当然可以在项目属性中定义一个变量 properties->Build->“Define preprocessor variables” .但如果多个开发者同时添加一些变量可能导致修改项目文件时产生冲突
ScanAppVariables.wsx
<?xml version="1.0" encoding="utf-8"?>
<Include>
	<!-- TODO: Put your code here. -->
  <?define MajorVersion = "1"?>
  <?define MinorVersion = "1"?>
  <?define PatchVersion = "1"?>
  <?define VersionNumber = "$(var.MajorVersion).$(var.MinorVersion).$(var.PatchVersion)"?>
</Include>
安装包脚本文件 Product.wsx
基本上分为5个部分:update,condition和action,UI sequence,directory structure及需要安装的feature.
<?xml version="1.0" encoding="UTF-8"?>
<!-- Add xmlns:util namespace definition to be able to use stuff from WixUtilExtension dll-->
<Wix xmlns="http://schemas.microsoft.com/wix/2006/wi" xmlns:util="http://schemas.microsoft.com/wix/UtilExtension">
  <!-- This is how we include wxi files -->
  <?include "..\Includes\ScanAppVariables.wxi" ?>
  <!--
  Id="*" is to enable upgrading. * means that the product ID will be autogenerated on each build.
  Name is made of localized product name and version number.
  -->
  <Product Id="*" Name="!(loc.ProductName) $(var.VersionNumber)" Language="!(loc.LANG)" Version="$(var.VersionNumber)" Manufacturer="!(loc.ManufacturerName)" UpgradeCode="$(var.UpgradeCode)">
    <!-- Define the minimum supported installer version (3.0) and that the install should be done for the whole machine not just the current user -->
    <Package InstallerVersion="300" Compressed="yes" InstallScope="perMachine"/>
    <Media Id="1" Cabinet="media1.cab" EmbedCab="yes" />
    <!-- Upgrade settings. This will be explained in more detail in a future post -->
    <Upgrade Id="$(var.UpgradeCode)">
      <UpgradeVersion OnlyDetect="yes" Minimum="$(var.VersionNumber)" IncludeMinimum="no" Property="NEWER_VERSION_FOUND" />
      <UpgradeVersion Minimum="0.0.0.0" IncludeMinimum="yes" Maximum="$(var.VersionNumber)" IncludeMaximum="no" Property="OLDER_VERSION_FOUND" />
    </Upgrade>
    <!-- Reference the global NETFRAMEWORK35 property to check if it exists -->
    <PropertyRef Id="NETFRAMEWORK35"/>
    <!--
    Startup conditions that checks if .Net Framework 3.5 is installed or if
    we're running the OS higher than Windows XP SP2.
    If not the installation is aborted.
    By doing the (Installed OR ...) property means that this condition will only
    be evaluated if the app is being installed and not on uninstall or changing
    -->
    <Condition Message="!(loc.DotNetFrameworkNeeded)">
      <![CDATA[Installed OR NETFRAMEWORK35]]>
    </Condition>
    <Condition Message="!(loc.AppNotSupported)">
      <![CDATA[Installed OR ((VersionNT >= 501 AND ServicePackLevel >= 2) OR (VersionNT >= 502))]]>
    </Condition>
    <!--
    This custom action in the InstallExecuteSequence is needed to
    stop silent install (passing /qb to msiexec) from going around it.
    -->
    <CustomAction Id="NewerVersionFound" Error="!(loc.ScanAppNewerVersionInstalled)" />
    <InstallExecuteSequence>
      <!-- Check for newer versions with FindRelatedProducts and execute the custom action after it -->
      <Custom Action="NewerVersionFound" After="FindRelatedProducts">
        <![CDATA[NEWER_VERSION_FOUND]]>
      </Custom>
      <!-- Remove the previous versions of the product -->
      <RemoveExistingProducts After="InstallInitialize"/>
      <!-- WixCloseApplications is a built in custom action that uses util:CloseApplication below -->
      <Custom Action="WixCloseApplications" Before="InstallInitialize" />
    </InstallExecuteSequence>
    <!-- This will ask the user to close the SuperForm app if it's running while upgrading -->
    <util:CloseApplication Id="CloseSuperForm" CloseMessage="no" Description="!(loc.MustCloseSuperForm)"
                           ElevatedCloseMessage="no" RebootPrompt="no" Target="$(var.ExeProcessName)" />
    <!-- Use the built in WixUI_InstallDir GUI -->
    <UIRef Id="WixUI_InstallDir" />
    <UI>
      <!-- These dialog references are needed for CloseApplication above to work correctly -->
      <DialogRef Id="FilesInUse" />
      <DialogRef Id="MsiRMFilesInUse" />
      <!-- Here we'll add the GUI logic for installation and updating in a future post-->
    </UI>
    <!-- Set the icon to show next to the program name in Add/Remove programs -->
    <Icon Id="ScanAppIcon.ico" SourceFile="..\resources\device.ico" />
    <Property Id="ARPPRODUCTICON" Value="ScanAppIcon.ico" />
    <!-- Installer UI custom pictures. File names are made up. Add path to your pics. –>
    <!--
    <WixVariable Id="WixUIDialogBmp" Value="MyAppLogo.jpg" />
    <WixVariable Id="WixUIBannerBmp" Value="installBanner.jpg" />
    -->
    <!-- the default directory structure -->
    <Directory Id="TARGETDIR" Name="SourceDir">
      <Directory Id="ProgramFilesFolder">
        <Directory Id="INSTALLLOCATION" Name="!(loc.ProductName)" />
      </Directory>
    </Directory>
    <!--
    Set the default install location to the value of
    INSTALLLOCATION (usually c:\Program Files\YourProductName)
    -->
    <Property Id="WIXUI_INSTALLDIR" Value="INSTALLLOCATION" />
    <!-- Set the components defined in our fragment files that will be used for our feature  -->
    <Feature Id="ScanAppFeature" Title="!(loc.ProductName)" Level="1">
      <ComponentGroupRef Id="ScanAppFiles" />
      <ComponentRef Id="cmpVersionInRegistry" />
      <ComponentRef Id="cmpIsThisUpdateInRegistry" />

    </Feature>
  </Product>
</Wix>
通过 heat.exe 生成文件或文件夹Fragment
因为项目要安装的文件比较多,手工输入到wsx比较麻烦,可以通过heat.exe自动生成componentgourp,然后加入到feature中
"$(WIX)bin\heat.exe" dir "..\Artifact\Main" -cg ScanAppFiles -gg -scom -sreg -sfrag -srd -dr INSTALLLOCATION -var var.FilesDir -out "$(ProjectDir)Fragments\FilesFragment.wxs"
- dir "..\Artifact\Main":需要安装的文件所在的目录
- –cg ScanAppFiles : 生成的component group的名字
- -dr INSTALLLOCATION: 生成Fragment对应的directory
- -var var.FilesDir: 替换生成的Fragment文件中$(SourceDir)字段
- -out "$(ProjectDir)Fragments\FilesFragment.wxs":输出文件路径
FilesFragment.wxs
<?xml version="1.0" encoding="utf-8"?>
<Wix xmlns="http://schemas.microsoft.com/wix/2006/wi">
    <Fragment>
        <ComponentGroup Id="ScanAppFiles">
            <ComponentRef Id="cmp5BB40DB822CAA7C5295227894A07502E" />
            <ComponentRef Id="cmpCFD331F5E0E471FC42A1334A1098E144" />
            <ComponentRef Id="cmp4614DD03D8974B7C1FC39E7B82F19574" />
            <ComponentRef Id="cmpDF166522884E2454382277128BD866EC" />
        </ComponentGroup>
    </Fragment>
    <Fragment>
        <DirectoryRef Id="INSTALLLOCATION">
            <Component Id="cmp5BB40DB822CAA7C5295227894A07502E" Guid="{117E3352-2F0C-4E19-AD96-03D354751B8D}">
                <File Id="filDCA561ABF8964292B6BC0D0726E8EFAD" KeyPath="yes" Source="$(var.FilesDir)\ScanApp.exe" />
            </Component>
            <Component Id="cmpCFD331F5E0E471FC42A1334A1098E144" Guid="{369A2347-97DD-45CA-A4D1-62BB706EA329}">
                <File Id="filA9BE65B2AB60F3CE41105364EDE33D27" KeyPath="yes" Source="$(var.FilesDir)\ScanApp.pdb" />
            </Component>
            <Component Id="cmp4614DD03D8974B7C1FC39E7B82F19574" Guid="{3443EBE2-168F-4380-BC41-26D71A0DB1C7}">
                <File Id="fil5102E75B91F3DAFA6F70DA57F4C126ED" KeyPath="yes" Source="$(var.FilesDir)\ScanApp.vshost.exe" />
            </Component>
            <Component Id="cmpDF166522884E2454382277128BD866EC" Guid="{0C0F3D18-56EB-41FE-B0BD-FD2C131572DB}">
                <File Id="filF7CA5083B4997E1DEC435554423E675C" KeyPath="yes" Source="$(var.Files)\ScanApp.vshost.exe.manifest" />
            </Component>
        </DirectoryRef>
    </Fragment>
</Wix>