TCP负载均衡地址转换
【实验名称】 <?xml:namespace prefix = o ns = "urn:schemas-microsoft-com:office:office" />
TCP
负载均衡地址转换
【
实验目的
】
掌握多台服务器复用同一IP地址时的TCP负载均衡地址转换技术。
【
背景描述
】
你是某网站的高级网络管理员,你的网站为了更好的给外界提供下载服务,用两台服务器共同承担外界对你网站的
FTP
下载。但是网站的
FTP
下载地址已经固定唯一,请你能实现两台服务器对同一服务的负载分担,且不能让外界探测到你服务器的数量。
【
实现功能
】
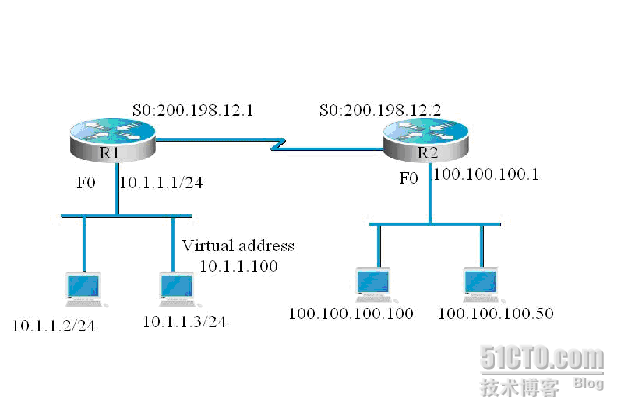
多台主机共享一个虚拟
IP
地址,实现服务负载分担。
【
实验拓扑
】 
<?xml:namespace prefix = v ns = "urn:schemas-microsoft-com:vml" />
【
实验设备
】
R<?xml:namespace prefix = st2 ns = "Tencent" />2624
(
2
台)
【
实验步骤
】
第一步:
基本配置
Red-Giant>enable
Red-Giant#configure terminal
Red-Giant(config)#hostname R1
R1(config)#interface serial 0
R1(config-if)#ip address 200.198.12.1 255.255.255.0
R1(config-if)#clock rate 64000
R1(config-if)#no sh
R1(config-if)#exi
R1(config)#interface fastethernet 0
R1(config-if)#ip address <?xml:namespace prefix = st1 ns = "urn:schemas-microsoft-com:office:smarttags" />10.1.1.1 255.255.255.0
R1(config-if)#no sh
R1(config-if)#end
Red-Giant#configure terminal
Red-Giant(config)#hostname R2
R2(config)#interface serial 0
R2(config-if)#ip address 200.198.12.2 255.255.255.0
R2(config-if)#no shutdown
R2(config-if)#exi
R2(config)#interface fastethernet 0
R2(config-if)#ip address 100.100.100.1 255.255.255.0
R2(config-if)#end
验证测试:
R2#ping 200.198.12.1
Type escape sequence to abort.
Sending 5, 100-byte ICMP Echoes to 200.198.12.1 timeout is 2 seconds:
!!!!!
第二步:
配置
TCP
负载均衡地址转换
R1(config)# ip nat pool realhosts 10.1.1.2 10.1.1.3 netmask 255.255.255.0 type rotary
!定义真实地址负载分担
R1(config)#access-list 1 permit 10.1.1.100
R1(config)#ip nat inside de
R1(config)#ip nat inside destination list 1 pool realhosts
!定义一个虚拟的
IP
地址表现为代表几个主机的唯一地址
R1(config)#interface serial 0
R1(config-if)#ip nat outside
R1(config-if)#exi
R1(config)#interface fastethernet 0
R1(config-if)#ip nat inside
验证测试:
R1#sh ip nat translations
Pro Inside global Inside local Outside local Outside global
Tcp 10.1.1.100:21 10.1.1.2:21 100.100.100.100:1178 100.100.100.100:1178
Tcp 10.1.1.100:21 10.1.1.3:21 100.100.100.50:1024 100.100.100.50:1024
【
注意事项
】
l
不要把
inside
和
outside
应用的接口弄错
l
要建立一个虚拟地址代表多台服务器
【
参考配置
】
R1#sh run
Building configuration...
Current configuration:
!
version 6.14(2)
!
hostname "R1"
!
ip subnet-zero
!
interface FastEthernet0
ip address 10.1.1.1 255.255.255.0
ip nat inside
!
interface FastEthernet1
no ip address
shutdown
!
interface FastEthernet2
no ip address
shutdown
!
interface FastEthernet3
no ip address
shutdown
!
interface Serial0
ip address 200.198.12.1 255.255.255.0
ip nat outside
clock rate 64000
!
interface Serial1
no ip address
shutdown
!
ip nat pool realhosts 10.1.1.2 10.1.1.3 netmask 255.255.255.0
type rotary
ip nat inside destination list 1 pool realhosts
ip classless
access-list 1 permit 10.1.1.100
!
line con 0
line aux 0
line vty 0 4
login
!
end
R2#sh run
Current configuration:
!
version 6.14(2)
!
hostname "R2"
!
ip subnet-zero
!
interface FastEthernet0
ip address 100.100.100.1 255.255.255.0
!
interface FastEthernet1
no ip address
shutdown
!
interface FastEthernet2
no ip address
shutdown
!
interface FastEthernet3
no ip address
shutdown
!
interface Serial0
ip address 200.198.12.2 255.255.255.0
!
interface Serial1
no ip address
shutdown
!
ip classless
!
line con 0
line aux 0
line vty 0 4
login
!
end
转载于:https://blog.51cto.com/lidai/245827