内容:
1.进程线程复习
2.flask多线程的问题
3.线程隔离
4.LocalStack
5.flask上下文整理
6.多app应用
1.进程线程复习
(1)进程
进程是一个具有一定独立功能的程序关于某个数据集合的一次运行活动。它是操作系统动态执行的基本单元,在传统的操作系统中,进程既是基本的分配单元,也是基本的执行单元
简单说进程就是操作系统调度分配资源的单位,每一个应用程序至少有一个进程
(2)线程
线程可以说是进程的一部分,可以有一个线程也可以有多个线程
只用进程管理CPU资源,粒度太大了,需要更小的单元来管理,就出现了线程
(3)进程与线程的区别
- 进程:是并发执行的程序在执行过程中分配和管理资源的基本单位,是一个动态概念,竞争计算机系统资源的基本单位
- 线程:是进程的一个执行单元,是进程内科调度实体。比进程更小的独立运行的基本单位。线程也被称为轻量级进程
- 地址空间:同一进程的线程共享本进程的地址空间,而进程之间则是独立的地址空间
- 资源拥有:同一进程内的线程共享本进程的资源如内存、I/O、cpu等,但是进程之间的资源是独立的
- 一个进程崩溃后,在保护模式下不会对其他进程产生影响,但是一个线程崩溃整个进程都死掉。所以多进程要比多线程健壮
- 进程切换时,消耗的资源大,效率高。所以涉及到频繁的切换时,使用线程要好于进程。同样如果要求同时进行并且又要共享某些变量的并发操作,只能用线程不能用进程
- 执行过程:每个独立的进程有一个程序运行的入口、顺序执行序列和程序入口。但是线程不能独立执行,必须依存在应用程序中,由应用程序提供多个线程执行控制
- 线程是处理器调度的基本单位,但是进程不是
(4)多线程的好处
- 多线程可以更加充分的利用CPU的性能优势
- 实现异步编程
(5)其他
对于普通python(GIL)、node.js来说一般都是单进程单线程的
- 对于CPU密集型程序,多线程无优势
- 对于IO密集型程序,多线程有优势
2.flask多线程的问题
(1)flask与webserver
flask自带的run方法其实是自己的一个服务器,只是供我们测试调试用的,真正上线后我们要用webserver去运行flask而不是用flask自带的运行方法
另外flask自带的是单进程单线程的,不能同时处理多个请求,用webserver可以有效提高性能
常见的webserver:nginx、apache、IIS等
(2)flask多线程的问题
flask中可以开启多线程,开启方法:run方法中有一个threaded参数,设置为True开启多线程
开启之后可能会导致这个问题:
flask中通过线程隔离来解决这个问题
3.线程隔离
(1)flask线程隔离基本原理
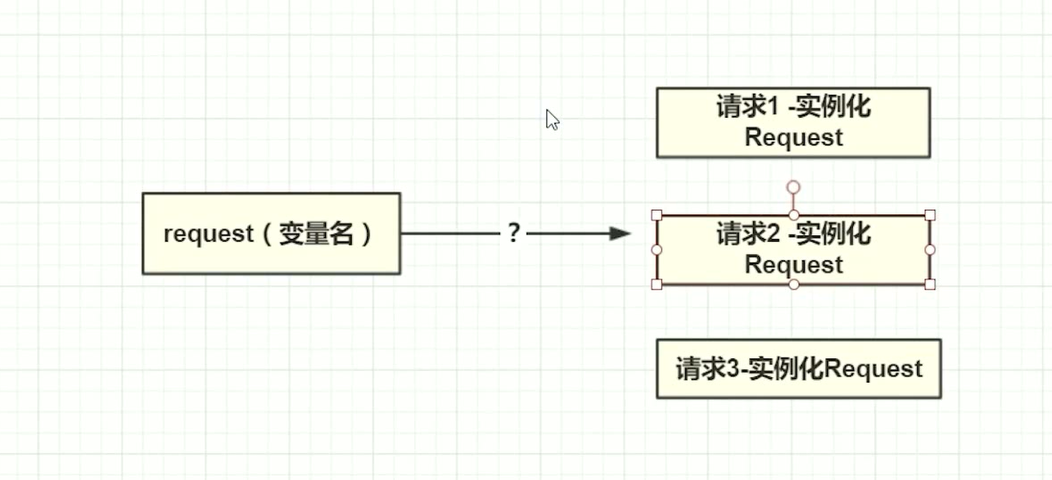
现有全局变量request=None
- 在线程1中 request=Request()
- 在线程2中 request=Request()
- 在线程3中 request=Request()
想取线程1的request, 现在的情况下肯定无法做到
解决办法:全局变量改为dict, 每一个线程都有对应的自己的key, 并将request作为value存放。falsk的线程隔离技术也是基于类似的原理实现的。
(2)源码
siet-package/werkzeug/local.py 中的Local类:
 1 class Local(object):
 2     __slots__ = ('__storage__', '__ident_func__')
 3
 4     def __init__(self):
 5         object.__setattr__(self, '__storage__', {})   # __storge__ 实现空的字典
 6         object.__setattr__(self, '__ident_func__', get_ident) # get_ident是获取当前线程id号的 函数
 7
 8     def __iter__(self):
 9         return iter(self.__storage__.items())
10
11     def __call__(self, proxy):
12         """Create a proxy for a name."""
13         return LocalProxy(self, proxy)
14
15     def __release_local__(self):
16         self.__storage__.pop(self.__ident_func__(), None)
17
18     def __getattr__(self, name):
19         try:
20             return self.__storage__[self.__ident_func__()][name]
21         except KeyError:
22             raise AttributeError(name)
23
24     def __setattr__(self, name, value):
25         ident = self.__ident_func__()     # 取当前线程的 线程id号,
26         storage = self.__storage__        # 类本身的字典
27         try:
28             storage[ident][name] = value   # 把当前线程id号存起来
29         except KeyError:
30             storage[ident] = {name: value}
31
32     def __delattr__(self, name):
33         try:
34             del self.__storage__[self.__ident_func__()][name]
35         except KeyError:
36             raise AttributeError(name)
Local类用当前线程的id号当作key存储不同的线程,不同线程操作该对象时互不影响,Local类就是线程隔离的对象
Local隔离实例:
 1 from werkzeug.local import Local
 2 import threading, time
 3
 4 my_obj = Local()
 5 my_obj.b = 1
 6
 7
 8 def worker():
 9     my_obj.b = 2
10     print('in sub thread b is:' + str(my_obj.b))   # 2
11
12
13 subthread1 = threading.Thread(target=worker, name='subthread1')
14 subthread1.start()
15
16 time.sleep(1)
17
18 print('my_obj.b is : {}'.format(my_obj.b))  # 1
19
(3)线程隔离的意义
使用线程隔离使当前线程能正确引用到自己创建的对象,而不是引用到其他线程所创建的对象
4.LocalStack
(1)源码
 1 class LocalStack(object):
 2     def __init__(self):
 3         self._local = Local()
 4
 5     def __release_local__(self):
 6         self._local.__release_local__()
 7
 8     def _get__ident_func__(self):
 9         return self._local.__ident_func__
10
11     def _set__ident_func__(self, value):
12         object.__setattr__(self._local, '__ident_func__', value)
13     __ident_func__ = property(_get__ident_func__, _set__ident_func__)
14     del _get__ident_func__, _set__ident_func__
15
16     def __call__(self):
17         def _lookup():
18             rv = self.top
19             if rv is None:
20                 raise RuntimeError('object unbound')
21             return rv
22         return LocalProxy(_lookup)
23
24     def push(self, obj):
25         """Pushes a new item to the stack"""
26         rv = getattr(self._local, 'stack', None)
27         if rv is None:
28             self._local.stack = rv = []
29         rv.append(obj)
30         return rv
31
32     def pop(self):
33         """Removes the topmost item from the stack, will return the
34         old value or `None` if the stack was already empty.
35         """
36         stack = getattr(self._local, 'stack', None)
37         if stack is None:
38             return None
39         elif len(stack) == 1:
40             release_local(self._local)
41             return stack[-1]
42         else:
43             return stack.pop()
44
45     @property
46     def top(self):
47         """The topmost item on the stack.  If the stack is empty,
48         `None` is returned.
49         """
50         try:
51             return self._local.stack[-1]
52         except (AttributeError, IndexError):
53             return None
(2)LocalStack和Local关系
- Local使用字典实现线程隔离
- LocalStack封装了Local,实现了线程隔离的栈结构
(3)使用LocalStack
 1 from werkzeug.local import LocalStack       # 栈 先进后出
 2 # LocalStack常用方法: push pop top
 3
 4
 5 s = LocalStack()
 6 s.push(1)
 7 print(s.top)        # top只会取出元素不会删除
 8 print(s.top)
 9 print(s.pop())      # pop取出元素并删除
10 print(s.top)
11
12 s.push(1)
13 s.push(2)
14 print(s.top)
15 print(s.top)
16 print(s.pop())
17 print(s.top)
 1 from werkzeug.local import LocalStack       # 栈 先进后出
 2 from threading import Thread
 3 import time
 4
 5 my_stack = LocalStack()
 6 my_stack.push(1)
 7 print("in main thread after push, value is: " + str(my_stack.top))      # 1
 8
 9
10 def worker():
11     # 新线程
12     print("in new thread before push, value is: " + str(my_stack.top))      # None
13     my_stack.push(2)
14     print("in new thread after push, value is: " + str(my_stack.top))       # 2
15
16
17 new_t = Thread(target=worker, name="new thread")
18 new_t.start()
19 time.sleep(1)
20
21 # 主线程
22 print("finally, in main thread value is: " + str(my_stack.top))     # 1
5.flask上下文整理
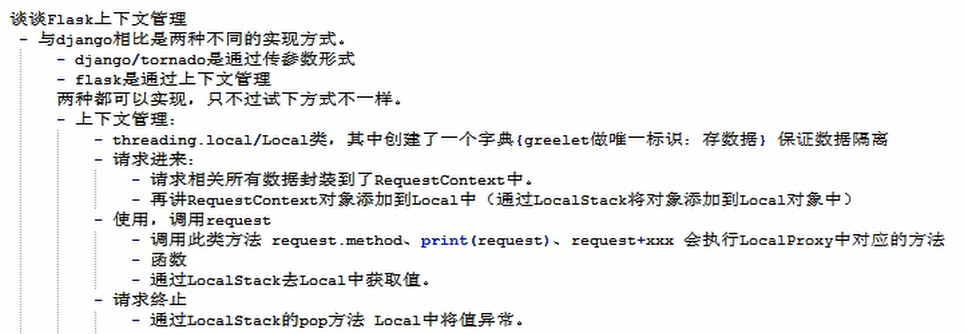
(1)请求上下文
 1 from flask import Flask,request,session,g,current_app
 2
 3 app = Flask(__name__)
 4
 5 @app.route('/',methods=['GET',"POST"])
 6 def index():
 7     # request是 LocalProxy 的对象
 8     print(request)  # LocalProxy.__str__ --> str(LocalProxy._get_current_object) --> 调用偏函数 --> ctx.request
 9     request.method  # LocalProxy.__getattr__ -->
10                                             # str(LocalProxy._get_current_object) --> 调用偏函数 --> ctx.request
11                                             # getattr(self._get_current_object(), name)          --> ctx.request.method
12
13     request.path   # ctx.request.path
14
15     print(session) # LocalProxy.__str__ --> str(LocalProxy._get_current_object) --> 调用偏函数 --> ctx.session
16
17
18     print(g) # 执行g对象的__str__
19     return "index"
20
21
22 if __name__ == '__main__':
23     # 1. app.__call__
24     # 2. app.wsgi_app
25     app.wsgi_app
26     app.request_class
27     app.run()
(2)应用上下文
 1 from flask import Flask,request,session
 2
 3 app = Flask(__name__)
 4
 5 @app.route('/',methods=['GET',"POST"])
 6 def index():
 7     # request是 LocalProxy 的对象
 8     print(request)  # LocalProxy.__str__ --> str(LocalProxy._get_current_object) --> 调用偏函数 --> ctx.request
 9     request.method  # LocalProxy.__getattr__ -->
10                                             # str(LocalProxy._get_current_object) --> 调用偏函数 --> ctx.request
11                                             # getattr(self._get_current_object(), name)          --> ctx.request.method
12
13     request.path   # ctx.request.path
14
15     print(session) # LocalProxy.__str__ --> str(LocalProxy._get_current_object) --> 调用偏函数 --> ctx.session
16     return "index"
17
18
19 if __name__ == '__main__':
20     # 1. app.__call__
21     # 2. app.wsgi_app
22     app.wsgi_app
23     app.run()
 1 from flask import Flask,request,g
 2
 3 app = Flask(__name__)
 4
 5 @app.before_request
 6 def before():
 7     g.permission_code_list = ['list','add']
 8
 9
10 @app.route('/',methods=['GET',"POST"])
11 def index():
12     print(g.permission_code_list)
13     return "index"
14
15
16 if __name__ == '__main__':
17     app.run()
(3)请求上下文及应用上下文
 1 a. 请求上下文:
 2     - request
 3     - session
 4
 5 b. 应用上下文:
 6 请求流程:
 7         _request_ctx_stack.local = {
 8
 9         }
10
11         _app_ctx_stack.local = {
12
13         }
14
15
16     1. 请求到来 ,有人来访问
17         # 将请求相关的数据environ封装到了RequestContext对象中
18         # 再讲对象封装到local中(每个线程/每个协程独立空间存储)
19         # ctx.app # 当前APP的名称
20         # ctx.request # Request对象(封装请求相关东西)
21         # ctx.session # 空
22         _request_ctx_stack.local = {
23             唯一标识:{
24                 "stack":[ctx, ]
25             },
26             唯一标识:{
27                 "stack":[ctx, ]
28             },
29         }
30
31
32         # app_ctx = AppContext对象
33         # app_ctx.app
34         # app_ctx.g
35
36         _app_ctx_stack.local = {
37             唯一标识:{
38                 "stack":[app_ctx, ]
39             },
40             唯一标识:{
41                 "stack":[app_ctx, ]
42             },
43         }
44
45     2. 使用
46             from flask import request,session,g,current_app
47
48             print(request,session,g,current_app)
49
50             都会执行相应LocalProxy对象的 __str__
51
52             current_app = LocalProxy(_find_app)
53                 request = LocalProxy(partial(_lookup_req_object, 'request'))
54                 session = LocalProxy(partial(_lookup_req_object, 'session'))
55
56                 current_app = LocalProxy(_find_app)
57                 g = LocalProxy(partial(_lookup_app_object, 'g'))
58
59     3. 终止,全部pop
60
61     问题1:多线程是如何体现?
62     问题2:flask的local中保存数据时,使用列表创建出来的栈。为什么用栈?
63            - 如果写web程序,web运行环境;栈中永远保存1条数据(可以不用栈)。
64            - 写脚本获取app信息时,可能存在app上下文嵌套关系。
65                 from flask import Flask,current_app,globals,_app_ctx_stack
66
67                 app1 = Flask('app01')
68                 app1.debug = False # 用户/密码/邮箱
69                 # app_ctx = AppContext(self):
70                 # app_ctx.app
71                 # app_ctx.g
72
73                 app2 = Flask('app02')
74                 app2.debug = True # 用户/密码/邮箱
75                 # app_ctx = AppContext(self):
76                 # app_ctx.app
77                 # app_ctx.g
78
79
80
81                 with app1.app_context():# __enter__方法 -> push -> app_ctx添加到_app_ctx_stack.local
82                     # {<greenlet.greenlet object at 0x00000000036E2340>: {'stack': [<flask.ctx.AppContext object at 0x00000000037CA438>]}}
83                     print(_app_ctx_stack._local.__storage__)
84                     print(current_app.config['DEBUG'])
85
86                     with app2.app_context():
87                         # {<greenlet.greenlet object at 0x00000000036E2340>: {'stack': [<flask.ctx.AppContext object at 0x00000000037CA438> ]}}
88                         print(_app_ctx_stack._local.__storage__)
89                         print(current_app.config['DEBUG'])
90
91                     print(current_app.config['DEBUG'])
6.多app应用
 1 from werkzeug.wsgi import DispatcherMiddleware
 2 from werkzeug.serving import run_simple
 3 from flask import Flask, current_app
 4
 5 app1 = Flask('app01')
 6 app2 = Flask('app02')
 7
 8
 9 @app1.route('/index')
10 def index():
11     return "app01"
12
13
14 @app2.route('/index2')
15 def index2():
16     return "app2"
17
18 # http://www.oldboyedu.com/index  --> app1
19 # http://www.oldboyedu.com/admin/index2  --> app2
20 app= DispatcherMiddleware(app1, {
21     '/admin': app2,
22 })
23
24 if __name__ == "__main__":
25     run_simple('localhost', 5000, app)