本地虚拟化开发环境 vagrant+virtualbox
本文以magento 2 为例,构建 phpstorm+xdebug+LNMP+redis环境。本文是在windows10 操作系统搭建,如果是MAC,请下载相应的软件。
step1: 下载 vagrant和virtualbox,并安装。
vagrant_1.9.7_x86_64.msi,VirtualBox-5.1.24-117012-Win.exe,Magento-CE-2.1.7
step2: mkdir D:\project ,将magento2 移动到该目录下,重命名为emptyM2。
step3: 在project目录下创建文件Vagrantfile,内容如下: (附件中有)
# -*- mode: ruby -*-
# vi: set ft=ruby :

# All Vagrant configuration is done below. The "2" in Vagrant.configure
# configures the configuration version (we support older styles for
# backwards compatibility). Please don't change it unless you know what
# you're doing.
Vagrant.configure("2") do |config|
  # The most common configuration options are documented and commented below.
  # For a complete reference, please see the online documentation at
  # https://docs.vagrantup.com.

  # Every Vagrant development environment requires a box. You can search for
  # boxes at https://atlas.hashicorp.com/search.
  config.vm.box = "ubuntu/trusty64"

  config.vm.provision :shell, path: "bootstrap.sh"


  # Disable automatic box update checking. If you disable this, then
  # boxes will only be checked for updates when the user runs
  # `vagrant box outdated`. This is not recommended.
  # config.vm.box_check_update = false

  # Create a forwarded port mapping which allows access to a specific port
  # within the machine from a port on the host machine. In the example below,
  # accessing "localhost:8080" will access port 80 on the guest machine.
  config.vm.network :forwarded_port, guest: 80, host: 9080
  config.vm.network :forwarded_port, guest: 3306, host: 9306
  config.vm.network :forwarded_port, guest: 443, host: 9443

  # Create a private network, which allows host-only access to the machine
  # using a specific IP.
  # config.vm.network "private_network", ip: "192.168.33.10"

  # Create a public network, which generally matched to bridged network.
  # Bridged networks make the machine appear as another physical device on
  # your network.
  # config.vm.network "public_network"

  # Share an additional folder to the guest VM. The first argument is
  # the path on the host to the actual folder. The second argument is
  # the path on the guest to mount the folder. And the optional third
  # argument is a set of non-required options.
    config.vm.synced_folder ".", "/vagrant", id:"vagrant",owner: "vagrant",group: "vagrant",:mount_options => ["dmode=777","fmode=777"]

  # Provider-specific configuration so you can fine-tune various
  # backing providers for Vagrant. These expose provider-specific options.
  # Example for VirtualBox:
  #
   config.vm.provider "virtualbox" do |vb|

    vb.customize ["modifyvm", :id, "--memory", 4096]
    vb.name = "dev-project"
    vb.cpus = "4"
   end
end
step4:在project目录下创建文件 bootstrap.sh,内容如下:(附件中有)
#!/usr/bin/env bash


# China repository
sed -i 's/archive.ubuntu.com/mirrors.aliyun.com/' /etc/apt/sources.list && \
sed -i 's/kr.archive.ubuntu.com/mirrors.aliyun.com/' /etc/apt/sources.list && \
sed -i 's/security.ubuntu.com/mirrors.aliyun.com/' /etc/apt/sources.list

# install software  do not show promots
export DEBIAN_FRONTEND="noninteractive"

apt-get update
apt-get -y install wget curl ssmtp python-setuptools redis-server

#nginx install
apt-get -y install libssl-dev libpcre3-dev g++

#cd /tmp && \
#wget http://nginx.org/download/nginx-1.12.0.tar.gz  | tar xzvf - && \
#cd nginx-1.12.0 && \
#./configure --prefix=/usr/local/nginx --with-stream --with-http_stub_status_module --with-http_realip_module && \
#make && make install

echo "install nginx"
cd /tmp && wget http://nginx.org/download/nginx-1.12.0.tar.gz
tar -zxvf nginx-1.12.0.tar.gz && cd nginx-1.12.0 && ./configure --prefix=/usr/local/nginx --with-stream --with-http_stub_status_module --with-http_realip_module --with-http_ssl_module && make && make install

cd /usr/local/nginx/conf
sudo mkdir site-enabled

sudo cp /vagrant/config/ssl/server.crt /usr/local/nginx/conf/server.crt
sudo cp /vagrant/config/ssl/server.key /usr/local/nginx/conf/server.key
sudo cp /vagrant/config/nginx/nginx.conf /usr/local/nginx/conf/nginx.conf
sudo cp /vagrant/config/nginx/nginx.dev.conf /usr/local/nginx/conf/site-enabled/nginx.dev.conf


#mysql 5.6 install
# mysql unintall  sudo apt-get autoremove --purge mysql-server-5.6

echo "install mysql"
apt-get -y install mysql-server-5.6

mysql -u root -e "create user 'root'@'10.0.2.2' identified by 'aabb1122'"
mysql -u root -e "grant all privileges on *.* to 'root'@'10.0.2.2' with grant option"
mysql -u root -e "create user 'magentouser'@'10.0.2.2' identified by 'password'"
mysql -u root -e "grant all privileges on *.* to 'magentouser'@'10.0.2.2'"
mysql -u root -e "CREATE DATABASE IF NOT EXISTS magento2 DEFAULT CHARACTER SET utf8 COLLATE utf8_general_ci"
mysql -u root -e "FLUSH PRIVILEGES"


sudo sed -i "s/bind-address/#bind-address/g" /etc/mysql/my.cnf

sudo /etc/init.d/mysql stop
sudo /etc/init.d/mysql start


#php 5.6 install
#add-apt-repository ppa:ondrej/php
#apt-get -y update
#apt-get -y install php5.6 php5.6-mcrypt php5.6-mbstring php5.6-curl php5.6-cli php5.6-mysql php5.6-gd php5.6-intl php5.6-xsl

#php 7.0 install
echo "install php7.0"
LC_ALL=C.UTF-8 add-apt-repository ppa:ondrej/php
sudo apt-get -y update
sudo apt-get install -y php7.0 php7.0-dev php7.0-fpm  php7.0-common php7.0-gd php7.0-mysql php7.0-mcrypt php7.0-curl php7.0-intl php7.0-xsl php7.0-mbstring php7.0-zip php7.0-bcmath php7.0-iconv php7.0-soap
# sudo /etc/init.d/php7.0-fpm start restart stop

sudo cp /vagrant/config/php/php.ini  /etc/php/7.0/fpm/php.ini
sudo cp /vagrant/config/php/php-fpm.conf  /etc/php/7.0/fpm/php-fpm.conf
sudo cp /vagrant/config/php/www.conf  /etc/php/7.0/fpm/pool.d/www.conf

#xdebug install
echo "install xdebug"
cd /tmp && wget -O xdebug-2.4.0rc2.tgz  http://xdebug.org/files/xdebug-2.4.0rc2.tgz
tar -xvzf /tmp/xdebug-2.4.0rc2.tgz
cd /tmp/xdebug-2.4.0RC2 && phpize && ./configure --enable-xdebug && make && sudo cp modules/xdebug.so /usr/lib/php/20151012/

# fro fpm
sudo cp /vagrant/config/php/20-xdebug.ini /etc/php/7.0/fpm/conf.d/20-xdebug.ini

#FOR CL
sudo cp /vagrant/config/php/20-xdebug.ini /etc/php/7.0/cli/conf.d/20-xdebug.ini

sudo /etc/init.d/php7.0-fpm restart

# Supervisor Config
sudo /usr/bin/easy_install supervisor
sudo /usr/bin/easy_install supervisor-stdout
sudo cp /vagrant/config/supervisor/supervisord.conf /etc/supervisord.conf
sudo cp /vagrant/config/supervisor/supervisord /etc/init.d/supervisord
sudo sed -i -e "s/\r$//g" /etc/init.d/supervisord
sudo chmod +x /etc/init.d/supervisord
sudo update-rc.d supervisord defaults
sudo /etc/init.d/supervisord stop
sudo /etc/init.d/supervisord start
step5: 在project目录下,执行 vagrant up。
step6: 安装mangeot2时,需要先将nginx.dev.conf 中的root设置为$MAGE_ROOT,等安装完成
后,再将root 设置为$MAGE_ROOT/pub。
step7: 浏览器输入http://local.magento2.dev:9080/ 开始安装。安装过程中,数据库用户名使用
root,秘密为空即可。
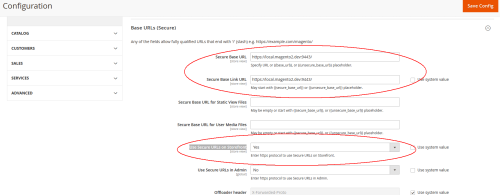
step8: https访问方式,https://local.magento2.dev:9443/,需要提前到magento2后台配置

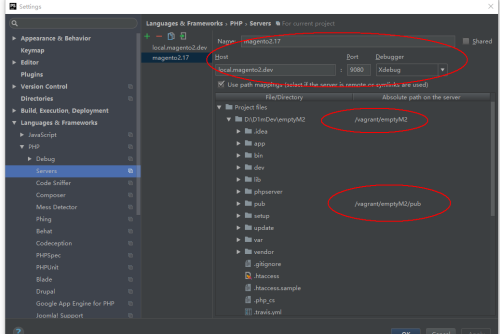
step9:phpstorm 配置xdebug,file->Settings->Language&Frameworks->php->servers
配置 Name:magento2.17; Host:local.magento2.dev,port:9080; 勾选use path;

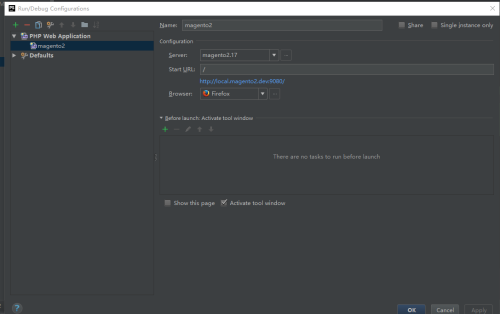
添加php Web Application:

转载于:https://blog.51cto.com/shaoxiao/1961341
