代码地址如下:
http://www.demodashi.com/demo/11712.html

一、指纹识别
①概述
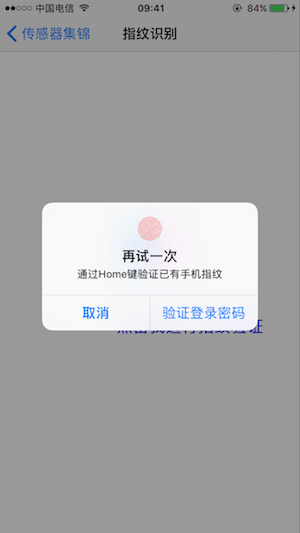
应用:指纹解锁、指纹登录、指纹支付

苹果从iPhone5S开始,具有指纹识别技术,从iOS8.0之后苹果允许第三方 App 使用 Touch ID进行身份验证。
连续三次指纹识别错误后,会自动弹出密码框,通过Touch ID的密码进行身份验证,如果此时取消密码验证,再2次指纹识别失败后,也就是 3 + 2 = 5次指纹识别失败后,Touch ID功能被锁定,就只能通过密码来进行身份验证和解锁Touch ID 功能。
②实现
全部代码如下:
#import <LocalAuthentication/LocalAuthentication.h>

-(void)OnTouchIDBtn:(UIButton *)sender{
    //判断设备是否支持Touch ID
    if ([[UIDevice currentDevice].systemVersion floatValue] < 8.0) {
        [self createAlterView:@"不支持指纹识别"];
        return;
    }else{
        LAContext *ctx = [[LAContext alloc] init];
        //设置 输入密码 按钮的标题
        ctx.localizedFallbackTitle = @"验证登录密码";
        //设置 取消 按钮的标题 iOS10之后
        ctx.localizedCancelTitle = @"取消";
        //检测指纹数据库更改 验证成功后返回一个NSData对象,否则返回nil
        //ctx.evaluatedPolicyDomainState;
        // 这个属性应该是类似于支付宝的指纹开启应用,如果你打开他解锁之后,按Home键返回桌面,再次进入支付宝是不需要录入指纹的。因为这个属性可以设置一个时间间隔,在时间间隔内是不需要再次录入。默认是0秒,最长可以设置5分钟
        //ctx.touchIDAuthenticationAllowableReuseDuration = 5;

        NSError * error;
       _localizedReason = @"通过Home键验证已有手机指纹";
        // 判断设备是否支持指纹识别
        if ([ctx canEvaluatePolicy:LAPolicyDeviceOwnerAuthentication error:&error]) {

            // 验证指纹是否匹配,需要弹出输入密码的弹框的话:iOS9之后用 LAPolicyDeviceOwnerAuthentication ;    iOS9之前用LAPolicyDeviceOwnerAuthenticationWithBiometrics
            [ctx evaluatePolicy:LAPolicyDeviceOwnerAuthentication localizedReason:_localizedReason reply:^(BOOL success, NSError * error) {
                if (success) {
                    [self createAlterView:@"指纹验证成功"];
                }else{

                    // 错误码 error.code
                    NSLog(@"指纹识别错误描述 %@",error.description);

                    // -1: 连续三次指纹识别错误
                    // -2: 在TouchID对话框中点击了取消按钮
                    // -3: 在TouchID对话框中点击了输入密码按钮
                    // -4: TouchID对话框被系统取消,例如按下Home或者电源键
                    // -8: 连续五次指纹识别错误,TouchID功能被锁定,下一次需要输入系统密码
                    NSString * message;
                    switch (error.code) {
                        case -1://LAErrorAuthenticationFailed
                            message = @"已经连续三次指纹识别错误了,请输入密码验证";
                            _localizedReason = @"指纹验证失败";
                            break;
                        case -2:
                            message = @"在TouchID对话框中点击了取消按钮";
                            return ;
                            break;
                        case -3:
                            message = @"在TouchID对话框中点击了输入密码按钮";
                            break;
                        case -4:
                            message = @"TouchID对话框被系统取消,例如按下Home或者电源键或者弹出密码框";
                            break;
                        case -8:
                            message = @"TouchID已经被锁定,请前往设置界面重新启用";
                            break;
                        default:
                            break;
                    }
                    [self createAlterView:message];
                }
            }];
        }else{

            if (error.code == -8) {
                [self createAlterView:@"由于五次识别错误TouchID已经被锁定,请前往设置界面重新启用"];
            }else{
                [self createAlterView:@"TouchID没有设置指纹,请前往设置"];
            }
        }
    }
}

- (void)createAlterView:(NSString *)message{
    UIAlertController * vc = [UIAlertController alertControllerWithTitle:@"提示" message:message preferredStyle:UIAlertControllerStyleAlert];
    [self presentViewController:vc animated:NO completion:^(void){
        [NSThread sleepForTimeInterval:1.0];
        [vc dismissViewControllerAnimated:YES completion:nil];
    }];
}
二、运动传感器/加速计/陀螺仪
①概述
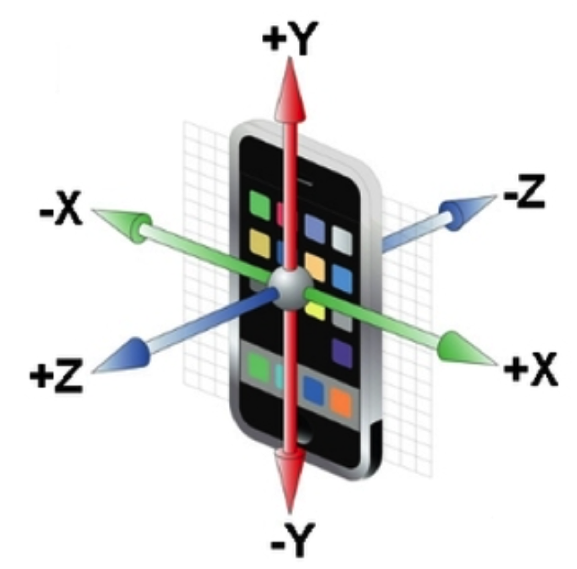
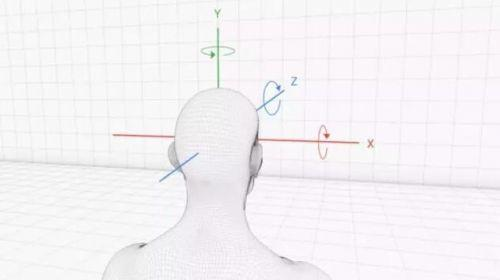
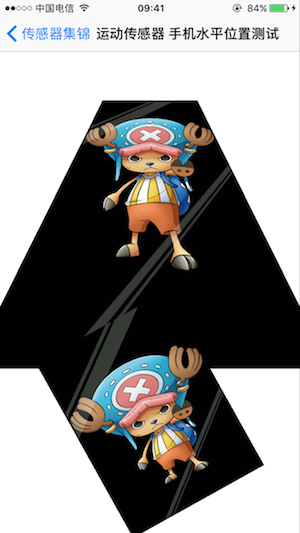
应用:水平位置测试、摇一摇、计步器、游戏、特效动画
*******
加速计和运动传感器主要监测设备在X、Y、Z轴上的加速度 ,根据加速度数值,就可以判断出在各个方向上的作用力度,陀螺仪主要用来监测设备的旋转方向和角度。
***
这几个传感器都是依赖于苹果官方CoreMotion框架,用法都差不多,先判断各个传感器是否可用开启,然后设置各个传感器的采集频率,接着就开始采集数据,并返回采集到的运动信息参数:各个方向的重力加速度、旋转方向角度等等。
②实现
* 示例效果:图片旋转的第一张图片用于检测设备是否处于水平位置,第二张图是设备无论在竖直/水平方向上怎么旋转,图片都保持于水平/竖直方向垂直。滚动小球不仅用了加速计,还用到了CoreMotion框架中行为管理CMMotionManager中的碰撞、重力行为,和动力学属性:摩擦、密度、弹力、阻力等
- 运动传感器的示例代码如下,其它的用法都差不多,只是相关的方法名称、属性名称和返回的参数类型和值不同,详情可以看demo,注释还算清晰;对于眼镜的绘制可以看下我之前的笔记:CALayer系列、CGContextRef、UIBezierPath、文本属性Attributes
 self.motionManager= [[CMMotionManager alloc] init];
    //判断设备运动传感器是否可用
    if(!self.motionManager.isDeviceMotionAvailable){
        NSLog(@"手机没有此功能,换肾吧");
    }
    //更新速率是100Hz
    self.motionManager.deviceMotionUpdateInterval = 0.1;
    //开始更新采集数据
    //需要时采集数据
    //[motionManager startDeviceMotionUpdates];
    //实时获取数据
    [self.motionManager startDeviceMotionUpdatesToQueue:[NSOperationQueue mainQueue] withHandler:^(CMDeviceMotion * _Nullable motion, NSError * _Nullable error) {
        //获取X的值
        double x = motion.gravity.x;
        //手机水平位置测试
        //判断y是否小于0,大于等于-1.0
        if(motion.gravity.y < 0.0 && motion.gravity.y >= -1.0){
                //设置旋转
                [imageView1 setRotation:80 * motion.gravity.y];
            }else if (motion.gravity.z * -1 > 0 && motion.gravity.z * -1 <= 1.0){
                [imageView1 setRotation:80 - (80 * motion.gravity.z * -1)];
            }
        //X、Y方向上的夹角
        double rotation = atan2(motion.gravity.x, motion.gravity.y) - M_PI;
        NSLog(@"%.2f",rotation);
        //图片始终保持垂直方向
        imageView2.transform = CGAffineTransformMakeRotation(rotation);
    }];
三、环境光感处理器
①概述
应用:常见的比如说根据环境的亮度去调整屏幕的亮度,在黑暗情况下,手机会自动调暗屏幕亮度,以防刺眼;iPhone 系统相机拍照时光线暗时会自动打开闪光灯;共享单车在黑暗的情况下扫码时检测到特别暗就自动提示打开闪光灯。
- 利用摄像头获取环境光感参数,通过摄像头采集环境参数,然后在代理方法中输出,光感越小,环境越暗,然后根据需要做相应的操作。
②实现
- 示例中是环境变暗后就自动提示是否打开闪光灯,打开之后,环境变亮后会自动提示是否关闭闪光灯。
  // 1.获取硬件设备
    AVCaptureDevice *device = [AVCaptureDevice defaultDeviceWithMediaType:AVMediaTypeVideo];
    if (device == nil) {
        NSLog(@"该换肾了");
        return;
    }

    // 2.创建输入流
    AVCaptureDeviceInput *input = [[AVCaptureDeviceInput alloc]initWithDevice:device error:nil];
    // 3.创建设备输出流
    AVCaptureVideoDataOutput *output = [[AVCaptureVideoDataOutput alloc] init];
    [output setSampleBufferDelegate:self queue:dispatch_get_main_queue()];
    // AVCaptureSession属性
    _session = [[AVCaptureSession alloc]init];
    // 设置为高质量采集率
    [_session setSessionPreset:AVCaptureSessionPresetHigh];
    // 添加会话输入和输出
    if ([_session canAddInput:input]) {
        [_session addInput:input];
    }
    if ([_session canAddOutput:output]) {
        [_session addOutput:output];
    }
    // 9.启动会话
    [_session startRunning];

#pragma mark- AVCaptureVideoDataOutputSampleBufferDelegate的方法
- (void)captureOutput:(AVCaptureOutput *)captureOutput didOutputSampleBuffer:(CMSampleBufferRef)sampleBuffer fromConnection:(AVCaptureConnection *)connection {

 CFDictionaryRef metadataDict = CMCopyDictionaryOfAttachments(NULL,sampleBuffer, kCMAttachmentMode_ShouldPropagate);
    NSDictionary *metadata = [[NSMutableDictionary alloc] initWithDictionary:(__bridge NSDictionary*)metadataDict];
    CFRelease(metadataDict);
    NSDictionary *exifMetadata = [[metadata objectForKey:(NSString *)kCGImagePropertyExifDictionary] mutableCopy];
    float brightnessValue = [[exifMetadata objectForKey:(NSString *)kCGImagePropertyExifBrightnessValue] floatValue];

    NSLog(@"环境光感 : %f",brightnessValue);


    // 根据brightnessValue的值来打开和关闭闪光灯
    AVCaptureDevice *device = [AVCaptureDevice defaultDeviceWithMediaType:AVMediaTypeVideo];
    BOOL result = [device hasTorch];// 判断设备是否有闪光灯
    if ((brightnessValue < 0) && result) {// 打开闪光灯

        if(device.torchMode == AVCaptureTorchModeOn){
            return;
        }

        UIAlertController * alertVC  = [UIAlertController alertControllerWithTitle:@"提示" message:@"小主是否要打开闪光灯?" preferredStyle:UIAlertControllerStyleAlert];
        UIAlertAction * openAction = [UIAlertAction actionWithTitle:@"打开" style:UIAlertActionStyleDefault handler:^(UIAlertAction * _Nonnull action) {
            [device lockForConfiguration:nil];
            [device setTorchMode: AVCaptureTorchModeOn];//开
            [device unlockForConfiguration];
        }];
        [alertVC addAction:openAction];
        UIAlertAction * cancleAction = [UIAlertAction actionWithTitle:@"取消" style:UIAlertActionStyleCancel handler:^(UIAlertAction * _Nonnull action) {}];
        [alertVC addAction:cancleAction];
        [self presentViewController:alertVC animated:NO completion:nil];
    }else if((brightnessValue > 0) && result) {// 关闭闪光灯

        if(device.torchMode == AVCaptureTorchModeOn){
            UIAlertController * alertVC  = [UIAlertController alertControllerWithTitle:@"提示" message:@"小主是否要关闭闪光灯?" preferredStyle:UIAlertControllerStyleAlert];
            UIAlertAction * openAction = [UIAlertAction actionWithTitle:@"关闭" style:UIAlertActionStyleDefault handler:^(UIAlertAction * _Nonnull action) {
                [device lockForConfiguration:nil];
                [device setTorchMode: AVCaptureTorchModeOff];//关
                [device unlockForConfiguration];
            }];
            [alertVC addAction:openAction];
            UIAlertAction * cancleAction = [UIAlertAction actionWithTitle:@"取消" style:UIAlertActionStyleCancel handler:^(UIAlertAction * _Nonnull action) { }];
            [alertVC addAction:cancleAction];
            [self presentViewController:alertVC animated:NO completion:nil];
        }
    }
}
四、距离传感器
①概述
距离传感器: 感应是否有其他物体靠近屏幕,iPhone手机中内置了距离传感器,位置在手机的听筒附近,当我们在打电话或听微信语音的时候靠近听筒,手机的屏幕会自动熄灭,这就靠距离传感器来控制
- 首先打开距离传感器,然后添加通知UIDeviceProximityStateDidChangeNotification监听有物品靠近还是离开,从而做出操作,记得最后要关闭距离传感器,有始有终哦。
②实现
- 示例中是默认用扬声器播放音乐,当有物体(比如耳朵)靠近听筒附近时就切换听筒播放音乐,物体离开后就继续用扬声器播放音乐。
- (void)distanceSensor{
    // 打开距离传感器
    [UIDevice currentDevice].proximityMonitoringEnabled = YES;
    // 通过通知监听有物品靠近还是离开
    [[NSNotificationCenter defaultCenter] addObserver:self selector:@selector(proximityStateDidChange:) name:UIDeviceProximityStateDidChangeNotification object:nil];
    AVAudioSession *audioSession = [AVAudioSession sharedInstance];
    //默认情况下扬声器播放
    [audioSession setCategory:AVAudioSessionCategoryPlayback error:nil];
    [audioSession setActive:YES error:nil];
       NSString * path = [[NSBundle mainBundle] pathForResource:@"SeeYouAgain" ofType:@"mp3"];
    if(path == nil){
        return;
    }
    _play = [[AVPlayer alloc] initWithURL:[NSURL fileURLWithPath:path]];
    [_play play];
}
- (void)proximityStateDidChange:(NSNotification *)note
{
    if ([UIDevice currentDevice].proximityState) {
        NSLog(@"有东西靠近");
        //听筒播放
        [[AVAudioSession sharedInstance] setCategory:AVAudioSessionCategoryPlayAndRecord error:nil];
    } else {
        NSLog(@"有物体离开");
        //扬声器播放
        [[AVAudioSession sharedInstance] setCategory:AVAudioSessionCategoryPlayback error:nil];
    }
}
- (void)dealloc{
    [_play pause];
    _play = nil;
   //关闭距离传感器
    [UIDevice currentDevice].proximityMonitoringEnabled = NO;
    [self removeObserver];
}
五、磁力计
请看我的上一篇博客:iOS仿系统指南针
六、项目结构截图

- 温馨提示:请真机调试看效果。
iOS 传感器集锦
代码地址如下:
http://www.demodashi.com/demo/11712.html