(Redis使用系列) Springboot 使用redis实现接口Api限流 十
前言

该篇介绍的内容如题,就是利用redis实现接口的限流( 某时间范围内 最大的访问次数 ) 。
正文
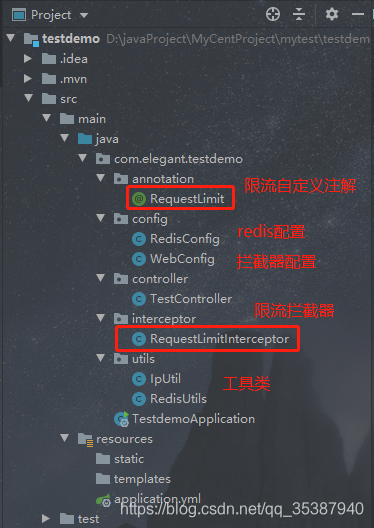
惯例,先看下我们的实战目录结构:
首先是pom.xml 核心依赖:
        <!--用于redis数据库连接-->
        <dependency>
            <groupId>org.springframework.boot</groupId>
            <artifactId>spring-boot-starter-data-redis</artifactId>
        </dependency>
        <!--用于redis lettuce 连接池pool使用-->
        <dependency>
            <groupId>org.apache.commons</groupId>
            <artifactId>commons-pool2</artifactId>
        </dependency>
        <dependency>
            <groupId>org.springframework.boot</groupId>
            <artifactId>spring-boot-starter-web</artifactId>
        </dependency>
然后是application.yml里面的redis接入配置:
spring:
  redis:
    lettuce:
      pool:
        #连接池最大连接数 使用负值代表无限制 默认为8
        max-active: 10
        #最大空闲连接 默认8
        max-idle: 10
        #最小空闲连接 默认0
        min-idle: 1
    host: 127.0.0.1
    password: 123456
    port: 6379
    database: 0
    timeout: 2000ms
server:
  port: 8710
redis的配置类, RedisConfig.java:
ps:可以看到日期是18年的,因为这些redis的整合教程,在这个系列里面一共有快10篇,不了解的看客如果感兴趣可以去看一看。
import com.fasterxml.jackson.annotation.JsonAutoDetect;
import com.fasterxml.jackson.annotation.PropertyAccessor;
import com.fasterxml.jackson.databind.ObjectMapper;
import org.springframework.cache.CacheManager;
import org.springframework.cache.annotation.EnableCaching;
import org.springframework.context.annotation.Bean;
import org.springframework.context.annotation.Configuration;
import org.springframework.data.redis.cache.RedisCacheConfiguration;
import org.springframework.data.redis.cache.RedisCacheManager;
import org.springframework.data.redis.connection.RedisConnectionFactory;
import org.springframework.data.redis.core.RedisTemplate;
import org.springframework.data.redis.core.StringRedisTemplate;
import org.springframework.data.redis.serializer.Jackson2JsonRedisSerializer;
import org.springframework.data.redis.serializer.RedisSerializationContext;
import org.springframework.data.redis.serializer.StringRedisSerializer;

import static org.springframework.data.redis.cache.RedisCacheConfiguration.defaultCacheConfig;

/**
 * @Author: JCccc
 * @CreateTime: 2018-09-11
 * @Description:
 */
@Configuration
@EnableCaching
public class RedisConfig {
    @Bean
    public CacheManager cacheManager(RedisConnectionFactory connectionFactory) {
        RedisCacheConfiguration cacheConfiguration =
                defaultCacheConfig()
                        .disableCachingNullValues()
                        .serializeValuesWith(RedisSerializationContext.SerializationPair.fromSerializer(new Jackson2JsonRedisSerializer(Object.class)));
        return RedisCacheManager.builder(connectionFactory).cacheDefaults(cacheConfiguration).build();
    }


    @Bean
    public RedisTemplate<String, Object> redisTemplate(RedisConnectionFactory factory) {
        RedisTemplate<String, Object> redisTemplate = new RedisTemplate<>();
        redisTemplate.setConnectionFactory(factory);
        Jackson2JsonRedisSerializer jackson2JsonRedisSerializer = new Jackson2JsonRedisSerializer(Object.class);
        ObjectMapper om = new ObjectMapper();
        om.setVisibility(PropertyAccessor.ALL, JsonAutoDetect.Visibility.ANY);
        om.enableDefaultTyping(ObjectMapper.DefaultTyping.NON_FINAL);
        jackson2JsonRedisSerializer.setObjectMapper(om);
        //序列化设置 ,这样为了存储操作对象时正常显示的数据,也能正常存储和获取
        redisTemplate.setKeySerializer(new StringRedisSerializer());
        redisTemplate.setValueSerializer(jackson2JsonRedisSerializer);
        redisTemplate.setHashKeySerializer(new StringRedisSerializer());
        redisTemplate.setHashValueSerializer(jackson2JsonRedisSerializer);
        return redisTemplate;
    }
    @Bean
    public StringRedisTemplate stringRedisTemplate(RedisConnectionFactory factory) {
        StringRedisTemplate stringRedisTemplate = new StringRedisTemplate();
        stringRedisTemplate.setConnectionFactory(factory);
        return stringRedisTemplate;
    }

}
自定义注解:
import java.lang.annotation.*;

/**
 * @Author JCccc
 * @Description
 * @Date 2021/7/23 11:46
 */
@Inherited
@Documented
@Target({ElementType.FIELD, ElementType.TYPE, ElementType.METHOD})
@Retention(RetentionPolicy.RUNTIME)
public @interface RequestLimit {

    /**
     * 时间内  秒为单位
     */
    int second() default 10;


    /**
     *  允许访问次数
     */
    int maxCount() default 5;


    //默认效果 : 10秒内 对于使用该注解的接口,只能总请求访问数 不能大于 5次

}
接下来是拦截器 RequestLimitInterceptor.java:
拦截接口的方式 是通过 ip地址+接口url ,做时间内的访问计数
import com.elegant.testdemo.annotation.RequestLimit;
import com.elegant.testdemo.utils.IpUtil;
import com.fasterxml.jackson.databind.ObjectMapper;
import org.slf4j.Logger;
import org.slf4j.LoggerFactory;
import org.springframework.beans.factory.annotation.Autowired;
import org.springframework.data.redis.core.RedisTemplate;
import org.springframework.stereotype.Component;
import org.springframework.web.method.HandlerMethod;
import org.springframework.web.servlet.HandlerInterceptor;

import javax.servlet.http.HttpServletRequest;
import javax.servlet.http.HttpServletResponse;
import java.io.IOException;
import java.util.concurrent.TimeUnit;

/**
 * @Author JCccc
 * @Description
 * @Date 2021/7/23 11:49
 */

@Component
public class RequestLimitInterceptor implements HandlerInterceptor {
    private final Logger log = LoggerFactory.getLogger(this.getClass());

    @Autowired
    private RedisTemplate<String, Object> redisTemplate;

    @Override
    public boolean preHandle(HttpServletRequest request, HttpServletResponse response, Object handler) throws Exception {
        try {
            if (handler instanceof HandlerMethod) {
                HandlerMethod handlerMethod = (HandlerMethod) handler;
                // 获取RequestLimit注解
                RequestLimit requestLimit = handlerMethod.getMethodAnnotation(RequestLimit.class);
                if (null==requestLimit) {
                    return true;
                }
                //限制的时间范围
                int seconds = requestLimit.second();
                //时间内的 最大次数
                int maxCount = requestLimit.maxCount();
                String ipAddr = IpUtil.getIpAddr(request);
                // 存储key
                String key =  ipAddr+":"+request.getContextPath() + ":" + request.getServletPath();
                // 已经访问的次数
                Integer count = (Integer) redisTemplate.opsForValue().get(key);
                log.info("检测到目前ip对接口={}已经访问的次数", request.getServletPath() , count);
                if (null == count || -1 == count) {
                    redisTemplate.opsForValue().set(key, 1, seconds, TimeUnit.SECONDS);
                    return true;
                }
                if (count < maxCount) {
                    redisTemplate.opsForValue().increment(key);
                    return true;
                }
                log.warn("请求过于频繁请稍后再试");
                returnData(response);
                return false;
            }
            return true;
        } catch (Exception e) {
            log.warn("请求过于频繁请稍后再试");
            e.printStackTrace();
        }
        return true;
    }

    public void returnData(HttpServletResponse response) throws IOException {
        response.setCharacterEncoding("UTF-8");
        response.setContentType("application/json; charset=utf-8");
        ObjectMapper objectMapper = new ObjectMapper();
        //这里传提示语可以改成自己项目的返回数据封装的类
        response.getWriter().println(objectMapper.writeValueAsString("请求过于频繁请稍后再试"));
        return;
    }

}
接下来是 拦截器的配置 WebConfig.java:
import com.elegant.testdemo.interceptor.RequestLimitInterceptor;
import org.springframework.beans.factory.annotation.Autowired;
import org.springframework.context.annotation.Configuration;
import org.springframework.web.servlet.config.annotation.InterceptorRegistry;
import org.springframework.web.servlet.config.annotation.WebMvcConfigurer;

/**
 * @Author JCccc
 * @Description
 * @Date 2021/7/23 11:52
 */

@Configuration
public class WebConfig implements WebMvcConfigurer {
    @Autowired
    private RequestLimitInterceptor requestLimitInterceptor;

    @Override
    public void addInterceptors(InterceptorRegistry registry) {
        registry.addInterceptor(requestLimitInterceptor)

                //拦截所有请求路径
                .addPathPatterns("/**")
                //再设置 放开哪些路径
                .excludePathPatterns("/static/**","/auth/login");
    }

}
最后还有两个工具类
IpUtil:
https://blog.csdn.net/qq_35387940/article/details/84391784
RedisUtil :
https://blog.csdn.net/qq_35387940/article/details/94392100
最后写个测试接口
TestController.java
import com.elegant.testdemo.annotation.RequestLimit;
import org.springframework.web.bind.annotation.GetMapping;
import org.springframework.web.bind.annotation.RestController;


/**
 * @Author JCccc
 * @Description
 * @Date 2021/7/23 11:55
 */
@RestController
public class TestController {

    @GetMapping("/test")
    @RequestLimit(maxCount = 3,second = 60)
    public String test() {
        return "你好,如果对你有帮助,请点赞加关注。";
    }


}
这个/test接口的注解,我们设置的是 60秒内 最大访问次数为 3次 (实际应用应该是根据具体接口做相关的次数限制。)
然后使用postman测试一下接口:
前面三次都是请求通过的:

第四次:
ok,就先到这。
