【框架】[Spring]AOP拦截-三种方式实现自动代理
转载请注明出处:http://blog.csdn.net/qq_26525215
本文源自【大学之旅_谙忆的博客】
这里的自动代理,我讲的是自动代理bean对象,其实就是在xml中让我们不用配置代理工厂,也就是不用配置class为org.springframework.aop.framework.ProxyFactoryBean的bean。
总结了一下自己目前所学的知识。
发现有三种方式实现自动代理
用Spring一个自动代理类DefaultAdvisorAutoProxyCreator:
<bean class="org.springframework.aop.framework.autoproxy.DefaultAdvisorAutoProxyCreator"></bean>例如:
原来不用自动代理的配置文件如下:
<?xml version="1.0" encoding="UTF-8"?>
<beans xmlns="http://www.springframework.org/schema/beans"
    xmlns:xsi="http://www.w3.org/2001/XMLSchema-instance" xmlns:context="http://www.springframework.org/schema/context"
    xmlns:tx="http://www.springframework.org/schema/tx"
    xsi:schemaLocation="http://www.springframework.org/schema/beans http://www.springframework.org/schema/beans/spring-beans-4.3.xsd
                http://www.springframework.org/schema/context http://www.springframework.org/schema/context/spring-context-4.3.xsd
                http://www.springframework.org/schema/tx http://www.springframework.org/schema/tx/spring-tx-4.3.xsd">

    <!-- 代理前原对象 -->
    <bean id="person" class="cn.hncu.xmlImpl.Person"></bean>

    <!-- 切面 = 切点+通知 -->
    <bean id="advisor" class="org.springframework.aop.support.RegexpMethodPointcutAdvisor">
        <!-- 切点 -->
        <property name="patterns">
            <list>
                <value>.*run.*</value>
            </list>
        </property>
        <!-- 通知-由我们写,实际代理动作 -->
        <property name="advice">
            <bean id="advice" class="cn.hncu.xmlImpl.AroundAdvice"></bean>
        </property>
    </bean>

    <!-- 代理工厂 -->
    <bean id="personProxied" class="org.springframework.aop.framework.ProxyFactoryBean">
        <!-- 放入原型对象 -->
        <property name="target" ref="person"></property>

        <!-- 放入切面 -->
        <property name="interceptorNames">
            <list>
                <value>advisor</value>
            </list>
        </property>
    </bean>


</beans>
现在改用自动代理,如下配置:
<beans ...>
<!-- 代理前原对象 -->
    <bean id="person" class="cn.hncu.xmlImpl.Person"></bean>

    <!-- 切面 = 切点+通知 -->
    <bean id="advisor" class="org.springframework.aop.support.RegexpMethodPointcutAdvisor">
        <!-- 切点 -->
        <property name="patterns">
            <list>
                <value>.*run.*</value>
            </list>
        </property>
        <!-- 通知-由我们写,实际代理动作 -->
        <property name="advice">
            <bean id="advice" class="cn.hncu.xmlImpl.AroundAdvice"></bean>
        </property>
    </bean>


    <!-- 自动代理 -->
    <bean class="org.springframework.aop.framework.autoproxy.DefaultAdvisorAutoProxyCreator"></bean>
</beans>
测试方法
@Test//自动代理
    public void demo4(){
        ApplicationContext ctx = new ClassPathXmlApplicationContext("cn/hncu/xmlImpl/4.xml");
        //我们直接在这里获取Person对象就可以了,因为在最开始xml文件newPerson对象后,Spring就已经帮我们代理了!
        Person p =ctx.getBean(Person.class);
        p.run();
        p.say();
    }
相对于前面,也就是把代理工厂部分换成自动代理了。
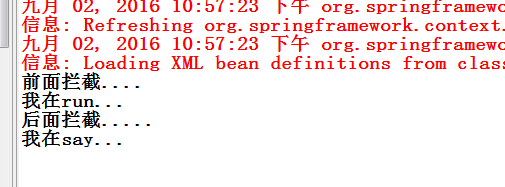
演示结果:
自己写一个自动代理底层实现:
我们也可以写一个类,来实现DefaultAdvisorAutoProxyCreator自动代理的功能!
首先,我们需要实现一个接口,也就是BeanPostProcessor接口。
BeanPostProcessor接口作用是:如果我们需要在Spring容器完成Bean的实例化、配置和其他的初始化前后添加一些自己的逻辑处理,我们就可以定义一个或者多个BeanPostProcessor接口的实现,然后注册到容器中。
而我们想要在原型对象bean被创建之后就代理了,就必须在原来的容器中拿到原来的原型对象,需要拿到原来spring容器中的切面对象,这个时候,我们就需要原来的容器,这个时候就需要另一个接口,也就是ApplicationContextAware接口!
通过这2个接口,我们就可以实现自动代理了。
package cn.hncu.xmlImpl;

import org.springframework.aop.Advisor;
import org.springframework.aop.framework.ProxyFactoryBean;
import org.springframework.beans.BeansException;
import org.springframework.beans.factory.config.BeanPostProcessor;
import org.springframework.context.ApplicationContext;
import org.springframework.context.ApplicationContextAware;

public class MyAutoProxy implements BeanPostProcessor,ApplicationContextAware{
    private ApplicationContext applicationContext=null;

    //bean创建之前调用
    @Override
    public Object postProcessBeforeInitialization(Object bean, String beanName)
            throws BeansException {
        return bean;//在这里,我们直接放行
    }

    //bean创建之后调用
    @Override
    public Object postProcessAfterInitialization(Object bean, String beanName)
            throws BeansException {
        ProxyFactoryBean factory = new ProxyFactoryBean();
        //把原型对象放入代理工厂
        factory.setTarget(bean);
        //在这里
        Advisor adv = applicationContext.getBean(Advisor.class);
        factory.addAdvisor(adv);
        //返回被代理后的对象
        return factory.getObject();
    }

    //拿到原来的spring中的容器
    @Override
    public void setApplicationContext(ApplicationContext applicationContext)
            throws BeansException {
        this.applicationContext=applicationContext;
    }

}
5.xml
<beans...>
<!-- 代理前原对象 -->
    <bean id="person" class="cn.hncu.xmlImpl.Person"></bean>

    <!-- 切面 = 切点+通知 -->
    <bean id="advisor" class="org.springframework.aop.support.RegexpMethodPointcutAdvisor">
        <!-- 切点 -->
        <property name="patterns">
            <list>
                <value>.*run.*</value>
            </list>
        </property>
        <!-- 通知-由我们写,实际代理动作 -->
        <property name="advice">
            <bean id="advice" class="cn.hncu.xmlImpl.AroundAdvice"></bean>
        </property>
    </bean>


    <!-- 自己写的自动代理 -->
    <bean class="cn.hncu.xmlImpl.MyAutoProxy"></bean>
</beans>
测试方法:
@Test//自己实现的自动代理
    public void demo5(){
        ApplicationContext ctx = new ClassPathXmlApplicationContext("cn/hncu/xmlImpl/5.xml");
        Person p =ctx.getBean(Person.class);
        p.run();
        p.say();
    }
测试结果就不上图了,和前面是一样的。
其实很多时候,我们如果自己去练一下底层,对上层的框架更好理解。
还有一种方法。
使用aop标签配自动代理
需要在beans加一个命名空间
xmlns:aop="http://www.springframework.org/schema/aop"还需要配xsi:schemaLocation,为aop加一个网络地址。
http://www.springframework.org/schema/aop http://www.springframework.org/schema/aop/spring-aop-4.3.xsd我们需要一个aspectjweaver-jar包:
下载地址:
http://mvnrepository.com/artifact/org.aspectj
xml配置文件:
<?xml version="1.0" encoding="UTF-8"?>
<beans xmlns="http://www.springframework.org/schema/beans"
        xmlns:xsi="http://www.w3.org/2001/XMLSchema-instance"
        xmlns:context="http://www.springframework.org/schema/context"
        xmlns:tx="http://www.springframework.org/schema/tx"
        xmlns:aop="http://www.springframework.org/schema/aop"
        xsi:schemaLocation="http://www.springframework.org/schema/beans http://www.springframework.org/schema/beans/spring-beans-4.3.xsd
                http://www.springframework.org/schema/context http://www.springframework.org/schema/context/spring-context-4.3.xsd
                http://www.springframework.org/schema/tx http://www.springframework.org/schema/tx/spring-tx-4.3.xsd
                http://www.springframework.org/schema/aop http://www.springframework.org/schema/aop/spring-aop-4.3.xsd ">
    <!-- 利用sop标签实现自动代理 -->
    <aop:aspectj-autoproxy></aop:aspectj-autoproxy>

    <!-- 代理前原对象 -->
    <bean id="person" class="cn.hncu.xmlImpl.Person"></bean>

    <!-- 切面 = 切点+通知 -->
    <bean id="advisor" class="org.springframework.aop.support.RegexpMethodPointcutAdvisor">
        <!-- 切点 -->
        <property name="patterns">
            <list>
                <value>.*run.*</value>
            </list>
        </property>
        <!-- 通知-由我们写,实际代理动作 -->
        <property name="advice">
            <bean id="advice" class="cn.hncu.xmlImpl.AroundAdvice"></bean>
        </property>
    </bean>

</beans>
测试方法:
@Test//自动代理
    public void demo6(){
        ApplicationContext ctx = new ClassPathXmlApplicationContext("cn/hncu/xmlImpl/6.xml");
        Person p =ctx.getBean(Person.class);
        p.run();
        p.say();
    }
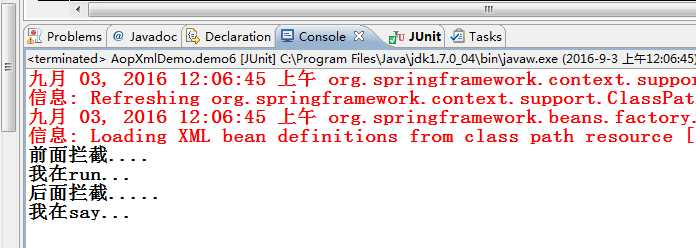
测试结果:
个人觉得能学会使用一种就OK了,不用全部记下来,为了学习,都了解一下就好,别人写出来,能看懂就好。
哈哈,其实底层学好了,自己写的时候,就算不会用Spring的自动代理,自己写出来底层也是蛮好的嘛
本文章由[谙忆]编写, 所有权利保留。
转载请注明出处:http://blog.csdn.net/qq_26525215
本文源自【大学之旅_谙忆的博客】


