AES加密算法的JAVA实现
最近公司需要,看了看AES对称加密算法,具体原理没有仔细研究还,先说说用法吧,由于能力有限,不足之处请大家多多指教,好了,不说废话了,直接上代码
/**
 * 加密
 *
 * @param content  需要加密的内容
 * @param password 加密密码
 * @return
 */
public static byte[] encrypt(String content, String password) {
    KeyGenerator kgen = null;
    try {
        kgen = KeyGenerator.getInstance("AES");
        kgen.init(128, new SecureRandom(password.getBytes()));
        SecretKey secretKey = kgen.generateKey();
        byte[] enCodeFormat = secretKey.getEncoded();
        SecretKeySpec key = new SecretKeySpec(enCodeFormat, "AES");
        Cipher cipher = Cipher.getInstance("AES");// 创建密码器
        cipher.init(Cipher.ENCRYPT_MODE, key);// 初始化
        byte[] byteContent = content.getBytes("utf-8");
        byte[] result = cipher.doFinal(byteContent);
        return result;//加密
    } catch (NoSuchAlgorithmException | InvalidKeyException
            | NoSuchPaddingException | BadPaddingException
            | UnsupportedEncodingException | IllegalBlockSizeException e) {
        e.printStackTrace();
    }
    return null;
}

/**
 * 解密
 *
 * @param content  待解密内容
 * @param password 解密密钥
 * @return
 */
public static byte[] decrypt(byte[] content, String password) {
    KeyGenerator kgen = null;
    try {
        kgen = KeyGenerator.getInstance("AES");
        kgen.init(128, new SecureRandom(password.getBytes()));
        SecretKey secretKey = kgen.generateKey();
        byte[] enCodeFormat = secretKey.getEncoded();
        SecretKeySpec key = new SecretKeySpec(enCodeFormat, "AES");
        Cipher cipher = Cipher.getInstance("AES");// 创建密码器
        cipher.init(Cipher.DECRYPT_MODE, key);// 初始化
        byte[] result = cipher.doFinal(content);
        return result; // 解密
    } catch (NoSuchAlgorithmException | BadPaddingException
            | IllegalBlockSizeException | NoSuchPaddingException
            | InvalidKeyException e) {
        e.printStackTrace();
    }
    return null;

}
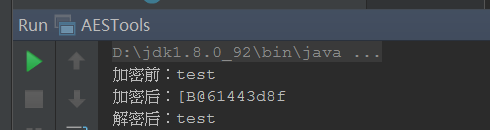
我们测试一下效果:
String content = "test";
String password = "123456";
//加密
System.out.println("加密前:" + content);
byte[] encryptResult = encrypt(content, password);
System.out.println("加密后:" + encryptResult.toString());
//解密
byte[] decryptResult = decrypt(encryptResult, password);
System.out.println("解密后:" + new String(decryptResult));
但有一点一定要注意——加密后的byte数组是不能强制转换成字符串的,我们可以实验下:
//解密
try {
    String encryptResultStr = new String(encryptResult, "utf-8");
    byte[] decryptResult = decrypt(encryptResultStr.getBytes("utf-8"), password);
    System.out.println("解密后:" + new String(decryptResult));
} catch (UnsupportedEncodingException e) {
    e.printStackTrace();
}
运行后,会报如下错误:

具体原因我们就不再详细解释了,事实上这种方法也是没有实际意义的,因为我们要考虑java的跨平台特性,因此我们使用这句:
kgen.init(128, new SecureRandom(password.getBytes()));
生成随机密钥,在别的平台很可能获得的密钥是不相同的,所以这只里能当做展示罢了。
网上看了很多文章,发现还是这样写合适:
/**
 * 加密
 * @param content
 * @param strKey
 * @return
 * @throws Exception
 */
public static byte[] encrypt(String content,String strKey ) throws Exception {
    SecretKeySpec skeySpec = getKey(strKey);
    Cipher cipher = Cipher.getInstance("AES/CBC/PKCS5Padding");
    IvParameterSpec iv = new IvParameterSpec("0102030405060708".getBytes());
    cipher.init(Cipher.ENCRYPT_MODE, skeySpec, iv);
    byte[] encrypted = cipher.doFinal(content.getBytes());
    return  encrypted;
}

/**
 * 解密
 * @param strKey
 * @param content
 * @return
 * @throws Exception
 */
public static String decrypt(byte[] content,String strKey ) throws Exception {
    SecretKeySpec skeySpec = getKey(strKey);
    Cipher cipher = Cipher.getInstance("AES/CBC/PKCS5Padding");
    IvParameterSpec iv = new IvParameterSpec("0102030405060708".getBytes());
    cipher.init(Cipher.DECRYPT_MODE, skeySpec, iv);
    byte[] original = cipher.doFinal(content);
    String originalString = new String(original);
    return originalString;
}

private static SecretKeySpec getKey(String strKey) throws Exception {
    byte[] arrBTmp = strKey.getBytes();
    byte[] arrB = new byte[16]; // 创建一个空的16位字节数组(默认值为0)

    for (int i = 0; i < arrBTmp.length && i < arrB.length; i++) {
        arrB[i] = arrBTmp[i];
    }

    SecretKeySpec skeySpec = new SecretKeySpec(arrB, "AES");

    return skeySpec;
}
测试就不写了,我们再对版本功能进行一下加强,对传输的数据使用base64进行编码,先写base64的编码和解码:
参考:
/**
 * base 64 encode
 * @param bytes 待编码的byte[]
 * @return 编码后的base 64 code
 */
public static String base64Encode(byte[] bytes){
    return new BASE64Encoder().encode(bytes);
}

/**
 * base 64 decode
 * @param base64Code 待解码的base 64 code
 * @return 解码后的byte[]
 * @throws Exception
 */
public static byte[] base64Decode(String base64Code) throws Exception{
    return base64Code.isEmpty() ? null : new BASE64Decoder().decodeBuffer(base64Code);
}
接着对AES加密的数据进行base64编码,对AES解密的数据进行解码:
好了,受个人水平所限,就先写这么多吧,以后有更多内容再往上补充
/**
 * AES加密为base 64 code
 * @param content 待加密的内容
 * @param encryptKey 加密密钥
 * @return 加密后的base 64 code
 * @throws Exception
 */
public static String aesEncrypt(String content, String encryptKey) throws Exception {
    return base64Encode(encrypt(content, encryptKey));
}
/**
 * 将base 64 code AES解密
 * @param encryptStr 待解密的base 64 code
 * @param decryptKey 解密密钥
 * @return 解密后的string
 * @throws Exception
 */
public static String aesDecrypt(String encryptStr, String decryptKey) throws Exception {
    return encryptStr.isEmpty() ? null : decrypt(base64Decode(encryptStr), decryptKey);
}
写一个测试,看下效果:
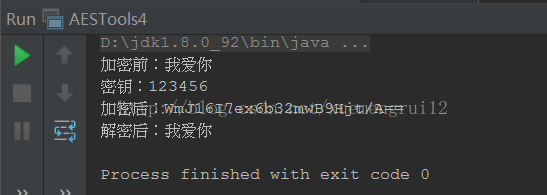
public static void main(String[] args) throws Exception {
    String test = "我爱你";
    System.out.println("加密前:" + test);

    String key = "123456";
    System.out.println("密钥:" + key);

    String encrypt = aesEncrypt(test, key);
    System.out.println("加密后:" + encrypt);

    String decrypt = aesDecrypt(encrypt, key);
    System.out.println("解密后:" + decrypt);

}
好了,受个人水平所限,就先写这么多吧,以后有更多内容再往上补充
http://blog.csdn.net/uikoo9/article/details/27982575
http://blog.csdn.net/hbcui1984/article/details/5201247
http://blog.sina.com.cn/s/blog_7c8eb1590100svr0.html
https://github.com/tozny/java-aes-crypto