python tkinter_tkinter转盘抽奖代码、调整和逐步优化的python分析
1 说明:
1.1 推荐指数:★★★★
1.2 网上的一段代码,来源不明,先表示感谢,如有侵权请告知,定会删除。
1.3 对这段代码进行调整、逐步优化和分析,很python。
1.4 python的相关知识点:self和列表推导式。
1.5 有点长,适合慢慢品味,提高自己的python思维。

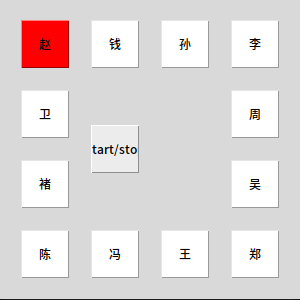
2 效果图
3 源代码:
#抽奖 面向对象版本import tkinterimport timeimport threading class choujiang: #初始化魔术方法 def __init__(self): #准备好界面 self.root = tkinter.Tk() self.root.title('lowB版转盘') self.root.minsize(300, 300) # 声明一个是否按下开始的变量 self.isloop = False self.newloop = False #调用设置界面的方法 self.setwindow() self.root.mainloop() #界面布局方法 def setwindow(self): #开始停止按钮 self.btn_start = tkinter.Button(self.root, text = 'start/stop',command = self.newtask) self.btn_start.place(x=90, y=125, width=50, height=50) self.btn1 = tkinter.Button(self.root, text='赵', bg='red') self.btn1.place(x=20, y=20, width=50, height=50) self.btn2 = tkinter.Button(self.root, text='钱', bg='white') self.btn2.place(x=90, y=20, width=50, height=50) self.btn3 = tkinter.Button(self.root, text='孙', bg='white') self.btn3.place(x=160, y=20, width=50, height=50) self.btn4 = tkinter.Button(self.root, text='李', bg='white') self.btn4.place(x=230, y=20, width=50, height=50) self.btn5 = tkinter.Button(self.root, text='周', bg='white') self.btn5.place(x=230, y=90, width=50, height=50) self.btn6 = tkinter.Button(self.root, text='吴', bg='white') self.btn6.place(x=230, y=160, width=50, height=50) self.btn7 = tkinter.Button(self.root, text='郑', bg='white') self.btn7.place(x=230, y=230, width=50, height=50) self.btn8 = tkinter.Button(self.root, text='王', bg='white') self.btn8.place(x=160, y=230, width=50, height=50) self.btn9 = tkinter.Button(self.root, text='冯', bg='white') self.btn9.place(x=90, y=230, width=50, height=50) self.btn10 = tkinter.Button(self.root, text='陈', bg='white') self.btn10.place(x=20, y=230, width=50, height=50) self.btn11 = tkinter.Button(self.root, text='褚', bg='white') self.btn11.place(x=20, y=160, width=50, height=50) self.btn12 = tkinter.Button(self.root, text='卫', bg='white') self.btn12.place(x=20, y=90, width=50, height=50) # 将所有选项组成列表 self.girlfrends = [self.btn1,self.btn2,self.btn3,self.btn4,self.btn5,self.btn6,self.btn7,self.btn8,self.btn9,self.btn10,self.btn11,self.btn12] def rounds(self): # 判断是否开始循环 if self.isloop == True: return # 初始化计数 变量 i = 0 # 死循环 while True: if self.newloop == True: self.newloop = False return # 延时操作 time.sleep(0.1) # 将所有的组件背景变为白色 for x in self.girlfrends: x['bg'] = 'white' # 将当前数值对应的组件变色 self.girlfrends[i]['bg'] = 'red' # 变量+1 i += 1 # 如果i大于最大索引直接归零 if i >= len(self.girlfrends): i = 0 # 建立一个新线程的函数 def newtask(self): if self.isloop == False: # 建立线程 t = threading.Thread(target = self.rounds) # 开启线程运行 t.start() # 设置循环开始标志 self.isloop = True elif self.isloop == True: self.isloop = False self.newloop = Truec = choujiang()4 上面牵涉到:
4.1 Python中的类和实例:
面向对象最重要的概念就是类(class)和实例(instance),类是抽象的模板。
由于类起到模板的作用,因此,可以在创建实例的时候,把我们认为必须绑定的属性强制填写进去。
4.2 Python的self用法:
Python当中的一个内置方法__init__方法,而__init__方法的第一参数永远是self,表示创建的类实例本身。
比如格式:
#格式class Good(object): def __init__(self, name, score): self.name = name self.score = scorepython的self和JavaScript(包括vue)的this很像,多指代当前属性,由于大型项目中可能有很多属性名重复,可是值不一定相同,为了避免报错,推荐这种指代性的属性。基于此,考虑小型抽奖tk,所以决定去掉self。
5 去掉self的代码:
#抽奖 面向对象版本import tkinterimport timeimport threadingroot = tkinter.Tk()root.title('lowB版转盘')root.minsize(300, 300)# 声明一个是否按下开始的变量isloop = Falsenewloop = False# 建立一个新线程的函数def newtask(): global isloop global newloop if isloop == False: # 建立线程 t = threading.Thread(target = rounds) # 开启线程运行 t.start() # 设置循环开始标志 isloop = True elif isloop == True: isloop = False newloop = True#开始停止按钮btn_start = tkinter.Button(root, text = 'start/stop',command = newtask)btn_start.place(x=90, y=125, width=50, height=50)btn1 = tkinter.Button(root, text='赵', bg='red')btn1.place(x=20, y=20, width=50, height=50)btn2 = tkinter.Button(root, text='钱', bg='white')btn2.place(x=90, y=20, width=50, height=50)btn3 = tkinter.Button(root, text='孙', bg='white')btn3.place(x=160, y=20, width=50, height=50)btn4 = tkinter.Button(root, text='李', bg='white')btn4.place(x=230, y=20, width=50, height=50)btn5 = tkinter.Button(root, text='周', bg='white')btn5.place(x=230, y=90, width=50, height=50)btn6 = tkinter.Button(root, text='吴', bg='white')btn6.place(x=230, y=160, width=50, height=50)btn7 = tkinter.Button(root, text='郑', bg='white')btn7.place(x=230, y=230, width=50, height=50)btn8 = tkinter.Button(root, text='王', bg='white')btn8.place(x=160, y=230, width=50, height=50)btn9 = tkinter.Button(root, text='冯', bg='white')btn9.place(x=90, y=230, width=50, height=50)btn10 = tkinter.Button(root, text='陈', bg='white')btn10.place(x=20, y=230, width=50, height=50)btn11 = tkinter.Button(root, text='褚', bg='white')btn11.place(x=20, y=160, width=50, height=50)btn12 = tkinter.Button(root, text='卫', bg='white')btn12.place(x=20, y=90, width=50, height=50)# 将所有选项组成列表girlfrends = [btn1,btn2,btn3,btn4,btn5,btn6,btn7,btn8,btn9,btn10,btn11,btn12]def rounds(): global newloop # 判断是否开始循环 if isloop == True: return # 初始化计数 变量 i = 0 # 死循环 while True: if newloop == True: newloop = False return # 延时操作 time.sleep(0.1) # 将所有的组件背景变为白色 for x in girlfrends: x['bg'] = 'white' # 将当前数值对应的组件变色 girlfrends[i]['bg'] = 'red' # 变量+1 i += 1 # 如果i大于最大索引直接归零 if i >= len(girlfrends): i = 0root.mainloop()6 注意去掉self和类定义后,代码的修改的位置,可能要改变,仔细比对上面的代码1和2的区别。
6.1 由于开始和暂定按钮的命令:newtask,所以需要把定义函数newtask,放在按钮设置的前面。
6.2 增加全局变量,global isloop和global newloop,注意仔细分析。python的局部变量和全局变量的关系,可以复习复习。
==========================高级一点==================
7 发现上面的按钮设置的代码很多重复的,以前我讲过,重复多的事情,python可以推导式。
简洁的推导式代码如下:
#抽奖 面向对象版本import tkinterimport timeimport threadingroot = tkinter.Tk()root.title('lowB版转盘')root.minsize(300, 300)# 声明一个是否按下开始的变量isloop = Falsenewloop = False# 建立一个新线程的函数def newtask(): global isloop global newloop if isloop == False: # 建立线程 t = threading.Thread(target = rounds) # 开启线程运行 t.start() # 设置循环开始标志 isloop = True elif isloop == True: isloop = False newloop = True#开始停止按钮btn_start = tkinter.Button(root, text = 'start/stop',command = newtask)btn_start.place(x=90, y=125, width=50, height=50)#列表推导式---高级一点点n=['赵','钱','孙','李','周','吴','郑','王','冯','陈','褚','卫']c=['red','white','white','white','white','white','white','white','white','white','white','white']x=[20,90,160,230,230,230,230,160,90,20,20,20]y=[20,20,20,20,90,160,230,230,230,230,160,90]z=50girlfrends =[]for i in range(12): girlfrends.append('btn'+str(i+1)) girlfrends[i]=tkinter.Button(root,text=n[i],bg=c[i]) girlfrends[i].place(x=x[i],y=y[i],width=z,height=z) i+=1#---注意培养自己的思维---#定义转圈函数def rounds(): global newloop # 判断是否开始循环 if isloop == True: return # 初始化计数 变量 i = 0 # 死循环 while True: if newloop == True: newloop = False return # 延时操作 time.sleep(0.1) # 将所有的组件背景变为白色 for x in girlfrends: x['bg'] = 'white' # 将当前数值对应的组件变色 girlfrends[i]['bg'] = 'red' # 变量+1 i += 1 # 如果i大于最大索引直接归零 if i >= len(girlfrends): i = 0root.mainloop()自己整理出来,分享给大家。