#Spring-boot高级
一、SpringBoot 整合 Mybatis
1、SpringBoot 整合 Mybatis
MyBatis 帮助我们快速集成 SpringBoot 提供的一个组件包(mybatis-spring-boot-starter),使用这个组件可以做到以下几点:
- 自动检测现有的DataSource
- 将创建并注册SqlSessionFactory的实例,该实例使用SqlSessionFactoryBean将该DataSource作为输入进行传递,将创建并注册从SqlSessionFactory中获取的SqlSessionTemplate的实例。
- 自动扫描您的mappers,将它们链接到SqlSessionTemplate并将其注册到Spring上下文,以便将它们注入到您的bean中
使用了该Starter之后,只需要定义一个DataSource即可(application.properties或application.yml中可配置),它会自动创建使用该DataSource的SqlSessionFactoryBean以及SqlSessionTemplate。会自动扫描你的Mappers,连接到SqlSessionTemplate,并注册到Spring上下文中。
SpringBoot官⽅并没有提供Mybatis的启动器,不过Mybatis官⽅⾃⼰实现了:
<!--mybaits与springboot整合-->
<dependency>
    <groupId>org.mybatis.spring.boot</groupId>
    <artifactId>mybatis-spring-boot-starter</artifactId>
    <version>2.2.0</version>
</dependency>
配置mapper扫描路径和日志
# 连接四⼤参数
spring.datasource.url=jdbc:mysql://127.0.0.1:3306/test?useUnicode=true&characterEncoding=utf-8&serverTimezone=UTC
spring.datasource.username=root
spring.datasource.password=123456
#加载mybatis的映射文件,在static下建一个mapper文件里面xml文件以dao结尾
mybatis.mapper-locations=classpath:mapper/*Dao.xml
#配置日志
logging.level.cn.woniu.dao=DEBUG
logging.level.root=INFO
logging.pattern.console='%d{yyyy-MM-dd HH:mm:ss.SSS} [%thread] %-5level %logger{50} - %msg%n'
logging.file.path=D:/mylog/log.log
在启动类上添加@MapperScan,扫描到dao接口路径, 或者在每个dao接口上添加@Mapper注解,但是建议使用启动类上注解例如:
@SpringBootApplication
@MapperScan("cn.woniu.dao") //自己项目dao接口路径
public class SpringbootAplication {
    public static void main(String[] args) {
        SpringApplication.run(SpringbootAplication.class, args);
    }
}
编写mapper文件下xml文件
<?xml version="1.0" encoding="UTF-8" ?>
<!DOCTYPE mapper PUBLIC "-//mybatis.org//DTD Mapper 3.0//EN" "http://mybatis.org/dtd/mybatis-3-mapper.dtd" >
<mapper namespace="cn.woniu.dao.UserDao">
   <select id="getUser" resultType="cn.woniu.domain.User">
      select username,password from user
   </select>
</mapper>
2、SpringBoot 整合连接池
2.1、spring-boot-starter-jdbc
从 Spring Boot 2.0 开始,spring-boot-starter-jdbc内部提供了默认的 HikariCP 数据库连接池,(也是传说中最快的数据库连接池)。spring-boot-starter-jdbc主要提供了三个功能,第一个就是对数据源的装配,第二个就是提供一个JdbcTemplate简化使用,第三个就是事务
a、关键依赖包
  <parent>
        <groupId>org.springframework.boot</groupId>
        <artifactId>spring-boot-starter-parent</artifactId>
        <version>2.5.4</version>
    </parent>

    <dependencies>
        <!--springmvc启动器-->
        <dependency>
            <groupId>org.springframework.boot</groupId>
            <artifactId>spring-boot-starter-web</artifactId>
        </dependency>
        <!--mysql驱动-->
        <dependency>
            <groupId>mysql</groupId>
            <artifactId>mysql-connector-java</artifactId>
            <scope>runtime</scope>
        </dependency>
        <!--spring默认数据库连接池-->
        <dependency>
            <groupId>org.springframework.boot</groupId>
            <artifactId>spring-boot-starter-jdbc</artifactId>
        </dependency>
    </dependencies>
b、创建springboot的配置文件application.properties
# 连接四⼤参数
spring.datasource.url=jdbc:mysql://127.0.0.1:3306/test?useUnicode=true&characterEncoding=utf-8&serverTimezone=UTC
spring.datasource.username=root
spring.datasource.password=123456
# 可省略,SpringBoot⾃动推断
spring.datasource.driverClassName=com.mysql.cj.jdbc.Driver
spring.datasource.hikari.idle-timeout=60000
spring.datasource.hikari.maximum-pool-size=30
spring.datasource.hikari.minimum-idle=10
2.2、配置druid
-
配置druid
如果你更喜欢Druid连接池,也可以使⽤Druid官⽅提供的启动器,那麼就不需要spring-boot-starter-jdbc启动器了
<!-- Druid连接池 -->
<dependency>
  <groupId>com.alibaba</groupId>
  <artifactId>druid-spring-boot-starter</artifactId>
  <version>1.1.10</version>
</dependency>
⽽连接信息的配置与上⾯是类似的,只不过在连接池特有属性上,⽅式略有不同:
spring.datasource.druid.driver-class-name=com.mysql.cj.jdbc.Driver
spring.datasource.druid.url=jdbc:mysql://localhost:3306/test?serverTimezone=UTC
spring.datasource.druid.username=root
spring.datasource.druid.password=123456

#初始化连接数
spring.datasource.initial-size=1 #最⼩空闲连接
spring.datasource.min-idle=1 #最⼤活动连接
spring.datasource.max-active=20
#获取连接时测试是否可⽤
spring.datasource.test-on-borrow=true
#监控⻚⾯启动
spring.datasource.stat-view-servlet.allow=true
2.3、动态配置多数据源
- 导入依赖
<dependency> <groupId>com.baomidou</groupId> <artifactId>dynamic-datasource-spring-boot-starter</artifactId> <version>3.5.0</version> </dependency>
配置多数据源
spring.datasource.dynamic.primary=master #默认的数据原标识
spring.datasource.dynamic.strict=false #false开启默认
spring.datasource.dynamic.datasource.master.url=jdbc:mysql://127.0.0.1:3306/master?useUnicode=true&characterEncoding=utf-8&serverTimezone=UTC
spring.datasource.dynamic.datasource.master.driver-class-name=com.mysql.cj.jdbc.Driver
spring.datasource.dynamic.datasource.master.username=root
spring.datasource.dynamic.datasource.master.password=123456

spring.datasource.dynamic.datasource.test.url=jdbc:mysql://127.0.0.1:3306/test?useUnicode=true&characterEncoding=utf-8&serverTimezone=UTC
spring.datasource.dynamic.datasource.test.driver-class-name=com.mysql.cj.jdbc.Driver
spring.datasource.dynamic.datasource.test.username=root
spring.datasource.dynamic.datasource.test.password=123456
在接口实现的类中加上@DS注解标识操作的是哪个数据源
@Mapper
@DS("master")
public interface UserDao extends BaseMapper<User> {
}
3、SpringBoot整合事务
1,事务的概念
其实,我们引⼊jdbc或者web的启动器,就已经引⼊事务相关的依赖及默认配置了
@Transactional 注解默认会回滚运行时异常及其子类
@Transactional 注解只能应用到 public 方法或者类上才有效
注意:如果异常被try{}catch{}了,事务就不回滚了,如果想让事务回滚必须再往外抛try{}catch(Exception e){throw e}。
2,事务的传递
a,REQUIRED
@Transactional(propagation = Propagation.REQUIRED)
spring默认的事务传播行为
REQUIRED:如果业务方法执行时已经在一个事务中,则加入当前事务,否则重新开启一个事务。
外层事务提交了,内层才会提交。内/外只要有报错,他俩会一起回滚
案例
外层事务不外抛
@Service
public class UserServiceImp implements UserService {

    @Resource
    private UserMapper userMapper;

    @Autowired
    StudentService studentService;

    @Override
    @Transactional(propagation = Propagation.REQUIRED)
    public int addUser(User user) {
        int i = userMapper.insertSelective(user);
        Student student = new Student();
        student.setCourse("cs");
        student.setName("sid");
        try {
            studentService.addStudent(student);
        }catch (Exception e){
            //不抛出
        }
        return  i;
    }
}
内层事务抛出
@Service
public class StudentServiceImp implements StudentService {

    @Resource
    private StudentMapper studentMapper;

    @Override
    @Transactional(propagation = Propagation.REQUIRED)
    public int addStudent(Student student) {
        int i = studentMapper.insertSelective(student);
        int j =  10/ 0;  // 内层报错抛出异常
        return i;
    }
}
结论:事务回滚,user表和student表都没有插入数据
结论:事务回滚,user表和student表都没有插入数据
b,REQUIRES_NEW
@Transactional(propagation = Propagation.REQUIRES_NEW)
支持事务。每次都是创建一个新事物,如果当前已经在事务中了,会挂起当前事务。内层事务结束,内层就提交了,不用等着外层一起提交
内层事务结束,内层就提交了,不用等着外层一起提交。
外层报错回滚,不影响内
二、SpringBoot单元测试
1、引入启动器
<dependency>
    <groupId>org.springframework.boot</groupId>
    <artifactId>spring-boot-starter-test</artifactId>
</dependency>
注意:不需要引入junit的jar包
2、测试方式1
import org.junit.Test;

@RunWith(SpringJUnit4ClassRunner.class)
@SpringBootTest(classes = {ApplicationApp.class})
public class MyTest {

    @Autowired
    private IUserService userService;

    @Test
    public void userTest(){
        System.out.println(userService.findUser());
    }
}
3、测试方式2
import org.junit.jupiter.api.Test;  //注意junit包名

@SpringBootTest(classes = ApplicationApp.class)
public class MyTest {

    @Autowired
    private IUserService userService;

    @Test
    public void userTest(){
        System.out.println(userService.findUser());
    }
}
三、SpringBoot整合MVC
1、访问静态资源
现在,我们的项⽬是⼀个jar⼯程,那么就没有webapp,我们的静态资源该放哪⾥呢?回顾我们上⾯看的源码,有⼀个叫做ResourceProperties的类继承的Resources类,⾥⾯就定义了静态资源的默认查找路径
默认的静态资源路径为:
- classpath:/META-INF/resources/
- classpath:/resources/
- classpath:/static/
- classpath:/public/
四、SpringBoot自定义拦截器
1、创建自定义拦截器类
/**
 * 自定义拦截器
 */
public class MyHandlerInterceptor implements HandlerInterceptor {

    /**
     * 在controller执行前执行
     * @param request
     * @param response
     * @param handler
     * @return
     * @throws Exception
     */
    @Override
    public boolean preHandle(HttpServletRequest request,
                             HttpServletResponse response, Object handler) throws Exception {
        System.out.println("还未进入controller...");
        return true;
    }

    /**
     * controller方法执行完,跳转页面前执行
     * @param request
     * @param response
     * @param handler
     * @param modelAndView
     * @throws Exception
     */
    @Override
    public void postHandle(HttpServletRequest request,
                           HttpServletResponse response,
                           Object handler, ModelAndView modelAndView) throws Exception {
        System.out.println("执行了controller中的方法,还未跳页面...");
    }

    /**
     * 完成页面跳转后执行
     * @param request
     * @param response
     * @param handler
     * @param ex
     * @throws Exception
     */
    @Override
    public void afterCompletion(HttpServletRequest request,
                                HttpServletResponse response,
                                Object handler, Exception ex) throws Exception {
        System.out.println("页面跳转完成了..");
    }
}
2、配置拦截器
创建springmvc配置类
/**
 * springmvc配置类
 */
@Configuration
public class WebMvcConfigurer implements WebMvcConfigurer {

    /**
     * 注册自定义拦截器
     * @param registry
     */
     @Override
    public void addInterceptors(InterceptorRegistry registry) {
        registry.addInterceptor(new MyHandlerInterceptor())
                .addPathPatterns("/**")  //拦截哪些url   /**表示拦截所有
                .excludePathPatterns("/","/login");
        //放行哪些请求  所有在登录前需要直接显示的就放行
    }
}
*配置拦截器后会造成页面静态资源无法加载的问题
-
修改配置文件
#配置mvc静态资源目录 不配置默认为"/**" spring.mvc.static-path-pattern=/static/** -
修改页面静态资源引用
要加上"/satic/"
修改拦截器注册方法
/**
 * springmvc配置类
 */
@Configuration
public class WebConfiguration implements WebMvcConfigurer {

    /**
     * 注册自定义拦截器
     * @param registry
     */
     @Override
    public void addInterceptors(InterceptorRegistry registry) {
        registry.addInterceptor(new MyHandlerInterceptor())
                .addPathPatterns("/**")  //拦截哪些url   /**表示拦截所有
                .excludePathPatterns("/","/login","/static/**");
        //放行哪些请求  所有在登录前需要直接显示的就放行
    }
}
统一返回类
@Data
public class ResponseResult<T> {
    private int code; // 状态码 200,成功,500:失败,403:无权
    private String msg; // 消息
    private T data; // 数据

    public ResponseResult() {
    }

    public ResponseResult(int code, T data) {
        this(code, "OK");
        this.data = data;
    }

    public ResponseResult(int code, String msg) {
        this.code = code;
        this.msg = msg;
    }

    public ResponseResult(int code, String msg, T data) {
        this.code = code;
        this.msg = msg;
        this.data = data;
    }

    public static final ResponseResult<Void> SUCCESS = new ResponseResult<>(200, "OK");
    public static final ResponseResult<Void> NOTLOGINED = new ResponseResult<>(401, "未登录");
    public static final ResponseResult<Void> FORBIDDEN = new ResponseResult<>(403, "无权限");
    public static final ResponseResult<Void> Unauthenticated = new ResponseResult<>(402, "认证失败");
    public static final ResponseResult<Void> FAIL = new ResponseResult<>(500, "操作失败");
}
五、SpringBoot异常处理
1、默认方式
SpringBoot 默认的处理异常的机制:SpringBoot 默认的已经提供了一套处理异常的机制。一旦程序中出现了异常 SpringBoot 向src/main/resources/templates目录下的/error 的 url 发送请求。在 springBoot 中提供了一个叫 BasicErrorController 来处理/error 请求,然后跳转到默认显示异常的页面来展示异常信息。
在pom.xml 引入thymeleaf依赖
   <dependency>
            <groupId>org.springframework.boot</groupId>
            <artifactId>spring-boot-starter-thymeleaf</artifactId>
   </dependency>
在src/main/resources/ templates创建error.html页面
<!DOCTYPE html>
<html xmlns:th="http://www.thymeleaf.org">
<head>
    <meta charset="UTF-8">
    <title>错误提示页面</title>
</head>
<body>
出错了,请与管理员联系。。。
</body>
</html>
修改controller
@Controller
public class HelloController {
    @RequestMapping("show")
    public String showInfo(){
       int i=1/0;
        return "index";
    }
}
2、@ExceptionHandle 注解方式
在controller当前类中添加方法来捕获当前类抛出的异常,从而进行处理,该方法上添加@ExceptionHandler注解
- 在resources/templates目录下创建error1.html页面
<!DOCTYPE html>
<html xmlns:th="http://www.thymeleaf.org">
<head>
    <meta charset="UTF-8">
    <title>错误提示页面-ArithmeticException</title>
</head>
<body>
    出错了,请与管理员联系。。。
    <span th:text="${error}"></span>
</body>
</html>
修改controller
@Controller
public class HelloController {
    @RequestMapping("show")
    public String showInfo(){
       int i=1/0;
        return "index";
    }

    /**
     * 异常处理方法
     * @param e
     * @return
     */
    @ExceptionHandler(value = {java.lang.ArithmeticException.class})
    public ModelAndView arithmeticExceptionHandler(Exception e) {
        ModelAndView model = new ModelAndView();
        model.addObject("error", e.toString());
        model.setViewName("error1");  //逻辑视图名
        return model;
    }
}
3、@ControllerAdvice方式
自定义一个类GlobalException,并添加注解 @ControllerAdvice,或者@RestControllerAdvice, 在处理异常的方法上面添加@ExceptionHandler注解并在value中添加要处理的异常
@ControllerAdvice
public class GlobalException {
    /**
     * java.lang.ArithmeticException
     * 该方法需要返回一个 ModelAndView:目的是可以让我们封装异常信息以及视
     * 图的指定
     * 参数 Exception e:会将产生异常对象注入到方法中
     */
    @ExceptionHandler(value = {ArithmeticException.class})
    public ModelAndView arithmeticExceptionHandler(Exception e) {
        ModelAndView mv = new ModelAndView();
        mv.addObject("error", e.toString());
        mv.setViewName("error");
        return mv;
    }

    /**
     * java.lang.NullPointerException
     * 该方法需要返回一个 ModelAndView:目的是可以让我们封装异常信息以及视
     * 图的指定
     * 参数 Exception e:会将产生异常对象注入到方法中
     */
    @ExceptionHandler(value = {NullPointerException.class})
    public ModelAndView nullPointerExceptionHandler(Exception e) {
        ModelAndView mv = new ModelAndView();
        mv.addObject("error", e.toString());
        mv.setViewName("error1");
        return mv;
    }
}
4、全局异常解析器【了解】
自定义一个配置类,创建一个全局异常SimpleMappingExceptionResolver解析器的bean对象到spring容器中,有spring来管理
@Configuration
public class GlobalException {
    /**
     * 该方法必须要有返回值。返回值类型必须是:
     * SimpleMappingExceptionResolver
     */
    @Bean
    public SimpleMappingExceptionResolver getSimpleMappingExceptionResolver() {
        SimpleMappingExceptionResolver resolver = new  SimpleMappingExceptionResolver();
        Properties mappings = new Properties();
        /**
         * 参数一:异常的类型,注意必须是异常类型的全名
         * 参数二:逻辑视图名称
         */
        mappings.put("java.lang.ArithmeticException", "error1");
        mappings.put("java.lang.NullPointerException", "error2");
        //设置异常与视图映射信息的
        resolver.setExceptionMappings(mappings);
        return resolver;
    }
}
六、SpringBoot定时任务
Scheduled 定时任务器:是 Spring3.0 以后自带的一个定时任务器
1、 引入依赖
<dependency>
    <groupId>org.springframework.boot</groupId>
    <artifactId>spring-boot-starter-web</artifactId>
</dependency>
2、编写定时任务
@Component
public class ScheduledDemo {
    /**
     *定时任务方法
     * @Scheduled:设置定时任务 cron 属性:cron 表达式。定时任务触发是时间的一个字符串表达形式
     */
    @Scheduled(cron = "0/2 * * * * ?")
    //@Scheduled(initialDelay =  1000 * 10,fixedRate = 1000 * 5) //fixedRate = 1000 *5表示每5秒执行一次
    public void scheduledMethod() {
        System.out.println("定时器被触发" + new Date());
    }
}
3、 开启定时任务注解
在启动类中添加@EnableScheduling注解
/**
 * 启动类
 */
@SpringBootApplication
@MapperScan("cn.woniu.dao")//扫描dao
@EnableScheduling //开启定时任务
public class ApplicationApp {
    public static void main(String[] args) {
        SpringApplication.run(ApplicationApp.class,args);
    }
}
4、Cron 表达式
Cron 表达式是一个字符串,分为 6 或 7 个域,每一个域代表一个含义;
Cron 从左到右(用空格隔开): 秒   分   小时   月份中的日期   月份   星期中的日期    年份(可省略)
Cron 有如下两种语法格式:
- Seconds Minutes Hours Day Month Week Year
- Seconds Minutes Hours Day Month Week
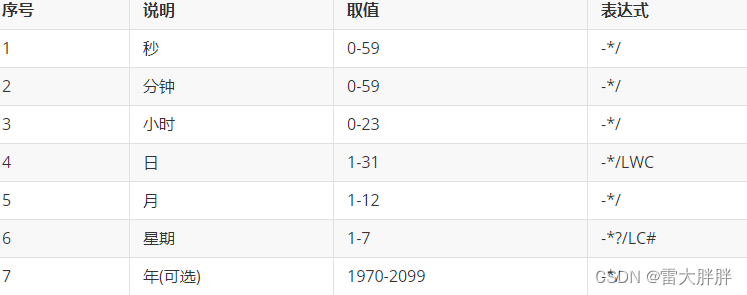
Cron 表达式的时间字段除允许设置数值外,还可使用一些特殊的字符,提供列表、范围、通配符等功,如下:
- 星号(**):可用在所有字段中,表示对应时间域的每一个时刻,例如,*在分钟字段时,表示“每分钟”;
- 问号(?):该字符只在日期和星期字段中使用,它通常指定为“无意义的值”,相当于占位符;
- 减号(-):表达一个范围,如在小时字段中使用“10-12”,则表示从 10 到 12 点,即 10,11,12;
- 逗号(,):表达一个列表值,如在星期字段中使用“MON,WED,FRI”,则表示星期一,星期三和星期五;
- 斜杠(/):x/y 表达一个等步长序列,x 为起始值,y 为增量步长值。如在分钟字段中使用 0/15,则表示为 0,15,30 和 45 秒,而 5/15 在分钟字段中表示 5,20,35,50,你也可以使用*/y,它等同于 0/y;
- L:该字符只在日期和星期字段中使用,代表“Last”的意思,但它在两个字段中意思不同。L 在日期字段中,表示这个月份的最后一天,如一月的 31 号,非闰年二月的 28 号;如果 L 用在星期中,则表示星期六,等同于 7。但是,如果 L 出现在星期字段里,而且在前面有一个数值 X,则表示“这个月的最后 X 天”,例如,6L 表示该月的最后星期五;
- W:该字符只能出现在日期字段里,是对前导日期的修饰,表示离该日期最近的工作日。例如 15W表示离该月 15 号最近的工作日,如果该月 15 号是星期六,则匹配 14 号星期五;如果 15 日是星期日,则匹配 16 号星期一;如果 15 号是星期二,那结果就是 15 号星期二。但必须注意关联的匹配日期不能够跨月,如你指定 1W,如果 1 号是星期六,结果匹配的是 3 号星期一,而非上个月最后的那天。W 字符串只能指定单一日期,而不能指定日期范围;
- LW 组合:在日期字段可以组合使用 LW,它的意思是当月的最后一个工作日;
- 井号(#):该字符只能在星期字段中使用,表示当月某个工作日。如 6#3 表示当月的第三个星期五(6表示星期五,#3 表示当前的第三个),而 4#5 表示当月的第五个星期三,假设当月没有第五个星期三,忽略不触发;
- C:该字符只在日期和星期字段中使用,代表“Calendar”的意思。它的意思是计划所关联的日期,如果日期没有被关联,则相当于日历中所有日期。例如 5C 在日期字段中就相当于日历 5 日以后的第一天。1C 在星期字段中相当于星期日后的第一天。
@Scheduled(cron = "0 0 1 1 1 ?")//每年一月的一号的 1:00:00 执行一次
@Scheduled(cron = "0 0 1 1 1,6 ?") //一月和六月的一号的 1:00:00 执行一次
@Scheduled(cron = "0 0 1 1 1,4,7,10 ?") //每个季度的第一个月的一号的 1:00:00 执行一次
@Scheduled(cron = "0 0 1 1 * ?")//每月一号 1:00:00 执行一次
@Scheduled(cron="0 0 1 * * *") //每天凌晨 1 点执行一次
七,打包
1、打jar包
1、打jar包
- 修改pom将找包方式改为jar
在工程中添加插件
<build>
    <plugins>
        <plugin>
            <groupId>org.springframework.boot</groupId>
            <artifactId>spring-boot-maven-plugin</artifactId>
            <!--注意这个版本 目前比较稳定 -->
            <version>1.4.2.RELEASE</version>
            <configuration>
                <!--指定启动类-->
        		<mainClass>cn.woniu.ApplicationApp</mainClass>
    		</configuration>
    		<executions>
        		<execution>
            		<id>repackage</id>
            		<goals>
                		<goal>repackage</goal>
            		</goals>
        		</execution>
            </executions>
        </plugin>
    </plugins>
</build>
或者用下面这个插件版本
<plugin>
    <groupId>org.springframework.boot</groupId>
    <artifactId>spring-boot-maven-plugin</artifactId>
    <version>2.3.7.RELEASE</version>
    <configuration>
        <!--指定启动类-->
        <mainClass>cn.woniu.ApplicationApp</mainClass>
    </configuration>
    <executions>
        <execution>
            <id>repackage</id>
            <goals>
                <goal>repackage</goal>
            </goals>
        </execution>
    </executions>
</plugin>
2、打包war⼯程
把⼀个项⽬打成war包,放到外部的tomcat容器运⾏
- 添加tomcat依赖,排除spring-boot-starter-web的内置的tomcat
- `在这里插入代码片
 <!--springmvc坐标-->
<dependency>
    <groupId>org.springframework.boot</groupId>
    <artifactId>spring-boot-starter-web</artifactId>
    <exclusions>
        <exclusion>
            <groupId>org.springframework.boot</groupId>
            <artifactId>spring-boot-starter-tomcat</artifactId>
        </exclusion>
     </exclusions>
</dependency>

<dependency>
    <groupId>org.springframework.boot</groupId>
    <artifactId>spring-boot-starter-tomcat</artifactId>
    <scope>provided</scope>
</dependency>
注意:不需要添加spring-boot-maven-plugin插件
打包⽅式改成war
war
⾸先在启动类继承SpringBootServletInitializer,并重写configure⽅法
/**
 * SpringBoot启动类
 */
@SpringBootApplication
public class ApplicationApp extends SpringBootServletInitializer {

    @Override
    protected SpringApplicationBuilder configure(SpringApplicationBuilder builder) {
        return super.configure(builder);
    }

    public static void main(String[] args) {
        SpringApplication.run(ApplicationApp.class);
    }
}
3、完整配置
1、pom配置
<?xml version="1.0" encoding="UTF-8"?>
<project xmlns="http://maven.apache.org/POM/4.0.0"
         xmlns:xsi="http://www.w3.org/2001/XMLSchema-instance"
         xsi:schemaLocation="http://maven.apache.org/POM/4.0.0 http://maven.apache.org/xsd/maven-4.0.0.xsd">
    <modelVersion>4.0.0</modelVersion>

    <groupId>cn.woniu</groupId>
    <artifactId>springboot-mybaits-mvc</artifactId>
    <version>1.0-SNAPSHOT</version>
    <packaging>jar</packaging>

    <properties>
        <maven.compiler.source>8</maven.compiler.source>
        <maven.compiler.target>8</maven.compiler.target>
    </properties>

    <parent>
        <artifactId>spring-boot-starter-parent</artifactId>
        <groupId>org.springframework.boot</groupId>
        <version>2.5.4</version>
    </parent>

    <dependencies>
        <!--mvc-->
        <dependency>
            <groupId>org.springframework.boot</groupId>
            <artifactId>spring-boot-starter-web</artifactId>
        </dependency>

        <!--数据库驱动-->
        <dependency>
            <groupId>mysql</groupId>
            <artifactId>mysql-connector-java</artifactId>
            <scope>runtime</scope>
        </dependency>
        <!--数据源-->
        <dependency>
            <groupId>org.springframework.boot</groupId>
            <artifactId>spring-boot-starter-jdbc</artifactId>
        </dependency>

        <!--springboot的mybaits启动器-->
        <dependency>
            <groupId>org.mybatis.spring.boot</groupId>
            <artifactId>mybatis-spring-boot-starter</artifactId>
            <version>2.2.0</version>
        </dependency>

        <!--实体类工具-->
        <dependency>
            <groupId>org.projectlombok</groupId>
            <artifactId>lombok</artifactId>
        </dependency>

        <!--整合thymeleaf-->
        <dependency>
            <groupId>org.springframework.boot</groupId>
            <artifactId>spring-boot-starter-thymeleaf</artifactId>
        </dependency>

        <!--分页-->
        <dependency>
            <groupId>com.github.pagehelper</groupId>
            <artifactId>pagehelper-spring-boot-starter</artifactId>
            <version>1.3.1</version>
        </dependency>

        <!--文件上传相关坐标-->
        <dependency>
            <groupId>commons-fileupload</groupId>
            <artifactId>commons-fileupload</artifactId>
            <version>1.3.3</version>
        </dependency>

        <dependency>
            <groupId>commons-io</groupId>
            <artifactId>commons-io</artifactId>
            <version>2.6</version>
        </dependency>

        <!--测试启动器-->
        <dependency>
            <groupId>org.springframework.boot</groupId>
            <artifactId>spring-boot-starter-test</artifactId>
        </dependency>
    </dependencies>

    <build>
        <plugins>
            <!--springboot编译插件-->
            <plugin>
                <groupId>org.springframework.boot</groupId>
                <artifactId>spring-boot-maven-plugin</artifactId>
                <version>2.3.7.RELEASE</version>
                <configuration>
                    <mainClass>cn.woniu.ApplicationApp</mainClass>
                </configuration>
                <executions>
                    <execution>
                        <id>repackage</id>
                        <goals>
                            <goal>repackage</goal>
                        </goals>
                    </execution>
                </executions>
            </plugin>

        </plugins>
    </build>
</project>
2、applicaton.yml配置
#服务器配置
server:
    #服务端口
    port: 80
      #tomcat访问路径
      #servlet:
    #context-path: /springdemo

#日志配置
logging:
    level:
        cn:
            woniu:
                dao: DEBUG
        root: INFO
    pattern:
        console: '%d{yyyy-MM-dd HH:mm:ss.SSS} [%thread] %-5level %logger{50} - %msg%n'
spring:
    #数据源配置
    datasource:
        password: root
        url: jdbc:mysql://localhost:3306/woniu_db?useUnicode=true&characterEncoding=utf-8&useSSL=false&serverTimezone=UTC
        username: root
    #springmvc静态资源根目录指定
    mvc:
        static-path-pattern: /static/**
    #文件上传配置
    servlet:
        multipart:
            max-file-size: 30MB #单个文件最大Size
            max-request-size: 60MB  #单次请求最大Size
    #关闭thymeleaf缓存
    thymeleaf:
        cache: false