Java Agent入门教程
目录
- 1. Java Agent简介
- 2. premain方式
- 2.1 新建工程
- 2.2 创建agent类
- 2.3 指定agent启动类
- 2.3.1 使用MANIFEST.MF
- 2.3.2 使用 maven 插件
- 2.4 打包
- 2.5 创建一个springboot工程
- 2.6 验证
- 3. agentmain方式
- 3.1 新建工程
- 3.2 验证
- 3.2.1 指定进程号方式
- 3.2.2 指定程序名称方式
1. Java Agent简介
- java agent是一个专门制作的jar文件,可以动态修改字节码文件。它利用JVM提供的Instrumentation API可以在 JVM 执行字节码之前或在JVM 加载字节码之后对字节码文件进行修改。
- 如果要使用agent,我们需要定义两个方法
premain: 将在JVM启动时使用-javaagent参数静态地加载agent
agentmain: 将使用Java Attach API动态加载agent到JVM中
2. premain方式
- 以jvm参数形式调用premain方法,在java程序的main方法执行之前执行
2.1 新建工程
- 先创建一个maven工程
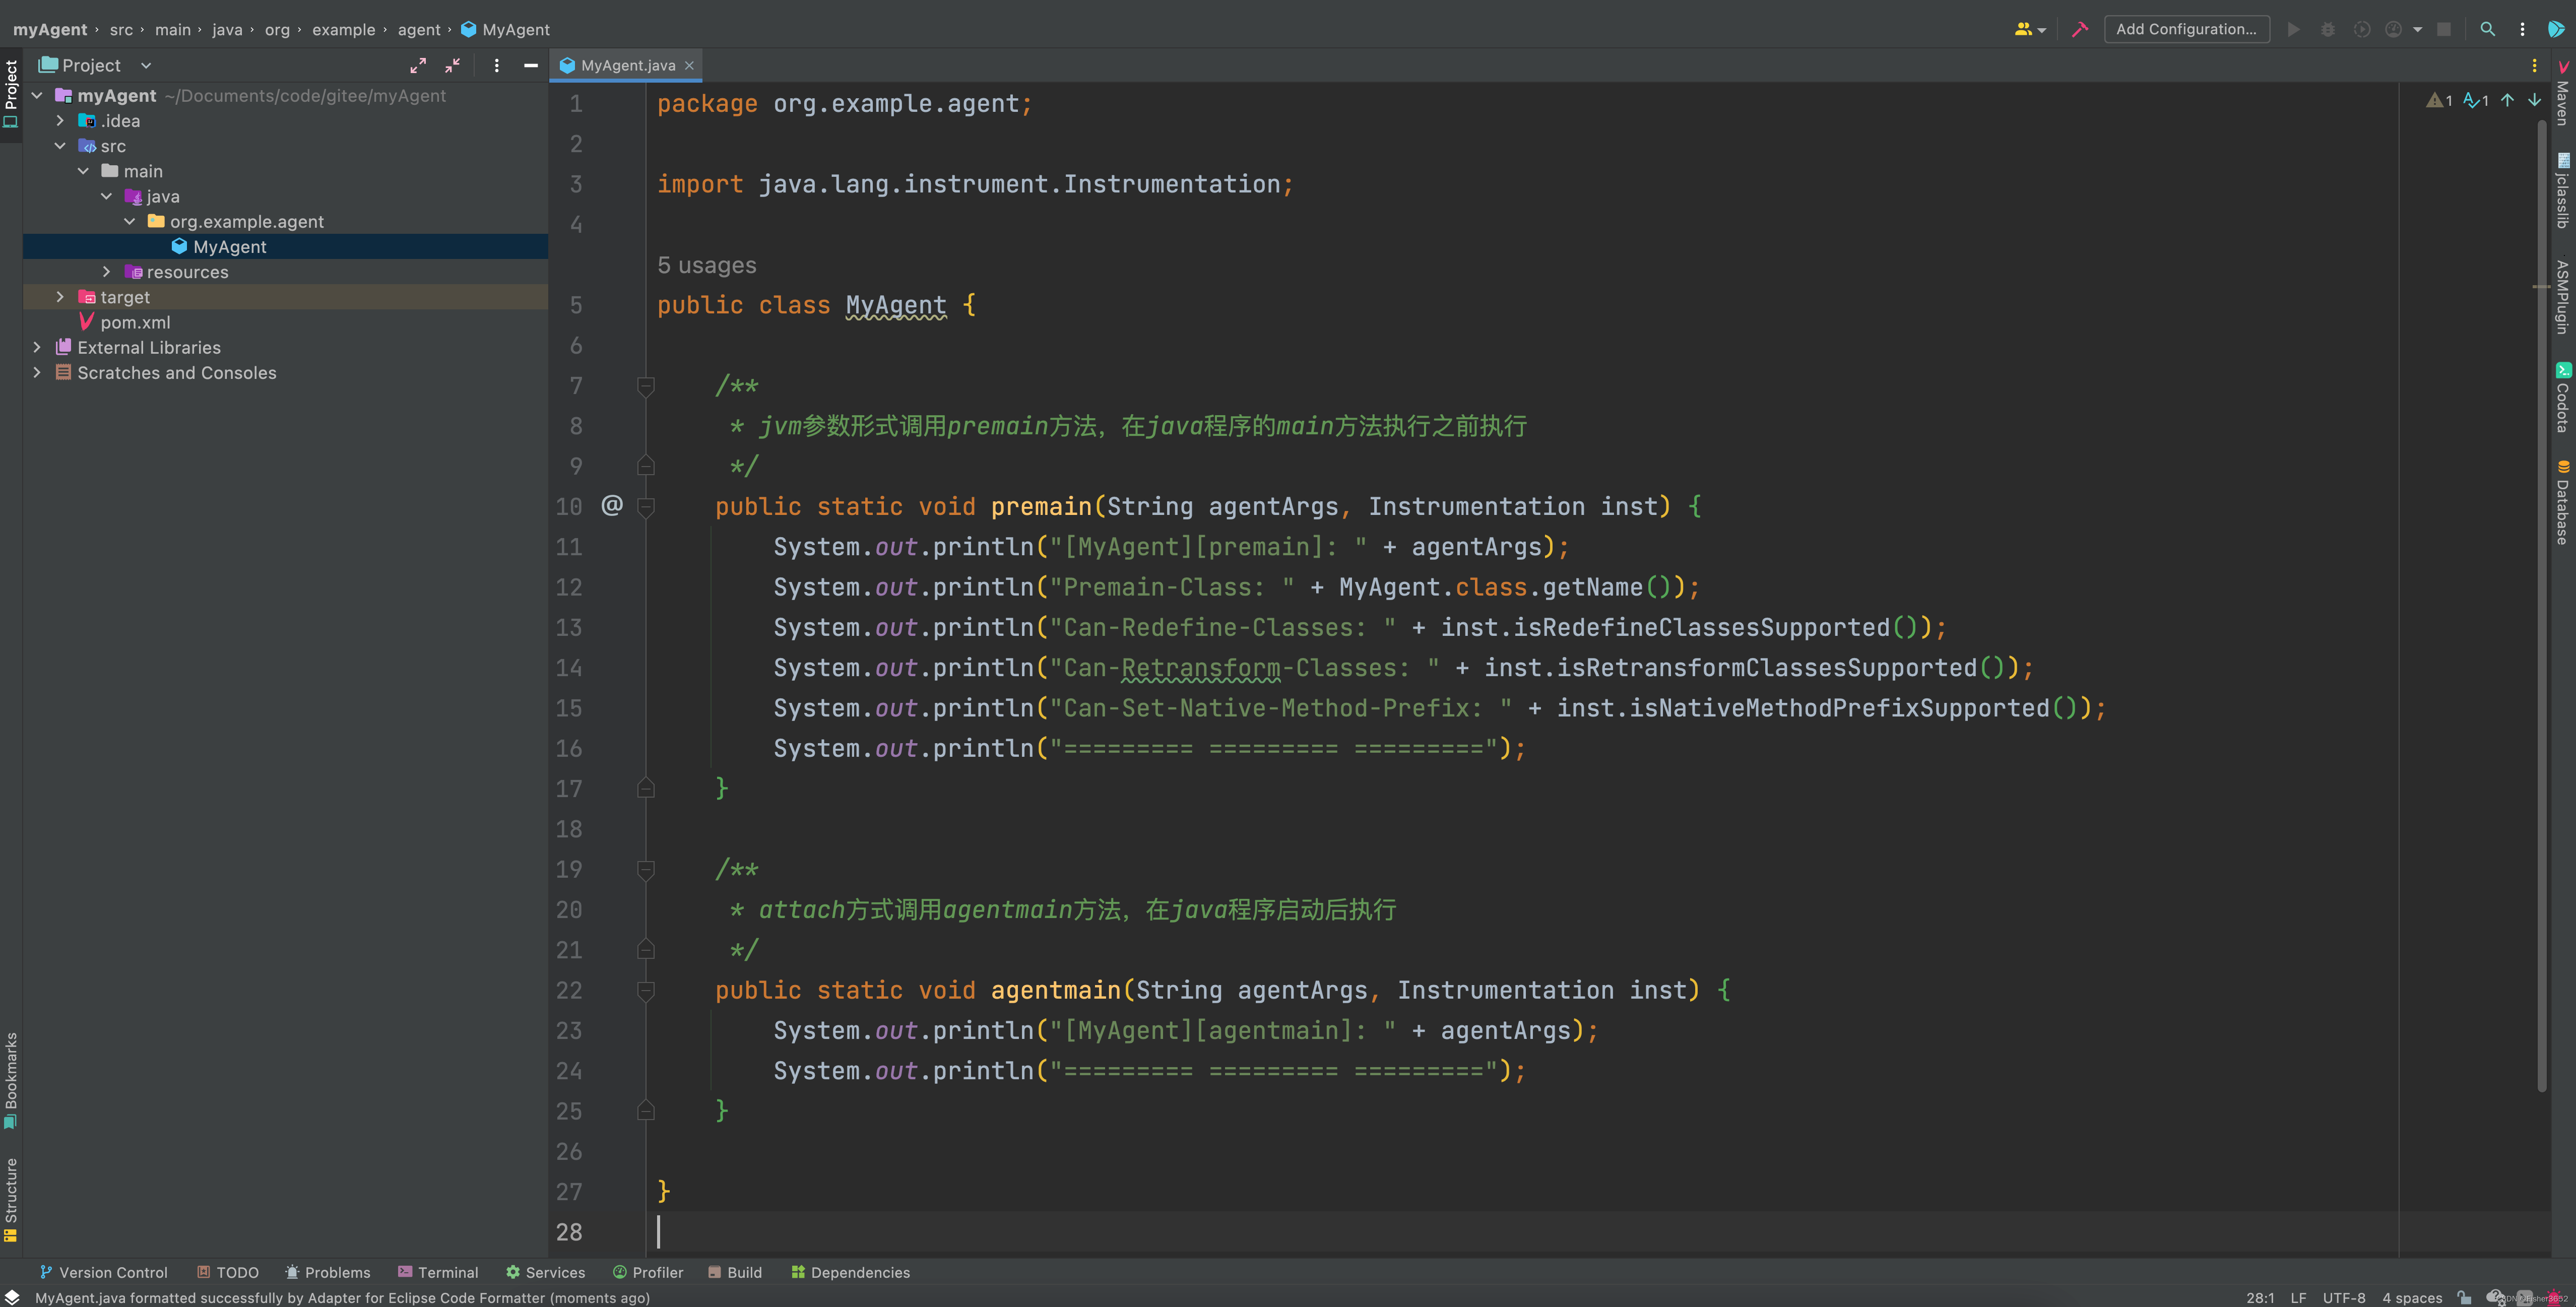
2.2 创建agent类
package org.example.agent;

import java.lang.instrument.Instrumentation;

public class MyAgent {

    /**
     * jvm参数形式调用premain方法,在java程序的main方法执行之前执行
     */
    public static void premain(String agentArgs, Instrumentation inst) {
        System.out.println("[MyAgent][premain]: " + agentArgs);
        System.out.println("Premain-Class: " + MyAgent.class.getName());
        System.out.println("Can-Redefine-Classes: " + inst.isRedefineClassesSupported());
        System.out.println("Can-Retransform-Classes: " + inst.isRetransformClassesSupported());
        System.out.println("Can-Set-Native-Method-Prefix: " + inst.isNativeMethodPrefixSupported());
        System.out.println("========= ========= =========");
    }

    /**
     * attach方式调用agentmain方法,在java程序启动后执行
     */
    public static void agentmain(String agentArgs, Instrumentation inst) {
        System.out.println("[MyAgent][agentmain]: " + agentArgs);
        System.out.println("========= ========= =========");
    }

}
2.3 指定agent启动类
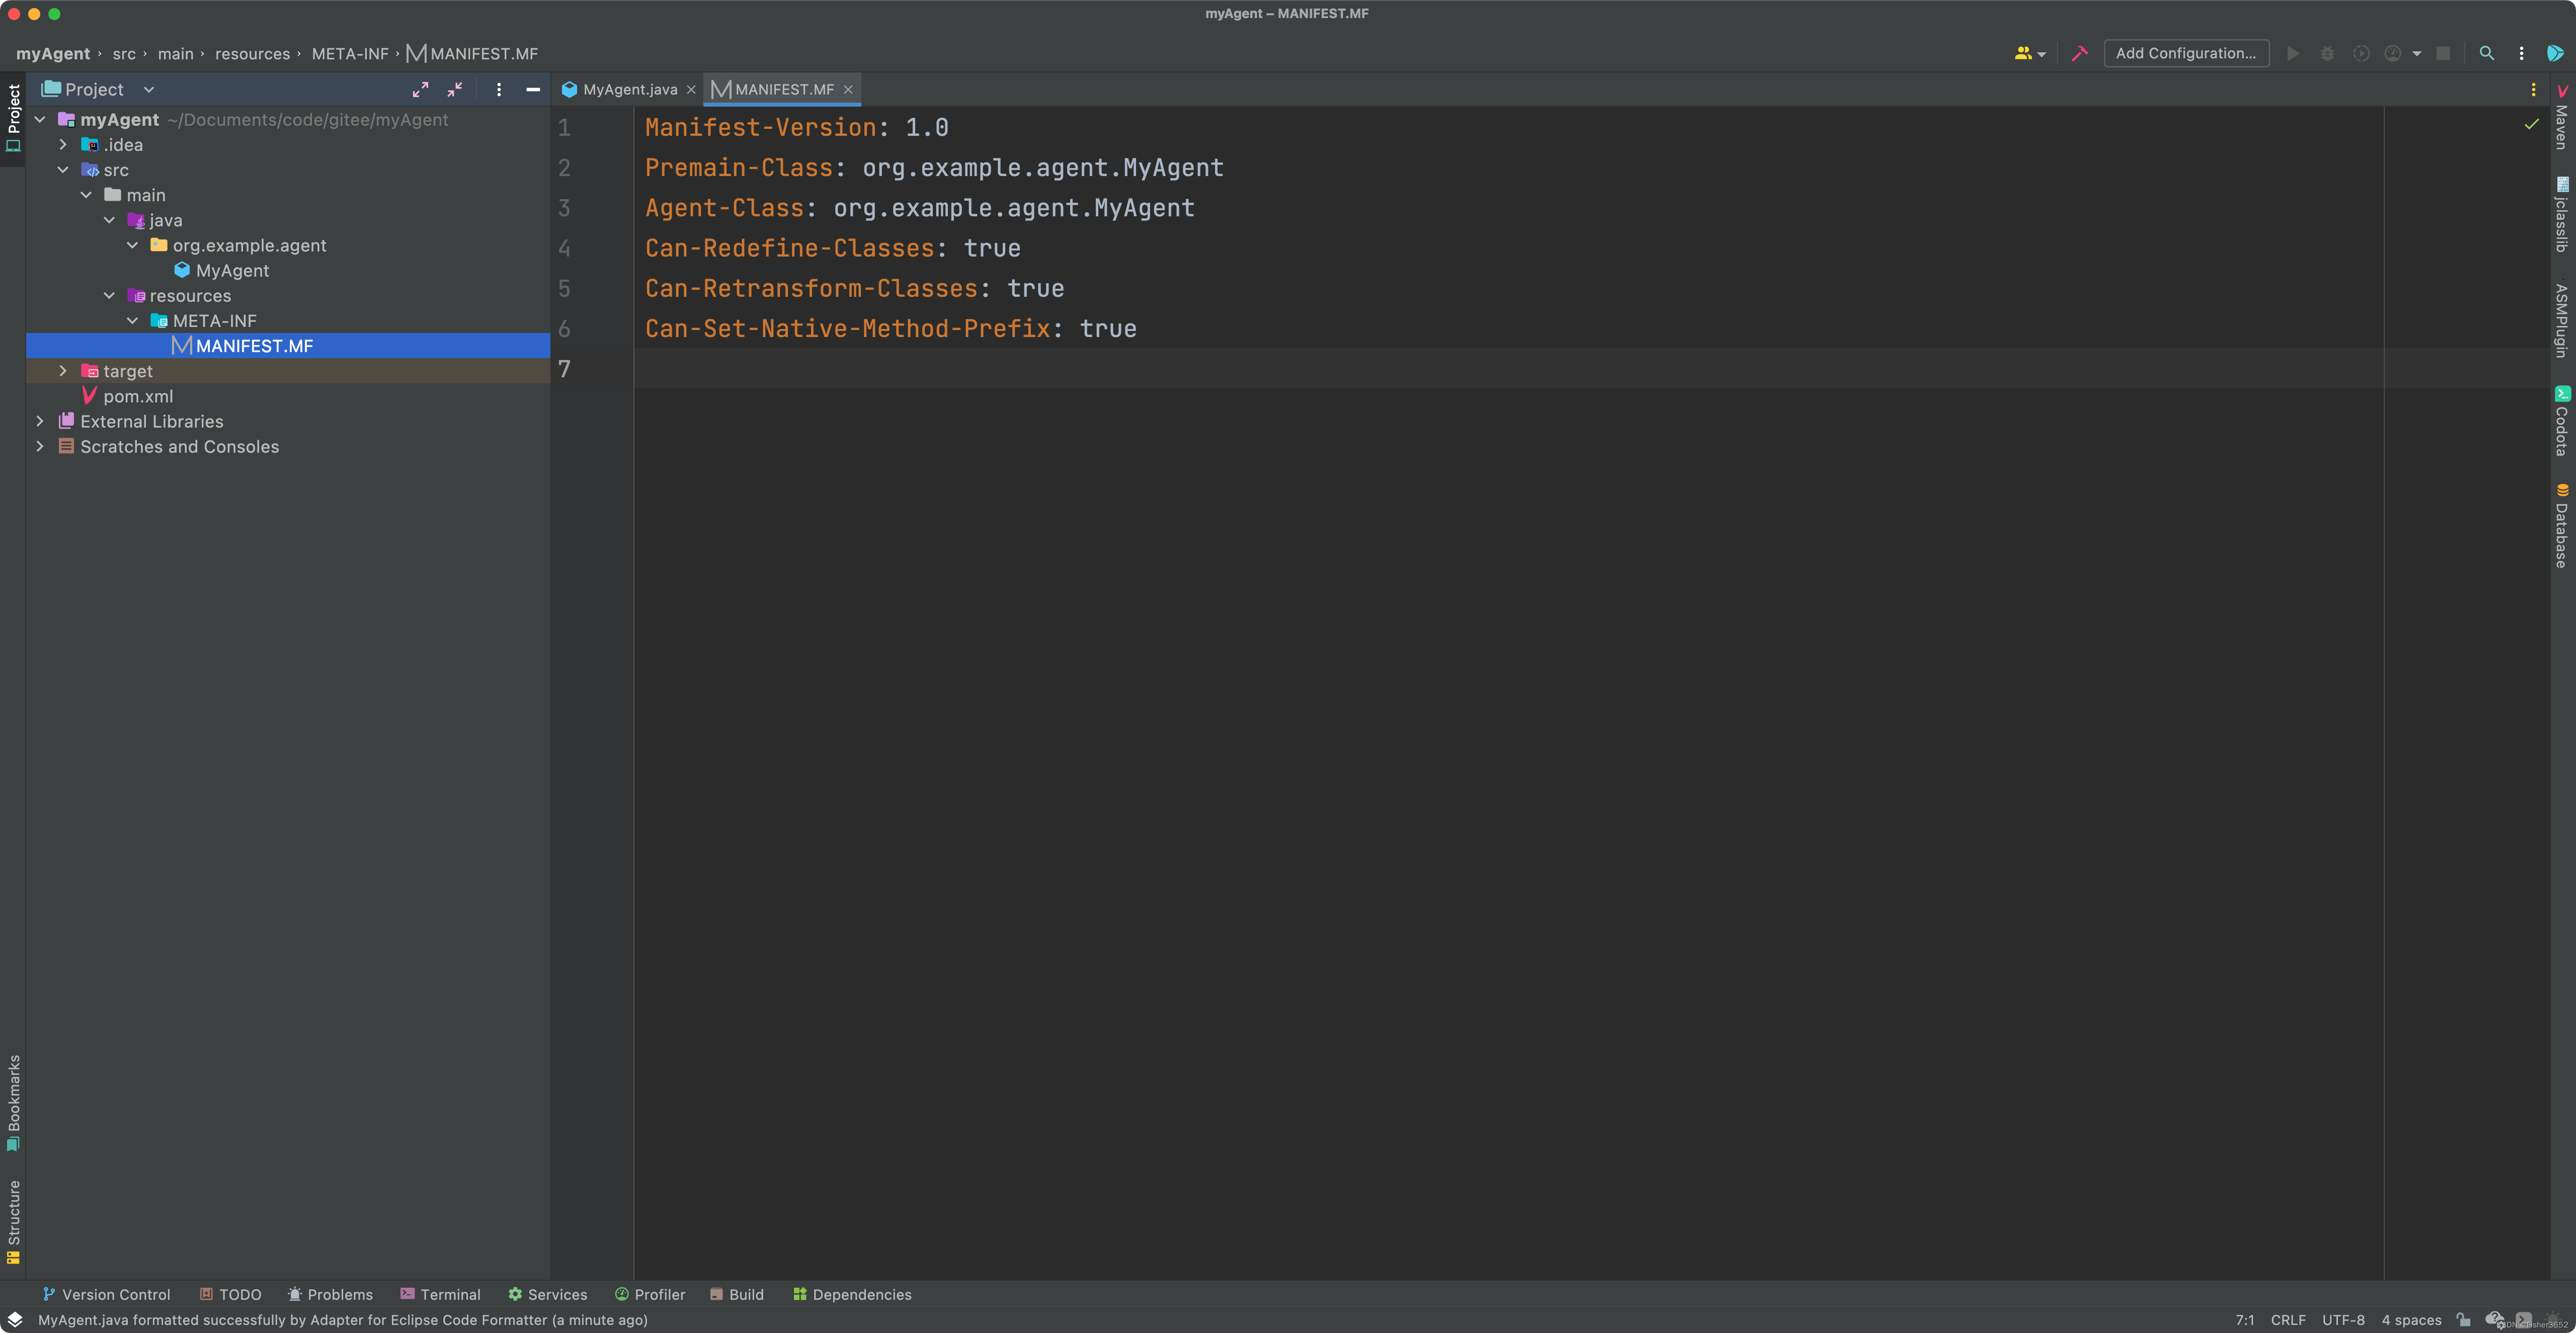
2.3.1 使用MANIFEST.MF
- 在resources文件夹下创建META-INF文件夹,再创建MANIFEST.MF文件,填写如下内容,最后一行要有空一行
Manifest-Version: 1.0
Premain-Class: org.example.agent.MyAgent
Agent-Class: org.example.agent.MyAgent
Can-Redefine-Classes: true
Can-Retransform-Classes: true
Can-Set-Native-Method-Prefix: true
Premain-Class:包含premain方法的类,需要配置为类的全路径
Agent-Class:包含agent方法的类,需要配置为类的全路径
Can-Redefine-Classes:为true时表示能够重新定义class
Can-Retransform-Classes:为true时表示能够重新转换class,实现字节码替换
Can-Set-Native-Method-Prefix:为true时表示能够设置native方法的前缀
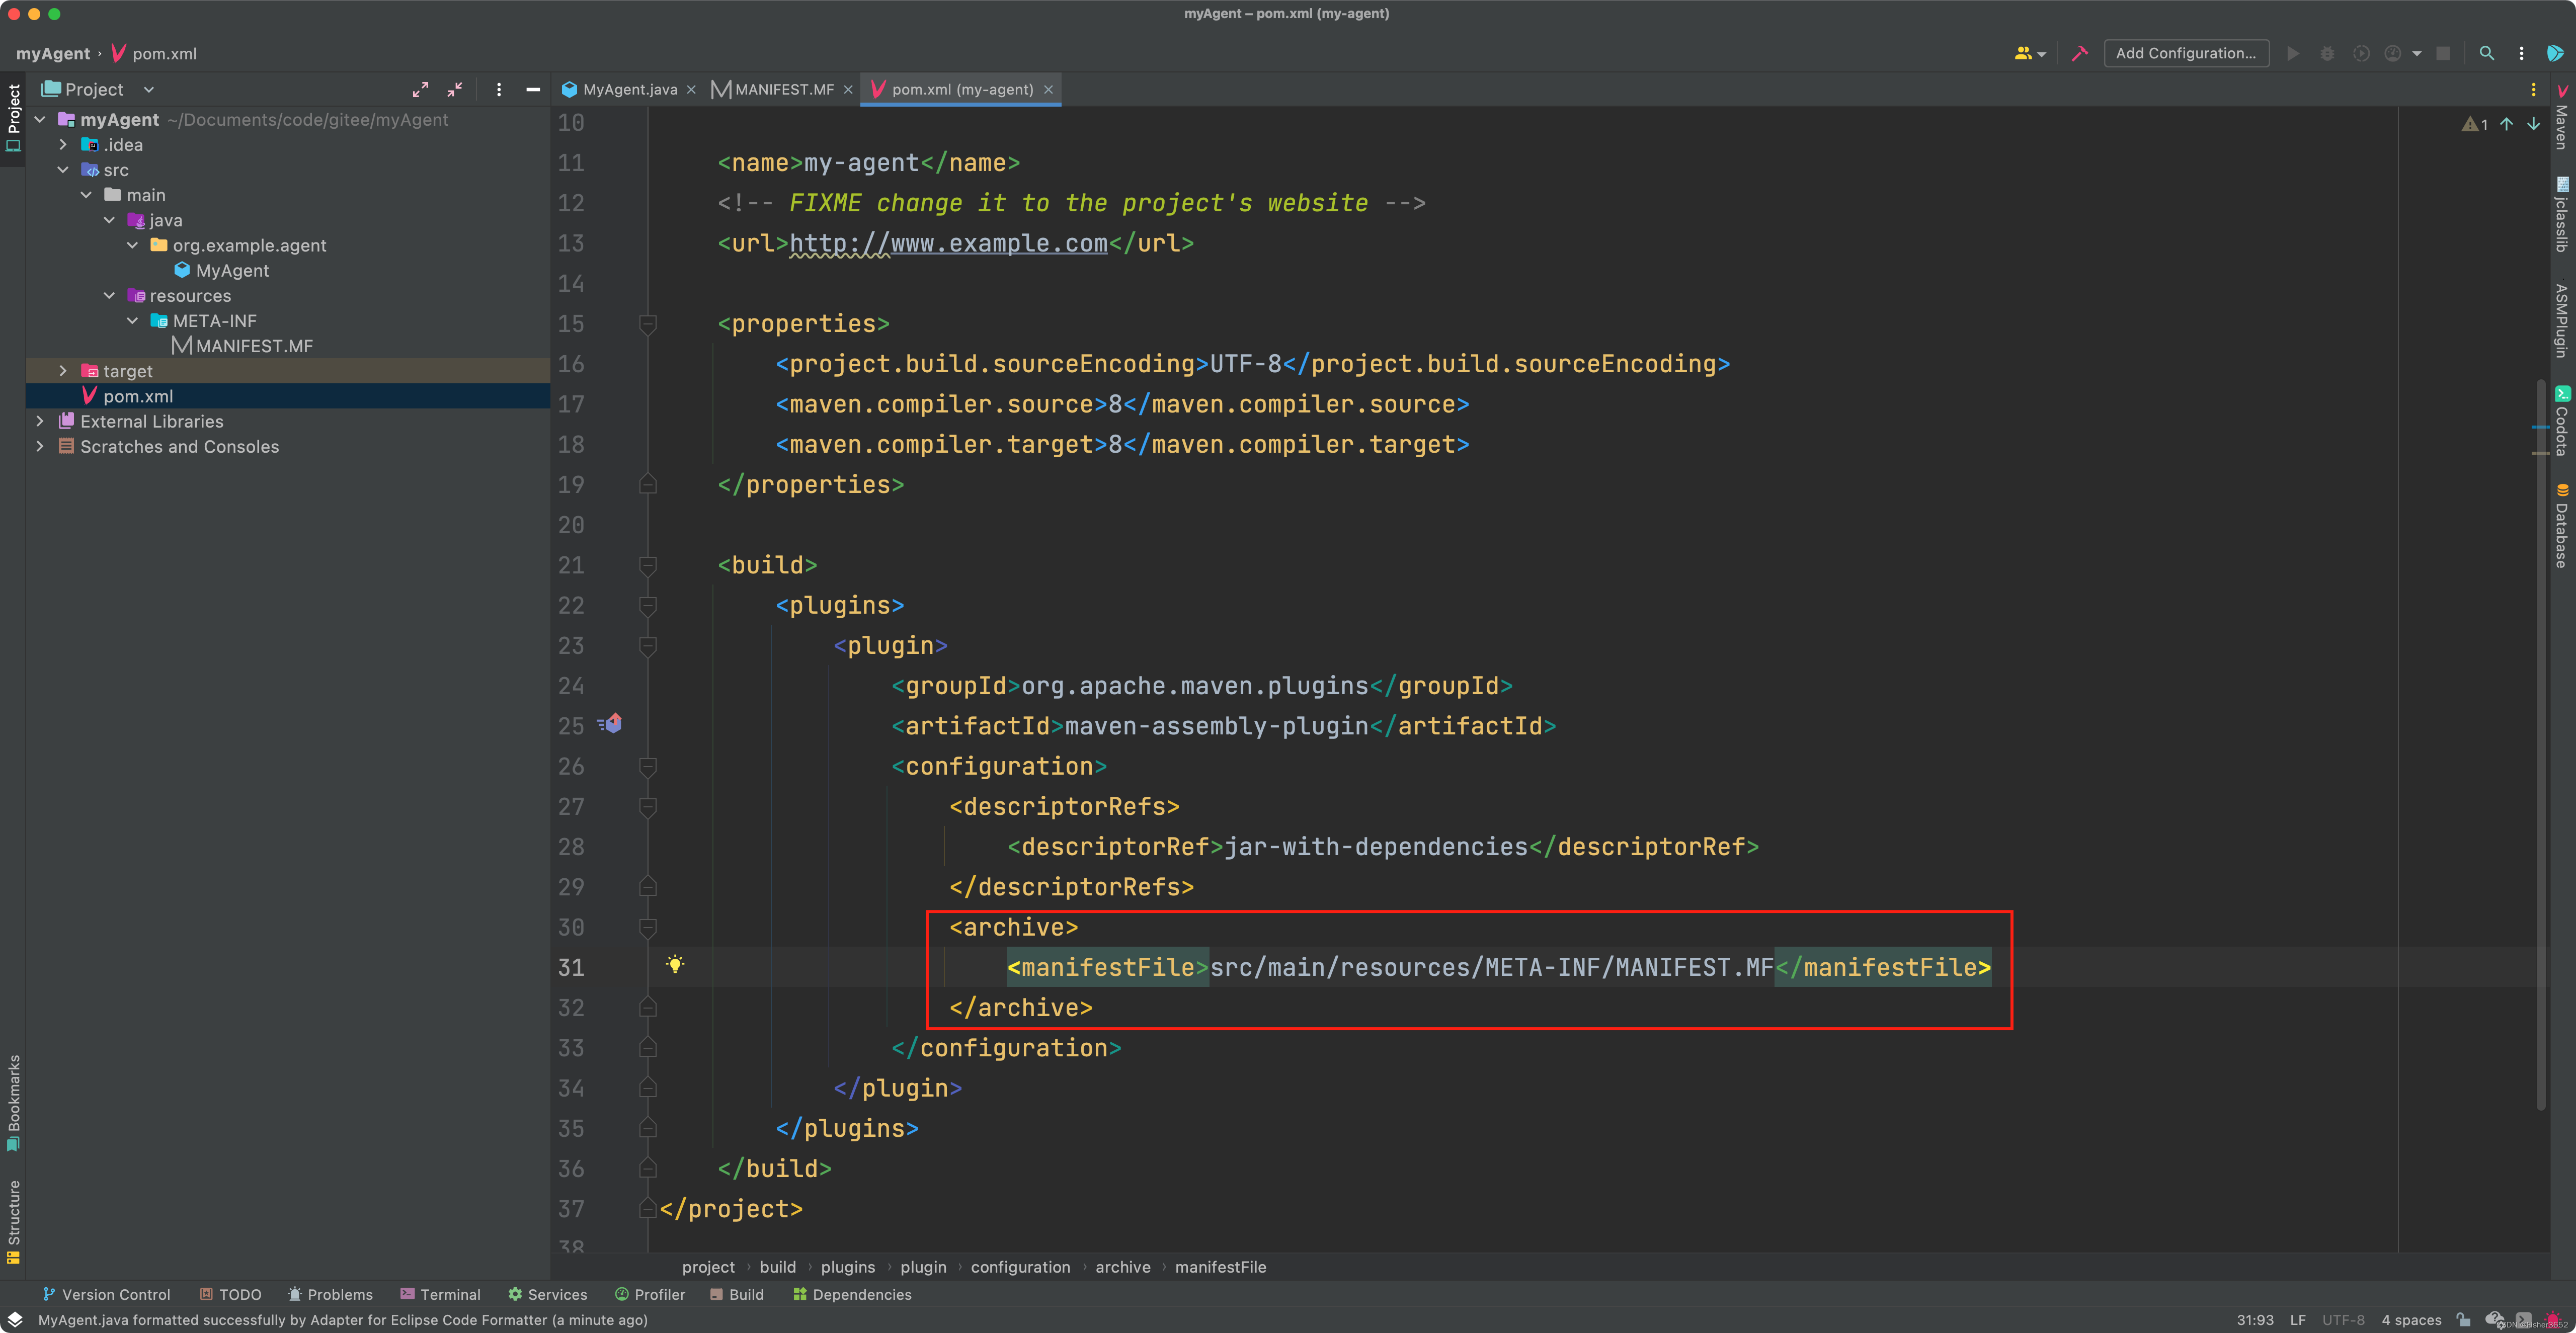
- 相应pom.xml,在manifestFile中指定MANIFEST.MF文件
<?xml version="1.0" encoding="UTF-8"?>

<project xmlns="http://maven.apache.org/POM/4.0.0" xmlns:xsi="http://www.w3.org/2001/XMLSchema-instance"
         xsi:schemaLocation="http://maven.apache.org/POM/4.0.0 http://maven.apache.org/xsd/maven-4.0.0.xsd">
    <modelVersion>4.0.0</modelVersion>

    <groupId>org.example</groupId>
    <artifactId>my-agent</artifactId>
    <version>1.0-SNAPSHOT</version>

    <name>my-agent</name>
    <!-- FIXME change it to the project's website -->
    <url>http://www.example.com</url>

    <properties>
        <project.build.sourceEncoding>UTF-8</project.build.sourceEncoding>
        <maven.compiler.source>8</maven.compiler.source>
        <maven.compiler.target>8</maven.compiler.target>
    </properties>

    <build>
        <plugins>
            <plugin>
                <groupId>org.apache.maven.plugins</groupId>
                <artifactId>maven-assembly-plugin</artifactId>
                <configuration>
                    <descriptorRefs>
                        <descriptorRef>jar-with-dependencies</descriptorRef>
                    </descriptorRefs>
                    <archive>
                        <manifestFile>src/main/resources/META-INF/MANIFEST.MF</manifestFile>
                    </archive>
                </configuration>
            </plugin>
        </plugins>
    </build>
</project>
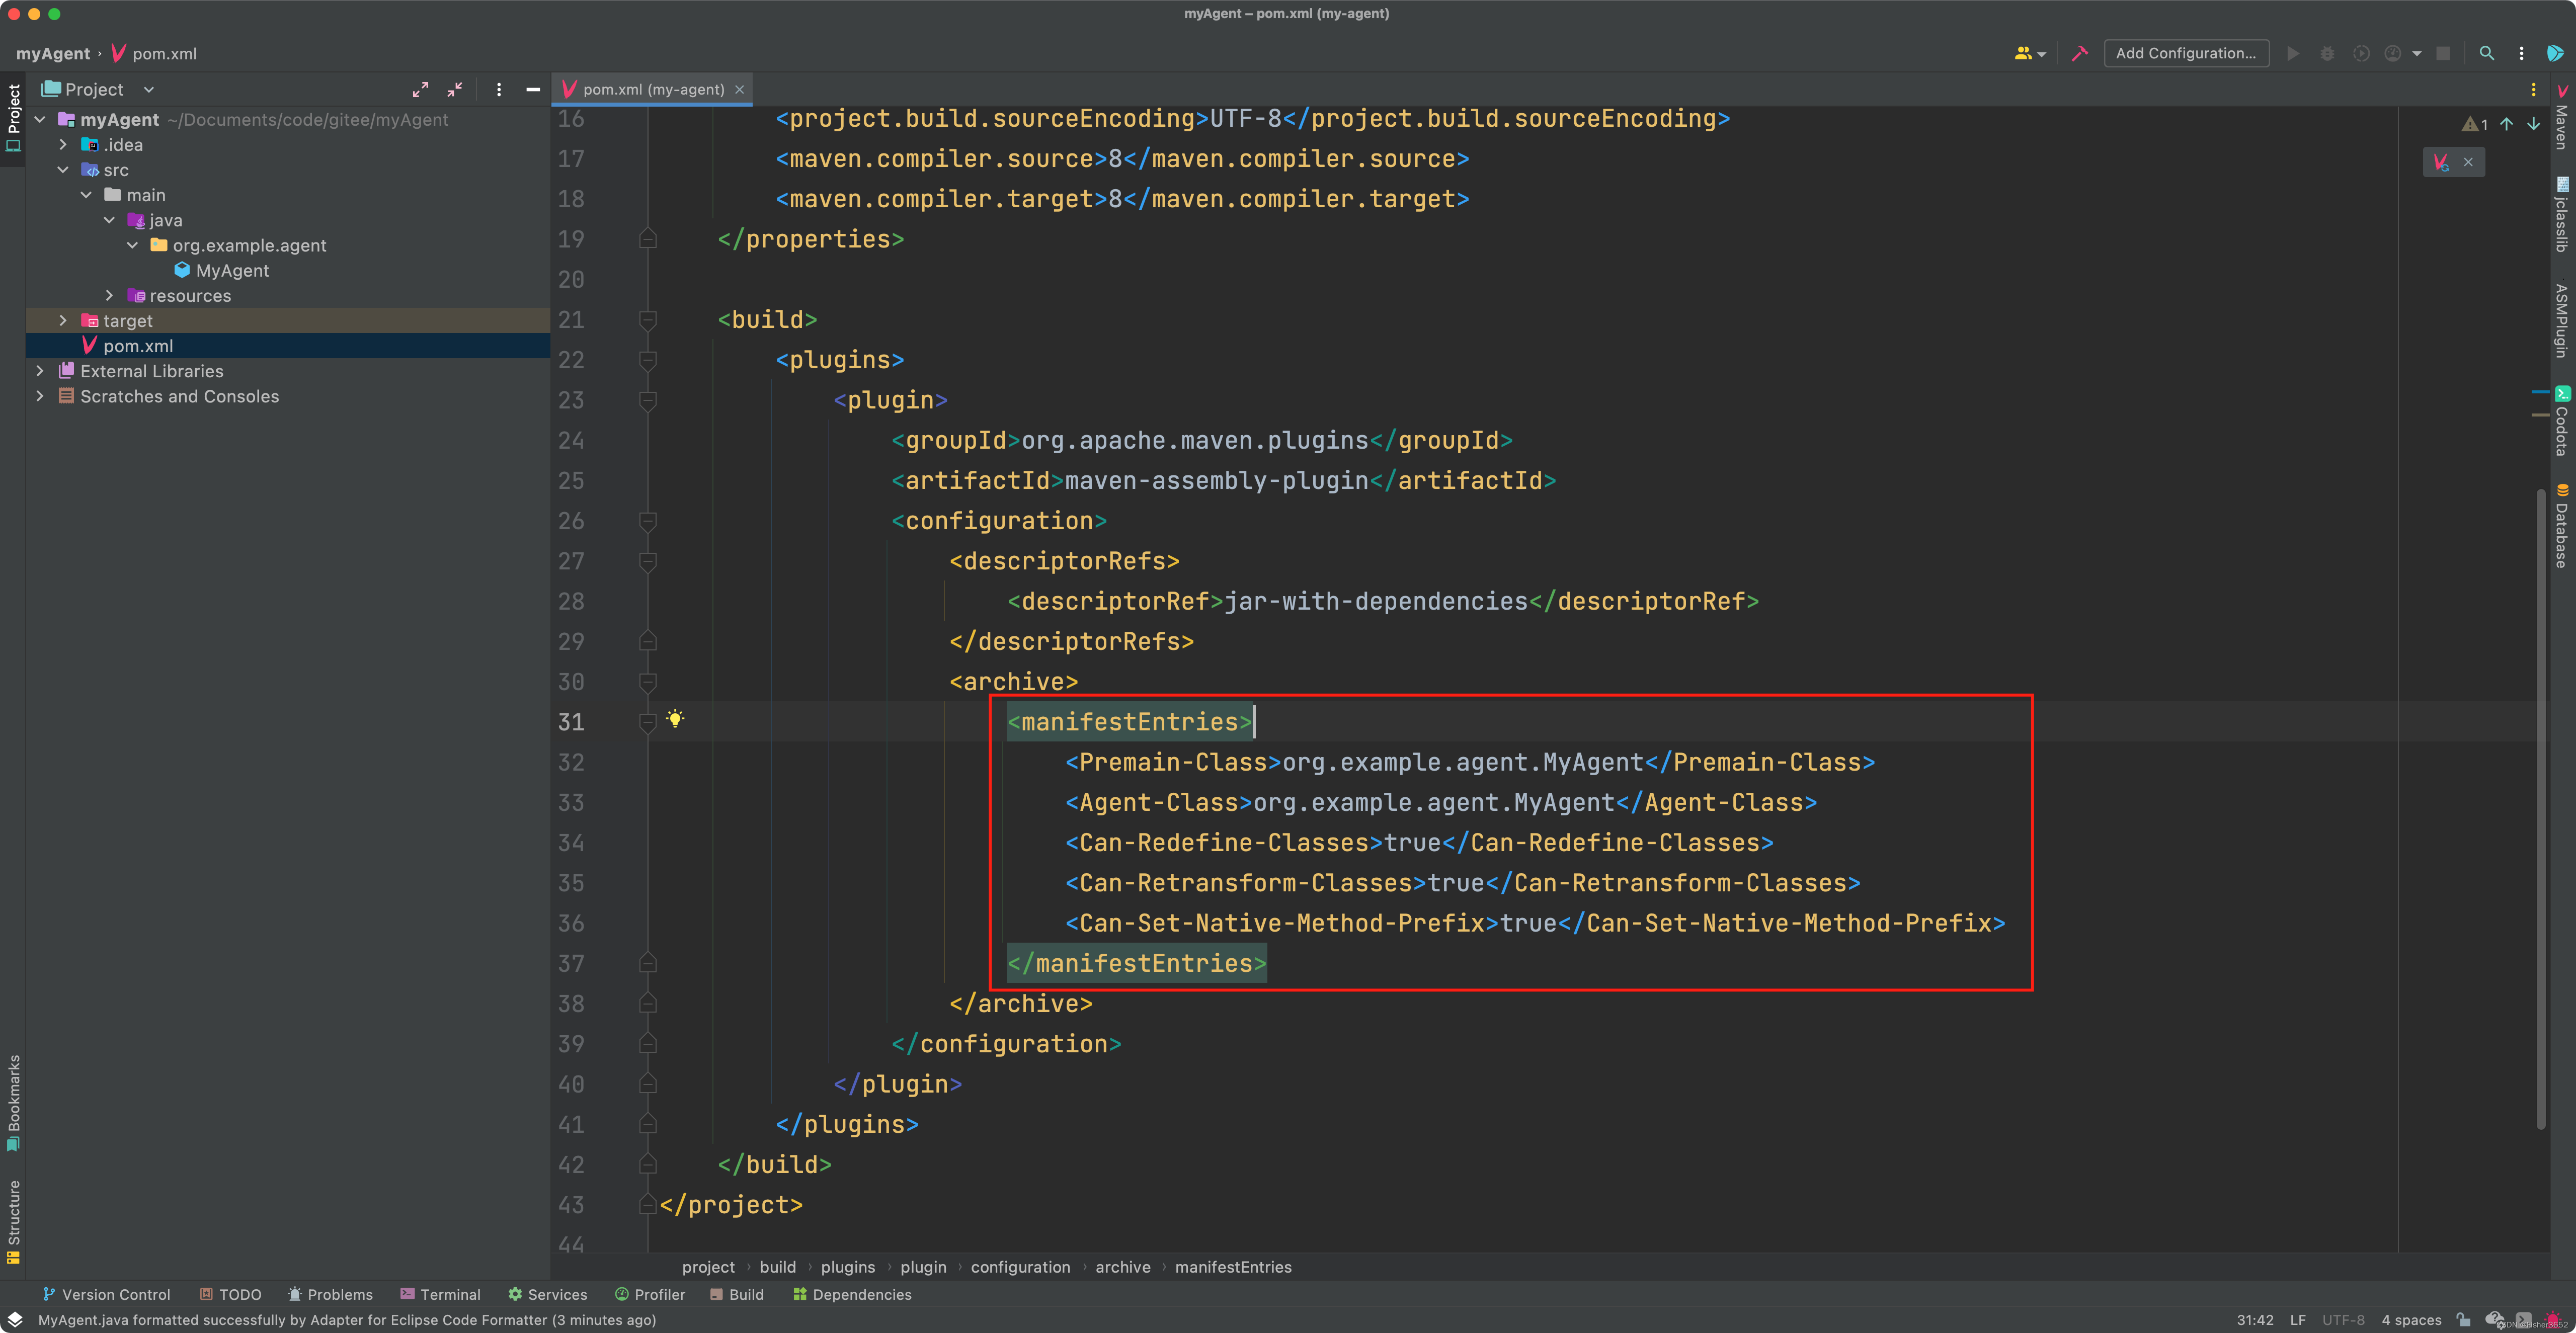
2.3.2 使用 maven 插件
- 在manifestEntries中添加配置
<?xml version="1.0" encoding="UTF-8"?>

<project xmlns="http://maven.apache.org/POM/4.0.0" xmlns:xsi="http://www.w3.org/2001/XMLSchema-instance"
         xsi:schemaLocation="http://maven.apache.org/POM/4.0.0 http://maven.apache.org/xsd/maven-4.0.0.xsd">
    <modelVersion>4.0.0</modelVersion>

    <groupId>org.example</groupId>
    <artifactId>my-agent</artifactId>
    <version>1.0-SNAPSHOT</version>

    <name>my-agent</name>
    <!-- FIXME change it to the project's website -->
    <url>http://www.example.com</url>

    <properties>
        <project.build.sourceEncoding>UTF-8</project.build.sourceEncoding>
        <maven.compiler.source>8</maven.compiler.source>
        <maven.compiler.target>8</maven.compiler.target>
    </properties>

    <build>
        <plugins>
            <plugin>
                <groupId>org.apache.maven.plugins</groupId>
                <artifactId>maven-assembly-plugin</artifactId>
                <configuration>
                    <descriptorRefs>
                        <descriptorRef>jar-with-dependencies</descriptorRef>
                    </descriptorRefs>
                    <archive>
                        <manifestEntries>
                            <Premain-Class>org.example.agent.MyAgent</Premain-Class>
                            <Agent-Class>org.example.agent.MyAgent</Agent-Class>
                            <Can-Redefine-Classes>true</Can-Redefine-Classes>
                            <Can-Retransform-Classes>true</Can-Retransform-Classes>
                            <Can-Set-Native-Method-Prefix>true</Can-Set-Native-Method-Prefix>
                        </manifestEntries>
                    </archive>
                </configuration>
            </plugin>
        </plugins>
    </build>
</project>
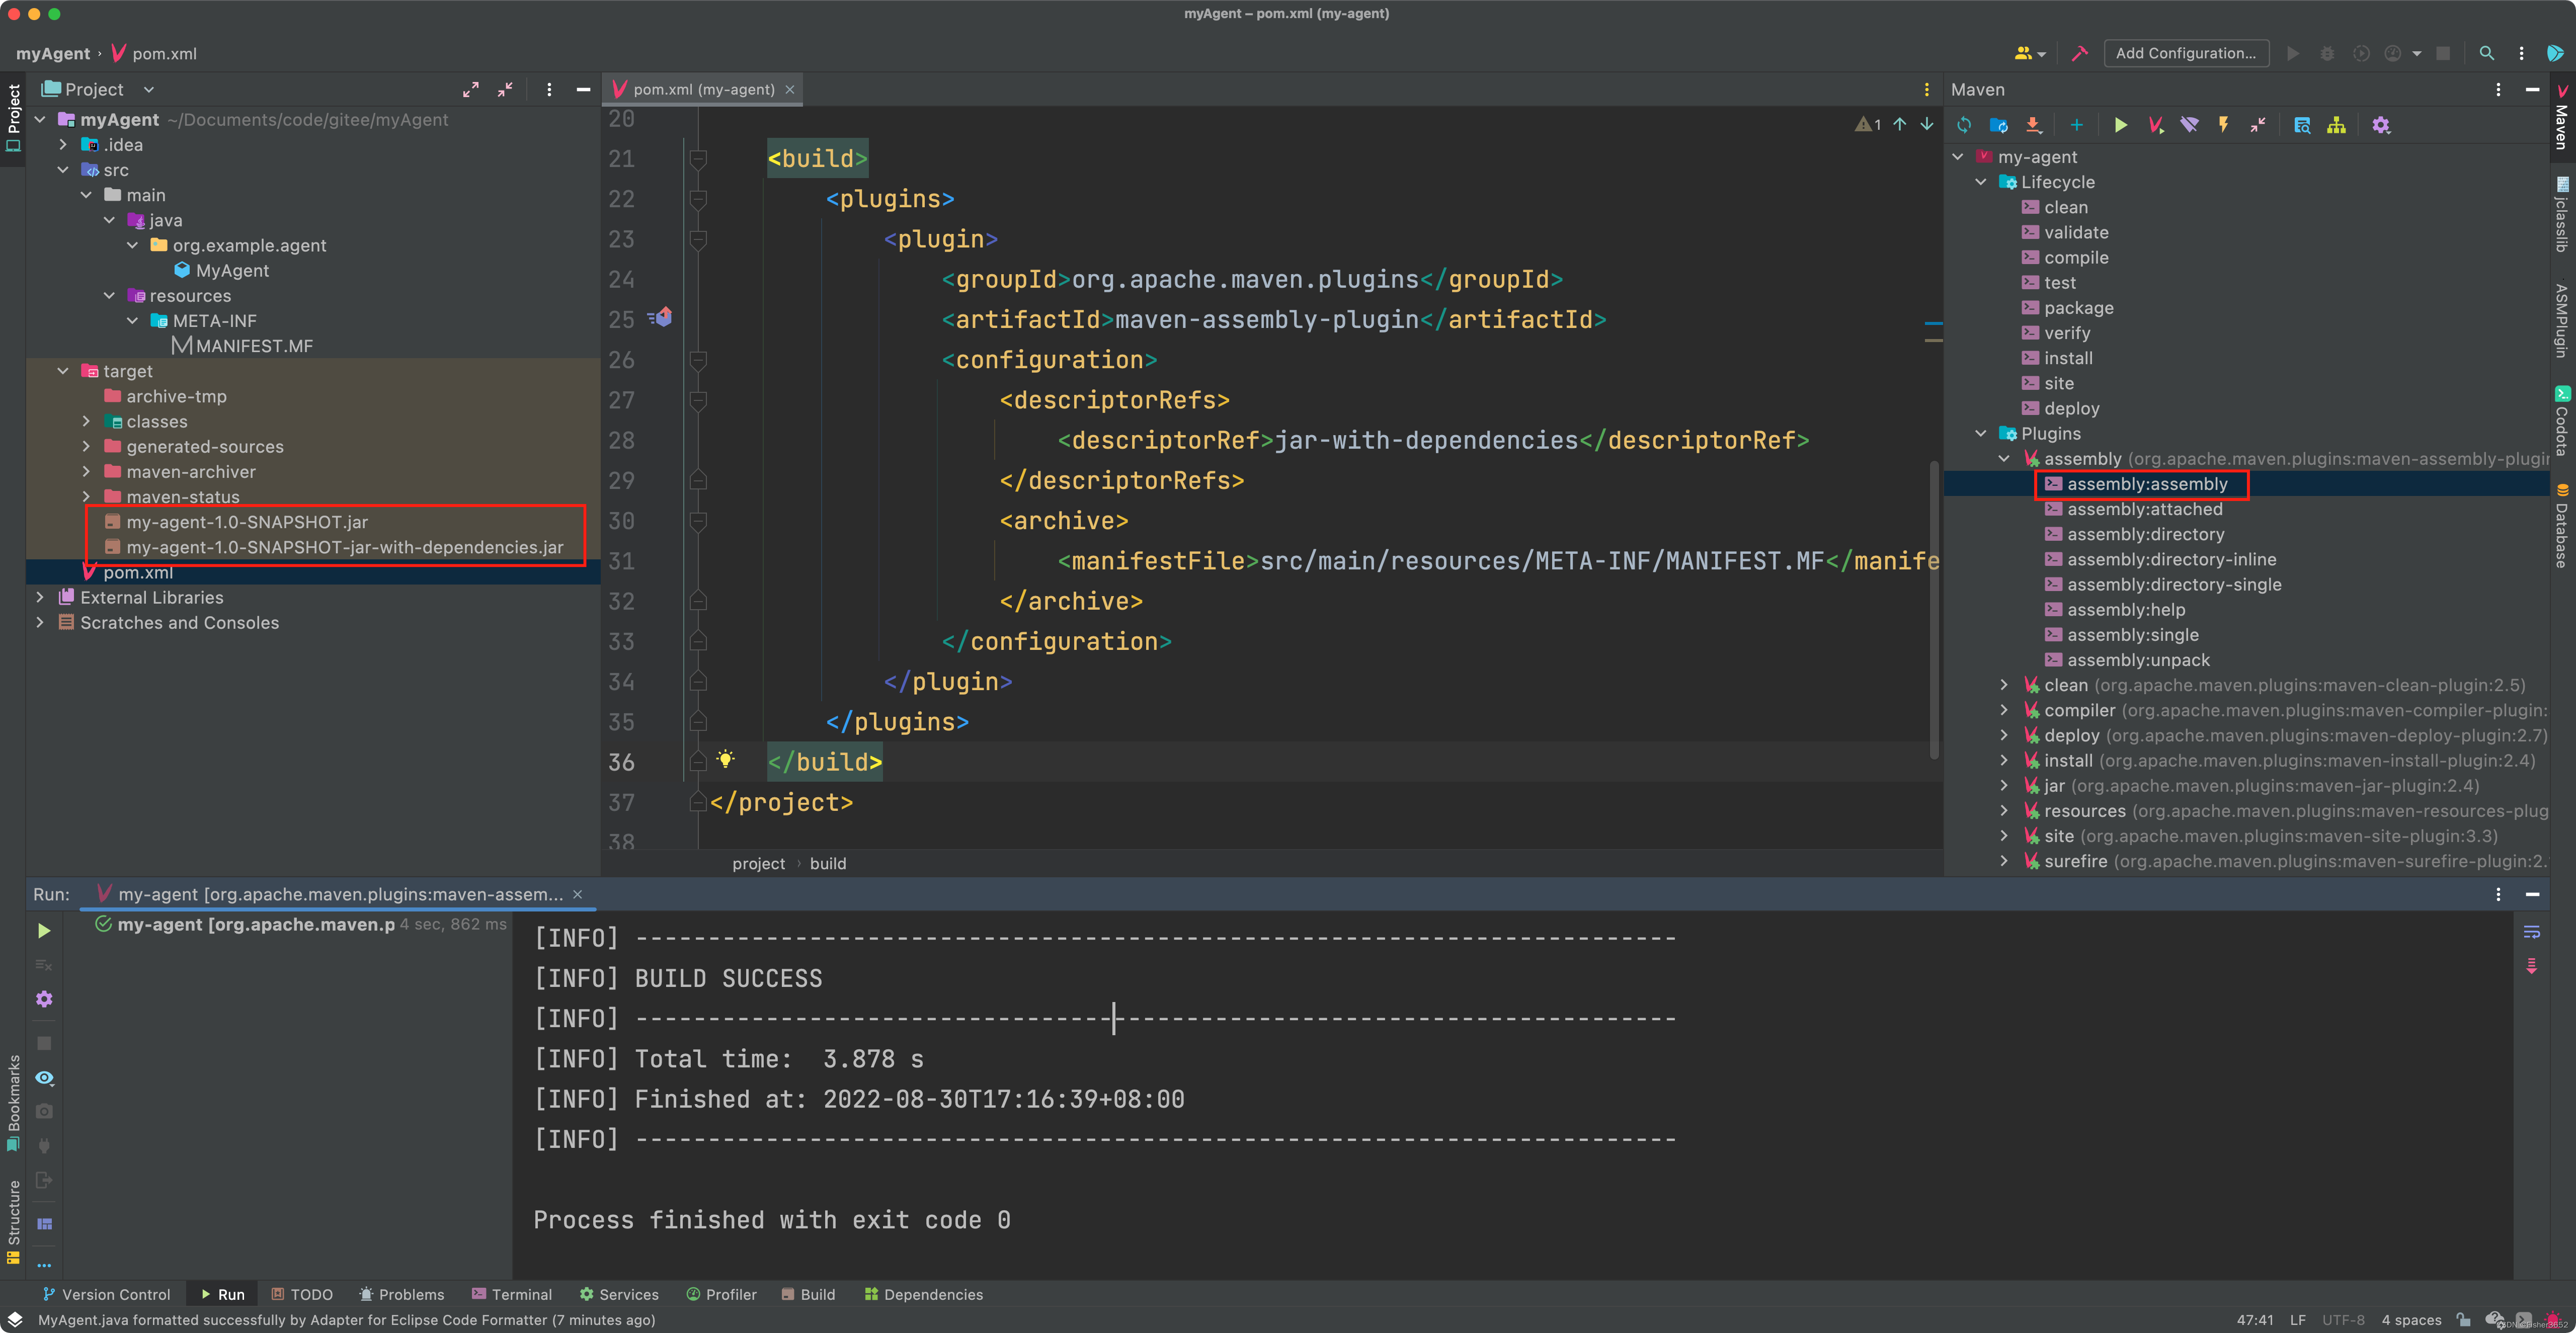
2.4 打包
- 运行IDEA的maven插件,点击assembly:assembly,会生成2个jar包,my-agent-1.0-SNAPSHOT.jar中不带这个项目所依赖的jar包,my-agent-1.0-SNAPSHOT-jar-with-dependencies.jar中包含这个项目所依赖的jar包,后面需要使用my-agent-1.0-SNAPSHOT-jar-with-dependencies.jar这个jar
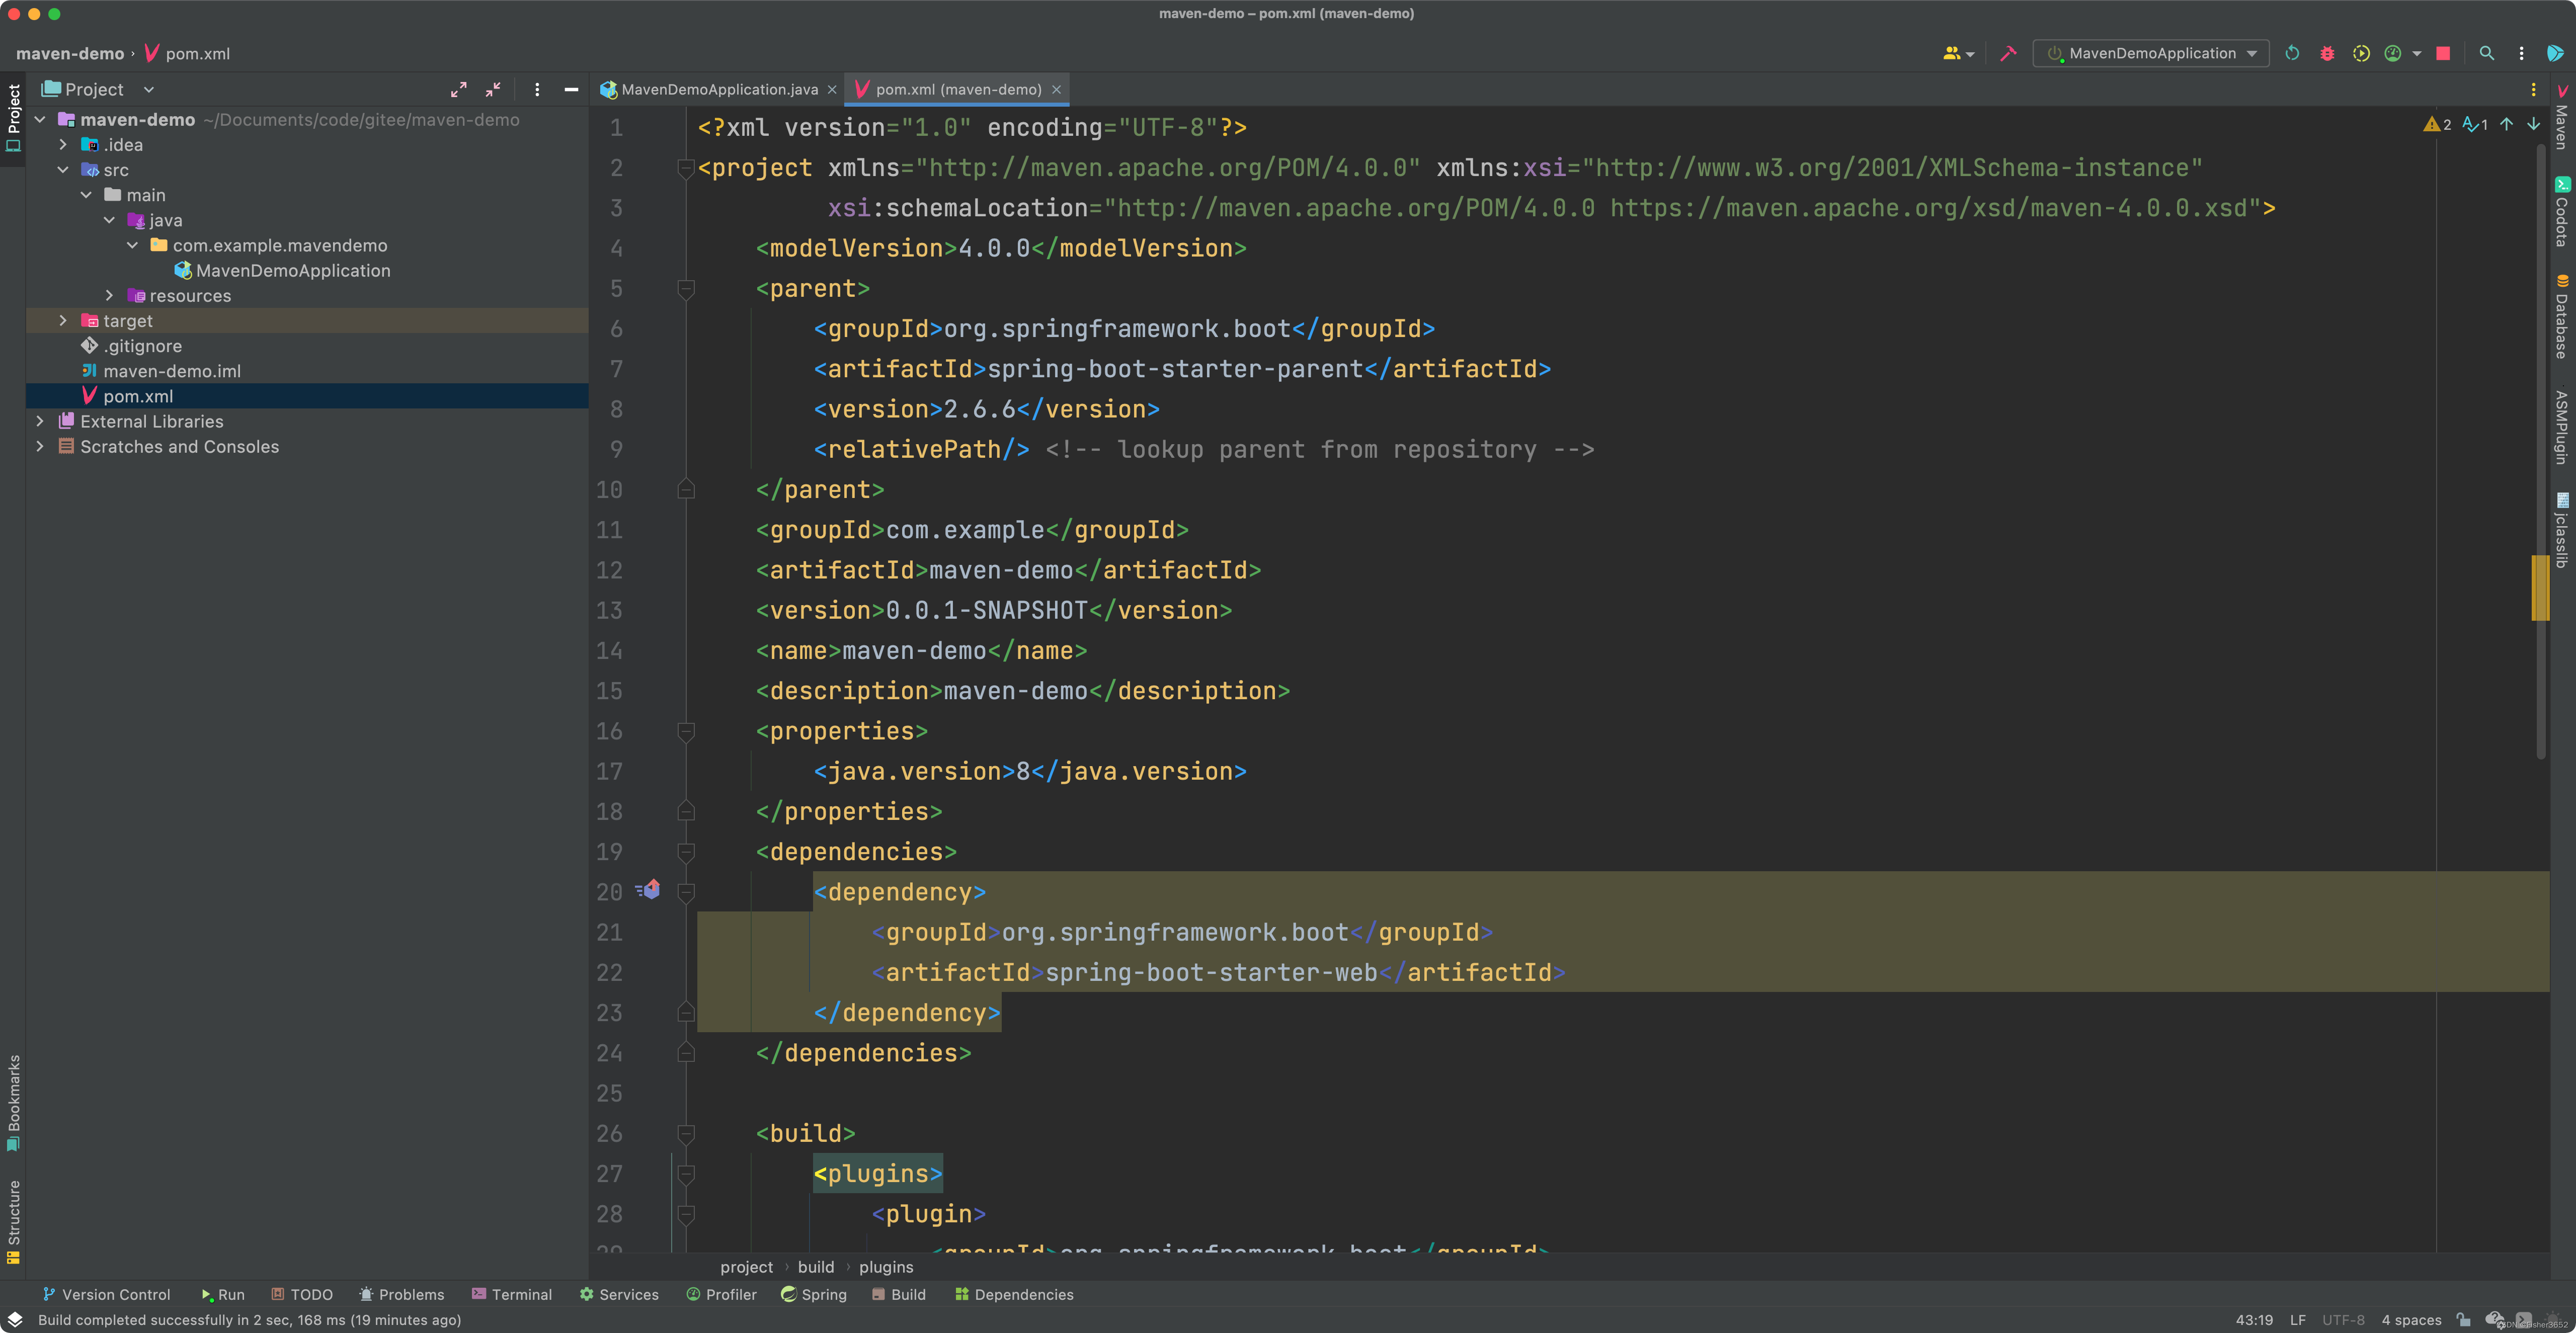
2.5 创建一个springboot工程
- 用来验证agent包中的premain方法
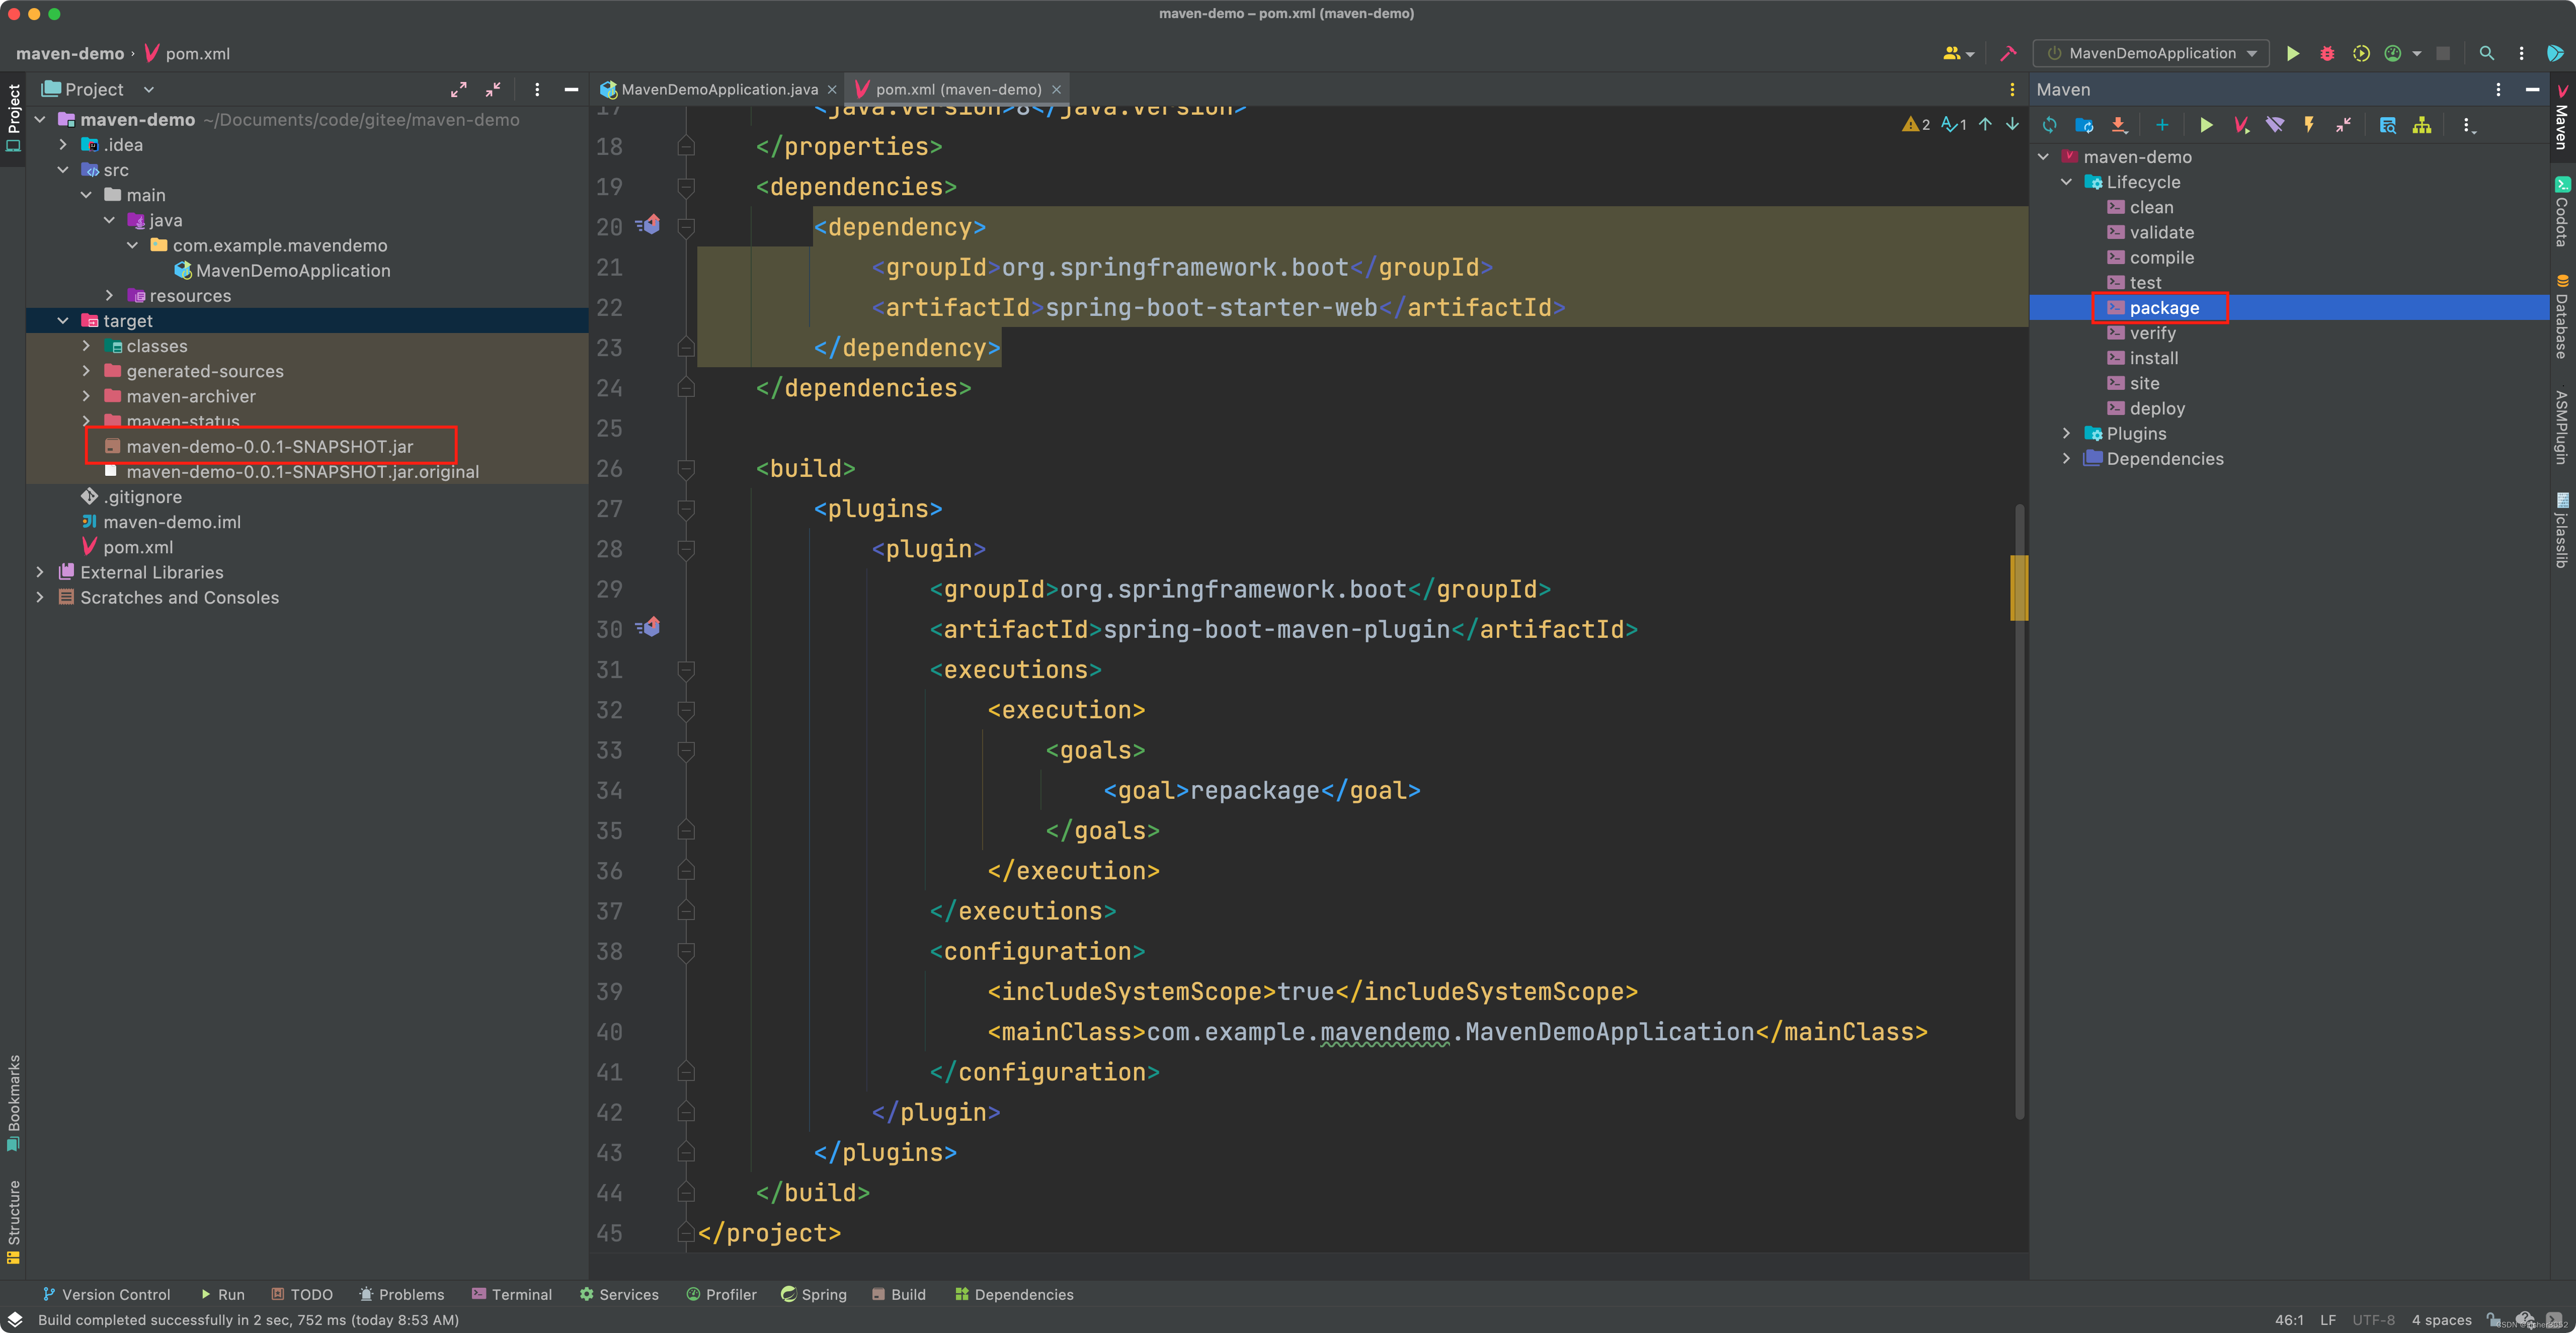
- pom.xml,添加了maven的打包插件,用于后面使用java -jar启动项目时,做动态修改验证
<?xml version="1.0" encoding="UTF-8"?>
<project xmlns="http://maven.apache.org/POM/4.0.0" xmlns:xsi="http://www.w3.org/2001/XMLSchema-instance"
         xsi:schemaLocation="http://maven.apache.org/POM/4.0.0 https://maven.apache.org/xsd/maven-4.0.0.xsd">
    <modelVersion>4.0.0</modelVersion>
    <parent>
        <groupId>org.springframework.boot</groupId>
        <artifactId>spring-boot-starter-parent</artifactId>
        <version>2.6.6</version>
        <relativePath/> <!-- lookup parent from repository -->
    </parent>
    <groupId>com.example</groupId>
    <artifactId>maven-demo</artifactId>
    <version>0.0.1-SNAPSHOT</version>
    <name>maven-demo</name>
    <description>maven-demo</description>
    <properties>
        <java.version>8</java.version>
    </properties>
    <dependencies>
        <dependency>
            <groupId>org.springframework.boot</groupId>
            <artifactId>spring-boot-starter-web</artifactId>
        </dependency>
    </dependencies>

    <build>
        <plugins>
            <plugin>
                <groupId>org.springframework.boot</groupId>
                <artifactId>spring-boot-maven-plugin</artifactId>
                <executions>
                    <execution>
                        <goals>
                            <goal>repackage</goal>
                        </goals>
                    </execution>
                </executions>
                <configuration>
                    <includeSystemScope>true</includeSystemScope>
                    <mainClass>com.example.mavendemo.MavenDemoApplication</mainClass>
                </configuration>
            </plugin>
        </plugins>
    </build>
</project>
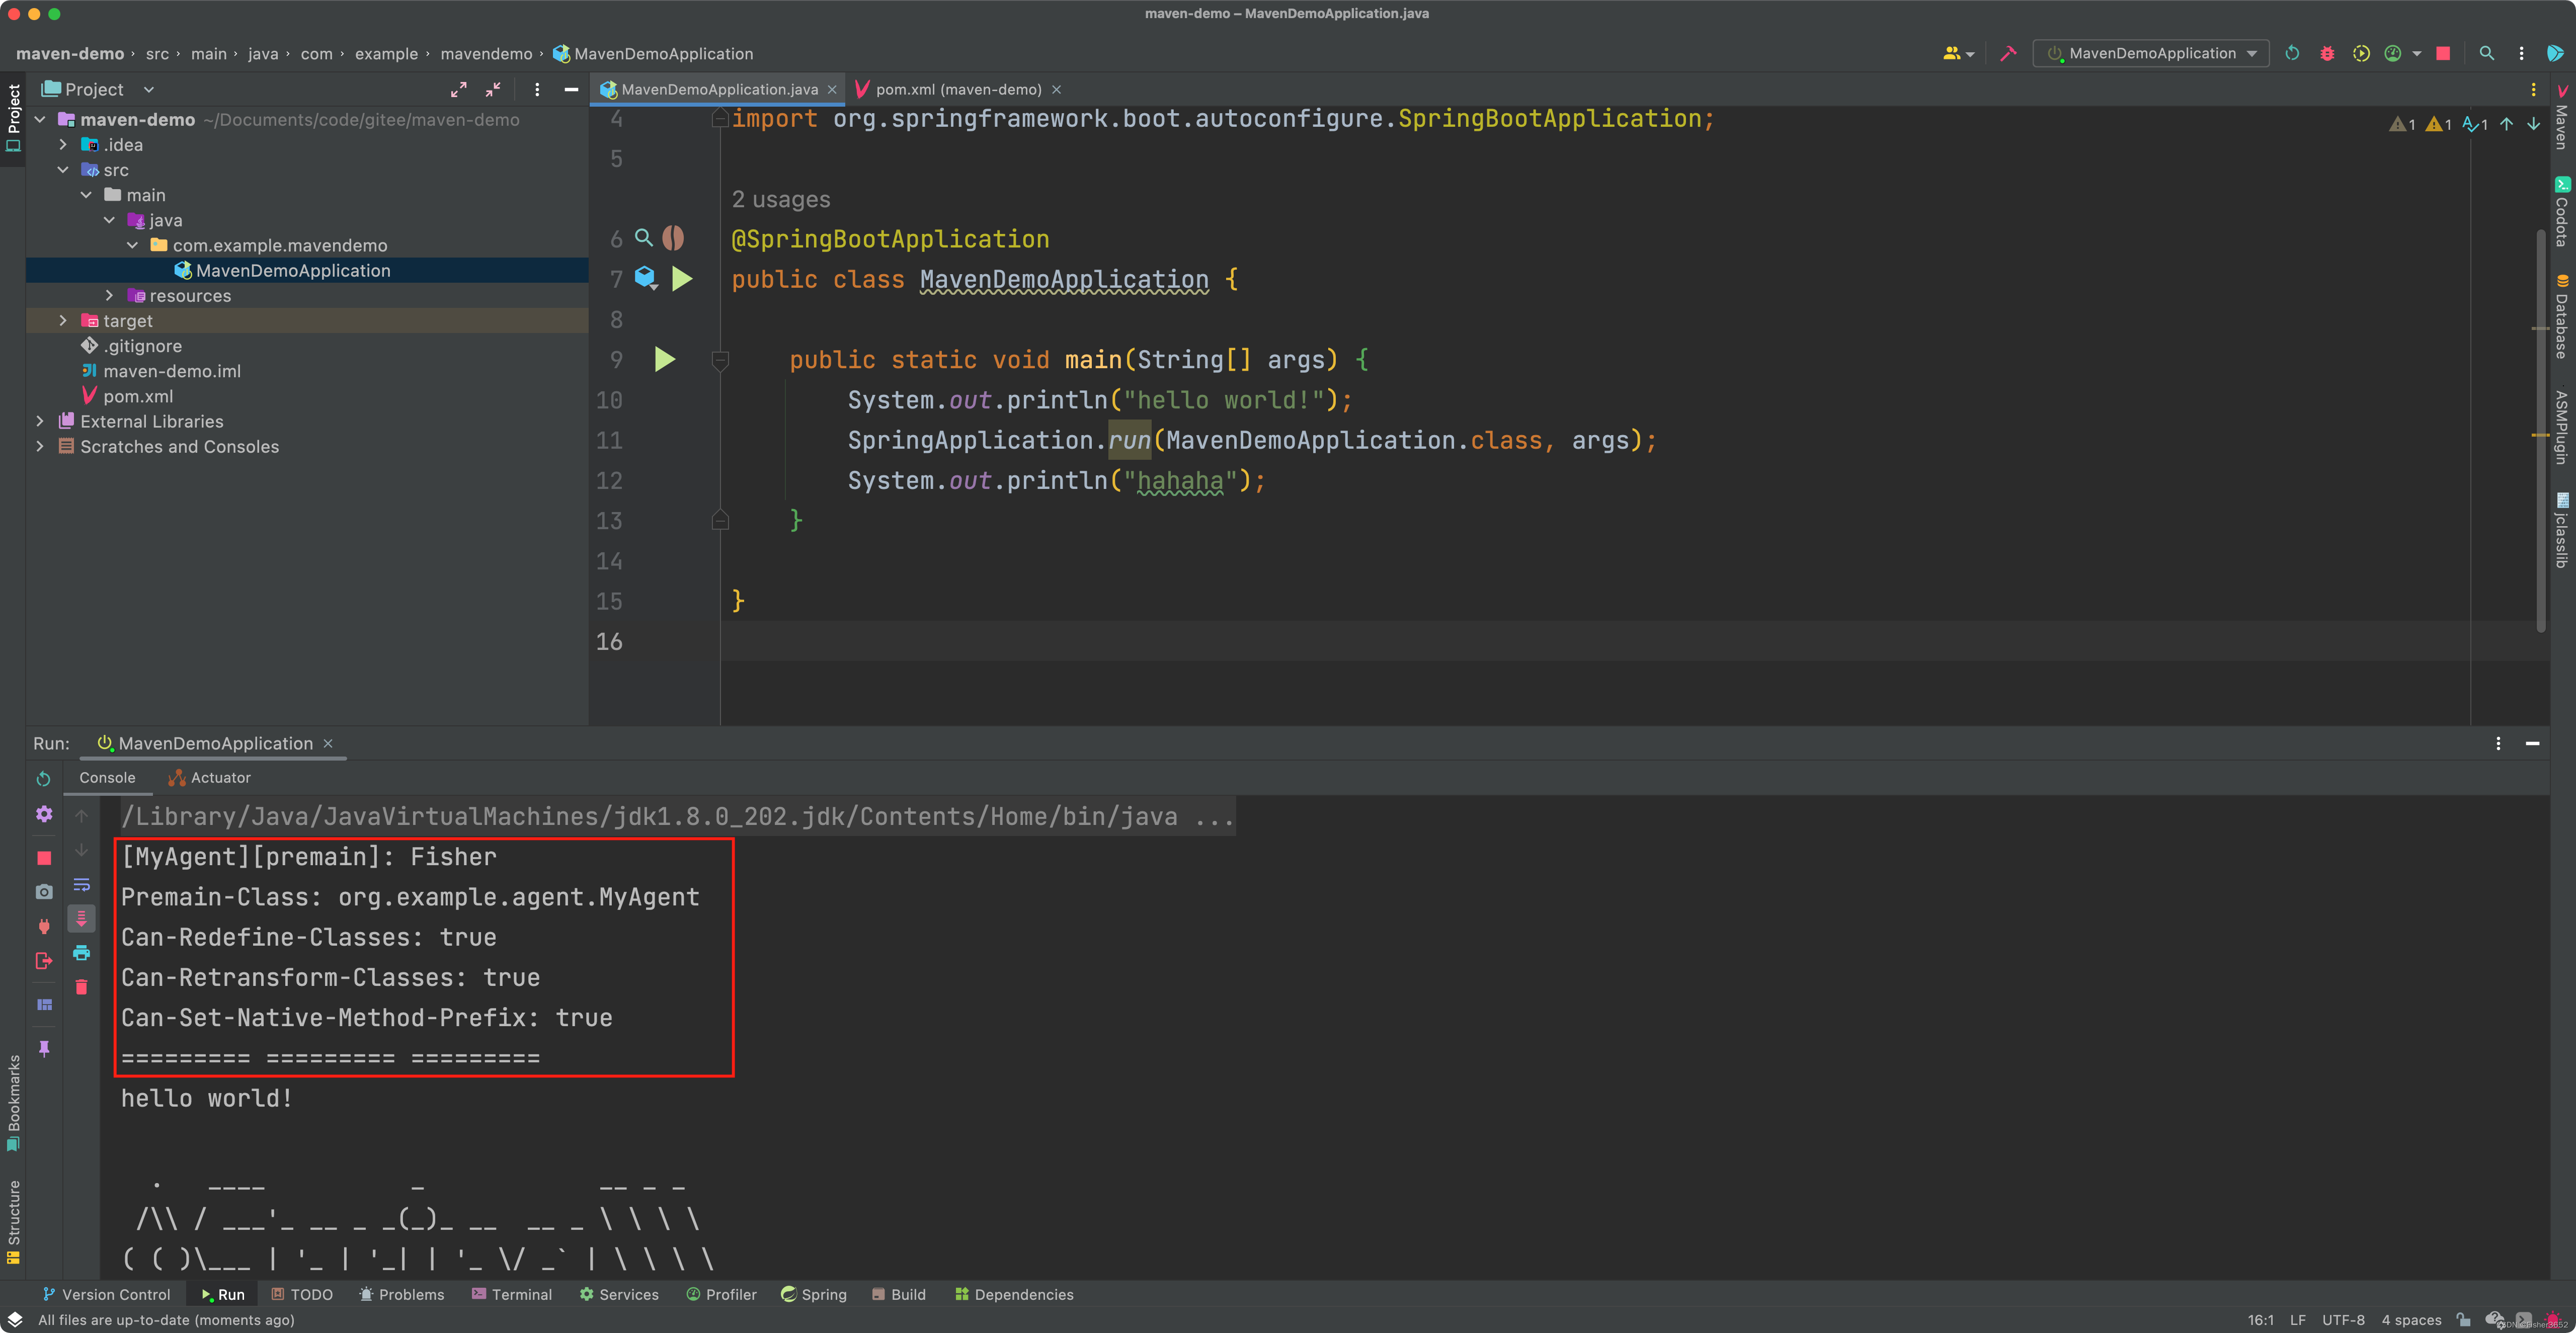
- 启动类
package com.example.mavendemo;

import org.springframework.boot.SpringApplication;
import org.springframework.boot.autoconfigure.SpringBootApplication;

@SpringBootApplication
public class MavenDemoApplication {

    public static void main(String[] args) {
        System.out.println("hello world!");
        SpringApplication.run(MavenDemoApplication.class, args);
        System.out.println("hahaha");
    }

}

2.6 验证
- 在idea的VM options中添加
-javaagent:xxx.jar参数
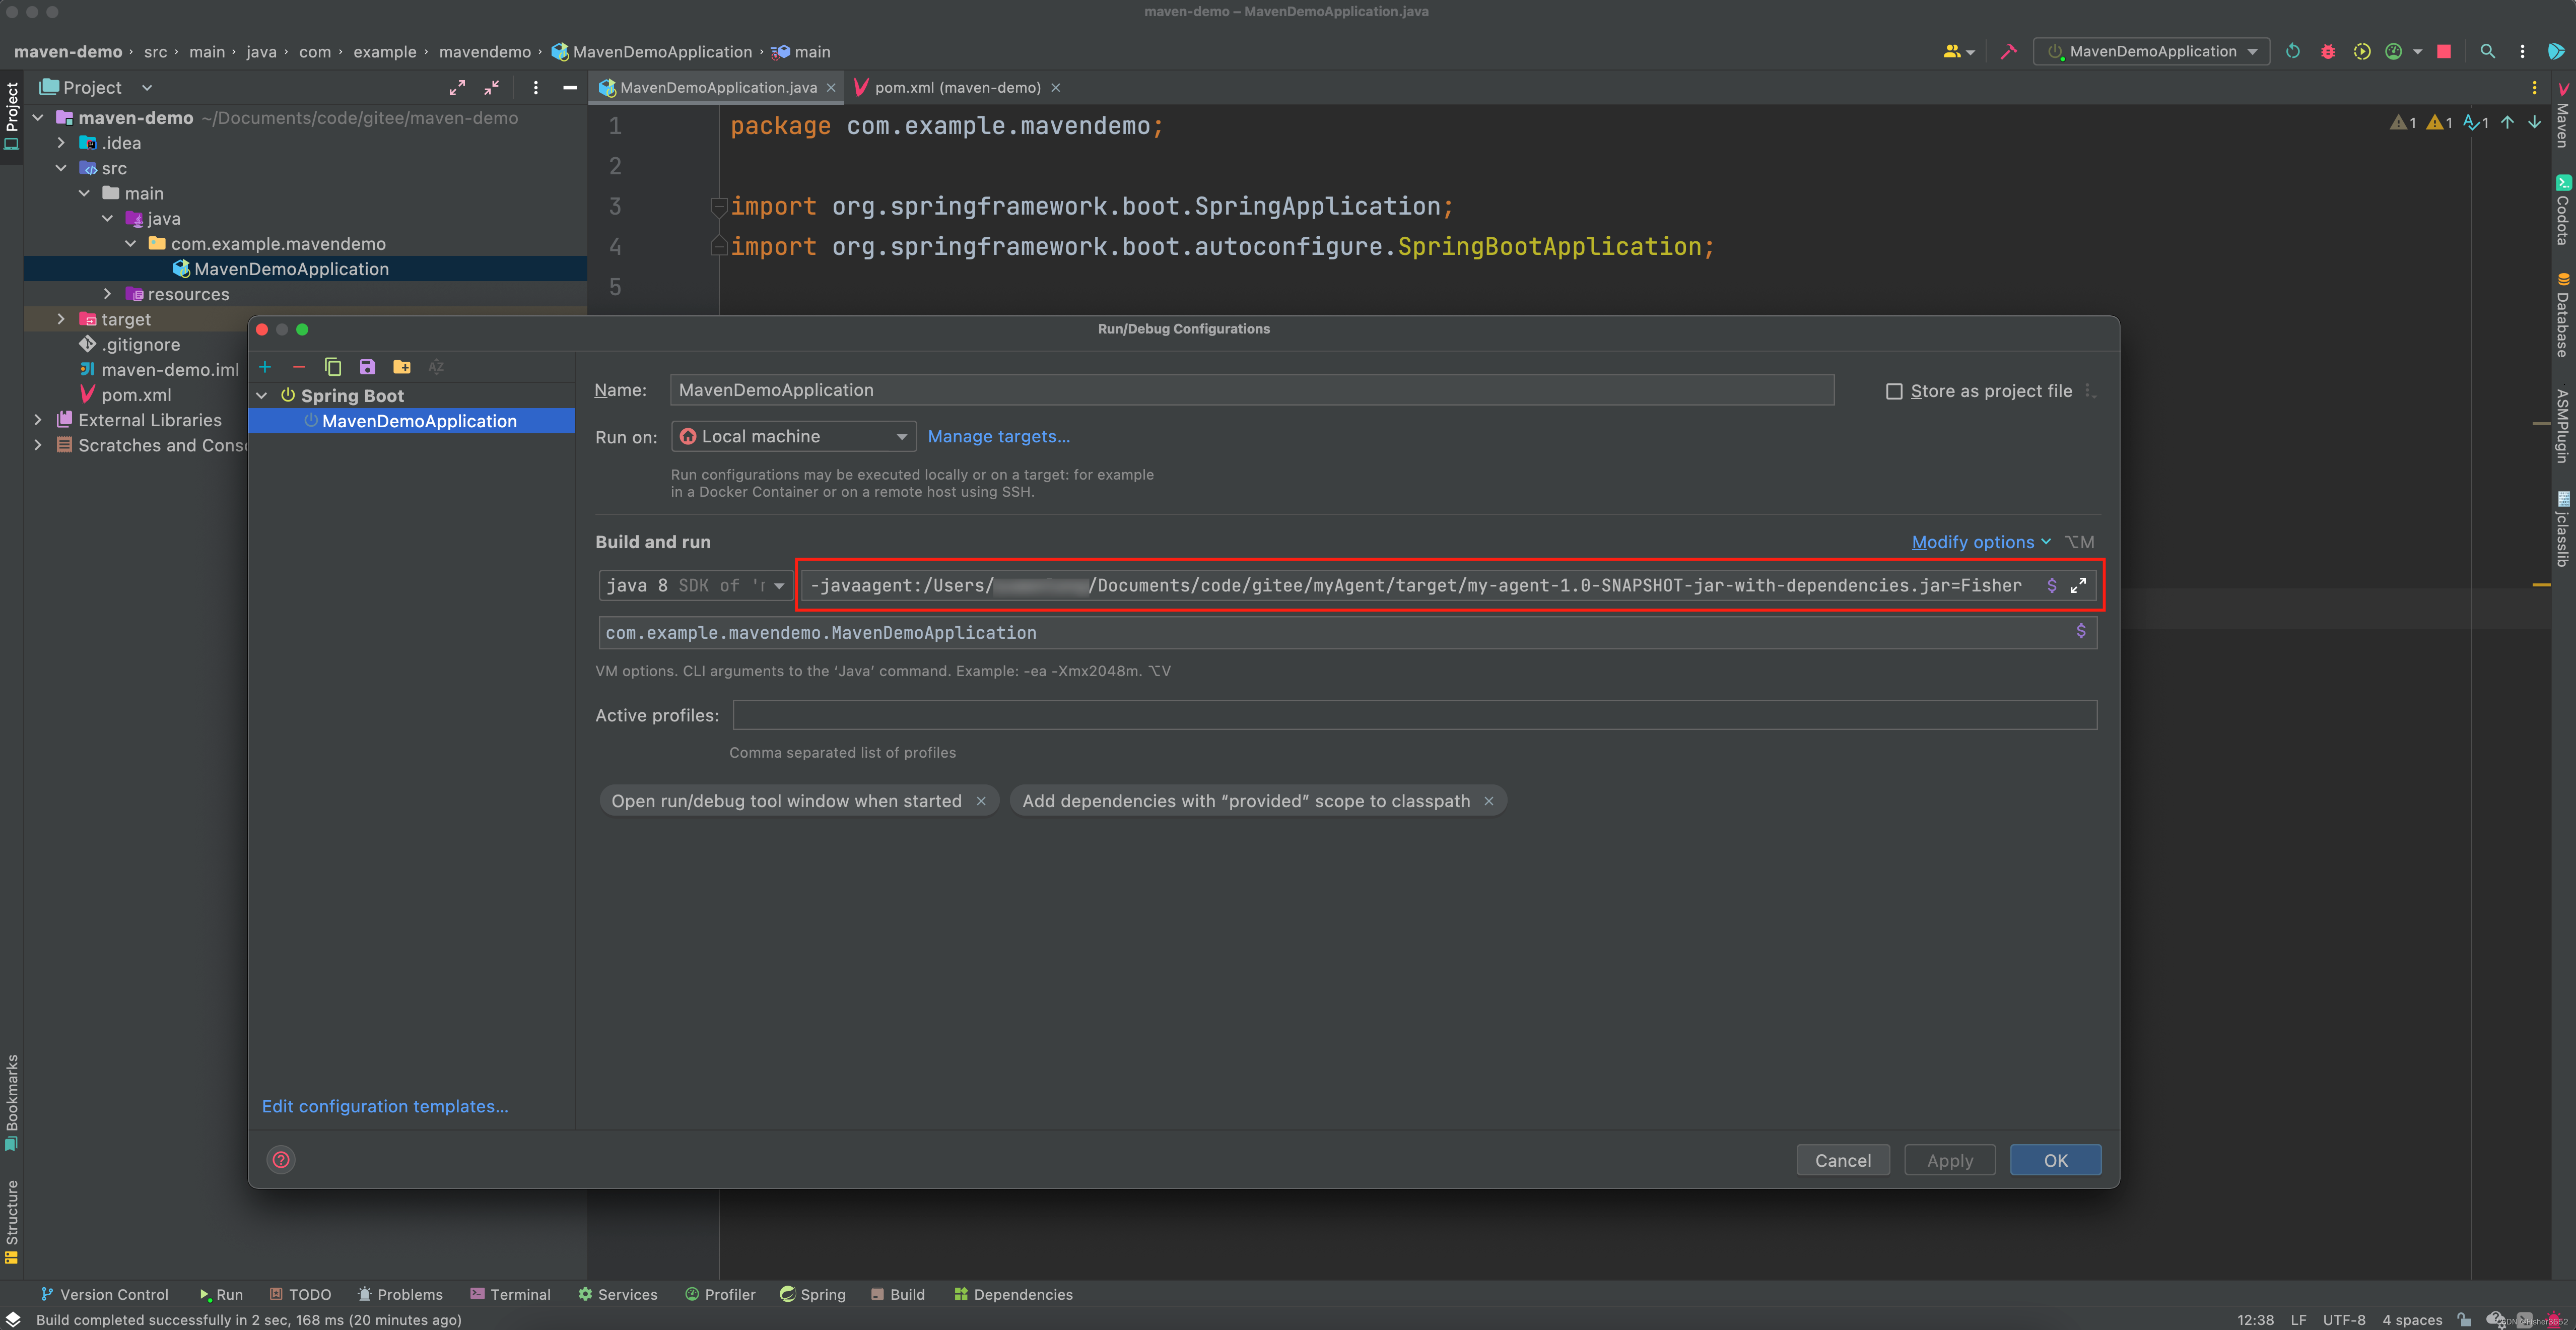
- 运行程序,查看打印
3. agentmain方式
- 和premain模式不同,不能通过添加启动参数的方式将agent包挂载到主程序,需要使用com.sun.tools.attach包下的VirtualMachine工具类,需要注意该类不是jvm标准规范,是由Sun公司自己实现的,使用前需要引入依赖
3.1 新建工程
- 创建一个maven工程
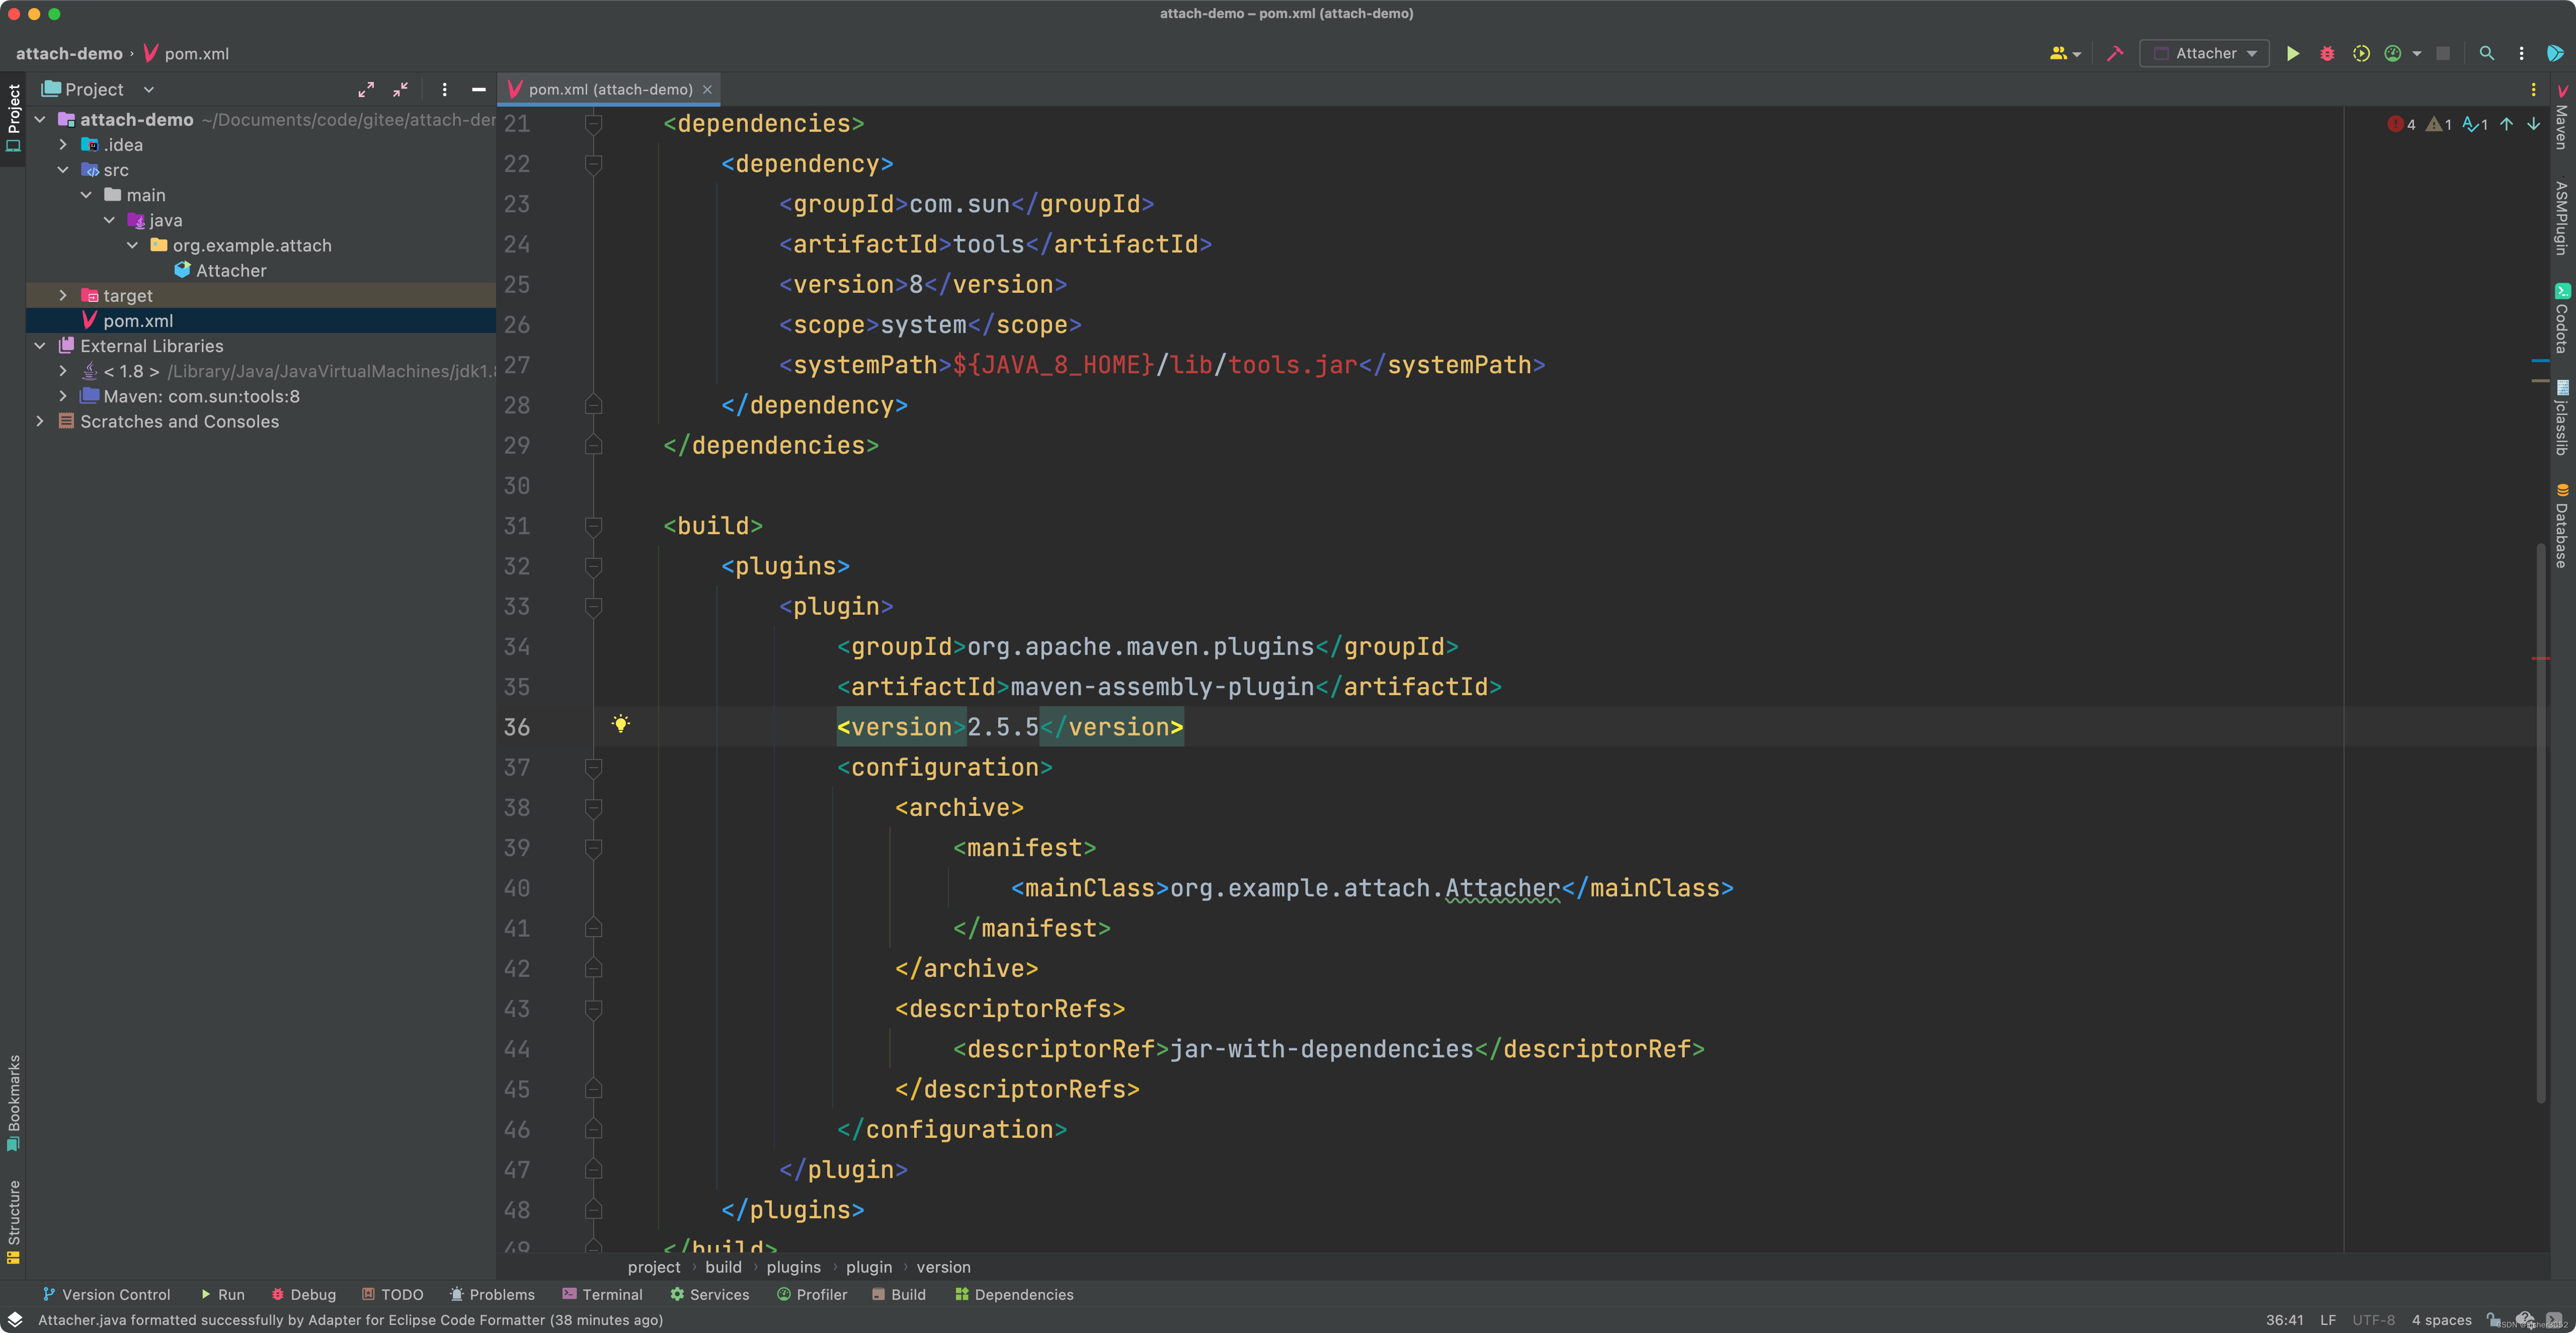
- pom.xml,使用系统环境中的com.sun.tools包,引入maven-assembly-plugin插件,指定main方法启动类
${JAVA_8_HOME}/lib/tools.jar就是jdk8下面com.sun.tools存放的位置,其他版本的jdk不一定是在这个文件夹下,${JAVA_8_HOME}是你自己设置jdk环境变量时的名字,根据自己的设置进行修改
<?xml version="1.0" encoding="UTF-8"?>

<project xmlns="http://maven.apache.org/POM/4.0.0" xmlns:xsi="http://www.w3.org/2001/XMLSchema-instance"
         xsi:schemaLocation="http://maven.apache.org/POM/4.0.0 http://maven.apache.org/xsd/maven-4.0.0.xsd">
    <modelVersion>4.0.0</modelVersion>

    <groupId>org.example</groupId>
    <artifactId>attach-demo</artifactId>
    <version>1.0-SNAPSHOT</version>

    <name>attach-demo</name>
    <!-- FIXME change it to the project's website -->
    <url>http://www.example.com</url>

    <properties>
        <project.build.sourceEncoding>UTF-8</project.build.sourceEncoding>
        <maven.compiler.source>8</maven.compiler.source>
        <maven.compiler.target>8</maven.compiler.target>
    </properties>

    <dependencies>
        <dependency>
            <groupId>com.sun</groupId>
            <artifactId>tools</artifactId>
            <version>8</version>
            <scope>system</scope>
            <systemPath>${JAVA_8_HOME}/lib/tools.jar</systemPath>
        </dependency>
    </dependencies>

    <build>
        <plugins>
            <plugin>
                <groupId>org.apache.maven.plugins</groupId>
                <artifactId>maven-assembly-plugin</artifactId>
                <version>2.5.5</version>
                <configuration>
                    <archive>
                        <manifest>
                            <mainClass>org.example.attach.Attacher</mainClass>
                        </manifest>
                    </archive>
                    <descriptorRefs>
                        <descriptorRef>jar-with-dependencies</descriptorRef>
                    </descriptorRefs>
                </configuration>
            </plugin>
        </plugins>
    </build>
</project>

3.2 验证
3.2.1 指定进程号方式
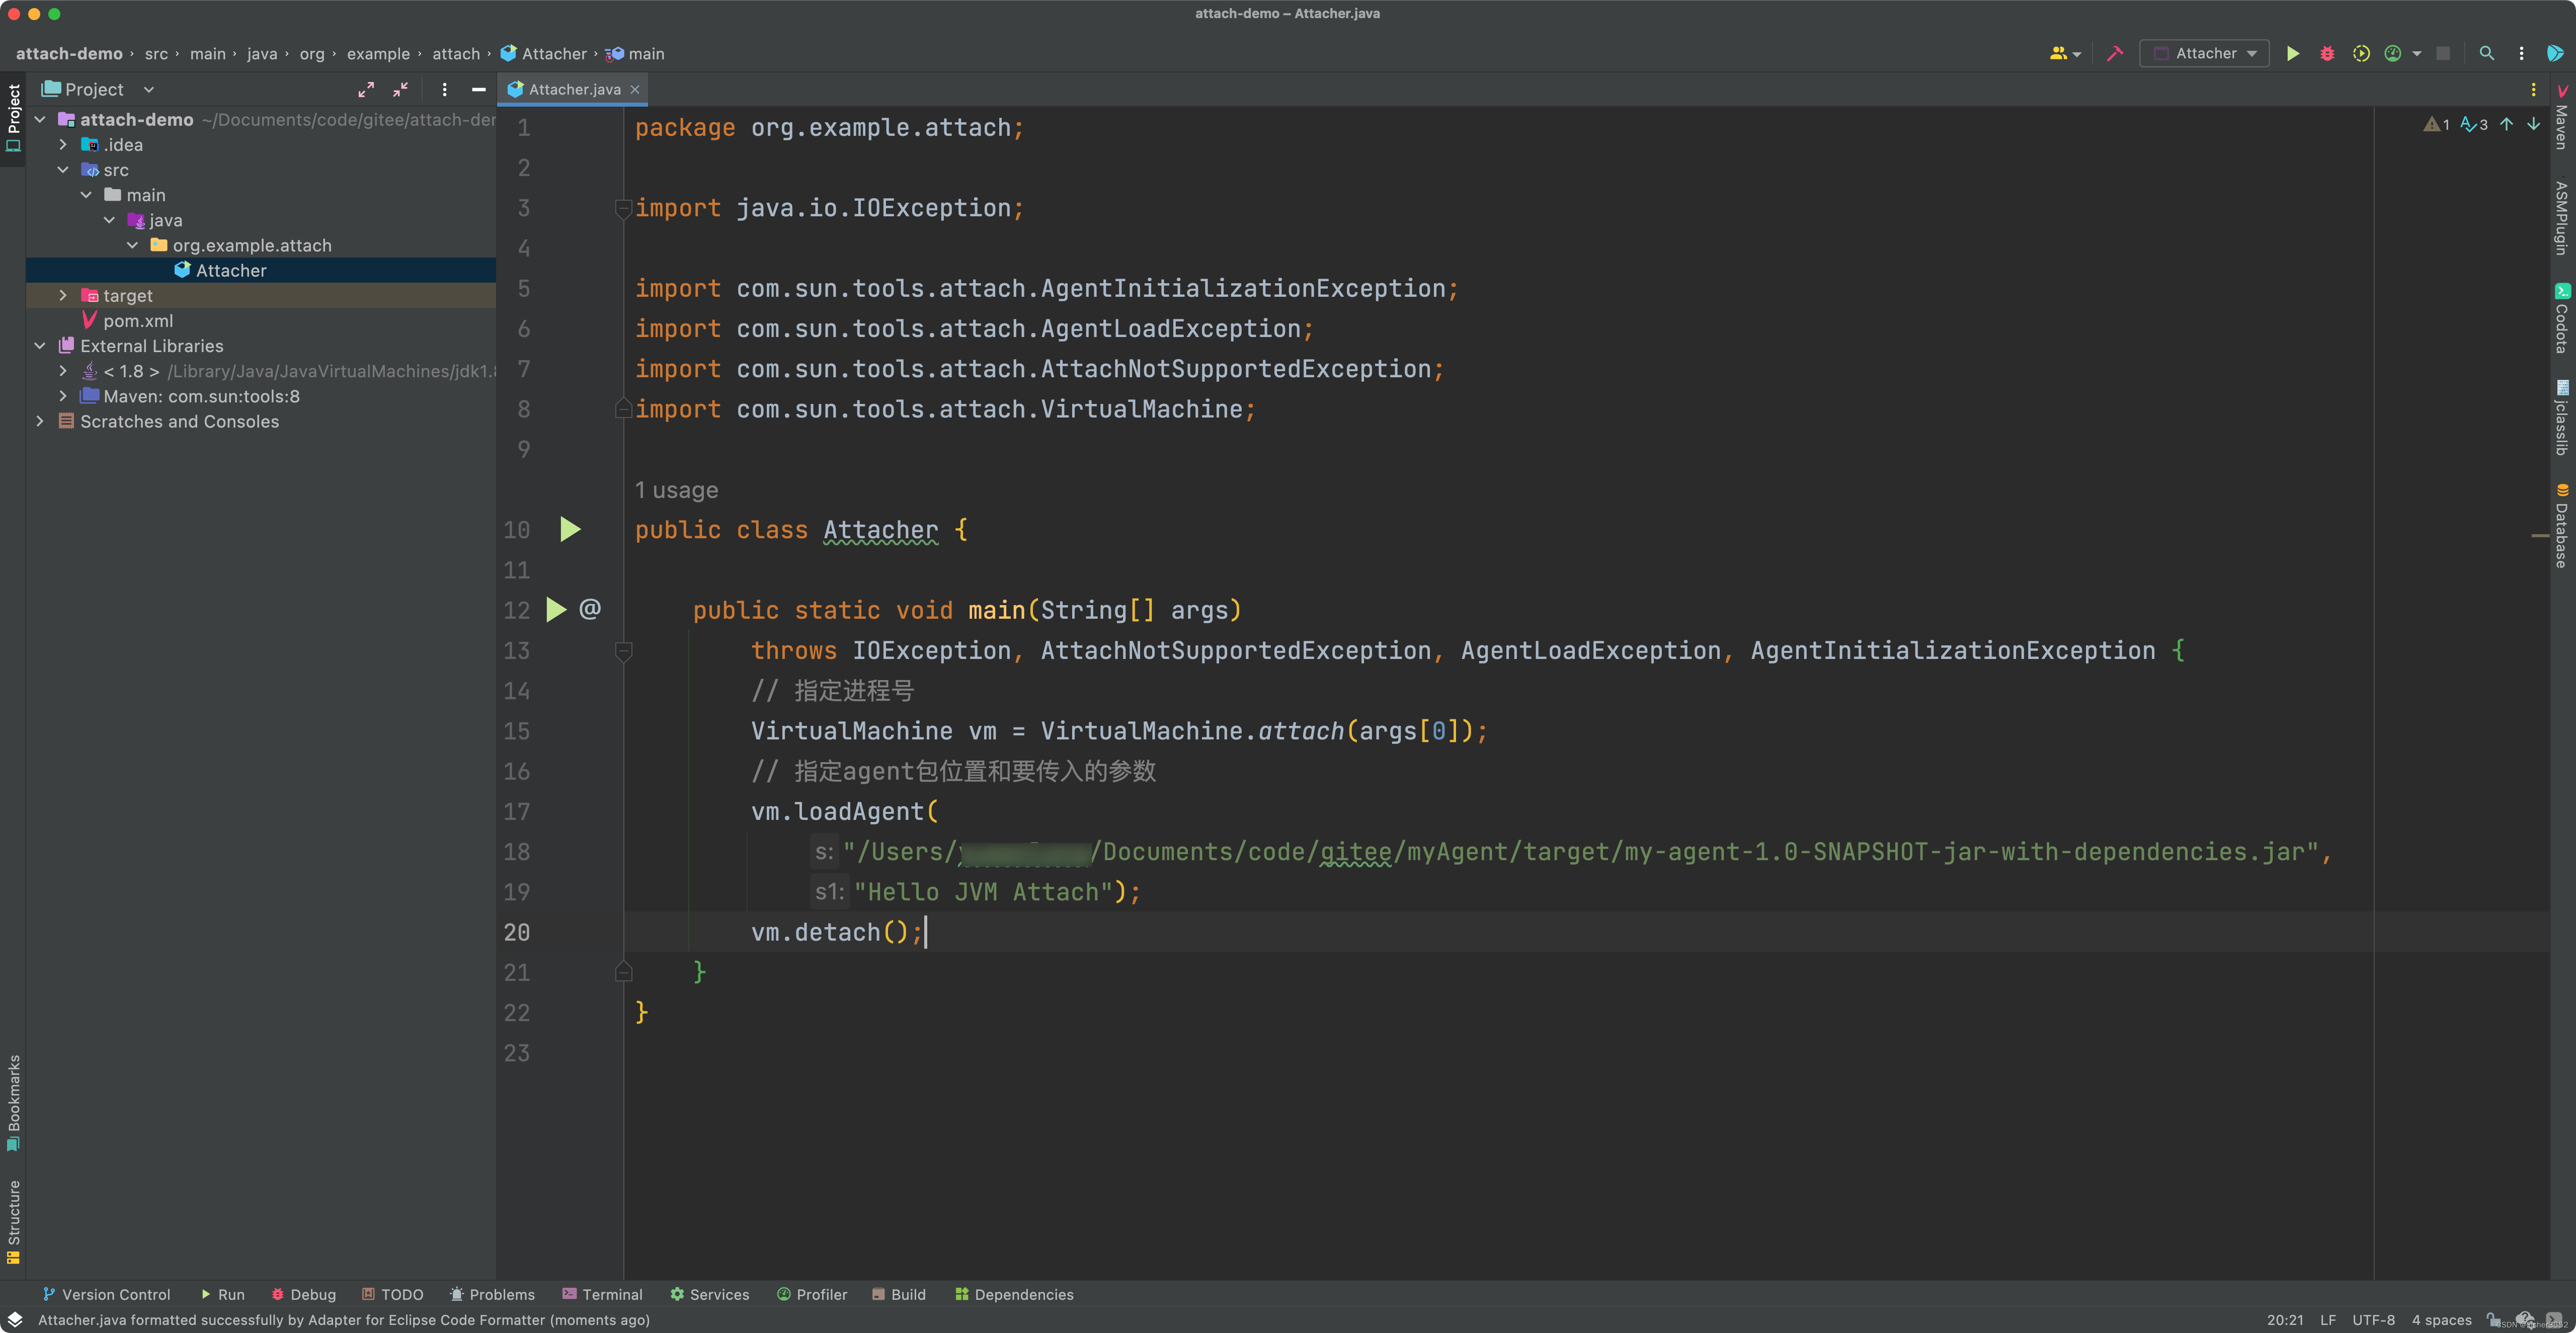
- 启动类
package org.example.attach;

import java.io.IOException;

import com.sun.tools.attach.AgentInitializationException;
import com.sun.tools.attach.AgentLoadException;
import com.sun.tools.attach.AttachNotSupportedException;
import com.sun.tools.attach.VirtualMachine;

public class Attacher {

    public static void main(String[] args)
        throws IOException, AttachNotSupportedException, AgentLoadException, AgentInitializationException {
        // 指定进程号
        VirtualMachine vm = VirtualMachine.attach(args[0]);
        // 指定agent包位置和要传入的参数
        vm.loadAgent(
            "/Users/fisher/Documents/code/gitee/myAgent/target/my-agent-1.0-SNAPSHOT-jar-with-dependencies.jar",
            "Hello JVM Attach");
        vm.detach();
    }
}
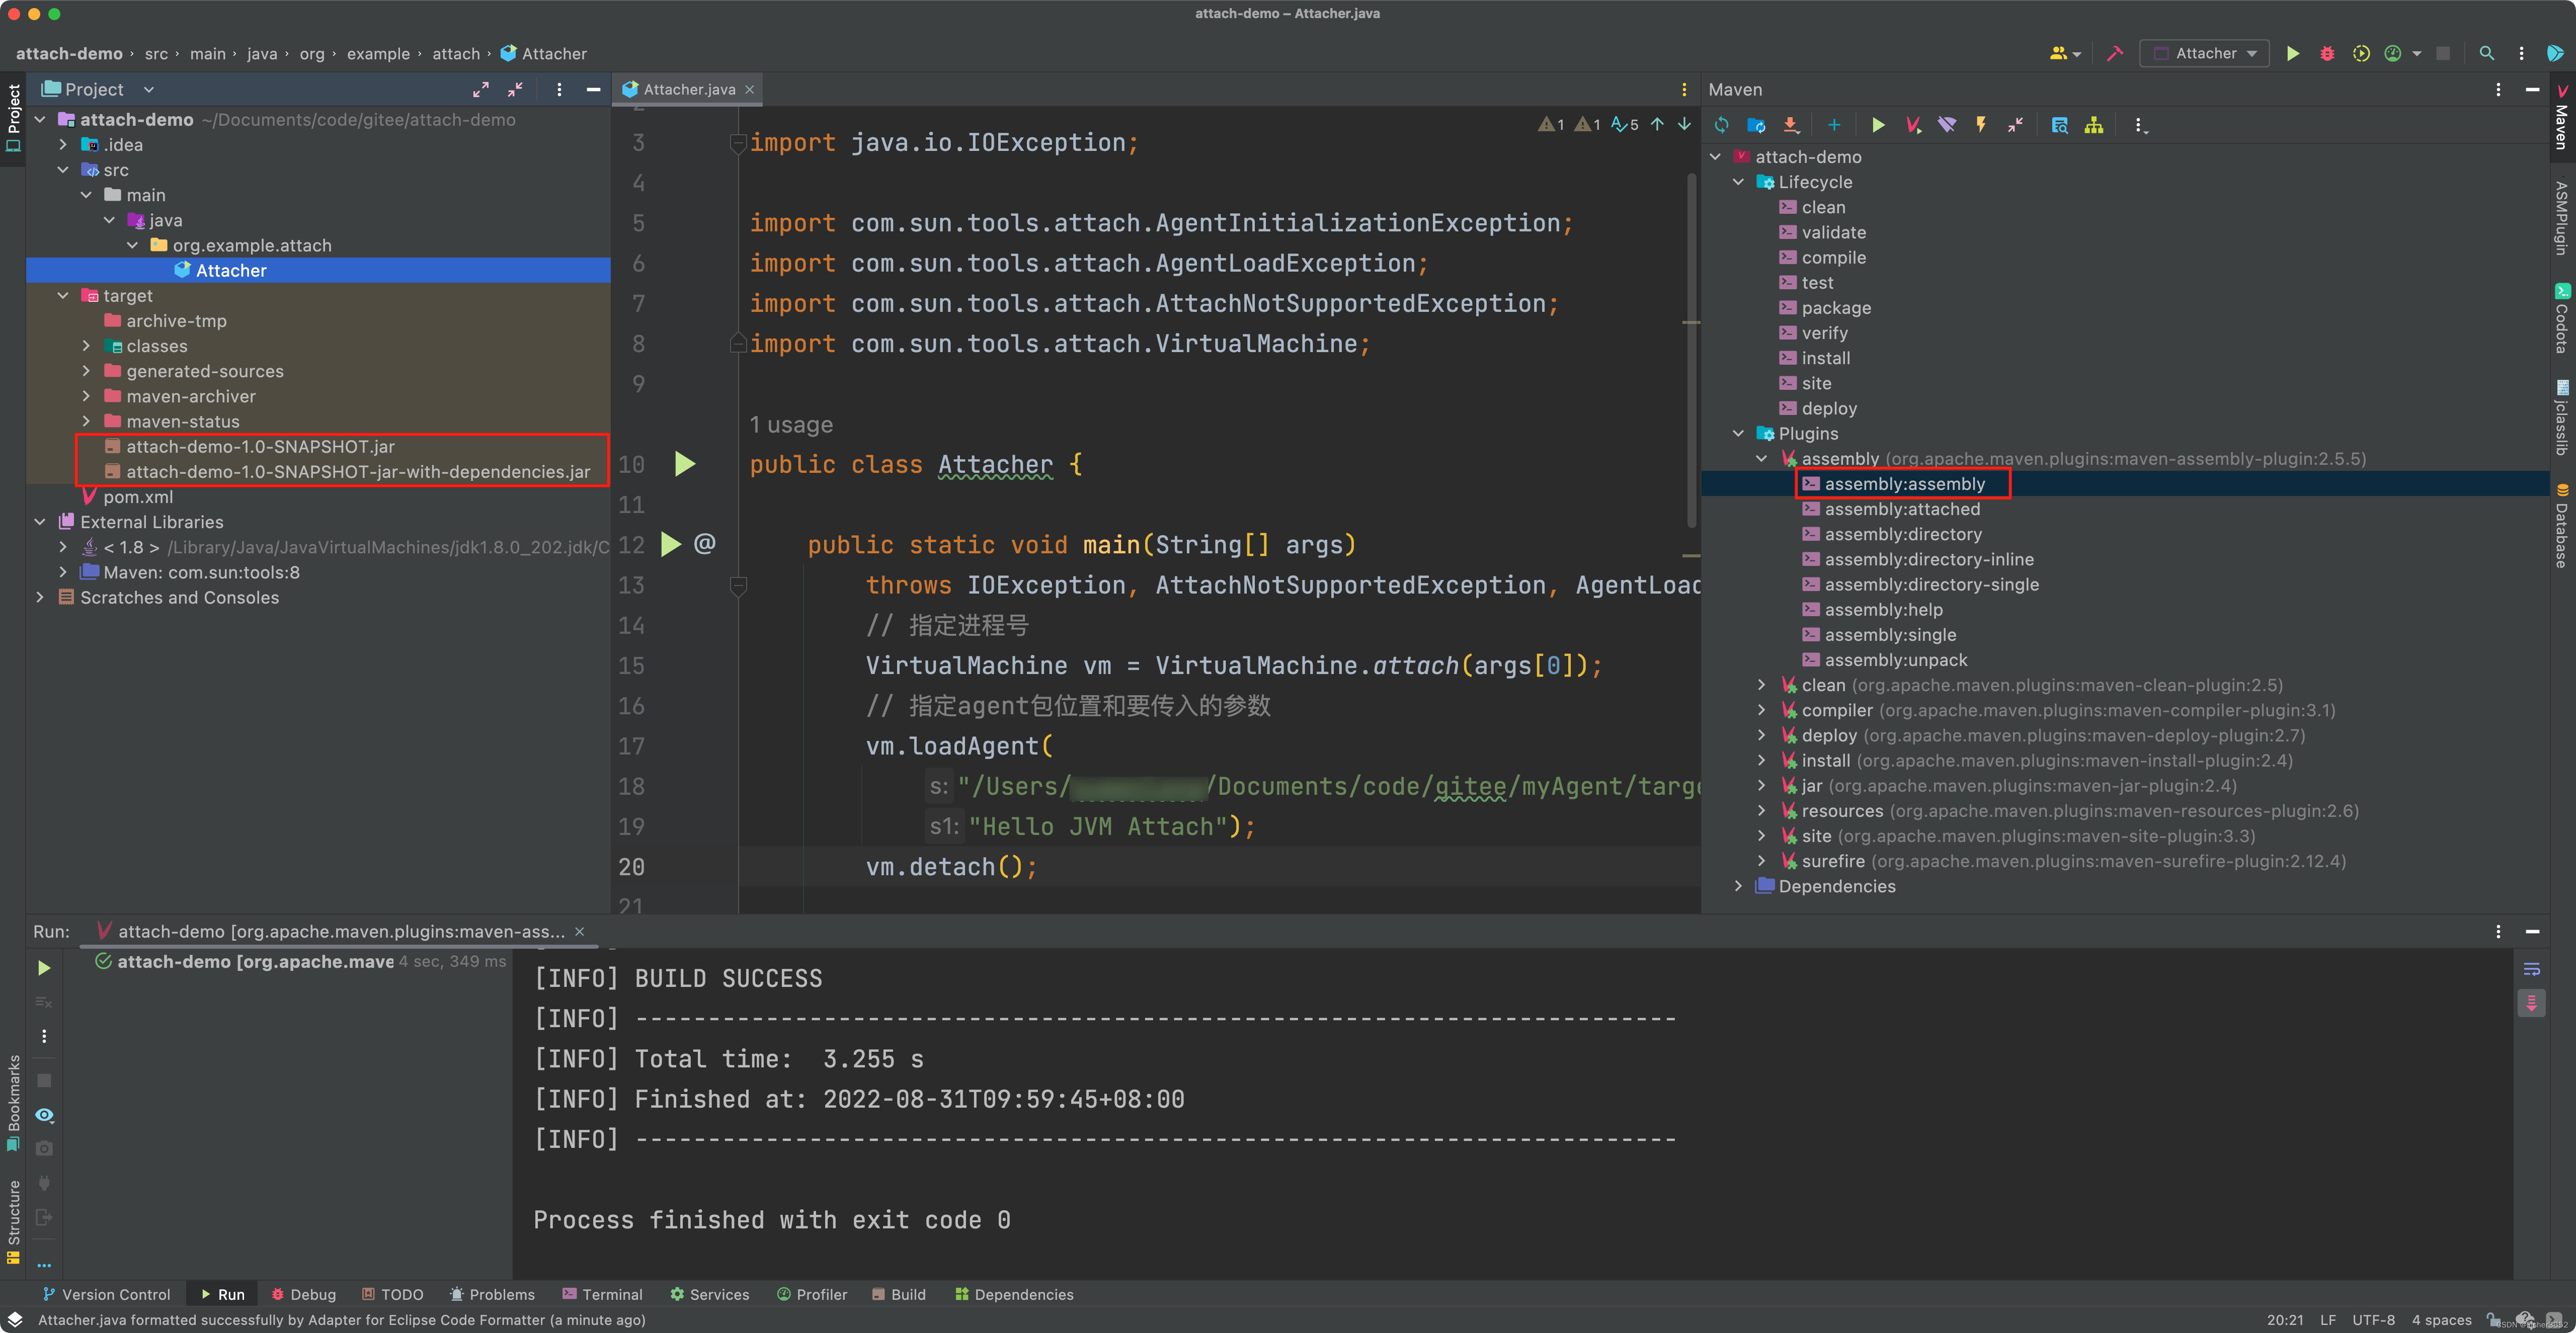
- 使用maven插件,assembly:assembly,同样生成2个jar包,后面使用attach-demo-1.0-SNAPSHOT-jar-with-dependencies.jar
- 打包待修改的项目,使用spring-boot-maven-plugin,点击package
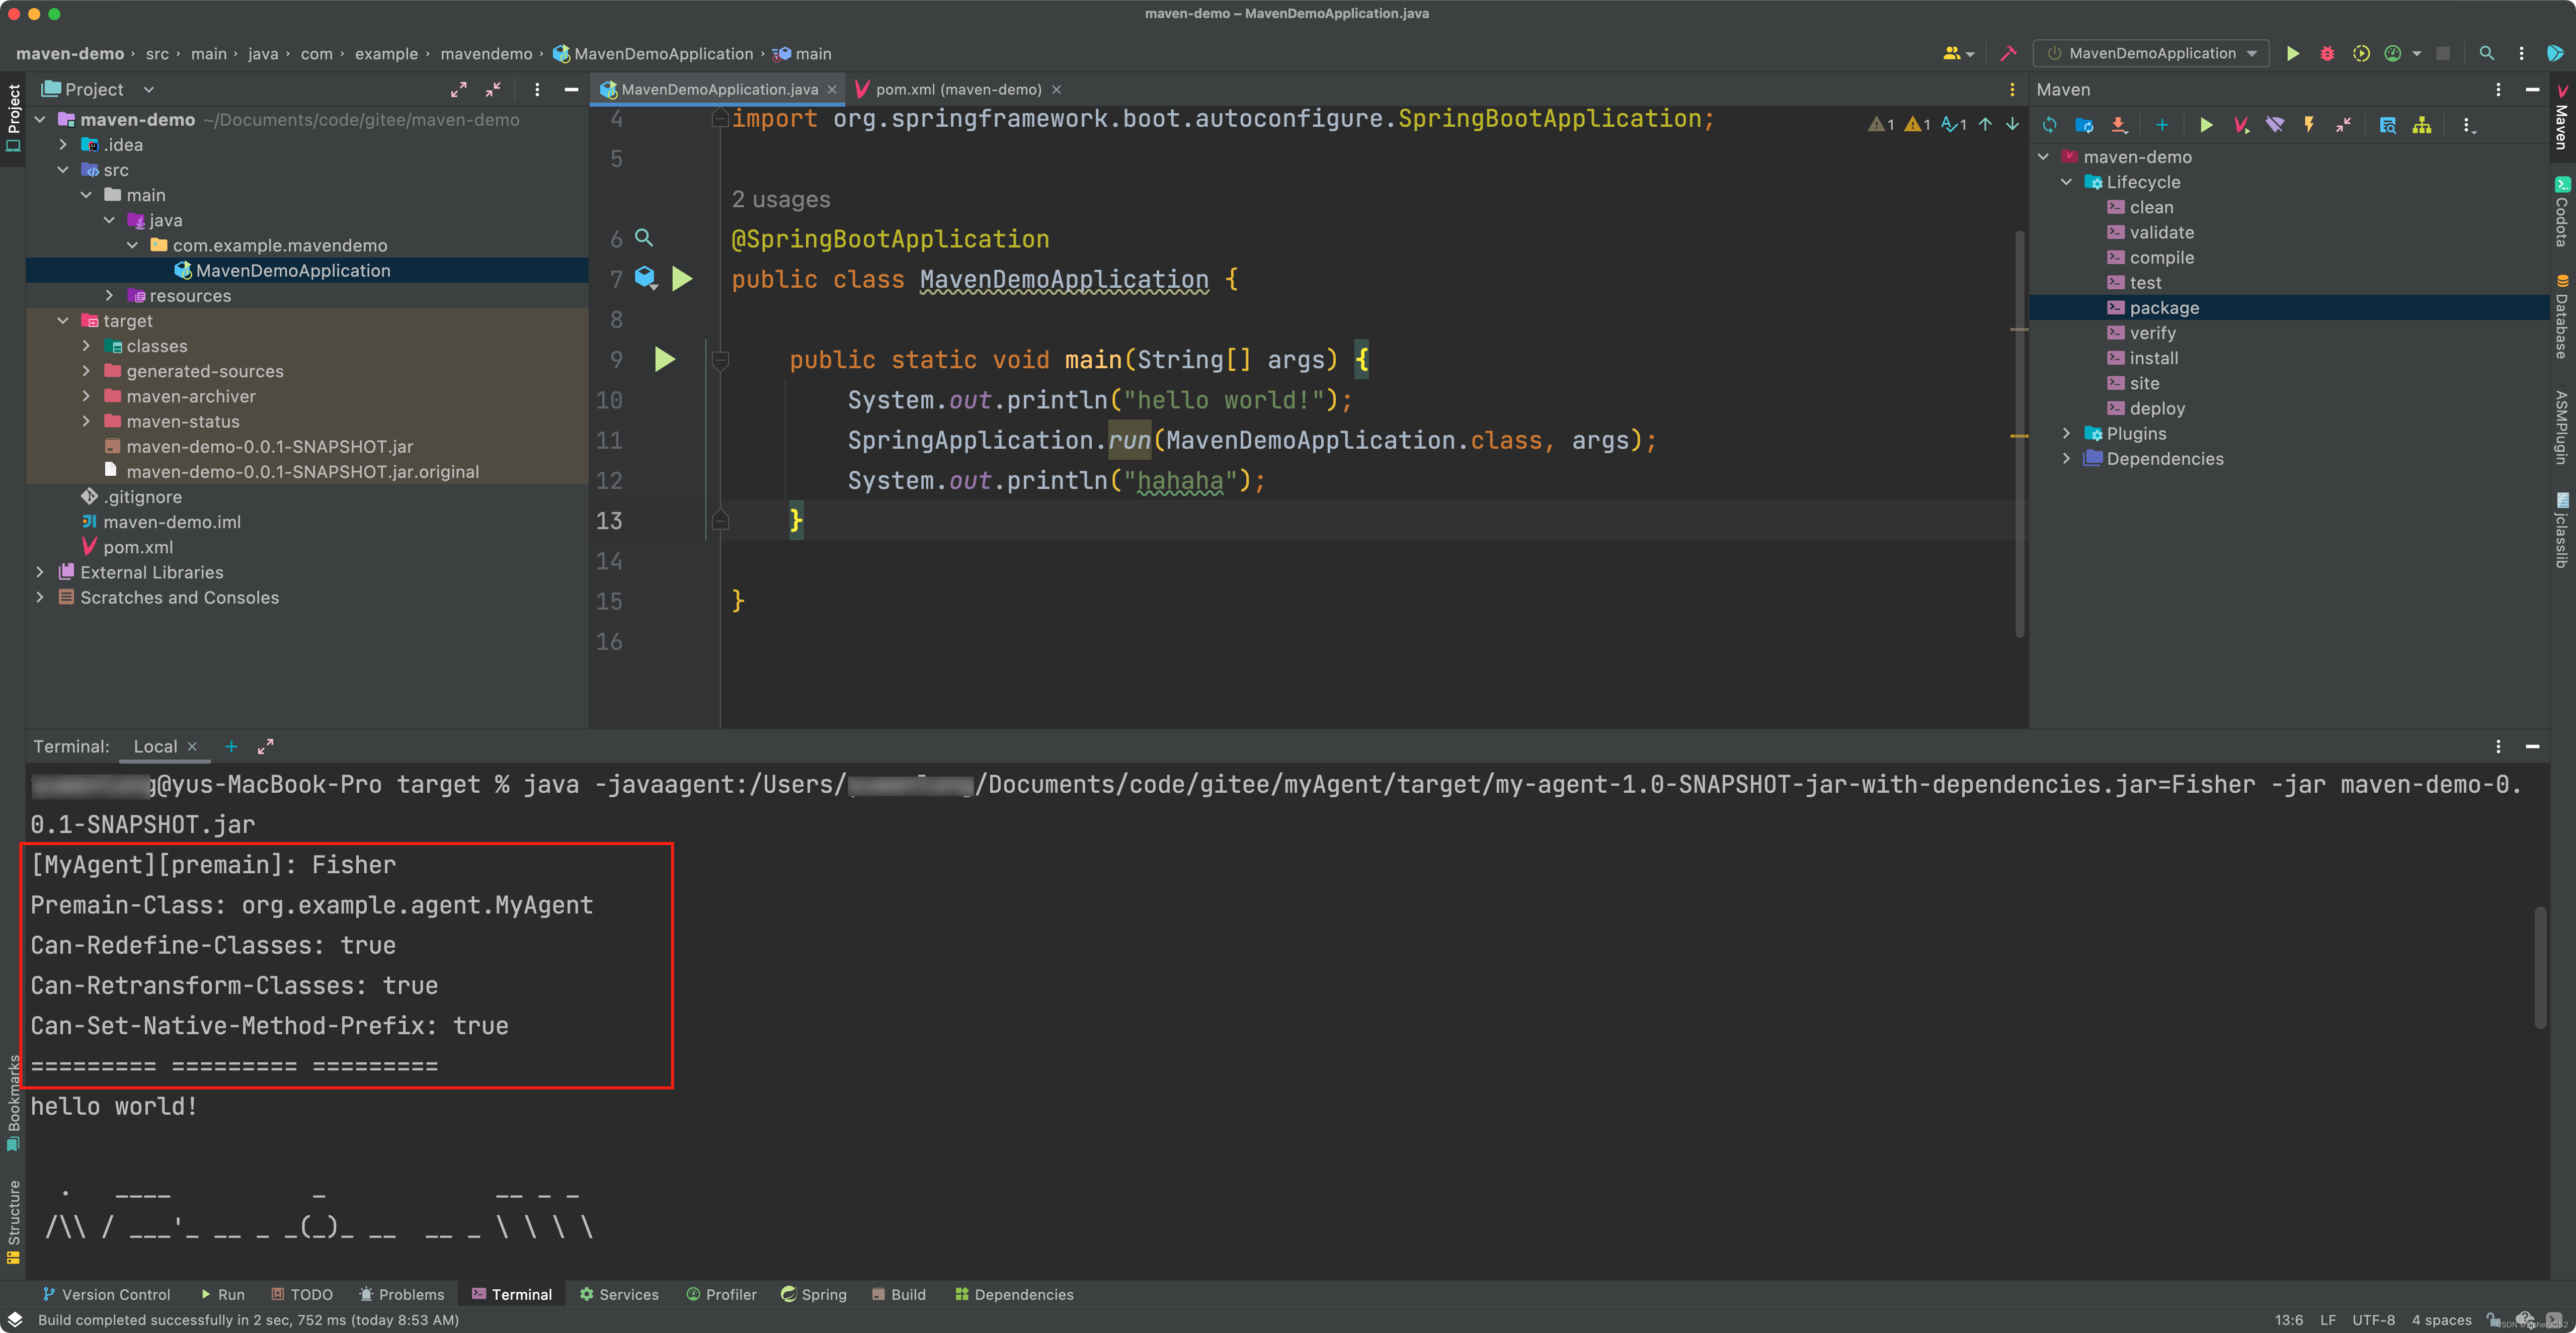
- 使用
java -javaagent:/Users/xxx/Documents/code/gitee/myAgent/target/my-agent-1.0-SNAPSHOT-jar-with-dependencies.jar=Fisher -jar maven-demo-0.0.1-SNAPSHOT.jar启动,同样可以看到premain中的方法被执行了
- 查看进程号
jps
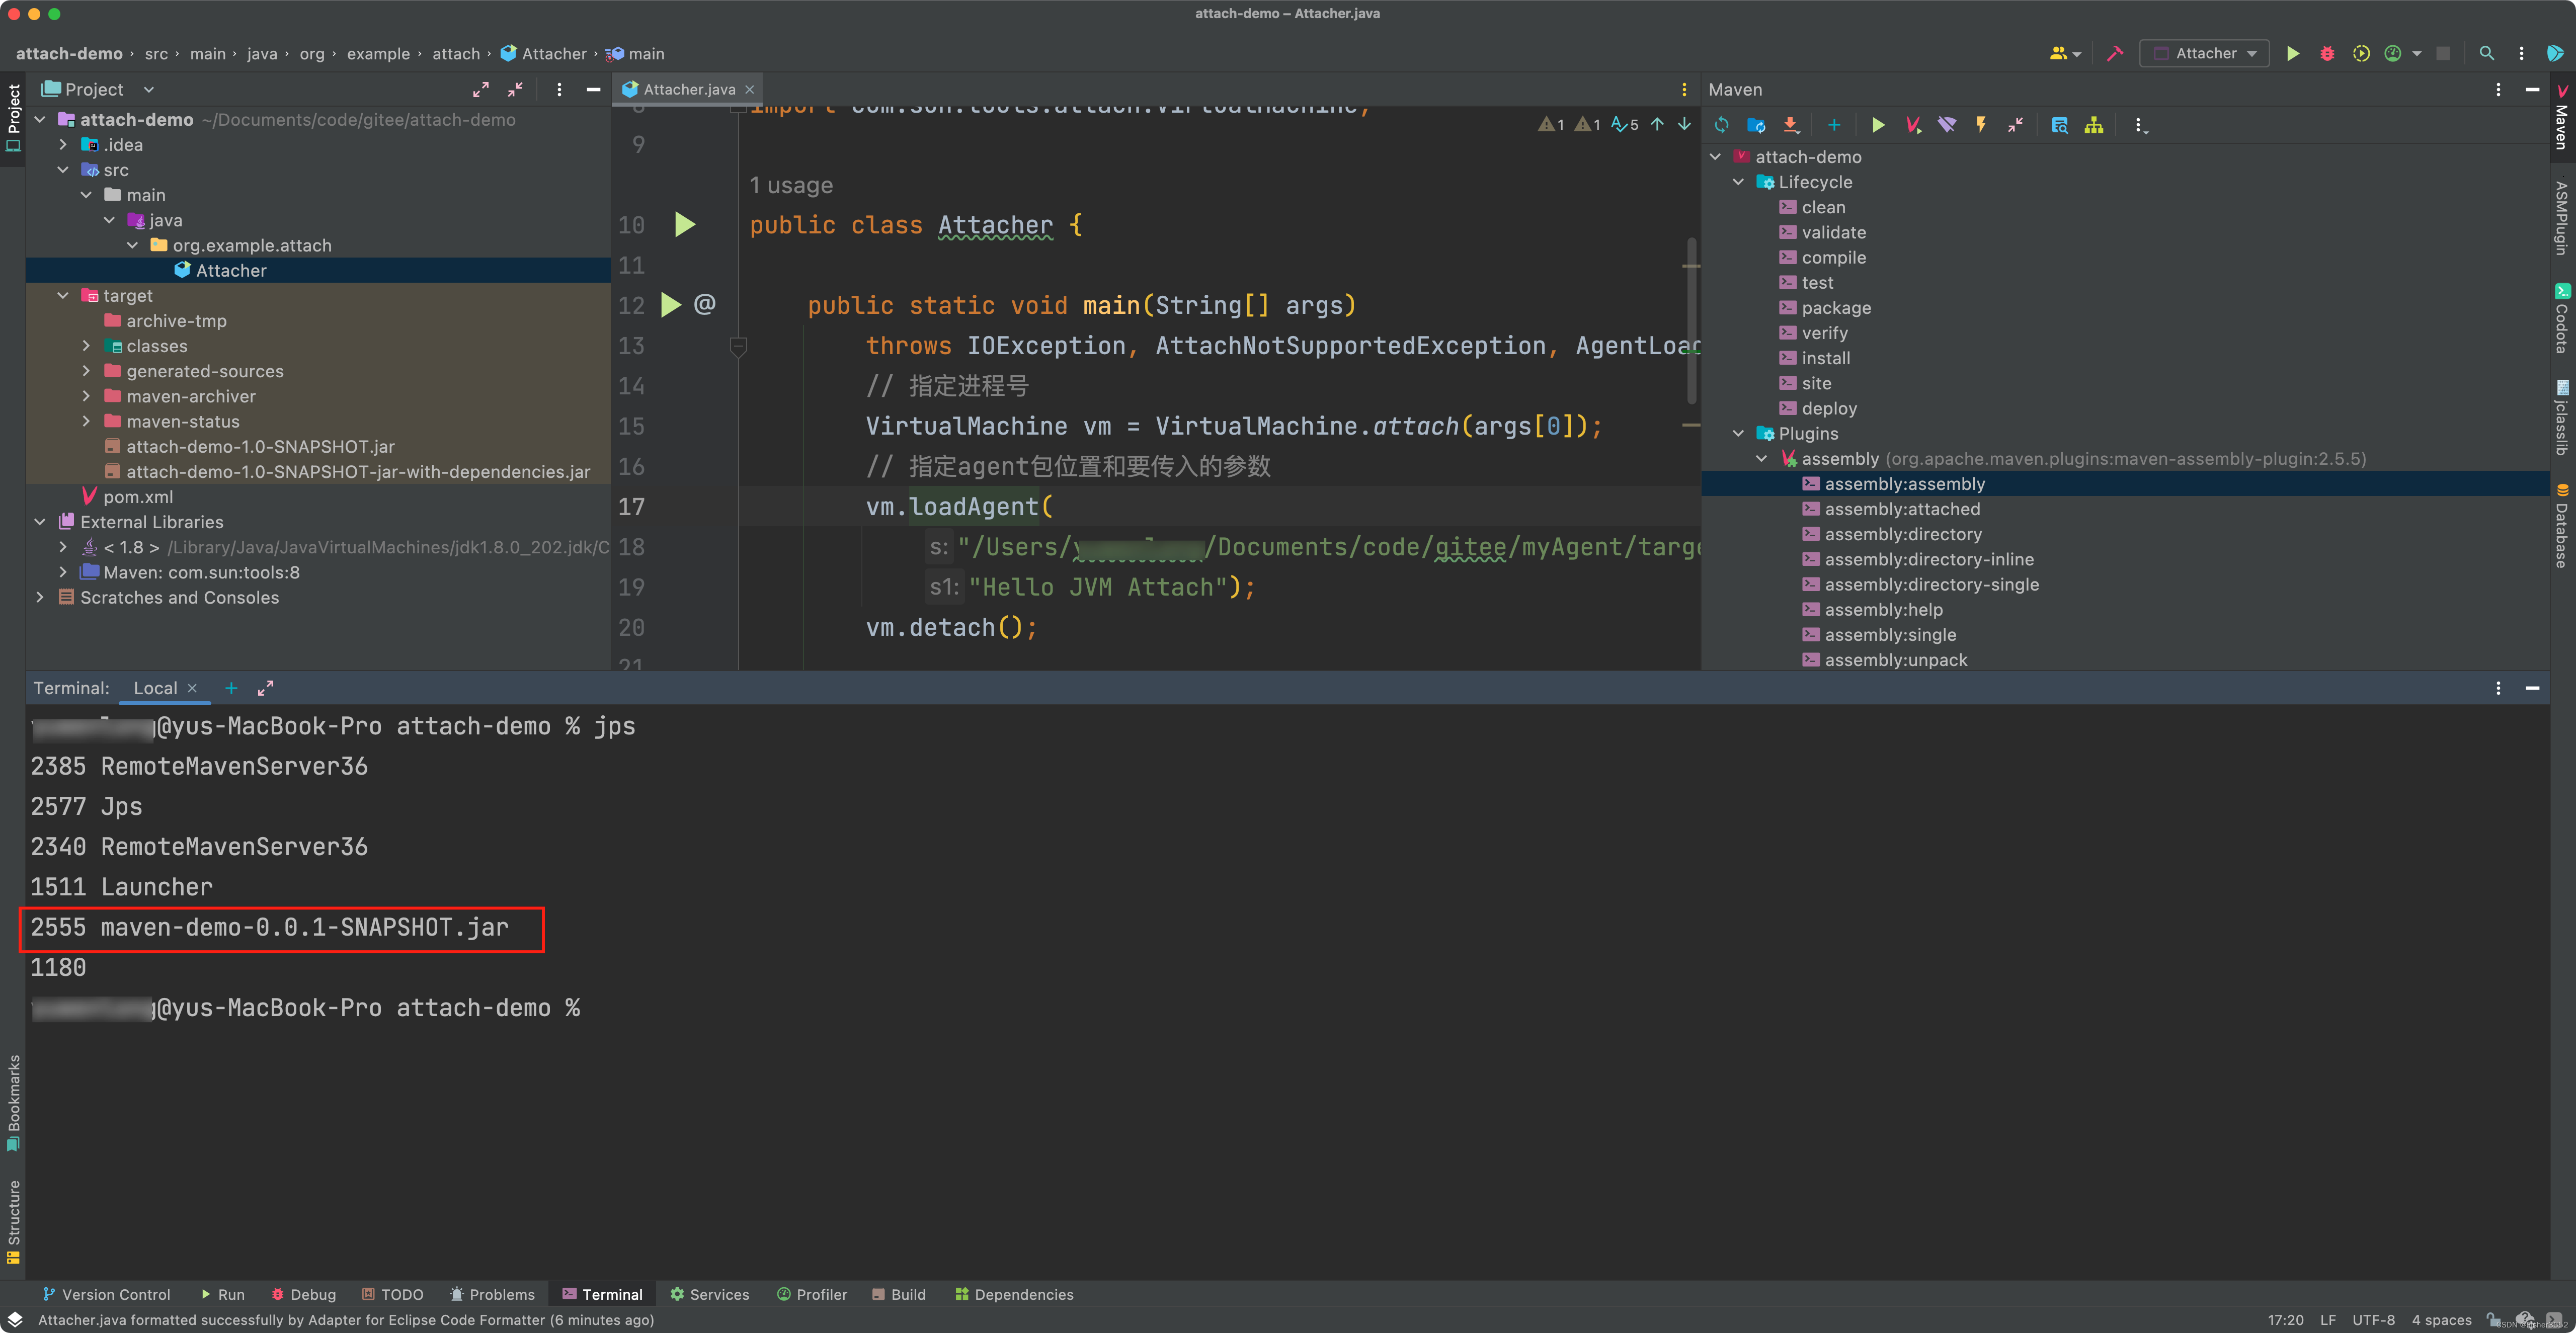
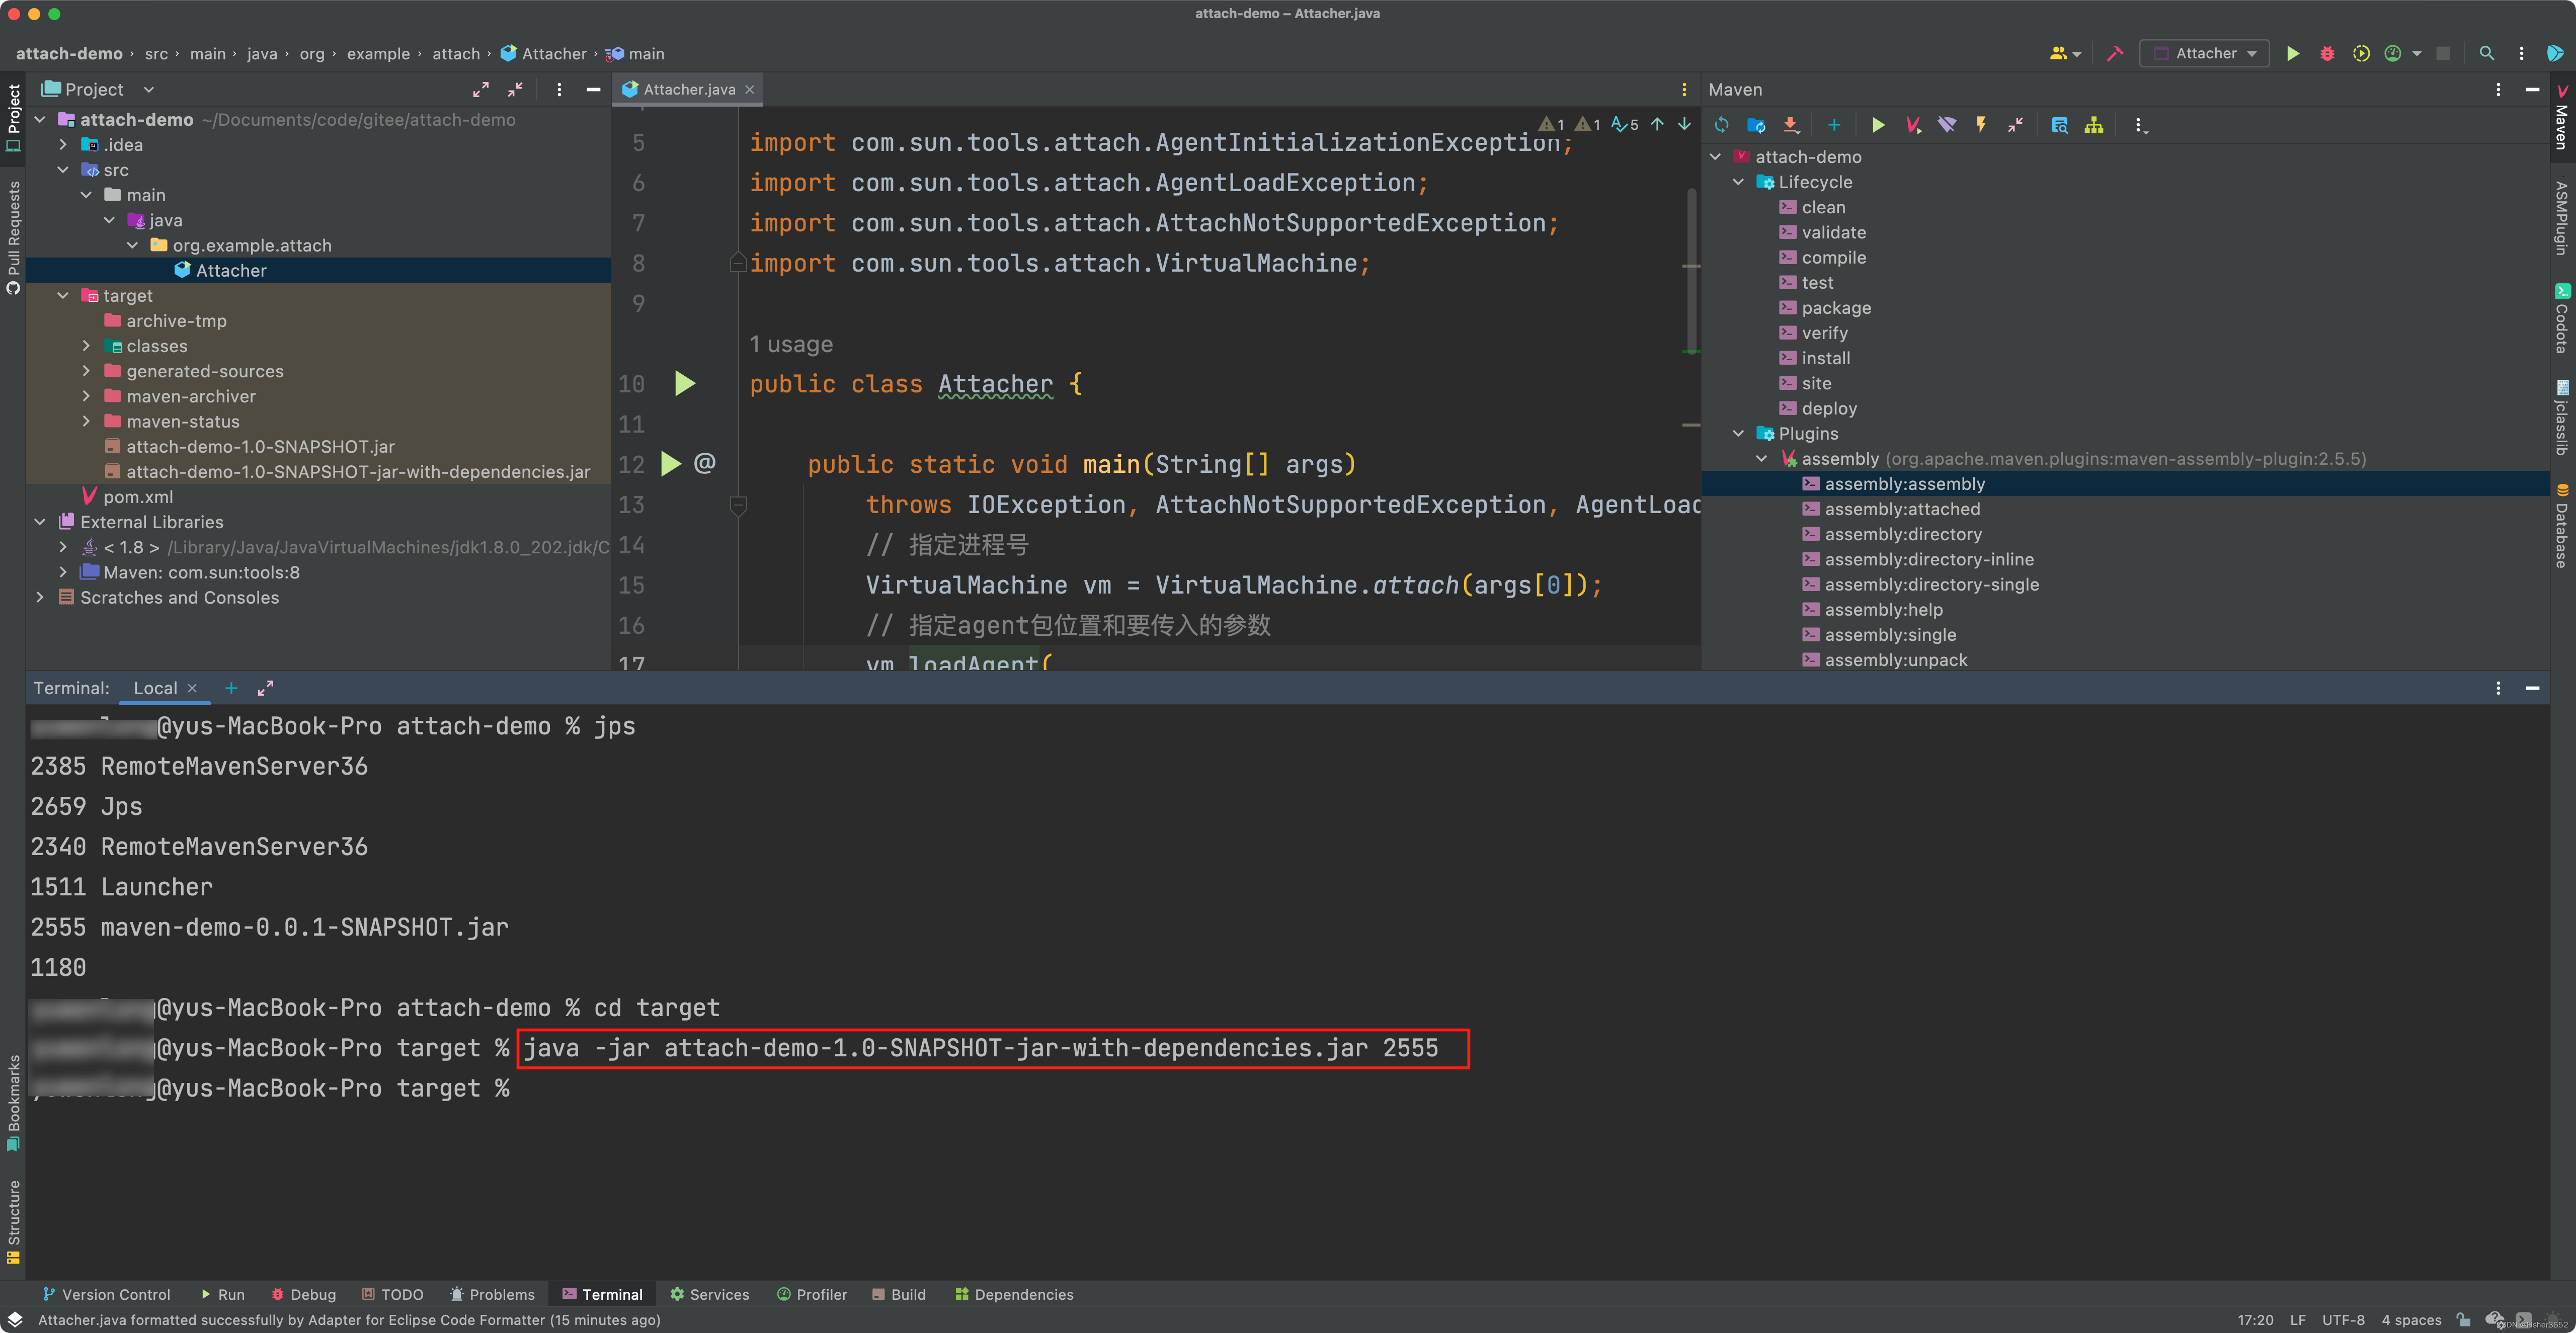
- 运行agent包,
java -jar attach-demo-1.0-SNAPSHOT-jar-with-dependencies.jar 2555,2555就是待修改的运行中的程序的进程号
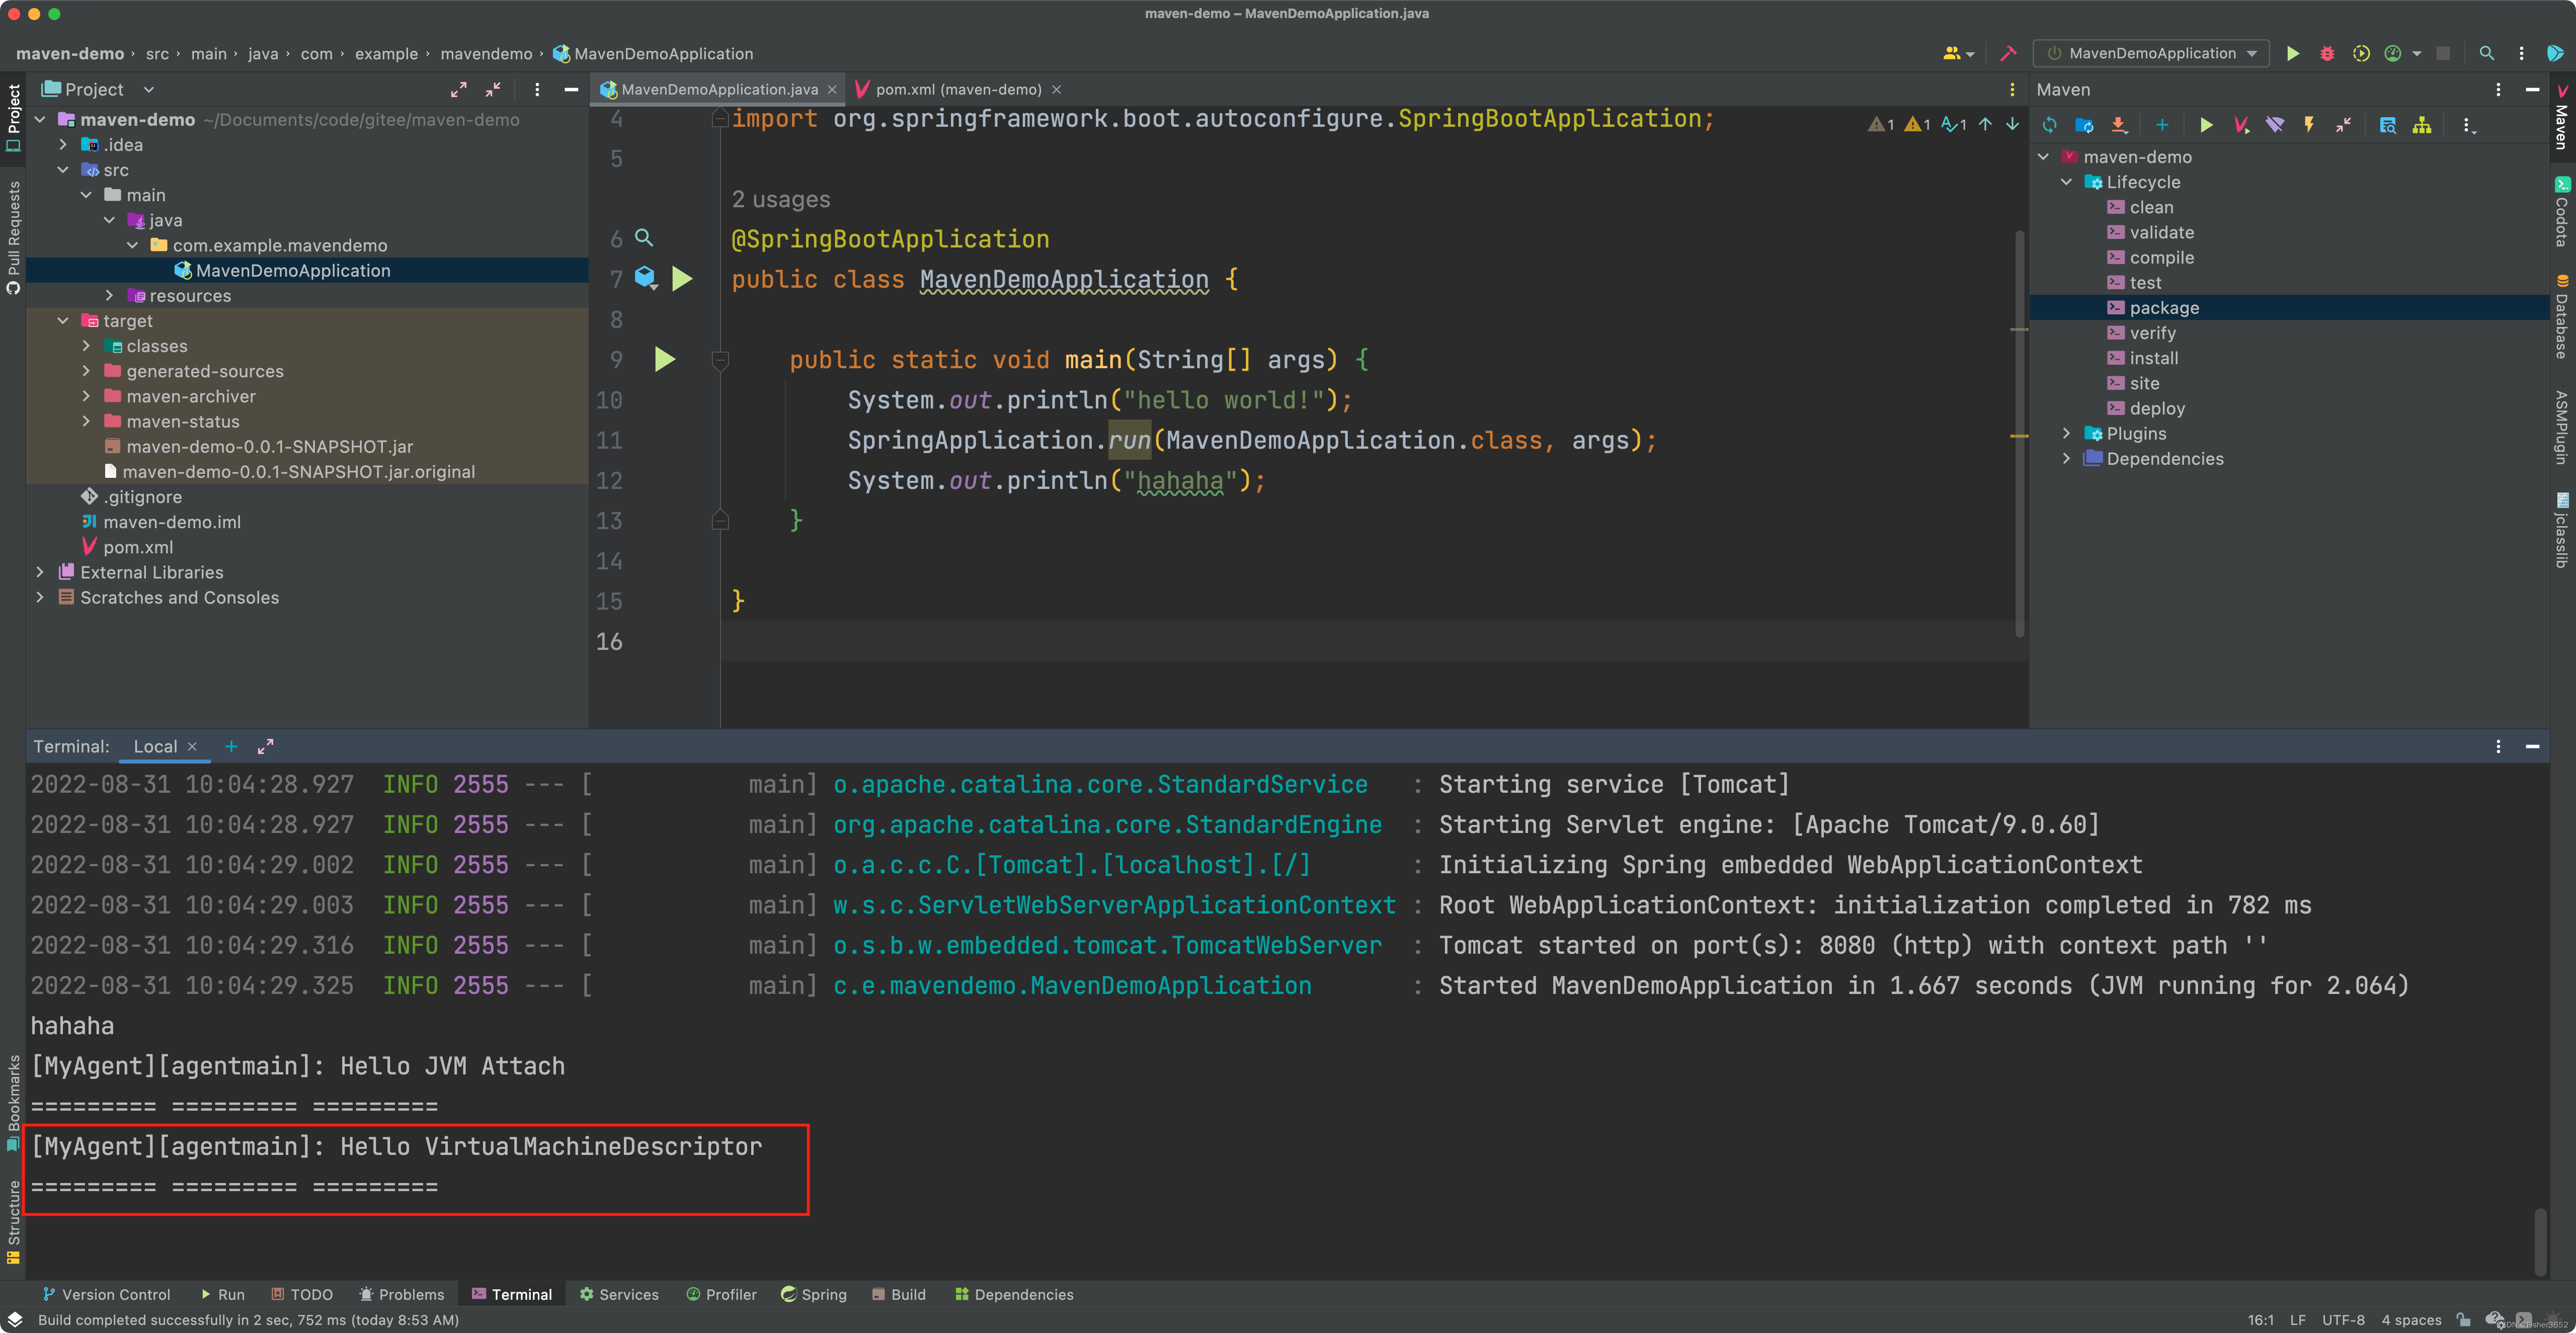
- 查看待修改程序,已经执行了agentmain中的代码
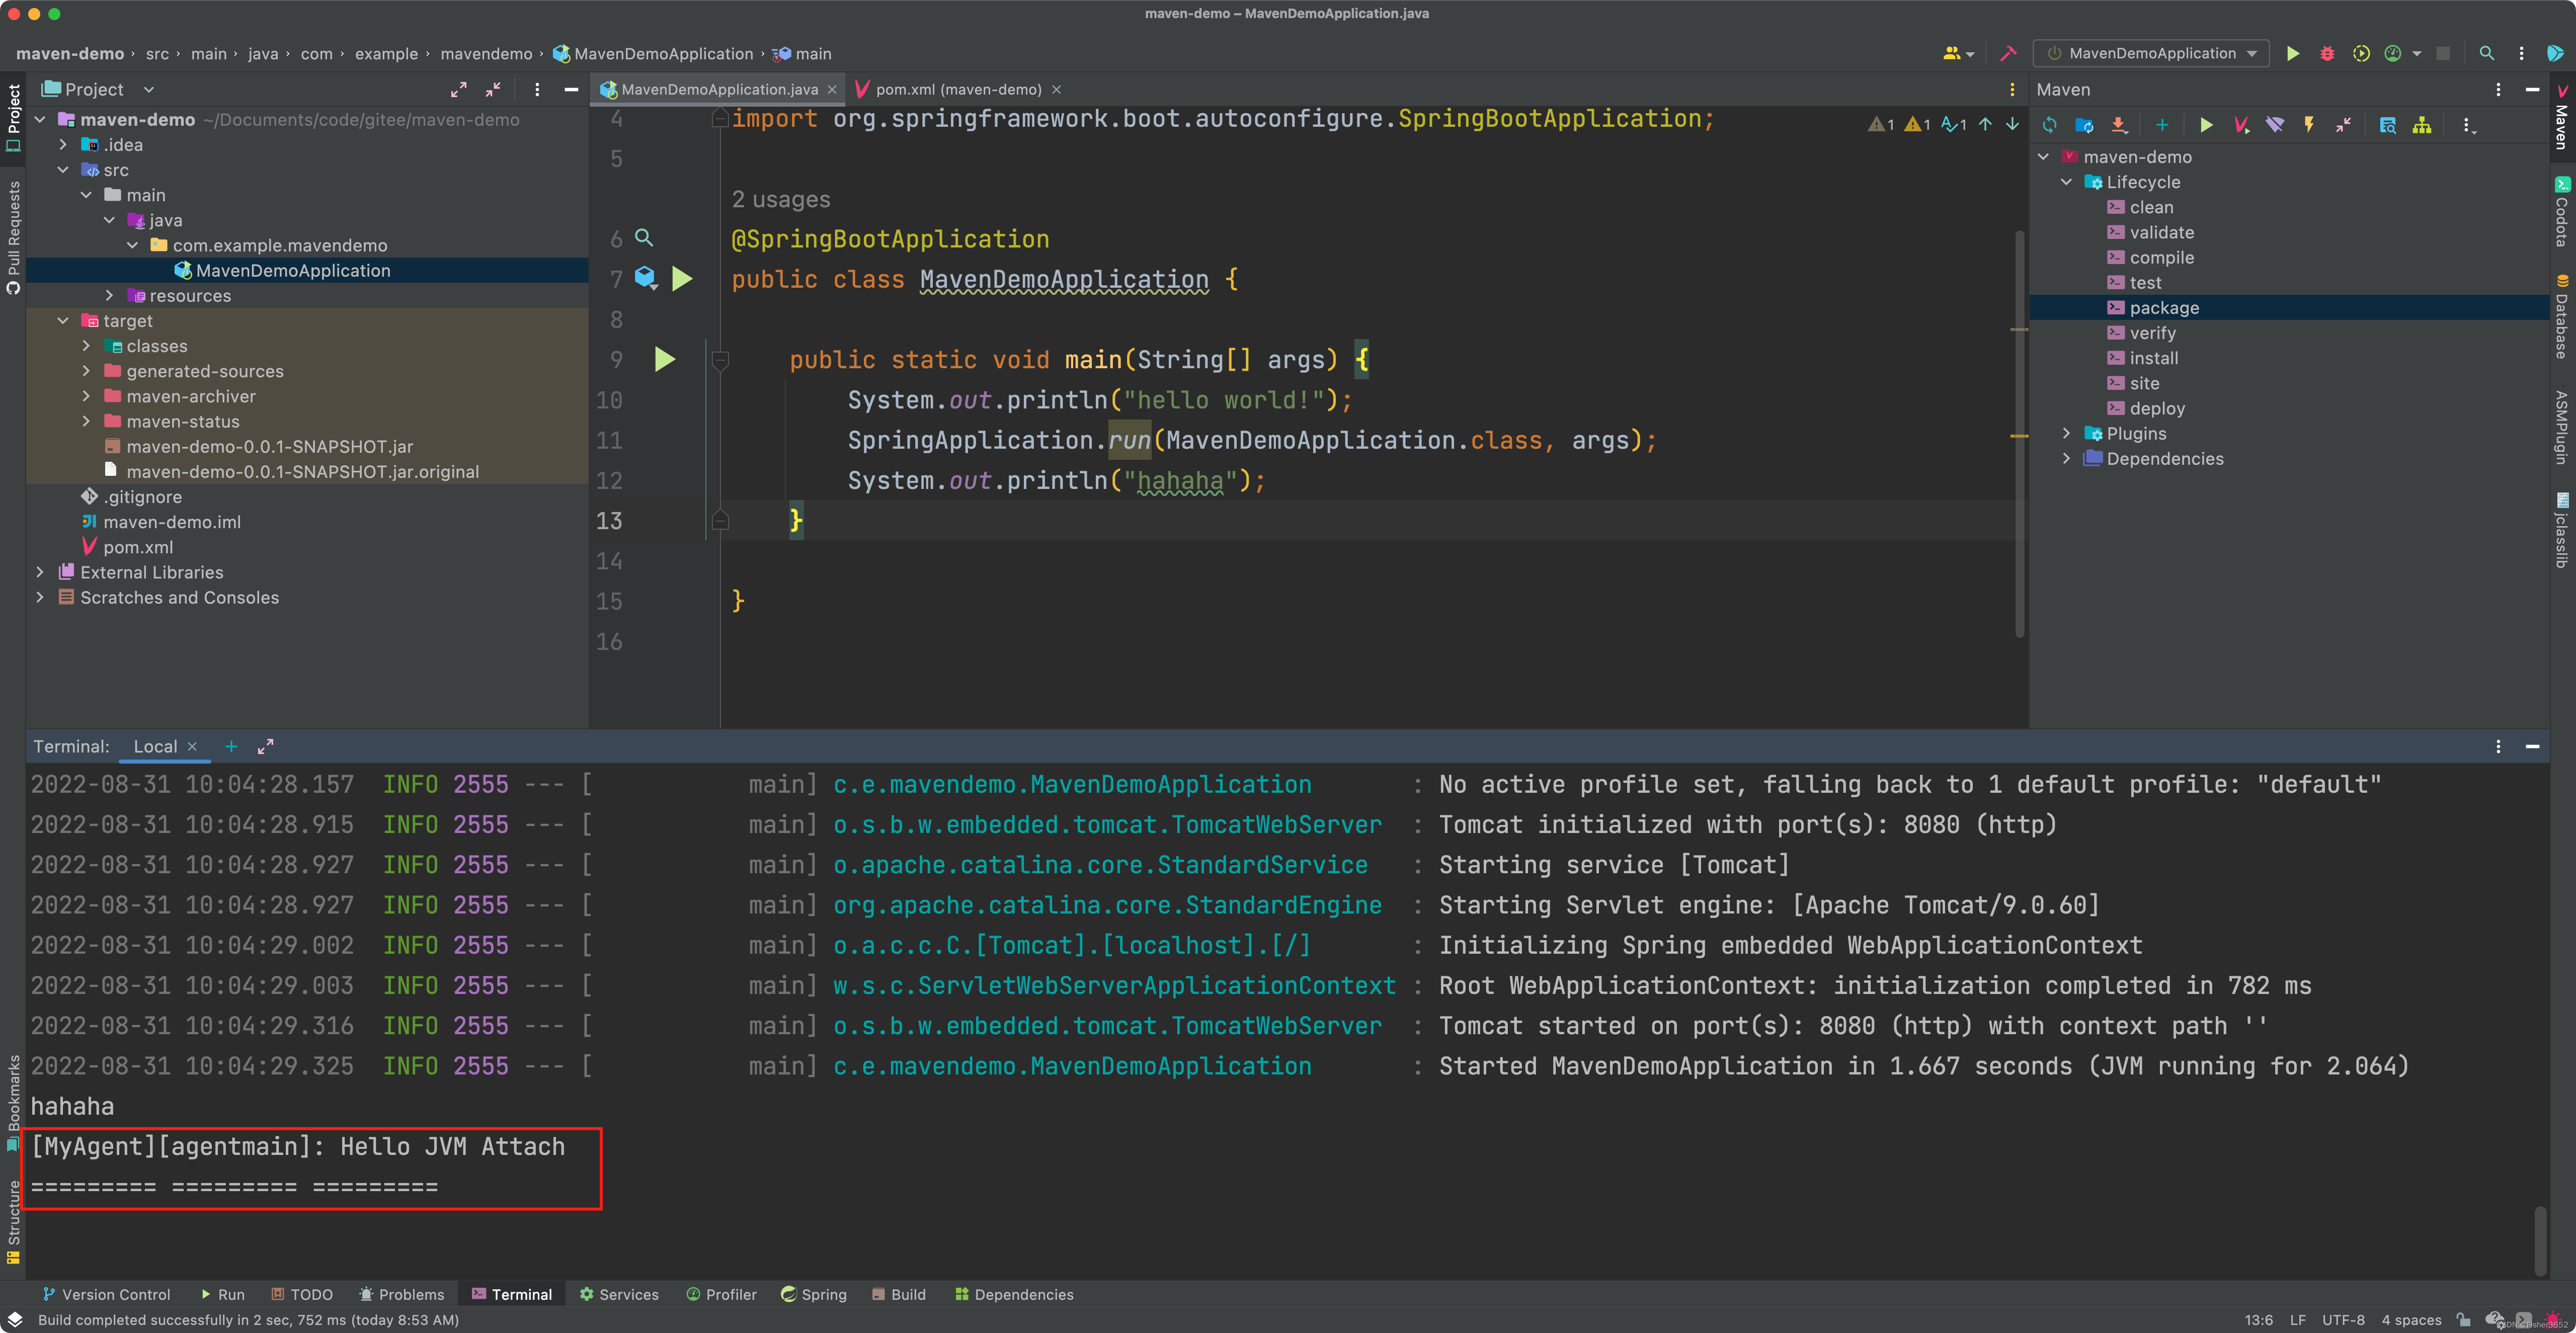
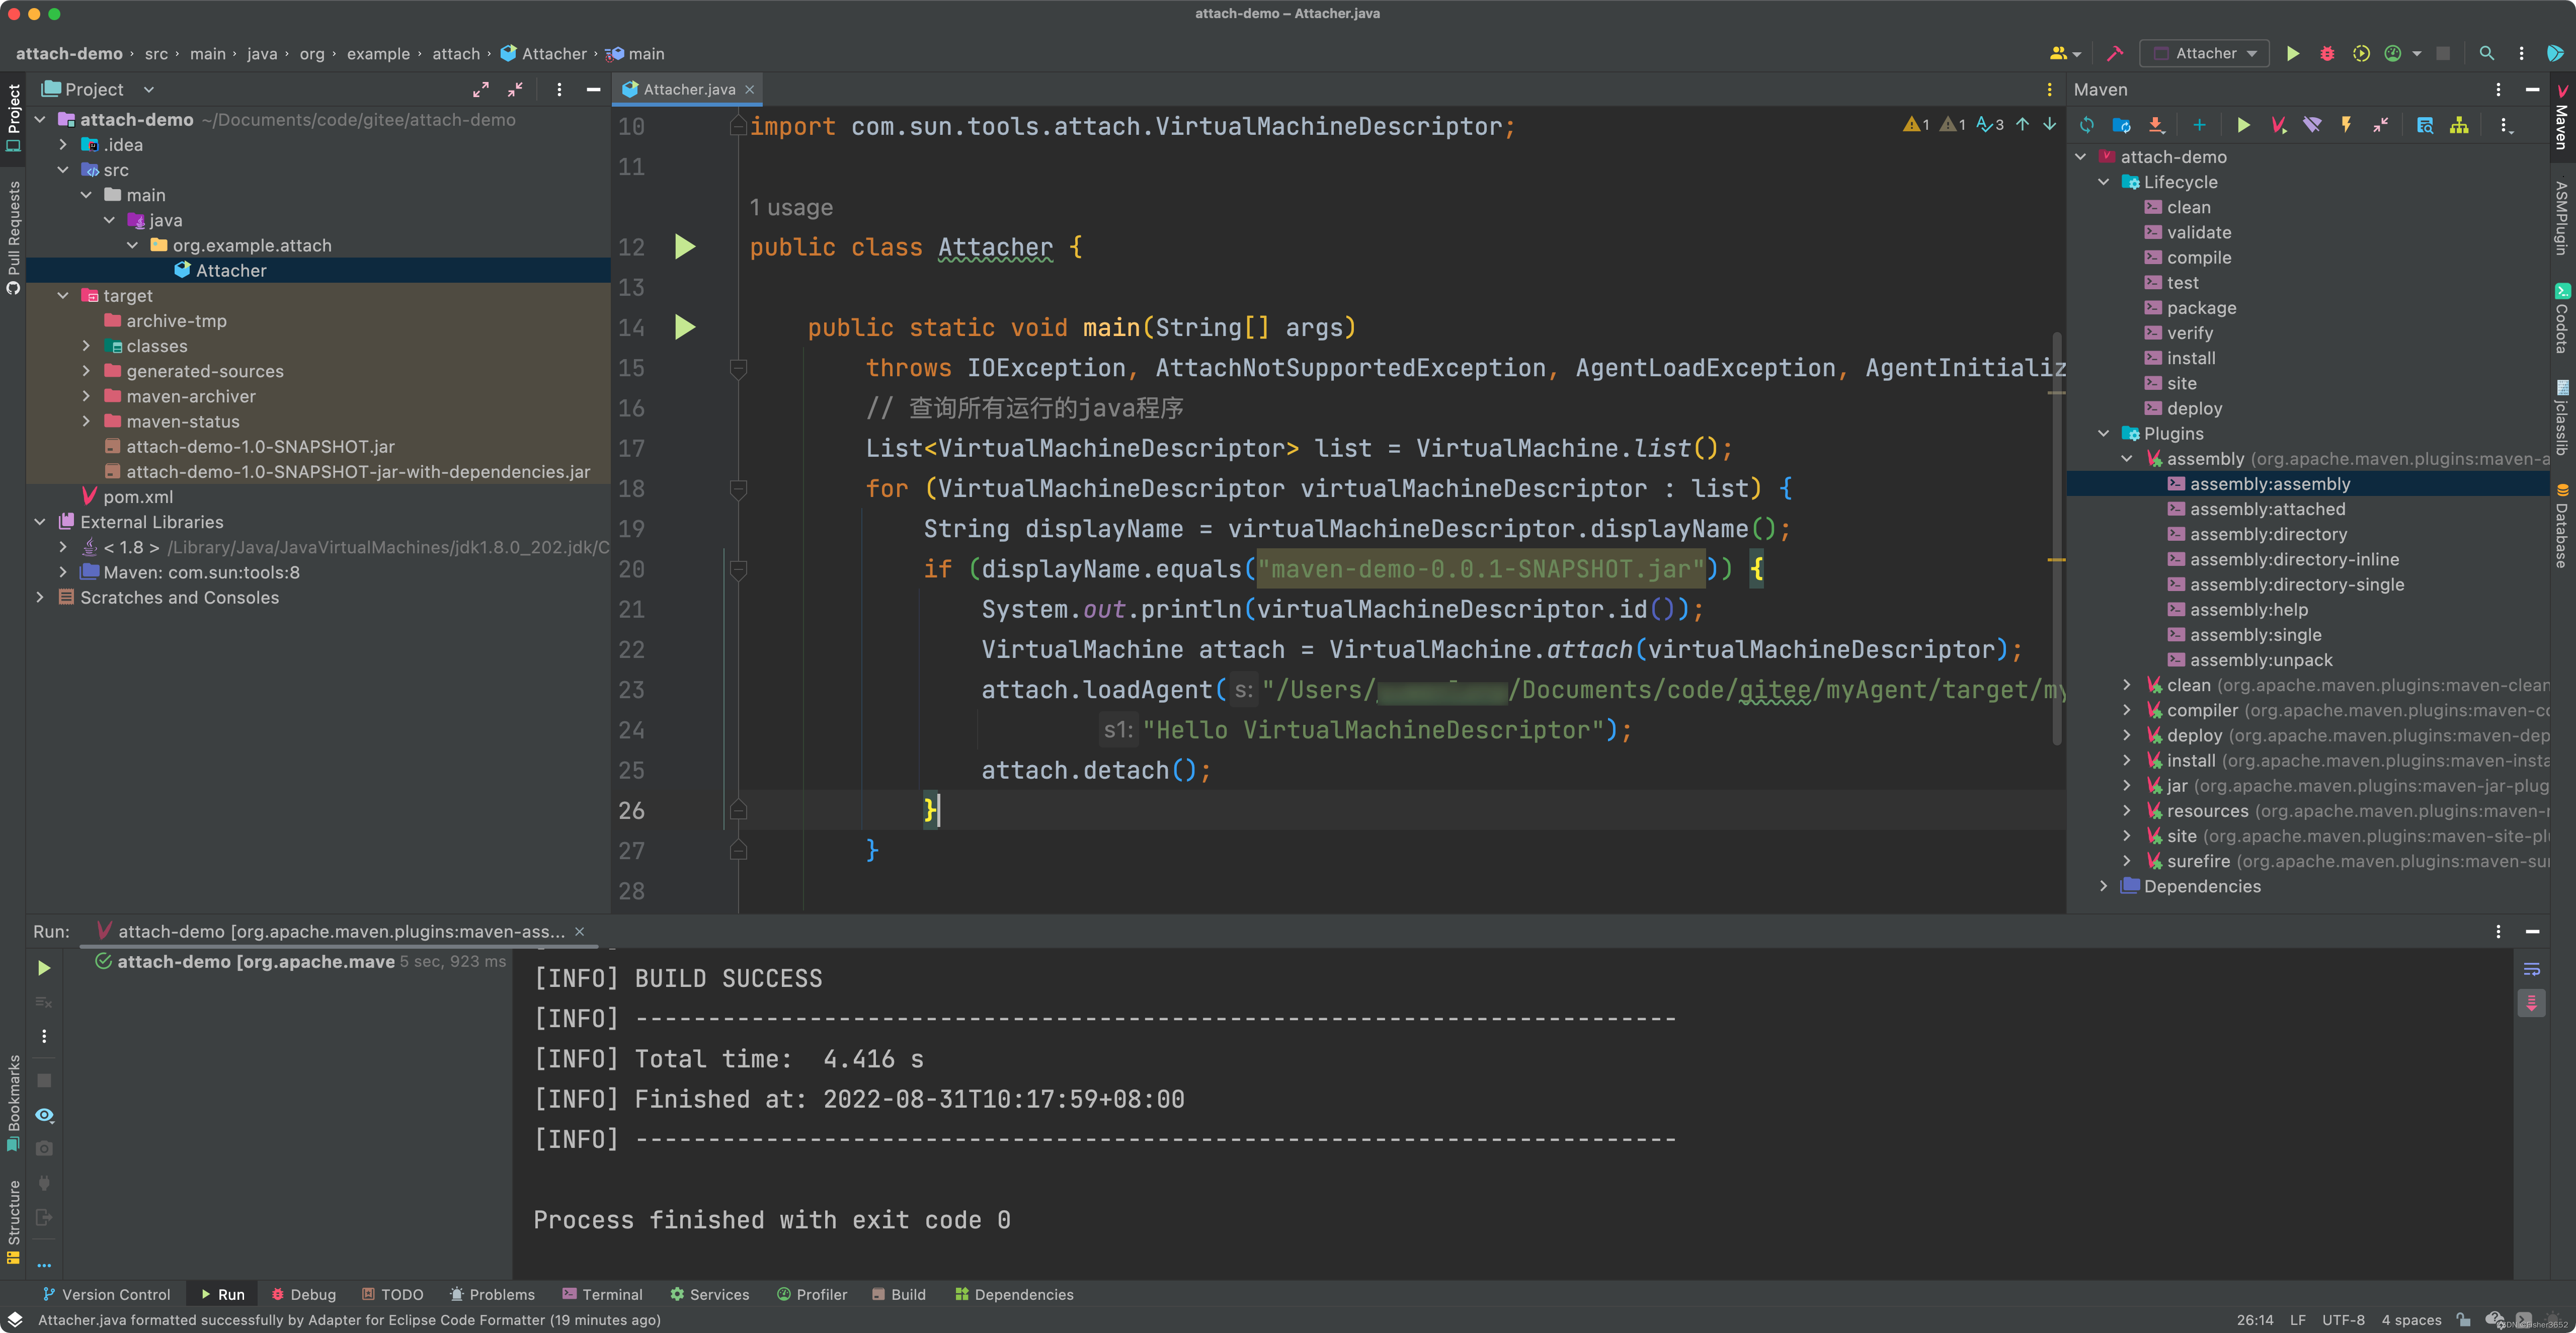
3.2.2 指定程序名称方式
- 启动类
package org.example.attach;

import java.io.IOException;
import java.util.List;

import com.sun.tools.attach.AgentInitializationException;
import com.sun.tools.attach.AgentLoadException;
import com.sun.tools.attach.AttachNotSupportedException;
import com.sun.tools.attach.VirtualMachine;
import com.sun.tools.attach.VirtualMachineDescriptor;

public class Attacher {

    public static void main(String[] args)
        throws IOException, AttachNotSupportedException, AgentLoadException, AgentInitializationException {
        // 查询所有运行的java程序
        List<VirtualMachineDescriptor> list = VirtualMachine.list();
        for (VirtualMachineDescriptor virtualMachineDescriptor : list) {
            String displayName = virtualMachineDescriptor.displayName();
            // 这里指定运行的程序的名称,使用jps就能看出名称
            if (displayName.equals("maven-demo-0.0.1-SNAPSHOT.jar")) {
                System.out.println(virtualMachineDescriptor.id());
                VirtualMachine attach = VirtualMachine.attach(virtualMachineDescriptor);
                attach.loadAgent("/Users/xxx/Documents/code/gitee/myAgent/target/my-agent-1.0-SNAPSHOT-jar-with-dependencies.jar",
                        "Hello VirtualMachineDescriptor");
                attach.detach();
            }
        }
    }
}
- 重新打包,运行agent包,
java -jar attach-demo-1.0-SNAPSHOT-jar-with-dependencies.jar
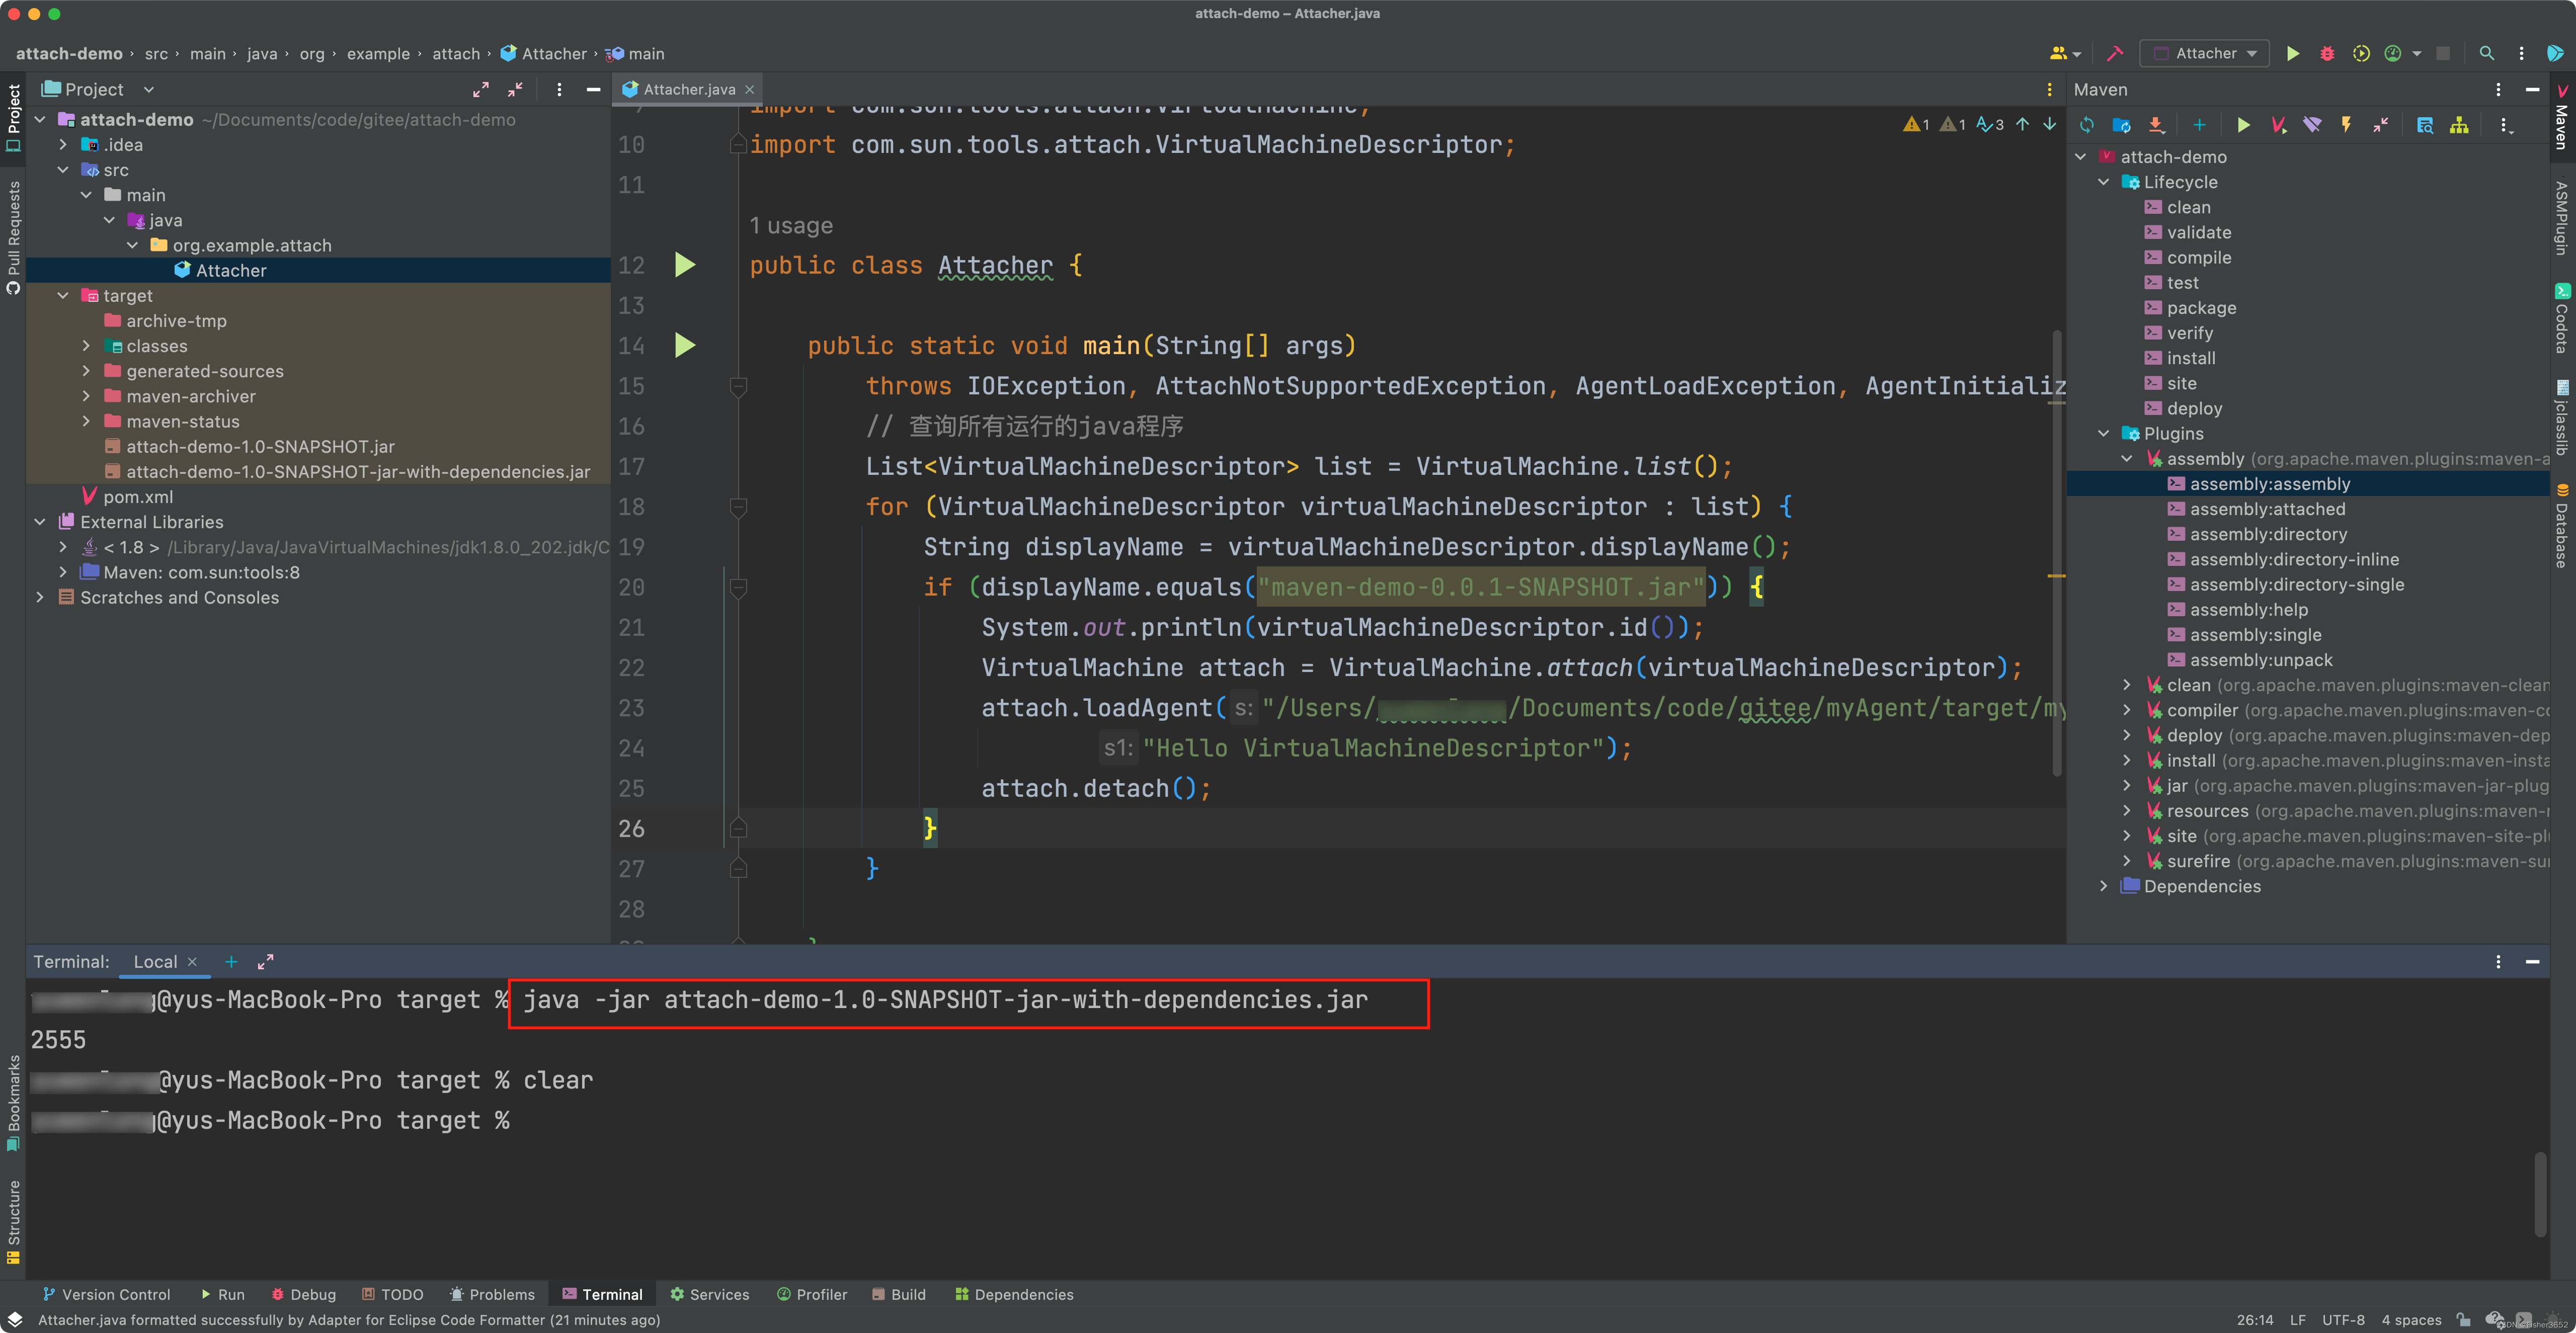
- 查看待修改程序