瑞吉外卖 —— 2、后台登录和登出
1、后台登录功能
1.1、接口分析
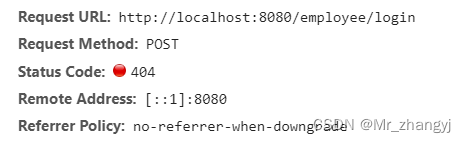
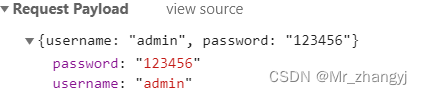
通过浏览器调试工具 F12 可以发现,在登录页面点击登录后,发送 POST 请求 http://localhost:8080/employee/login ,并将输入的账号和密码信息以 JSON 格式发送给后台
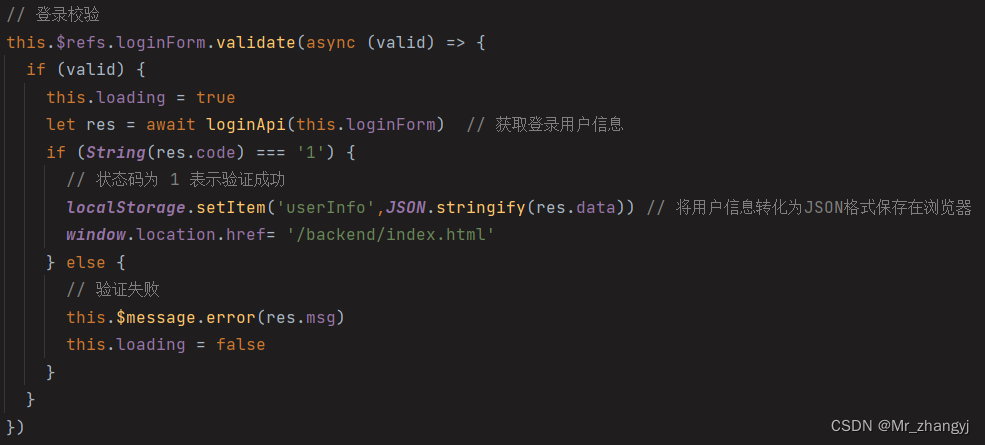
前端校验代码如下:
1.1.2、登录校验逻辑
1、将页面提交的密码password进行md5加密处理
2、根据页面提交的用户名username查询数据库
3、如果没有查询到则返回登录失败结果
4、密码比对,如果不一致则返回登录失败结果
5、查看员工状态,如果为已禁用状态,则返回员工已禁用结果
6、登录成功,将员工id存入Session并返回登录成功结果
1.2、代码
首先导入资料中的 Employee 实体类,然后创建对应的 mapper、service、controller

@Mapper
public interface EmployeeMapper extends BaseMapper<Employee> {
}
public interface EmployeeService extends IService<Employee> {
}@Service
public class EmployeeServiceImpl extends ServiceImpl<EmployeeMapper, Employee> implements EmployeeService {
}1.2.1、统一的返回结果实体类
package com.itheima.reggie.common;

import lombok.Data;
import java.util.HashMap;
import java.util.Map;

// 通用结果返回集
@Data
public class R<T> {

    private Integer code; //编码:1成功,0和其它数字为失败

    private String msg; //错误信息

    private T data; //数据

    private Map map = new HashMap(); //动态数据

    public static <T> R<T> success(T object) {
        R<T> r = new R<T>();
        r.data = object;
        r.code = 1;
        return r;
    }

    public static <T> R<T> error(String msg) {
        R r = new R();
        r.msg = msg;
        r.code = 0;
        return r;
    }

    public R<T> add(String key, Object value) {
        this.map.put(key, value);
        return this;
    }

}
1.2.2、controller 方法
package com.itheima.reggie.controller;

import com.baomidou.mybatisplus.core.conditions.query.LambdaQueryWrapper;
import com.itheima.reggie.common.R;
import com.itheima.reggie.entity.Employee;
import com.itheima.reggie.service.EmployeeService;
import lombok.extern.slf4j.Slf4j;
import org.springframework.beans.factory.annotation.Autowired;
import org.springframework.util.DigestUtils;
import org.springframework.web.bind.annotation.PostMapping;
import org.springframework.web.bind.annotation.RequestBody;
import org.springframework.web.bind.annotation.RequestMapping;
import org.springframework.web.bind.annotation.RestController;

import javax.servlet.http.HttpServletRequest;

/**
 * @Author zhang
 * @Date 2022/8/30 - 21:46
 * @Version 1.0
 */
@Slf4j
@RestController
@RequestMapping("/employee")
public class EmployeeController {

    @Autowired
    private EmployeeService employeeService;

    /**
     * 员工登录
     * @param employee  含有前端提供的账号密码信息
     * @param request   用于向浏览器的session域储存用户信息
     * @return
     */
    @PostMapping("/login")
    public R<Employee> login(
            @RequestBody Employee employee,
            HttpServletRequest request
    ){
        // 将页面提交的密码password进行md5加密处理
        String password = employee.getPassword();
        password = DigestUtils.md5DigestAsHex(password.getBytes());

        // 根据页面提交的用户名 username 查询数据库
        LambdaQueryWrapper<Employee> queryWrapper = new LambdaQueryWrapper<>();
        queryWrapper.eq(Employee::getUsername, employee.getUsername());
        Employee emp = employeeService.getOne(queryWrapper);

        // 如果没有查询到则返回登录失败结果
        if(emp == null){
            return R.error("用户名或密码错误");
        }

        // 密码比对,如果不一致则返回登录失败结果
        if(!emp.getPassword().equals(password)){
            return R.error("用户名或密码错误");
        }

        // 查看员工状态,如果为已禁用状态,则返回员工已禁用结果
        if(emp.getStatus() == 0){
            return R.error("该账号已被禁用");
        }

        // 登录成功,将员工id存入Session并返回登录成功结果
        request.getSession().setAttribute("employee", employee.getId());

        return R.success(emp);
    }

}
1.3、测试
测试前,可以先修改请求超时时间,避免调试时间过长导致报错。
修改 js/request.js 下的 timeout 数值

登录成功后,可以在浏览器的 Local Storage 中看到登录的用户信息

前端方法如下
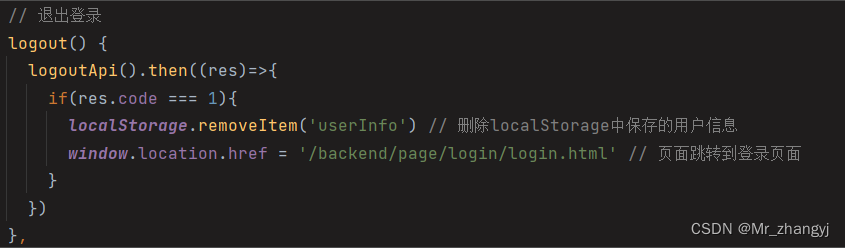
2、后台退出功能
2.1、分析
点击退出登录按钮后,浏览器发送 http://localhost:8080/employee/logout 请求,方式为 POST

后台只需要在 controller 方法中清理 Session 中的用户 id 并返回结果即可。
2.2、代码
    /**
     * 退出登录
     * @param request 用于删除session域中的用户信息
     * @return
     */
    @PostMapping("/logout")
    public R<String> logout(HttpServletRequest request){
        // 清理Session域中保存的当前登录员工的id
        request.getSession().removeAttribute("employee");
        return R.success("退出成功");
    }