opencv中直方图和颜色跟踪相关:calcHist, calcBackProject, Meanshift和Camshift
1. 理解calcHist的应用
1)单通道hist
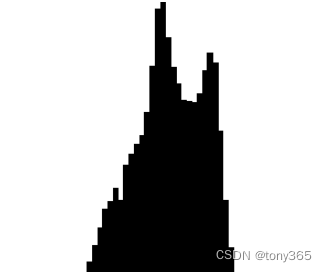
calcHist比较好理解,就是计算 图像的直方图,单通道来说就是 灰度的分布
比如下图是灰度像素的分布,在0-255的灰度图上划分为若干个bin, 统计数量
2) 多维的hist
比如计算 二维hist, 横纵坐标轴分别为 Hue 和 saturation
代码如下:首先 cvtColor(src, hsv, COLOR_BGR2HSV) 转换为HSV空间
然后统计hsv的信息calcHist(&hsv, 1, channels, Mat(), // do not use mask
hist, 2, histSize, ranges,
true, // the histogram is uniform
false);
其他一些操作是为了显示hist图像
#include <opencv2/imgproc.hpp>
#include <opencv2/highgui.hpp>
using namespace cv;
int main(int argc, char** argv)
{
    Mat src, hsv;
    //if (argc != 2 || !(src = imread(argv[1], 1)).data)
    //    return -1;

    std::string file = "D:\\dataset\\dang_yingxiangzhiliangceshi\\gain\\2022-07-28-20-49-03_GAIN4_of_simu.png";
    src = imread(file, 1);
    cvtColor(src, hsv, COLOR_BGR2HSV);
    // Quantize the hue to 30 levels
    // and the saturation to 32 levels
    int hbins = 30, sbins = 32;
    int histSize[] = { hbins, sbins };
    // hue varies from 0 to 179, see cvtColor
    float hranges[] = { 0, 180 };
    // saturation varies from 0 (black-gray-white) to
    // 255 (pure spectrum color)
    float sranges[] = { 0, 256 };
    const float* ranges[] = { hranges, sranges };
    MatND hist;
    // we compute the histogram from the 0-th and 1-st channels
    int channels[] = { 0, 1 };
    calcHist(&hsv, 1, channels, Mat(), // do not use mask
        hist, 2, histSize, ranges,
        true, // the histogram is uniform
        false);
    double maxVal = 0;
    minMaxLoc(hist, 0, &maxVal, 0, 0);
    int scale = 10;
    Mat histImg = Mat::zeros(sbins * scale, hbins * 10, CV_8UC3);
    for (int h = 0; h < hbins; h++)
        for (int s = 0; s < sbins; s++)
        {
            float binVal = hist.at<float>(h, s);
            int intensity = cvRound(binVal * 255 / maxVal);
            rectangle(histImg, Point(h * scale, s * scale),
                Point((h + 1) * scale - 1, (s + 1) * scale - 1),
                Scalar::all(intensity),
                cv::FILLED);
        }
    namedWindow("Source", 1);
    imshow("Source", src);
    namedWindow("H-S Histogram", 1);
    imshow("H-S Histogram", histImg);
    waitKey();
    return 0;
}
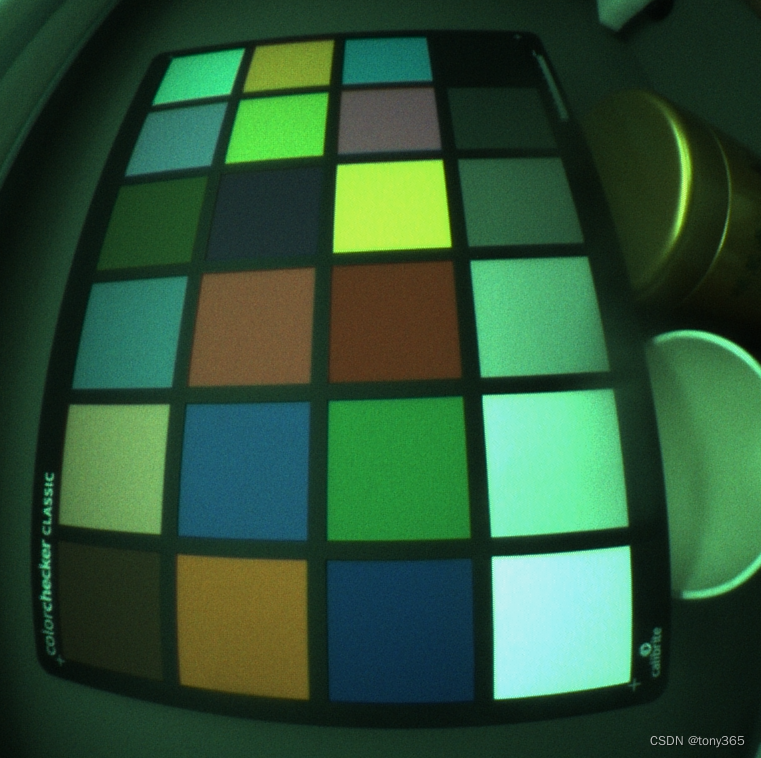
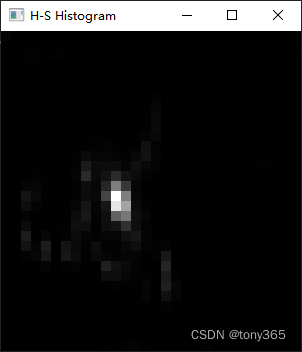
如下,分别是原图和 HS hist
2. 理解 calcBackProject
可以参考反向投影calcBackProject()
calcBackProject 反向投影
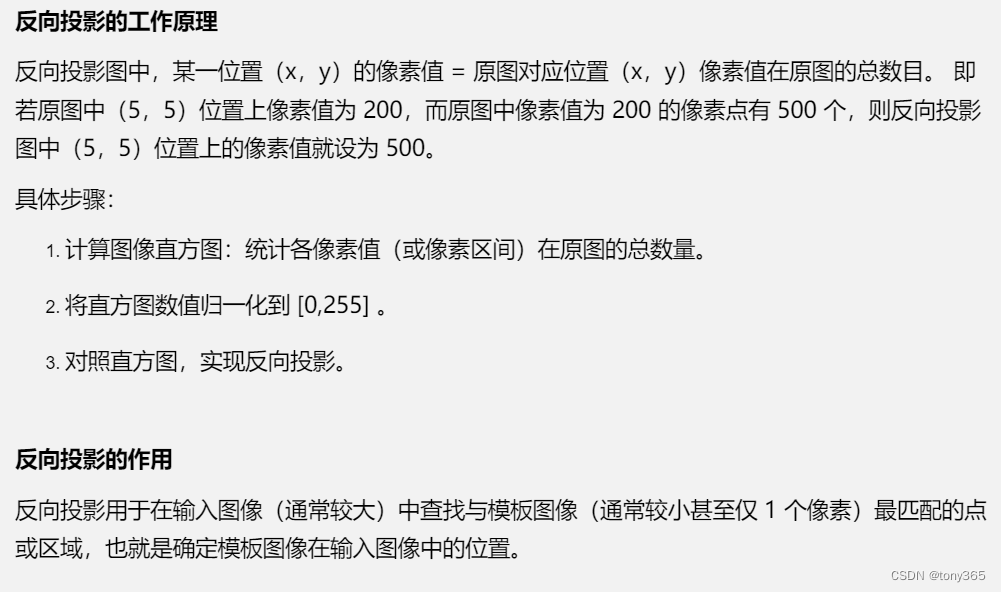
意思就是
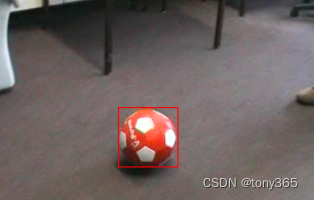
1)我们首先获得一个物体(比较单一的颜色)的hist,比如是手,或者运动的皮球。最好物体颜色和背景区分度比较大,否则容易出现出错,比如下面的球有红色白色和背景灰色区别较大。然后可想而知,该物体的hist分布一定是集中在某个颜色。那么在一副被搜索的图像上这个颜色是目标的概率应该比较大
2)在另一个大图像上(上面有我们要搜寻的物体,比如手,皮球),那么back project就是对每个像素查找目标 hist所属的bin 对应的数量,每个像素遍历一遍。归一化后就表示物体的概率
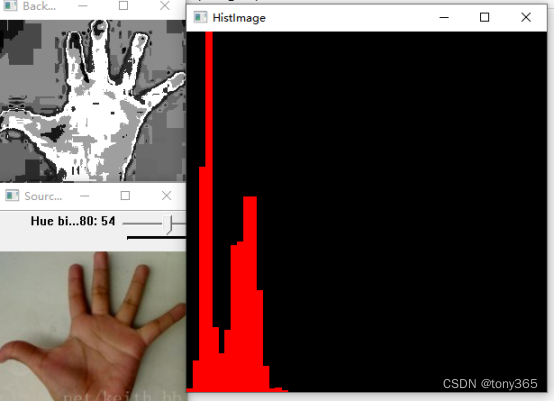
如下图,手的图像,手的hist, 以及 被搜索的图像上的 back project()。可以当作手图像的概率,越亮表示概率越大。
#include <iostream>
#include <opencv2/core.hpp>
#include <opencv2/highgui.hpp>
#include <opencv2/imgproc.hpp>

using namespace std;
using namespace cv;

//定义全局变量
Mat srcImage, hsvImage, hueImage;
const int hueBinMaxValue = 180;
int hueBinValue = 25;

//声明回调函数
void Hist_and_Backprojection(int, void*);

int main()
{
    srcImage = imread("hand.png");

    //判断图像是否加载成功
    if (srcImage.empty())
    {
        cout << "图像加载失败" << endl;
        return -1;
    }
    else
        cout << "图像加载成功..." << endl << endl;

    //将图像转化为HSV图像
    cvtColor(srcImage, hsvImage, cv::COLOR_BGR2HSV);

    //只使用图像的H参数
    hueImage.create(hsvImage.size(), hsvImage.depth());
    int ch[] = { 0,0 };
    mixChannels(&hsvImage, 1, &hueImage, 1, ch, 1);

    //轨迹条参数设置
    char trackBarName[20];
    sprintf_s(trackBarName, "Hue bin:%d", hueBinMaxValue);
    namedWindow("SourceImage", WINDOW_AUTOSIZE);

    //创建轨迹条并调用回调函数
    createTrackbar(trackBarName, "SourceImage", &hueBinValue, hueBinMaxValue, Hist_and_Backprojection);
    Hist_and_Backprojection(hueBinValue, 0);

    imshow("SourceImage", srcImage);

    waitKey(0);

    return 0;
}

void Hist_and_Backprojection(int, void*)
{
    MatND hist;
    int histsize = MAX(hueBinValue, 2);
    float hue_range[] = { 0,180 };
    const float* ranges = { hue_range };

    //计算图像直方图并归一化处理
    calcHist(&hueImage, 1, 0, Mat(), hist, 1, &histsize, &ranges, true, false);
    normalize(hist, hist, 0, 255, NORM_MINMAX, -1, Mat());

    //获取反向投影
    MatND backProjection;
    calcBackProject(&hueImage, 1, 0, hist, backProjection, &ranges, 1, true);

    //输出反向投影
    imshow("BackProjection", backProjection);

    //绘制图像直方图
    int w = 400;
    int h = 400;
    int bin_w = cvRound((double)w / histsize);
    Mat histImage = Mat::zeros(w, h, CV_8UC3);
    for (int i = 0; i < hueBinValue; i++)
    {
        rectangle(histImage, Point(i * bin_w, h), Point((i + 1) * bin_w, h - cvRound(hist.at<float>(i) * h / 255.0)), Scalar(0, 0, 255), -1);
    }
    imshow("HistImage", histImage);
}
3. 理解meanshift
Meanshift 的原理就是不断更新区域的质心, 与calcBackProject结合比较容易,因为calcBackProject后得到的是目标的概率,那么通过meanshift可以将目标框移动到概率较大的区域
c1_o是原始中心点,计算质心c1_r, 然后移动目标框,不断迭代,使目标框移动到数据密集或者数值较大的区域

opencv中的源码也比较简单
 for( i = 0; i < niters; i++ )
    {
        cur_rect = cur_rect & Rect(0, 0, size.width, size.height);
        if( cur_rect == Rect() )
        {
            cur_rect.x = size.width/2;
            cur_rect.y = size.height/2;
        }
        cur_rect.width = std::max(cur_rect.width, 1);
        cur_rect.height = std::max(cur_rect.height, 1);

        Moments m = isUMat ? moments(umat(cur_rect)) : moments(mat(cur_rect));

        // Calculating center of mass
        if( fabs(m.m00) < DBL_EPSILON )
            break;
		//计算质心和目标框中心的偏差,然后不断更新
        int dx = cvRound( m.m10/m.m00 - window.width*0.5 );
        int dy = cvRound( m.m01/m.m00 - window.height*0.5 );

        int nx = std::min(std::max(cur_rect.x + dx, 0), size.width - cur_rect.width);
        int ny = std::min(std::max(cur_rect.y + dy, 0), size.height - cur_rect.height);

        dx = nx - cur_rect.x;
        dy = ny - cur_rect.y;
        cur_rect.x = nx;
        cur_rect.y = ny;

        // Check for coverage centers mass & window
        if( dx*dx + dy*dy < eps )
            break;
    }
图像矩和质心的计算方法:
4. camshift的跟踪应用
相比meanshift主要多了框的大小和方向的变化,毕竟目标物体在图像中远近不同,姿态不同。
opencv3中camshift详解(二)camshift原理介绍系列文章介绍的比较详细,可以取看该博主的分析
求主轴角度
opencv中camshift的代码:
	//camshift首先调用 meanshift,更新框的位置
    meanShift( _probImage, window, criteria );
	// 然后将目标框 四周扩大 TOLERANCE=10个像素,框变大了
    window.x -= TOLERANCE;
    if( window.x < 0 )
        window.x = 0;

    window.y -= TOLERANCE;
    if( window.y < 0 )
        window.y = 0;

    window.width += 2 * TOLERANCE;
    if( window.x + window.width > size.width )
        window.width = size.width - window.x;

    window.height += 2 * TOLERANCE;
    if( window.y + window.height > size.height )
        window.height = size.height - window.y;
    // 然后计算矩,然后可以利用矩可以计算 质心,主轴长度,主轴角度等几何数据
    // Calculating moments in new center mass
    Moments m = isUMat ? moments(umat(window)) : moments(mat(window));

    double m00 = m.m00, m10 = m.m10, m01 = m.m01;
    double mu11 = m.mu11, mu20 = m.mu20, mu02 = m.mu02;

    if( fabs(m00) < DBL_EPSILON )
        return RotatedRect();

    double inv_m00 = 1. / m00;
    int xc = cvRound( m10 * inv_m00 + window.x );
    int yc = cvRound( m01 * inv_m00 + window.y );
    double a = mu20 * inv_m00, b = mu11 * inv_m00, c = mu02 * inv_m00;

    // Calculating width & height
    double square = std::sqrt( 4 * b * b + (a - c) * (a - c) );

    // Calculating orientation
    double theta = atan2( 2 * b, a - c + square );

    // Calculating width & length of figure
    double cs = cos( theta );
    double sn = sin( theta );

    double rotate_a = cs * cs * mu20 + 2 * cs * sn * mu11 + sn * sn * mu02;
    double rotate_c = sn * sn * mu20 - 2 * cs * sn * mu11 + cs * cs * mu02;
    rotate_a = std::max(0.0, rotate_a);  // avoid negative result due calculation numeric errors
    rotate_c = std::max(0.0, rotate_c);  // avoid negative result due calculation numeric errors
    double length = std::sqrt( rotate_a * inv_m00 ) * 4;
    double width = std::sqrt( rotate_c * inv_m00 ) * 4;

    // In case, when tetta is 0 or 1.57... the Length & Width may be exchanged
    if( length < width )
    {
        std::swap( length, width );
        std::swap( cs, sn );
        theta = CV_PI*0.5 - theta;
    }

    // Saving results
    int _xc = cvRound( xc );
    int _yc = cvRound( yc );

    int t0 = cvRound( fabs( length * cs ));
    int t1 = cvRound( fabs( width * sn ));

    t0 = MAX( t0, t1 ) + 2;
    window.width = MIN( t0, (size.width - _xc) * 2 );

    t0 = cvRound( fabs( length * sn ));
    t1 = cvRound( fabs( width * cs ));

    t0 = MAX( t0, t1 ) + 2;
    window.height = MIN( t0, (size.height - _yc) * 2 );

    window.x = MAX( 0, _xc - window.width / 2 );
    window.y = MAX( 0, _yc - window.height / 2 );

    window.width = MIN( size.width - window.x, window.width );
    window.height = MIN( size.height - window.y, window.height );

    RotatedRect box;
    box.size.height = (float)length;
    box.size.width = (float)width;
    box.angle = (float)((CV_PI*0.5+theta)*180./CV_PI);
    while(box.angle < 0)
        box.angle += 360;
    while(box.angle >= 360)
        box.angle -= 360;
    if(box.angle >= 180)
        box.angle -= 180;
    box.center = Point2f( window.x + window.width*0.5f, window.y + window.height*0.5f);
- 关于meanshift和camshift的一个应用demo
- opencvdemo: samples/cpp/camshiftdemo.cpp